JRRivi64
-
Posts
52 -
Joined
-
Last visited
Content Type
Forums
Gallery
Events
Everything posted by JRRivi64
-

Disturbing details...65 Riv trailing arm bushings
JRRivi64 replied to RockinRiviDad's topic in Buick Riviera
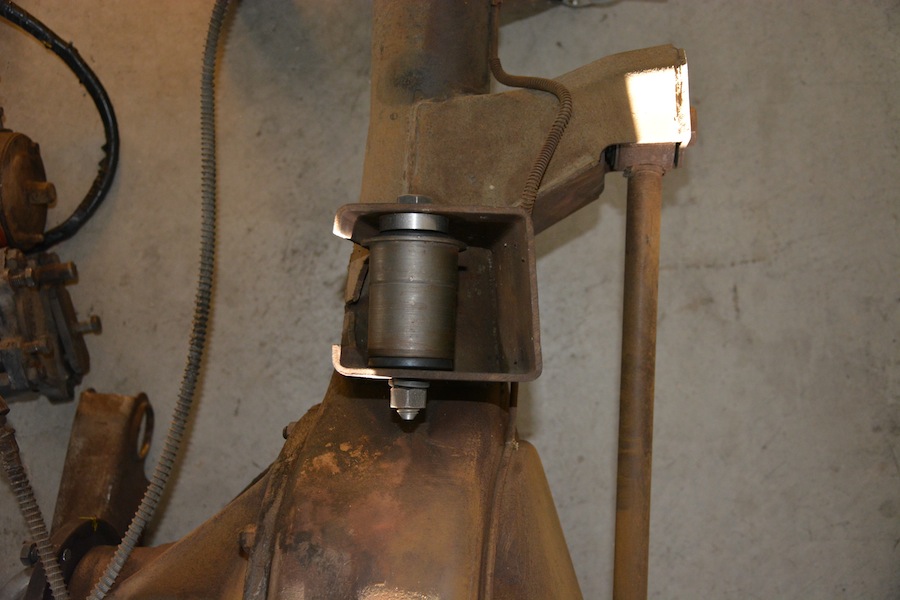
What Steve said…. Thanks Steve Also, bushing (in my pic of control arm with bushing and spacer) is not pressed in completely in control arm. I understand NEW bushing needs to be pressed in completely to flange which is at same point as the step or ridge on the old/stock bushing (as noted in David's first pic in this post). The inner metal spacer/sleeve in stock and new bushing protrudes slightly past rubber on either end which cause metal to metal/inner sleeve to frame contact. -
Disturbing details...65 Riv trailing arm bushings
JRRivi64 replied to RockinRiviDad's topic in Buick Riviera
David Because of your experience and detailed research on the first gen trailing arm bushings and Slosteve's fabrication/modification of his bushings, I also attempted the fab/mod of my bushings for my 64. With the info gathered by you two I saved a lot of $$ and learned a lot. Some details of my experience is posted on the following thread...http://forums.aaca.org/showthread.php?t=377717 -
Here is a mock up of the bushings with spacer at ADJUSTABLE UPPER control arm and REAR LOWER control arm. Bushings are NOT torqued down. As previously mentioned by David and slosteve the outer diameter of the bushing shell/housing had to be taken down minimally to be able to be pressed back into control arm. Same process described by slosteve…I measured and re-measured for fitment…this process took some time. Unfortunately, I've got more time than money so this process worked best for me and was not as difficult as I expected…it felt good to get my hands dirty...


-
I used measurements as posted by David and slosteve and measured parts/pieces to compare using digital caliper…note difference in length of bushing with/without round tube(spacer) compared to center spacer removed from original bushing. The overall difference was approximately 0.25


-
Thanks to David's ("RockinRiviDad") detailed build thread regarding the subject of rear control arm bushings and "slosteve's" details regarding his fabrication/modification of his rear control arm bushings, I built up some courage to attempt the fab/mod of rear bushings myself. With the info from David and slosteve, I too went to my local metal shop and purchased a footlong steel tube (less than $10) and ordered the identified bushings from David's original post. I then went to a local machinist, who had previously machined some axle spacers for my bike, and had him cut the steel tube to essentially make spacers for the Rivi bushings. The machinist made the spacers within a couple of hours and charged me only a few $ for his time. Attached are some pics, I will add more in another reply with additional info. I saved myself some $$$ and could not (most likely would not) have done this without David's initial post and slosteve's fabrication post. I owe you guys a beer (more like cases of beer)! Thanks


-
Gotta say...that is a BEAUTY! Interior looks great...it whispers "c'mon let's go for a ride"
-
Clamshells, I'll take that compliment! I've seen David's work and I can only hope my Riviera turns out half as good as his is turning out. He helped take my engine/tranny out.....hmmmmm Hey David feel up to cleaning and detailing another frame?
-
Thanks David/Eric, As for painting the assembly I plan to paint it but not set on type of finish yet. I'll be sure to post final outcome...kinda like the raw metal look.
-
Pics of some cleaning from months ago. Amazing how removing some surface rust on parts can make you "feel" as though you are making significant progress!


-
THANKS AGAIN Tom, very much appreciated!
-
Hello Jan, Not as SoCal as San Diego, actually in a rural town called Acton (north of Santa Clarita Valley and south of Antelope Valley). BTW Keep up the progress on your Riviera!
-
Soooooo since doing my intro on Jan 31, 2014 I've been a little busy with my attempt to restore this Rivi of mine. Its been suggested that I start a build thread but for some reason I've been a little reluctant. But during my disassembly of the Rivi I've come to realize how helpful these forums are. So, I plan to document my rebuild process and if it or I can help someone in anyway possible then cool. Someone, who shall remain nameless but has a screen name beginning with "rockin'" and ending with "dad" also suggested when it comes to getting help - pay it forward. If family, work and life allows I will document what I can from beginning of disassembly to present state. If someone needs a pic of something let me know and I'll do my best. If this thread can help with what to do OR what not to do then mission accomplished. Jeff Again, what I'm posting is only a FEW pics of what has already been done months ago and future post will soon (hopefully) be more current.


-
Daaaaang David, Making up for that hiatus huh? Keep up the progress. Gotta say, these pics/post don't do you justice. You CLAIM you don't have skills but seeing your work in person…. brutha you've got skills. Good on you for posting your resto process here for us. Thanks
-
THANK YOU guys very much for your input. I'm no where near the point of assembly of body to frame - I'm actually removing the body mounts. I have a tendency to evaluate/over-evaluate things and in this case I wanted to know the process of assembly. I checked body/chassis manuals and did a search here (but no luck) as well as a simple Google search…I even went on to another... FORUM ...and I feel dirty, ashamed, can't even look at myself in the mirror now. The closest info I found was at "1967 Buick Chassis Service Manual Section 2" if you just Google this and go to "Section C page 20-16" you'll find mounting specs and diagram of X frame not first gen though and their torque specs are 30-45 ft lbs. Thanks for confirming the info hope this helps others. I knew the ROA Forum wouldn't let me down!
-
Ahhh yesss…the sweet sounds of crickets chirping and the croaking of frogs in the distance…..
-
Ladies and gents, Searched high and low in my chassis and body service manual as well as did a "body mounts" search here. Lots of good info on resto steps and body mount manufacturers but couldn't find info regarding torque specs for body to frame mounts. Are there torque specs or just "tight as heck?" Thanks for any input. Jeff
-
Eric just sent pm
-
Eric Would be interested. Just sent you a pm. Thanks, Jeff
-
Dan, I removed bezel/glass by unscrewing set screw on underside of bezels (two larger bezels) using Allen wrench. For the clock I unscrewed knob first then GENTLY pulled out clock unit. On back side of console I see screws that appear to retain circuit board but I'm not 100% certain yet.


-
Ed Prior to your reply I checked out some brazing vids on YouTube. Your reply confirms this muggyweld/brazing is a possible solution to a problem where undamaged parts are scarce and no reproductions are available. Gotta say, although I'm a newbie Im aware of the fact you reply often to various posts. I admire your knowledge and appreciate your willingness to share. Jeff
-
dhaven64, i've got my instrument cluster out as well. I've removed the rings/glass from the face of the gauges. I intend on repainting also. Can't area not being repainted just be taped off or is there too big a risk of damaging electrical components?
-
Ladies and gents, The headlight grille/assembly on my '64 in my opinion is in good shape considering wear and tear of a over 50 year old car. The headlight grille on the passenger side has a broken fin/scoop (top left corner). Not wanting to scrap what I have to search high and low for an undamaged grille or unnecessarily spend $$, I was wondering if the grille material can be repaired…I'm guessing brazed? Anyone ever attempted a repair? The first pic is of drivers side grille with fin/scoop I'm missing (for passenger side). Thanks for any input. Jeff


-
Tom-I actually joined up with ROA weeks ago. Wealth of knowledge and experience for sure! T. Nugent-before joining ROA I picked up a reprint body manual and original chassis manual (from a law firm in Michigan!?!....hope that's not a bad sign...) Thank you all for viewing and taking the time to reply!
-
Hey all, Did an intro in main AACA Forum/page here I go again for the ROA Forum. Recently rescued a 64 Riviera - abandoned, neglected project. Broke my heart to see it in the condition I found it. My plan is to restore her as she deserves to be and back on the road - may end up breaking the bank in the process but these cars are too beautiful to let rot. Been wanting a first gen Riviera for some time although she's rough now, with some blood, sweat, tears and insufficient funds notices from the bank I'm gonna make her shine and roar. New to this forum stuff…hopefully pics load up. Btw engine, electrics work….until I started the disassembly process. Appreciate what I've learned so far from this forum and the ROA. Jeff


-
David Have not seen rear seat divider (fiberboard) specifically available for Rivieras as I am in need of one as well but oldbuickparts (see Group 15 section) sells some for Skylarks. I believe cost 20-25$ and will have to probably customize to fit. Engine is looking sweet!!! Jeff