


JRRivi64
-
Posts
52 -
Joined
-
Last visited
Content Type
Forums
Gallery
Events
Everything posted by JRRivi64
-
JSGUN, Front and rear are Scarebird setup/brackets. Axle flanges had to be turned down a little and went back on differential. Buick wheels went back on. Just followed instructions and parts list that came from Scarebird. Still have not addressed parking cable as I moved on to other components on frame and started reviewing where to start on body. Palmdale? I'm a stones throw away from Palmdale. Matter of fact had axles turned down in Lancaster.
-
Geeez...I'm not only jealous of your future workshop and land space, but your pace of working on your Rivi! Throwing in new components, painting this and that...slow down...I'm starting to feel inadequate with my project! Keep up the good work...looking forward to end result. Jeff
-
Telriv, Thank you for steering gear box info. I did a quick internet search about steering box swaps and searched on this Forum as well. Plenty of info available out there and my brief research indicated successful and improved steering/handling with the replacement ....just a matter of getting correct components. Thanks again, Jeff
-
Sure....a mulligan is always acceptable from time to time! Be right over with body cart, wire wheels and paint stripper... Steering box is not quick ratio unfortunately. Thanks for continued support and encouragement brotha!!
-
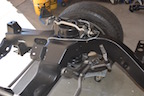
Here are more pics... The parking brake will have to be customized/modified. Scarebird provides instructions on the process. Now researching rebuilder for engine as well as shop to service transmission......also looking for that genie in a bottle to grant me my three wishes...1.) $ 2.) $$ & 3.) $$$ for this project!!


-
As for the painting of the control arms, front and rear components etc. I took Eric's (see inserted post) suggestion and followed Mr. Jason Z's very DETAILED write up. The frame was painted with KBS Blacktop chassis paint (satin black), differential and spindles were painted with POR-15 Metal Mask (grey). The KBS and POR-15 paint was easy to apply (brushed on) and appears to be pretty tough so far. The paint used on control arms and smaller components look great, application process took more steps it seemed with the prep, primer, aerosol paint and clear. How durable all the paint is...who knows until it hits the road. All I know for certain is it looks 110% better than when I found it and I don't expect frame/parts to look that bad ever again.
-
Thank you for comments guys. Here are some larger pics, hopefully better quality...


-
More progress...slowly but surely. Trying to finish what I started here. These restorations looks sooooooooo much easier on TV......... Since last pics I installed shocks, brake lines and brake hoses to calipers (to Scarebird disc conversion). Coils by Coil Spring Specialties, Monroe shocks via Rock Auto and brake lines via In Line Tube. Drive shaft serviced and painted to look pretty by local shop. Hopefully these pics help someone as far as reference because the build threads and attached pics/info on this Forum have certainly helped me along the way. Go Rams!!


-

63 Riviera rear disc conversion using scarebird bracket, eldorado calipers.
JRRivi64 replied to a topic in Buick Riviera
Benny Thanks for posting brake conversion video and pics, very informative. Looking forward to your progress. Jeff -
Hey all, Currently performing drum to disc conversion on my 64 Riviera (rear first) and wanted to post my recent experience to save someone else from some frustration and waste of time and money. After pulling axle shafts out, CAREFULLY cutting out old bearing retaining ring and wheel bearing and cleaning everything up I bought "National" brand bearings (Part#88128 RA). I pressed these bearings and retaining rings on to axle shafts (with axle retaining PLATE slipped on FIRST), installed disc brackets, new seals, lubed shaft splines, greased area per manual etc and reinstalled axle shafts. I tightened down the nuts for the axle retaining plates (not torqued to specs of 50lbs. yet) and noticed the axle shafts would not turn or turn very much. After searching the net and this forum I read another member had similar issue but he did not go into specifics. It turns out that although the National brand wheel bearing (Part#88128 RA) fits 1964 Riviera axles, the bearing retaining ring is too wide causing the ring to hit axle tube seal. Since I don't have a torch and too cheap to have some else do the work I CAREFULLY cut out the new wheel bearings and retaining rings from the axle shafts! (Initially I tried to just cut out the retaining ring and save the wheel bearing but it was too time consuming and difficult to keep from damaging wheel bearing-so off they all went). I purchased a NEW set of wheel bearings/retaining rings from Timken (Part#514003) via RockAuto and pressed them on. I reinstalled axle shafts and torqued retaining plate nuts to spec and problem solved! The attached photos show significant difference in size between National brand retaining ring vs. Timken brand ring. I plan to do a separate post regarding drum to disc conversion as I near completion but for now...avoid running into this problem First two pics shows bearing with larger ring with correct (smaller) ring slipped on. Last photo is of new bearing and new smaller ring installed.


-
Thanks for posting up video link and write up. I've studied that video several times and is very helpful. The front end conversion is straightforward. I've got the rear conversion bracket, I know rear discs may be overkill but I like the uniform look of disc at all four corners. I located my instructions for rear conversion and it's straightforward but I will now need to customize parking brake cables. I'll post up process once I start, I've got rear rotors, shopping around now for machinist to turn down axle flange. Jeff
-
Thank you for reply. Jeff
-
With a 64 Riviera, what OTHER make/model/year rear brake drum (IF ANY) can be used in place of the 64's? In previous posts I've read other member's opinions/experiences with rear drums from CARS and Kanters. I see OPGI offers rear drums as well but, again I've heard mixed opinions about certain products from OPGI. My experience with CARS has been good and I have yet to purchase anything from Kanters. Availability of original 64 rear drums in good condition is scarce. One of my rear drums appears to be in good condition, the other not so much. Jeff
-
Thanks for reply and info Ed. Maybe I'll just keep it simple and go with the discs up front and drums in back.
-
Hey Rocket88 and Ed (and anyone else with conversion experience), I received my conversion brackets and hardware from Scarebird several months ago but have yet to start process to install - just reinstalled front end steering linkages and suspension as well as rear end control arms, springs and differential. 1.) Did you two just do a drum to disc conversion in front or did the rear as well? (I will be doing front and rear conversion.) 2.) If you converted rear drum to disc how did you address issue with parking brake/cables? Are stock parking cables still used on new disc set up or is a custom application necessary? Thanks in advance for any input. Jeff
-
BTW - control arms/components were just installed for fitment and pics - nothing was torqued down yet. New ball joints installed, gasket for diff, and axle seals, bushings and other parts from CARS, Inc. Additional before and after pics...


-
It's been awhile... Here are some before and (most current) after pics of my attempts to restore my 64 Rivi. Trying to stay motivated, interested and focused on what I've started here. Although steering and suspension parts look nice and shiny - if I was to do this all over again I think I would definitely go the powder coat route but unfortunately money is an object for me. I think/hope (fingers crossed) the primer, paint and clear holds up on control arms/components - I figure it looks better than before...at least better than the rust and grime.


-
Welcome Dale, Thats a beautiful 64, she survived VERY well!
-
Thanks Chris, So far it has been fun and interesting to work on this project. I've enjoyed researching restoration issues that come up and finding solutions, at the same time learning more about my Rîviera. Gotta admit, studying your build thread, RockinRiviDad's, RobJ's as well as others has kept me motivated. Just recently got third member out of differential housing. Need to replace couple of axle shaft/wheel studs and shaft bearings/seals. Thank God for the Internet!
-
Tim Thanks for sharing your experience. I have heard nothing but positive feedback regarding Russ Martin and his products. Will more than likely seek his help...to what extent I don't know yet.
-
Thanks for the kind words Eric, Darren and Jason. As for "major work on engine" - I know work needs to be done, prior to disassembly engine ran, extent of engine work needed I don't know yet. I haven't dug into engine just yet as I've been working on frame and suspension. I have zero experience with engine rebuilds. Friends have suggested I do it myself but my rebuilds have been limited to motorcycle carbs. Reached out to Russ Martin to get info…looks like I need a second job!!
-
Additional progress... Got all suspension springs out without killing myself. The control arms came out with some work but the ball joints in the front control arms took ALOT of work. Once all out, got them cleaned up and painted. Thanks to member "Mjurasas" for the heads up on Jason Z's article regarding paint types/paint color options in his build write up on the ROA website. Color options other than black made painting parts more interesting. Can't forget to thank RockinRiviDad for help in disassembly of this beast as well as other members kind enough to post their knowledge and experiences.


-
Happy holidays all, Got some quiet time to finally post some old progress pics. Studying other people's restoration threads make this restoration thing look so easy…Anyways got body off frame, engine in stand, trans cleaned up, frame stripped and painted with KBS product.


-
Pat, Re-reviewed past related threads on these dang bushings and went out to garage to re-measure spacers I had cut up. In my review I saw slosteve eventually had his spacers CUT to 21/64" which is .328". I re-measured my spacers and they came out to .327". My measurement of the difference between the original bushings and new Raybestos bushings (excluding spacer) was "approximately" .25" -laziness must've set in and I just eyeballed difference.
-
Yo Pat sent you a PM


