Eric W
-
Posts
1,026 -
Joined
-
Last visited
-
Days Won
4
Content Type
Forums
Gallery
Events
Everything posted by Eric W
-

1952 Studebaker Commander Starlight Coupe
Eric W replied to Eric W's topic in Our Cars & Restoration Projects
One of the guys at the Studebaker show said he had an extra hood emblem. Took a couple of days since he's in the Phoenix area, but that really puts the finish on the front end...


-
1952 Studebaker Commander Starlight Coupe
Eric W replied to Eric W's topic in Our Cars & Restoration Projects
Some photos from the show...


-
1952 Studebaker Commander Starlight Coupe
Eric W replied to Eric W's topic in Our Cars & Restoration Projects
Yesterday had the car in a local Studebaker-only show. There were about 35 cars there, with maybe 10 of them from Phoenix (or beyond). Only maybe 5 or 6 were "street rod" style, with non-Studebaker engines, swapped out suspensions, etc. The rest were original / restored original. Met another previous owner of my car. At first he wasn't sure because I've swapped so much of the front end chrome, but another previous owner confirmed it for him. So this car has been around Tucson for a long, long time. Met another '52 restorer out of the Phoenix area, and spoke to another guy who brought down his '51 on a trailer. The guy with the '52 pointed out that I had the front bumper overrides swapped right for left, and I have to agree they looked a little weird. So I swapped them when I got home and they look much more aligned to the axis of the car. I had brought them over same as they were on the parts car and didn't really think much of it. At the end of the event where they did a couple of awards (basically people's choice of everyone there, people's choice given by the Phoenix club members, and a fuel economy award that some of the Phoenix club did on their drive over here), and the 50/50, raffle baskets, then door prizes for non-winning 50/50 ticket holders, one guy announced a Studebaker-parts estate sale for essentially the balance of Saturday, all day Sunday, and Monday morning (then what's left goes to scrap). So I got over there today, and there were all kinds of '50's and '60's Studebaker parts, with just a few non-Studebaker parts in the mix. A couple of the local club members were there sorting through things (trash, scrap metal, possibly usable parts). I went with some new-in-box oil filters, some hubcaps, and a bumper, all for $30. I guess the scrap guy shows up sometime tomorrow. They had some "not for sale" parts under a tarp - maybe I should have peeked to see what that was about. -
1952 Studebaker Commander Starlight Coupe
Eric W replied to Eric W's topic in Our Cars & Restoration Projects
On the heads, there's 2 intake ports towards the front, and two more towards the back. Then there's one more port in the center that routes exhaust under the intake manifold. The heat riser tube goes down into that port. There's a close-off valve on the right side exhaust manifold that stops exhaust going under the intake manifold when the engine is warmed up. -
1952 Studebaker Commander Starlight Coupe
Eric W replied to Eric W's topic in Our Cars & Restoration Projects
Got the intake manifold & choke heat riser swapped over. That heat riser tube was much longer than I expected. It extends way down into the manifold and probably even into the head. Started the car on choke, and the heat had the choke open in a minute or so (it's about 70F in the garage today). Got the choke cable pulled out, and put the original headlight switch in the dashboard hole. Still have the later-added headlight switch because I'm not replacing the wiring right now. First picture is choke before replacing.


-
1952 Studebaker Commander Starlight Coupe
Eric W replied to Eric W's topic in Our Cars & Restoration Projects
Clear shots w/ the trim scripts & mirror installed. I'm picking away at transferring other things from the parts car like the intake manifold with the choke heat riser tube, and swapping out the choke on the carb (which right now is an added-on push-pull to an incorrect dashboard knob) to the automatic heat-activated one.


-
1952 Studebaker Commander Starlight Coupe
Eric W replied to Eric W's topic in Our Cars & Restoration Projects
First show yesterday that wasn't a cruise night. Big differences from a cruise night (to me) are a required can't-move-it time from 10am - 3pm, and a lot of general public in attendance who may or may not know anything about what they're seeing. Overall, I think the car was received very well. I'm always surprised after doing so many things to get a car to a show that people will assume "it's all original" or "I found it that way, just polished it up". Well, I'm trying to replace all the non-original parts with originals, but it's not like it left the factory and stayed that way. Many things were replaced along the way, and for this particular car, it meant many things were replaced with whatever they had around the shop (its history as a commercial advertising vehicle), not Studebaker-sourced replacements. Nearly all appreciated the condition - they were happy to see a Studebaker rather than be negative about the roof paint. Nearly all were more positive about the roof, and some thought it should stay just the way it is. My thought is to have it redone to a factory 2-tone color combination (1952 Tahoe Green or 1950-1 Shenandoah Green). Anyway, 3 photos from early in the morning, and the last 2 were from just before leaving. This event is called the BBQ & Blues car show, so they had several local food vendors on site as well as a couple of live bands. The headliner band had a cowboy/western looking guy who sounded like Jimi Hendrix doing rock & blues classics - very good, though a little louder than I needed for my assigned parking spot. That's something else I think they do well for this show - assigned parking spaces with a lot of space between the cars. Some were by class, but many weren't. Makes it much easier when everyone is showing up - as the cars pass the gate and are told where their spots are, there's generally only 1 or 2 cars moving at the same time on any given row. We had 3 days of rain leading up to the show, and it was quite foggy in the morning, but as I got to the site, the sky cleared, and it was a nice day. This show was rained out last year and had to go to a rain date.


-
1952 Studebaker Commander Starlight Coupe
Eric W replied to Eric W's topic in Our Cars & Restoration Projects
The n has extra white that ran over. Since it's chrome, I can probably get the extra white off with some solvent. I got the "Commander" lettering onto the trunk today. Found that two of the holes still had the trim clips in them (painted over). Punched them out, then filed the holes a little to shift them in the direction of the pins on the lettering. Also found the top of the "C" was squeezed down about 3/8" from where the hole was in the trunk. Looking at photos of other cars, I think the hole in the trunk is correct, and the letter C got bent down some. So I carefully bent the letter until it aligned with all 4 holes. I also filed the extra chrome flash out from the inside of the letters.

-
1952 Studebaker Commander Starlight Coupe
Eric W replied to Eric W's topic in Our Cars & Restoration Projects
All these were from Studebaker International in Indiana. Got the hood scripts on with some filing on the holes in the hood to clear out the paint. Hood isn't latched shut, and you can see the imperfection in the white paint in the "n".


-
1952 Studebaker Commander Starlight Coupe
Eric W replied to Eric W's topic in Our Cars & Restoration Projects
Ordered a couple of parts that maybe I can get installed before a show next week. Left-side rearview mirror, one of several different types for 1952. I'd thought about one of those clip-on generic mirrors, but since NOS from '52 is right there in a catalog... I didn't do the right side because when installed symmetrically, I figured there's no way to actually see the right side mirror from the driver's seat. I judged the position from photos and the mirror location on the parts car. It looks low compared with how mirrors are on present-day cars, but it works. Also got the NOS hood & trunk scripts. I was considering repainting the letters and cleaning up the overflow of some of the white, but since these are NOS I'll just leave them as-is.


-
1952 Studebaker Commander Starlight Coupe
Eric W replied to Eric W's topic in Our Cars & Restoration Projects
Parts car items #20 - door and window handle escutcheons. Saw these in a catalog for $12 each, so a little more value out of the parts car. Pulled these from the rear doors since the fronts were faded and cracked from years in the sun. The door handles are easy to pull - exposed screw head right in the center of the handle. The window cranks have to push the door card back to slide the escutcheon back to expose a pin through the crank handle. The pin pushes out fairly easily - I used a small drill bit. Got all 4 onto the coupe - on the right window crank, there was a spring behind the escutcheon that holds the escutcheon out to cover the pin, preventing the pin from dropping back out. On the left door, the spring was gone, so there was a cotter pin that was just the slightest bit bent open that won't fall out. This replaces 3 completely mis-matched escutcheons and one that was just missing.


-
1952 Studebaker Commander Starlight Coupe
Eric W replied to Eric W's topic in Our Cars & Restoration Projects
Last weekend, got a few minutes to make a new gasket for the fuel pump flange. Still might be the slightest bit weepy there, but it's drivable. Took it to the cruise night this past Thursday. Anyway, tried again this morning to get some photos (posted below). This is just down the street from my house.


-
1952 Studebaker Commander Starlight Coupe
Eric W replied to Eric W's topic in Our Cars & Restoration Projects
First chance to start it & check for leaks today. Opened the oil filter canister - mostly to get a filter part number (Hastings LF101). It didn't look too bad, so I closed it back up & started the engine. Slight leak from the filter canister lid - tightened the bolt that holds the lid on to fix that. Let it warm up a little - no other obvious leaks. Drove it around for a couple minutes. Slight leak at the fuel pump flange, but none of the tubes or tube fittings leaked. I had moved the gasket for the fuel pump from the parts car, so no telling how old that was. I'll make up another gasket & order another filter. -
1952 Studebaker Commander Starlight Coupe
Eric W replied to Eric W's topic in Our Cars & Restoration Projects
Parts car items #11, 12, and 19. #11 - oil filter & bracket - cleaned these off and got them installed. You can see how dirty they were in an earlier post. Thought about doing the full bare metal & repaint, but this goes back to what one of the other forum members pointed out - then there'd be a couple of way-too-nice-looking parts right up top. #12 - fuel pump - after discussion w/ some in the local club, decided going fully original with this isn't worth it. For one, these earliest-V8 fuel pumps are much more expensive to rebuild, and there's a good pump already on the car. Also saw & heard some speak of "leave the pump on there for appearance, but run an electric pump". So I put the '51-'52 pump on there for looks, but also because the oil fitting from the parts car runs a line from the head to the fuel pump. So rather than cap the fitting, I just put the line in place as well. So this pump will circulate oil, but there's no pushrod (or fuel line to/from), so the pump itself is just for looks. I only had these things on & off about 4 times to figure out the order that things need to be tightened before they're buried by something else... #19 - Left side air vent screen from the parts car. Saw these in a catalog for $22 (+tax & shipping), so the parts car keeps providing value. First two photos are a reminder of the starting point.


-
1952 Studebaker Commander Starlight Coupe
Eric W replied to Eric W's topic in Our Cars & Restoration Projects
Wire harness will be a while. Since the wire terminals at the front lights are different, I can't just do the dash-to-under-hood harness by itself. Also have to replace all of the light sockets & front light wiring (the kit included parts for that). I also found that the wire terminals at the headlight switch are not all the same either, so there's some adapting to be done there as well. Given that, I'd expect "adapting" to occur at other items I haven't even looked at, so I don't want to get into it now. I signed up for a show next month, and I don't want to miss that because the wires are out. -
1952 Studebaker Commander Starlight Coupe
Eric W replied to Eric W's topic in Our Cars & Restoration Projects
Tucson, 4th of January. 78F in the afternoon. There was a late spring / early summer type crowd at the cruise night tonight due to the great weather. This is to remind me why I'm still here in August, when it's closer to 120F in the shade...


-
1952 Studebaker Commander Starlight Coupe
Eric W replied to Eric W's topic in Our Cars & Restoration Projects
I'm not sure yet where it goes, but I haven't seen anything like the '51 Buick where the rear light wiring came down from the right side of the dash/firewall, back along the right front floor, wrapping around the right edge of the front seat to the center of the back of the seat, between the front & back seats along the center of the floor, then into a tunnel at front edge of back seat to the left side, then up into the trunk at the left side... I expect the Studebaker to be more economical with wiring, with as straight a line as possible from the left side of the dash back along the left side. Though part of the Buick having such a lengthy routing is that the hydraulic pump for the power windows is in the right front fender, and the hydraulic line for the rear windows pops through the firewall on the right side, following the same routing as the wiring, but passes through the tunnel at the front of the back seat to Tee under the middle of the back seat to a line to the window cylinder on each side... And there's also a tee at the center of the back of the front seat for the line to the left side of the seat for the power seat cylinder... The fantastic complexity of an independent hydraulic system just to drive 4 windows and a seat adjuster... -
1952 Studebaker Commander Starlight Coupe
Eric W replied to Eric W's topic in Our Cars & Restoration Projects
Not sure how far I'm going with this, but the parts car had new wire harness in the trunk. Got it out today and labeled the leads. Wires on the left in the photo are the right side of under the hood. Headlights are up in the center, and under the dash is wrapped around to the right. The bundles at the bottom - left one is harness to the rear lights, right one is additional pieces that go under the hood, and the couple at the bottom are additional under-dash pieces. Second photo is the diagram / wire list.

-
1952 Studebaker Commander Starlight Coupe
Eric W replied to Eric W's topic in Our Cars & Restoration Projects
I think in the case of this car, many years of not having the horn wire through the steering shaft left the hole for the wire open down next to the engine, and material from the environment down there just collected in the wire hole. -
1952 Studebaker Commander Starlight Coupe
Eric W replied to Eric W's topic in Our Cars & Restoration Projects
Thanks for the comments, guys. Parts car item #18 - horn ring. I wasn't really thinking about this, but the chrome on some of the interior parts in the coupe is pretty thin. I tried some Simichrome on the horn ring of the parts car, and it cleaned up pretty well. First photo, upper left portion of the horn ring cleaned up. 2nd photo - whole thing cleaned up. When I disassembled the horn ring from the coupe, I found the few "horn" parts are just gone, so I transferred them over from the parts car, though I couldn't get the wire down the steering column. I probed the bottom end of the column (from the engine compartment side), and it's gummed up with grease. I may clean that out at some point, but there's a button under the left side dash for the horn now. The steering wheel overall is bent, so even if all of the horn parts are in there, it won't work. The steering wheel seems to be bent towards the driver. Not sure how that would happen, but the horn ring seems like it would make constant contact. Anyway, the chrome part looks nicer, and the emblem is less faded and has fewer cracks. Horn ring is held on by two 5/32" SHCS's, one on each steering wheel spoke. These screws have plastic "spool" pieces on them to allow the ring to move. The ring is "sprung" up off the steering wheel by a foam rubber ring. In the parts car, this ring had taken a set, so I added a thin piece of foam to it to thicken it up.


-
1952 Studebaker Commander Starlight Coupe
Eric W replied to Eric W's topic in Our Cars & Restoration Projects
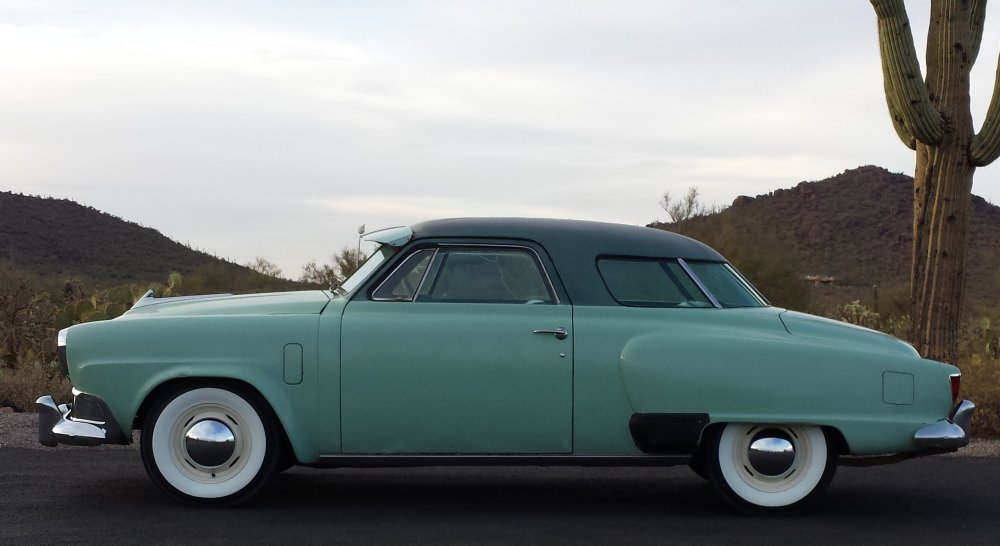
Tried to get some brighter photos, but these are too bright, with late-day sun nearly straight onto the sides of the car.


-
1952 Studebaker Commander Starlight Coupe
Eric W replied to Eric W's topic in Our Cars & Restoration Projects
Yes, I think I'm done with the fender skirts. I'll hold onto them, as original parts for the car, but they don't fit with these hubcaps. And now that the wheel / tire is so much better to look at, I don't want to cover them up. -
1952 Studebaker Commander Starlight Coupe
Eric W replied to Eric W's topic in Our Cars & Restoration Projects
Got the wheels cleaned up & on. Skipping the in-process photos. It's a couple of hours to clean off that blue paint (water soluble) and sand the powder coat out of the lug nut holes. And no, I didn't jack it up to get the wheel vent holes all lined up like that...


-
1952 Studebaker Commander Starlight Coupe
Eric W replied to Eric W's topic in Our Cars & Restoration Projects
North American Powder Coating - off Grant at I-10. He's good & quick, and if you can use a color he has in stock, it's $50/wheel. The tires are Coker - they're the "American Classic" model. I got them through Discount Tire - since they price match anything, their price was a little lower than ordering through Coker's website, even with Coker offering free shipping right now. Though the Discount Tire website doesn't bring up any Coker tires, just ask them & they'll call Coker no problem. -
1952 Studebaker Commander Starlight Coupe
Eric W replied to Eric W's topic in Our Cars & Restoration Projects
Now there's cleaning off the blue protective coating, adding the hubcap clips, putting them on the car... These bias-look radials were wrapped so the two sides were pressed together. This made them as hard as actual bias tires to get the air inside. There's only 3 whitewalls here because the tire shop couldn't get the air into the 4th one (after much trying)! They said they used to have a stronger air source but it was removed. They stayed until past closing time to finish these 3 & they'll try again tomorrow to get the air in. Anyway, that blackwall is a (much) lower-cost radial for the spare. The bias-look radial looks more like bias-ply than I thought it would... It's not just a wide-white radial...