


Eric W
-
Posts
1,026 -
Joined
-
Last visited
-
Days Won
4
Content Type
Forums
Gallery
Events
Everything posted by Eric W
-

1964 Austin Healey Sprite - Bugeye
Eric W replied to Eric W's topic in Our Cars & Restoration Projects
Pedal box primed & painted. Pedal links back in place. Rear brakes with drums off. Looked at others' photos and the diagrams in the manual for how the rear axle goes in, and with the drum off, and the one screw out of the end of the axle, the axle just pulls out. This uncovers where the o-ring and paper seal should go to keep the axle bearing grease from getting out onto the brake. The paper gaskets are missing from both sides, and the o-rings have definitely taken a set (from a round to a squared-off cross section). So I'll regrease the bearings and replace the seals. I may go farther with disassembly to remove the hubs and brake backing plates to clean those off and remove / replace the rear brake cylinders off of the car. Last photo shows the brake cylinder held in with a hefty circlip. Moss sells a tool specifically to press those clips on.


-
1964 Austin Healey Sprite - Bugeye
Eric W replied to Eric W's topic in Our Cars & Restoration Projects
Pedals cleaned up. Pedal box after the rust cutter, before cleaning, primer, and paint. Pulled the rear brake drums today. Axle grease to clean off inside the drums. Shoes are probably no good.


-
1964 Austin Healey Sprite - Bugeye
Eric W replied to Eric W's topic in Our Cars & Restoration Projects
Found this video series. About what I'll be going through, though the car in these videos is in a little better condition. Like when he goes to start it - starter switch on my car needs replacement. One carb is sticking. Vacuum tube broke off. Just little stuff stacking up to more time needed. But good to see pretty much what I'm looking at and how it goes together. https://www.youtube.com/watch?v=75mJPwmRRio - part 1 will it run https://www.youtube.com/watch?v=O1geJ_gpVAs - part 2 will it drive https://www.youtube.com/watch?v=t3yX0vfG9IM - part 3 will it stop https://www.youtube.com/watch?v=zol-EAjyXkg - part 4 charging system https://www.youtube.com/watch?v=SI-N0KTYCx4 - part 5 cooling system https://www.youtube.com/watch?v=3e9KkS4YO-s - part 6 carb rebuild -
1964 Austin Healey Sprite - Bugeye
Eric W replied to Eric W's topic in Our Cars & Restoration Projects
Here are a couple of the ad photos. Soaked pedal box fasteners in evap-o-rust this week. It would be about ready to put back together, but I'm making a list for a parts order, and a new master cylinder will be part of that. Also haven't determined whether the pushrods between the cylinder and the pedals can be re-used. They were quite built up with rust - still soaking, but they've cleaned up a lot so far.


-
1964 Austin Healey Sprite - Bugeye
Eric W replied to Eric W's topic in Our Cars & Restoration Projects
Last night, found a Harbor Freight media blast cabinet on c-list. This morning, it was still available, so was able to pick that up. The seller had modified it "to actually work". Worked pretty well. About 5 minutes to do each pedal, and about 1/2 hour to do the pedal box. Last photo, coated the pedal box with Rust Cutter to chemically neutralize the remaining rust. That needs to sit for a couple of days for the chemistry to do its thing. Painted the pedals. Need to get some more Evap-O-Rust to soak all of the fasteners. I had some previously used that I tried, but its active ingredient had already done its thing on some Studebaker parts. So this ends the couple of days off I had this week. I'm making a list of parts to order. Will check back when there's some new parts to install.


-
1964 Austin Healey Sprite - Bugeye
Eric W replied to Eric W's topic in Our Cars & Restoration Projects
Yesterday, heated a 7/16" tube fitting wrench with a torch and bent it to access the clutch and brake fittings at the back of the pedal box. Worked just fine. I looked to see if a wrench of this configuration was available somewhere, but no luck, and this was already in my toolbox. Got the guts out of the pedal box (master cylinder, pushrods, pedals). Last photo is for my reference where the stop bolts went. Though with new master cylinder, I expect to go through the adjusting procedure.


-
1964 Austin Healey Sprite - Bugeye
Eric W replied to Eric W's topic in Our Cars & Restoration Projects
John, Whoever did the conversion seemed to do just enough to get it mounted. There are bumpers that go on top of each of the inner fenders that are missing (but available from Moss), and there's a forward-mounted prop rod that I don't have. I'm guessing the prop rod is to keep the hood from lifting in the wind and releasing the two auto-latching prop rods that mount farther back. The left-side prop on my car doesn't latch, so I need to pull that out and see if it can be made to work (or they're available new for about $85 each, so I'm motivated to see if I can make it work). In the meantime, I cut a length of PVC to set between the inner fender and the upper prop point so the whole thing doesn't just twist over the car. -
1964 Austin Healey Sprite - Bugeye
Eric W replied to Eric W's topic in Our Cars & Restoration Projects
Picture with top removed. The "dirt collector" lightening hole inside the front wheel wells. The left side one was full to the top with dirt and leaves. The right side one had a little dirt in the bottom. Fortunately, storage must have been relatively dry, as there wasn't any rust through on either side. 3rd photo - under the hood. I know, there's a whole other language for these cars. A factory manual was in the car. I read some of it. Seemed extremely complicated. I know, 2 countries separated by a common language... Flipped some of the clearly un-labeled dash switches and the wipers started moving! Then noticed the running lights were on. The battery has some charge, so I could figure out what most of the switches do. Figured out the starter switch (mechanical pull knob) is dead, but the starter works.


-
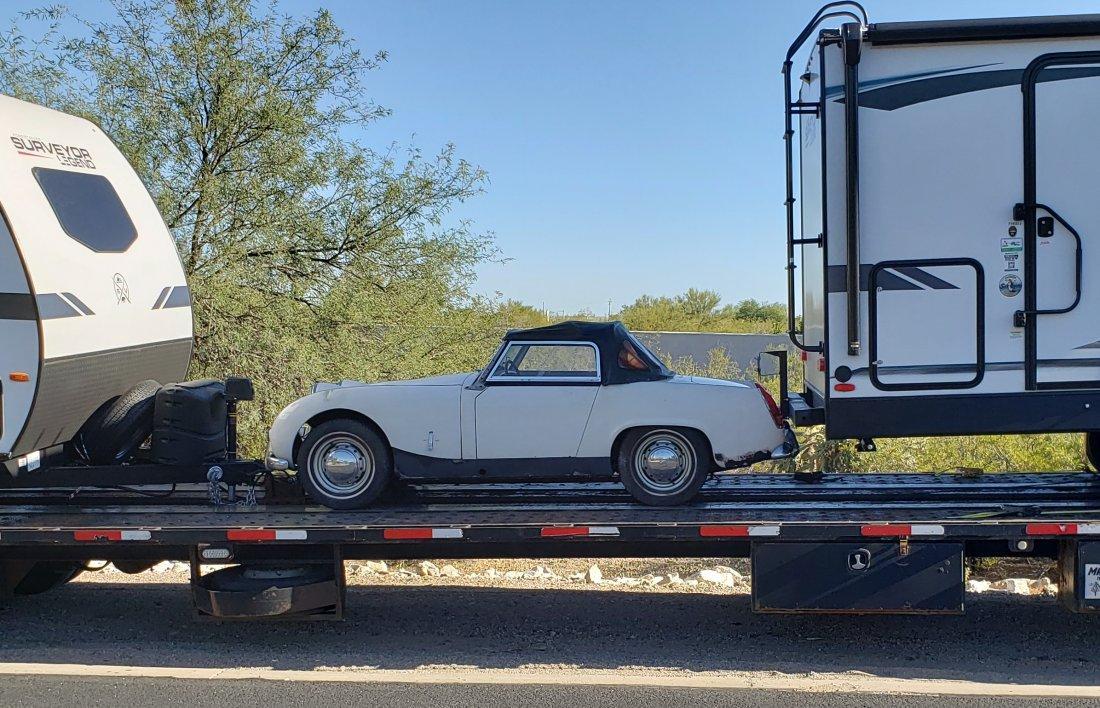
I know there are a million threads about this car on AHEXP.com and other sites. But I searched here and didn't find any. I may get more specific advice and feedback by posting this car on one of those forums, but if you've followed what I've done here, you've seen 3 Buicks, a Studebaker, a Miata, and a Ford Model A. So I'll put the story of this Sprite here. For those who know, you'll question the Bugeye. The '64 wasn't the Bugeye style, but this one has had the forward sheetmetal switched over to the '58-'61. I did run across at least one like this on AHEXP, and I'm sure there are more. It doesn't look like it requires much in the way of parts to make this conversion, and I like the style of the earlier nose. Compared with '58-'61, this '64 comes with the slightly larger engine, a separate trunk opening, front disk brakes, and more substantial seats, among other things I may discover. Near-term objectives are to replace what needs to be replaced to get it running and driving. Maybe new paint somewhere down the line. Trying to avoid taking it completely apart just to get it running. This car has history in Indiana, but I'm not sure how far back. Looks like the seller to me may have bought it about 20 years ago (didn't change over title/registration to themselves, so it hasn't run for the past 20 years). Whoever stored it seems like they did a somewhat proper job - the gas tank and radiator are drained. Compared with some of the Sprite restorations out there, this one seems to be fairly low rust. There's rust through in the left rear fender at the bottom behind the wheel, a little paint bubbling at the base of the cowl on each side (just forward of the doors), and surface rust along the bottom edge of the passenger door. The bugeye sheetmetal seems fairly good - something fell on the left fender just above the wheel, and there's a little rust through on the right side just forward of the wheel. Found this on Craigslist after selling the Studebaker. Started searching for Healey Sprite, and just walked the search around the country, city by major city. (I know there are nationwide searches out there, but I find just checking major cities gets more results for some reason.) The seller was moving to Florida (retirement move, I'm guessing), and didn't want to have to pay to move this car with him, just to try selling again in Florida. 20 years back, he had an idea of restoring this with his son, as it sounded like they'd done some other British cars, but that time has passed. I'd like to get my son in on helping with some of this, as he's expressed curiosity about the odd collection of cars in the garage (he's about 3 years until he can get a license). Here are some delivery pictures. Seller split shipping with me - they said they liked the idea of someone getting it going and sharing the experience with someone younger, but they seemed to be on the verge of taking on the shipping cost to Florida if it didn't sell. It took about a week with the shipping broker before it was picked up. I was about ready to accept that it wouldn't get here at all, but it got onboard with a travel trailer shipper. He had a strict deadline of being in Tucson on the 15th with those trailers. I think I saw an ad on TV for where he was going - there's a big travel trailer show and sale at the county fairgrounds this weekend. He got to me a _day_ early, on the 14th. I was out of town with my family, but we connected by text then phone, and I was able to get back just minutes after he had pulled up!


-
1952 Studebaker Commander Starlight Coupe
Eric W replied to Eric W's topic in Our Cars & Restoration Projects
Well, forget that last message. Someone figured out how to squeeze it in between two camp trailers. Should be here by end of the week... -
1952 Studebaker Commander Starlight Coupe
Eric W replied to Eric W's topic in Our Cars & Restoration Projects
Yes, that was a nice-looking car. Opens up being able to look for something else though. Anyone want to move a very small car from Indianapolis to Tucson? Seems all the commercial trucks are moving cars from NE to Florida. None wants to go West for less money... Right now, I have a car that's 10th on the list (of 33) needing to go from Indianapolis to Phoenix or beyond. But they're all just sitting. -
1952 Studebaker Commander Starlight Coupe
Eric W replied to Eric W's topic in Our Cars & Restoration Projects
And there it goes... The right guy showed up. Was thrilled with the style, didn't care about imperfection, and has "a guy" to take care of head gaskets no problem. Oh, and it went to Safford, AZ, not out of state or to Europe.


-
1952 Studebaker Commander Starlight Coupe
Eric W replied to Eric W's topic in Our Cars & Restoration Projects
The Bendix part number is 531829. Ok, I aired up the tires, topped off the coolant, and at the request of one potential buyer, pulled the battery, took it to the local shop for a check (it's good), cleaned up the battery hold down bracket, and reinstalled the battery. Another good hint from this potential buyer was the adjustment on the steering box - so I pulled the left front wheel for access and tightened that 1/4 turn. It did make a difference, but there's still a dead zone due to little clearances in the multiple linkages between your hand and the wheels (steering box to bell crank, bell crank to frame, bell crank to steering rods, steering rods to spindles) - someone could go nuts with trying to replace all that stuff, or live with a little dead zone. The car tracks straight, so it's not like this drives me nuts with constant corrections. I should tighten the brakes - pedal is low, and I bet a click or two on each wheel would do it (this car has later, manual-adjust brakes rather than the '52 self-adjusters). Bad news, but good diagnostics by one guy looking at it - the left head gasket leaks. It's allowing coolant into the exhaust (making white smoke, which is steam). Head gaskets are all of $15 each, so not a major part to buy, but I believe the job also requires (or should require) fresh exhaust manifold gaskets, and a good bit of effort to pull the heads off, change out the gaskets, and "adjust the valves". This potential buyer knows how to do this and seems willing to accept this condition, but he's yet to show up with money. I don't understand this - when I buy a car, I generally realize that other people are looking for it too, so if I have the cash on me, let's make the deal and I'll load it up and get it out of there. Maybe he really wants someone else to save him from this temptation. I had one guy tell me the photos in the ad make the car look better than it is. Isn't that the point of advertising? Everything looks better in little online photos than it is. I didn't retouch or process the photos to make them look better - just cropped for size. Should I take "worse" photos? He wouldn't say what the defects were, but yes, the paint has a little orange peel. Should I include microscopic close-ups of that? Does anyone really stand that close to a car when it's driving by? There's some cracks in the 69 year-old rubber. We didn't perfectly smooth every last ding. If you want a $30k+ restoration, look at $30k+ cars! -
1952 Studebaker Commander Starlight Coupe
Eric W replied to Eric W's topic in Our Cars & Restoration Projects
Hi Paul, Didn't see your post because I haven't been checking in here. We moved about a year ago, so it's been one thing after another with this new house. Some of the things we chose to do / update, but a lot we didn't. With that, I try to drive the Studebaker - ends up being about every 3-4 weeks. I've put it on c-list a couple of times, but nobody's really buying cars now, or they expect a $30k+ restoration for the price I'm asking. From last quarter to this quarter, Hagerty's valuation shows a BIG increase in these cars. Not sure what's going on, because I barely get response to ads at all, and even then they offer 2/3 what I'm asking... I still haven't finally resolved the starter. It still starts with the 6-cyl starter, and I bought a Bendix drive for the 8-cyl starter, but it's the same wrong-size Bendix as I got back from the rebuilder. I've posted on a Studebaker-specific forum about this starter, and some deny that there's even different starters for the 6- or 8-cyl. But there definitely is, as the parts manual and shop manual show. I need to get back on there and see if someone has a definite 8-cyl starter - even if it doesn't work, all I really need is the correct Bendix out of it. Right now, my thought is sell the car to pay for landscaping. Not a very thrilling thought, but I look at the (lack of) landscaping every day... If it doesn't sell, I'm thinking about getting the headliner, door panels, and floor carpet replaced. I've heard the back window has to be out to do the headliner. Not thrilled at that prospect, so I'll probably be looking at new back window gaskets as well...
-
My First Ford - 1930 Model A Tudor
Eric W replied to Eric W's topic in Our Cars & Restoration Projects
Replaced the main wire loom yesterday. Today, added connector terminals for the horn & tail / brake lights to mate with what's on the new harness. Pretty simple. Much more simple than the Studebaker, especially since this harness is split into several smaller / simpler sections. There's only 13 endpoints on the harness, not counting the center "starting point" that is inside the switch housing at the bottom of the steering column. 13 endpoints: each headlight has 3 (so 2 headlight connectors = 6 of the 13 points), horn is 2 more, generator output is 1, brake light switch is 2, and brake/tail light is the other 2. That's it. The headlight connector insert that clocks the 3 terminals in each connector is marked with "R" "G" "Y" for red, green, yellow, so you know which wire goes in which point in the connector. -
My First Ford - 1930 Model A Tudor
Eric W replied to Eric W's topic in Our Cars & Restoration Projects
Thanks guys. Yes, the pump probably wasn't moving water very well, though the accessory thermometer radiator cap would just barely show any temperature. It's winter here, so I haven't seen how well it does when it's over 100F outside. Swapped in LED headlight bulbs to see a little better, since the cruise night that I usually go to is really at night, and because this is a "dark sky city" there are very few streetlights. The right side headlight's internal wires decided to crumble with this disturbance, so I've ordered some replacement wiring. Hopefully that shows up in the next week or so - wires internal to the headlights, the forward main wire harness (from light switch to all lights & horn), and while I'm doing this, a fresh one from the generator to the terminal box, though that one looked ok. -
My First Ford - 1930 Model A Tudor
Eric W replied to Eric W's topic in Our Cars & Restoration Projects
About 2 1/2 hours to disassemble, swap the pump, and reassemble. Again using the Les Andrews handbook, though it looks like he was working with a '28-'29. I didn't have to pull the rear hood bracket, just loosened the radiator upper rods and leaned the radiator forwards a little to get the hood off. Pull radiator shell & radiator to allow removal of a pump with an aftermarket 4-bladed fan. So to the comment above, this is a much more recent fan - didn't look like any problems there. Yes, the pump was truly in 2 completely separate pieces. Went back together pretty easily. Didn't have time for a test drive to see if the ignition is cured, but at least it's ready.


-
My First Ford - 1930 Model A Tudor
Eric W replied to Eric W's topic in Our Cars & Restoration Projects
Ignition cutting out on a short drive a couple of days back. Just did the 5-step diagnosis per the Les Andrews handbook. Voltage where it was supposed to be. Found a new-in-package condenser in the small box of parts that came with the car and swapped that in. Did NOT make a test drive to see if problem solved, because I just noticed why the water pump is so weepy. Not sure how I missed it before (see photos). Anyway, I've got the new sealed-type water pump already here to install, so that's the next job.

-
My First Ford - 1930 Model A Tudor
Eric W replied to Eric W's topic in Our Cars & Restoration Projects
Got to the driver's door latch today. Replaced the latch support pin and latch spring. Seems to be working better. Found some photos online that showed the latch spring is supposed to hang over the edge of the latch base plate, and you push the spring inside the door opening with a screwdriver. The additional rotation on the spring by doing this brings the spring fully up to tight. I had some good luck with getting the outside door handle off - some of the things I found online made it out like this was a horrible, multi-hour ordeal. I had it off & back on in less than a minute. Here's some photos of the other items described above. The LED in the tail light also has LED elements along the "sides" of the bulb so it shines down onto the license plate. Speedometer almost looks like there's no glass in it at all. One of the dash panel screw threads wore down so much the screw wouldn't stay in - it looks like it's the screw that's worn down, so I'll get another one and hopefully the bracket in the dash still has threads.


-
My First Ford - 1930 Model A Tudor
Eric W replied to Eric W's topic in Our Cars & Restoration Projects
Received a couple of gift certificates to the Model A Store. Ordered a few things: new sealed water pump, speedo glass & seal, LED tail light bulbs, door latch striker plate, horn gaskets, safety fuse, horn data plate, windshield washers, LED headlight bulbs. They didn't have the LED headlight bulbs, so need to try that again sometime. Got the LED tail light bulbs installed - much brighter, and you can see the LED elements when it's on, so it doesn't look stock. But I'll use this car for evening cruise nights, so visibility is more important to me than originality in the light bulbs, and they're easy enough to change back. Installed the windshield side bracket washers. Was supposed to be a pack of 4, but there was only 2, so I'll order another pack next time. These seem to do a MUCH better job of holding the windshield side brackets than the plain flat washers that were in there. These have rubber molded onto one side of the washer to keep tension on the knob and stop rattles. Added the safety fuse. This is on the starter, and is between the starter post / battery cable and all of the rest of the electrical in the car. There are no fuses in these cars - only smoke if something goes bad. Adding the fuse was easy, since it's designed to be a screw-in / bolt in item. Did the speedo glass next. Received the Model A maintenance guide as a Christmas gift, so it was easy to follow the directions in there to remove the gauge panel and get the speedo apart. Hardest part was getting the ignition switch back in place - 3 little screws, and the screwdriver accesses two of them at an angle. Tried the door striker plate, since the driver's door will open while driving. When I pulled it off, I noticed it's about 1/8" longer than stock - built up with welded-on material. So I just put it back. I also bought the door latch spring kit - that's what I really need to work on, as the latch in the door is sticky, and doesn't pop out inside the door frame very well to hold the door closed. Installed the horn data plate, mostly because the one that was on there broke off when I was cleaning it up for paint (2 very tiny rivets, which come with the replacement data plate, but aren't available separately). In seeing the replacement, I don't think the one that was on there was original, as they both looked exactly the same, and look like there's spots for stamped numbers or letters that aren't stamped. Got the horn gaskets installed between the motor and the sound plate. These have a clocking hole that lines up with a stamped bump on the motor side. Soldered new (vintage-style) wires onto the horn, since one of the wires had broken off, and the other was in sad shape. Got the horn reconnected, and the horn button works. Need to work some more on the horn (lube, brush adjust), since it just barely works. I did adjust the horn adjuster - it goes from too tight to turn to too loose to make sound in about 3 clicks. There's only 1 or 2 clicks that actually make sound, and the motor isn't strong enough to turn very well. Water pump is more involved. I'll save that for another time. Need to drain radiator, pull hood, pull radiator, etc. for access. -
Found a couple of photos of the white '93.


-
Yes, this is the 3rd one for me. I don't recall the exact package numbers, but I my first one was a white '93 with the "big block" AM/FM/CD/Cass head unit. I did a lot of bad things to that car - changed wheels, tires, sway bars - really screwed up the handling. And a supercharger, which I took to the point where it exceeded the max fuel flow capacity, burned & cracked off a couple of valves, and drove home about 50mi on 2 cylinders, balancing between going fast enough not to get run over, and slow enough not to over heat. Yes, that was bad. Pulled the supercharger & head, disassembled the head on the dining table (single-guy stuff), and got the head reconditioned and put it all back together, less the supercharger, which I sold to the next kid to figure out it's not such a great idea. Next was a '94 black & tan - where I worked on "return to original" rather than modify. Pulled out a mess of cell phone add-on wiring & an aftermarket stereo. Replaced cracked/broken plastic parts back when these were easy to find. Found some photos - forgot how nice that one looked. This one - I got blue because when you find a decent NA Miata with a tolerable mileage and extensive maintenance history (back to day one), you go for it. On the white one, I added the factory "competition graphics package" (stripe kit) - long since no longer available. I'd add that to this blue one, but nobody is making them. There's one website advertising their own re-creation of that stripe kit, but the company is gone. The stripes are tapered slightly narrower at the very front & rear, and they taper out to full windshield width just in front of & behind the cabin.


-
My First Ford - 1930 Model A Tudor
Eric W replied to Eric W's topic in Our Cars & Restoration Projects
Decided to diagnose the horn. Wires in the steering column seem to be doing what they're supposed to. Then when I went to look at the wires out the bottom of the horn, one came out. So it's probably dead there. Got the horn off & wires disconnected from the car, then powered using a screwdriver to jump over to the contact on the horn motor. Motor is good & horn makes noise, so it should be ok with fresh wire soldered to the contact. Flaked off the loose paint, scotchbrited & shot w/ some rattle can Rustoleum. Need to order the gaskets, as the paper that was in there crumbled when I disassembled, and I don't know that paper would end up with the correct sound anyway. When I went to the store for the paint, decided to get the trans / diff oil. Checked online, and came up with a 50/50 mix of 2 modern products that would approximate. Got the trans & diff drained & refilled. Took it for a little drive. Seems like it's shifting better. Should get even better when I let it warm up more.


-
My First Ford - 1930 Model A Tudor
Eric W replied to Eric W's topic in Our Cars & Restoration Projects
Rebuilt the fuel gauge yesterday. It had a bunch of goop sealer all around the gauge-to-tank interface. Turns out, they had the cork on the wrong side of the glass, so it was probably a big leak problem. I haven't refilled it up past the glass yet, but hopefully cleaning off the surfaces & getting the parts in the correct order will have it seal like it's supposed to. Nice to replace the "indicator line" washer as well. Before photo shows what it looks like when it's got a soggy, sunken cork for a float. The new float is some sort of synthetic - supposed to be able to withstand the garbage that passes for fuel these days. Working with Bert's in Colorado, as that seems to be the nearest major parts supplier. Got their catalog. Highlighted a possible shopping list. The water pump continues to leak, and there's an option with a modern seal system which should fix that. Also need to finish cleaning off the roof. Didn't get through it all last weekend. You can see in these photos that the speedometer glass is missing right over the speed dial, so there's another thing to work on. That all works - speed, odometer, trip meter - so I'll just get a glass & gasket for that.

-
My First Ford - 1930 Model A Tudor
Eric W replied to Eric W's topic in Our Cars & Restoration Projects
Thanks Keith - I'll take a look. Being LED, the tail lights don't draw much current at all. Here's another photo showing the difference on the before/after on the roof. Multi stage process - scrub with soapy water using a brush, small area at a time. Wipe off the loosened dirt & water for each small area with a damp cloth. After scrubbing one half of the roof this way, then go back, small area at a time with Meguiar's "ultimate black" rubber/vinyl restoration product. Drop some on the surface, spread it out by hand (maybe 6" x 12" at a time), work it into the surface with a stiff brush, then wipe off the excess/residue with a cotton towel, frequently refreshing the towel surface. The Meguiar's partially acts as an additional cleaning, as the excess that wipes off is really dirty. Here's a couple more photos of where I took the exterior photos yesterday to show more of what was around the car. It's a road that slopes upward out the west side of town, and has an amazing view. The photo with car in center and two mountain ranges - that's the Tortolitas on the left and the Catalinas on the right. I looked at a lot for sale along this road, but what few lots are left aren't flat at all (would require some very costly earthworks to add a house and workshop), as well as there being association requirements and approvals as to what you can build. It's about 5 minutes from my house, which is quite a bit lower elevation and closer to the city.


