


unimogjohn
-
Posts
4,151 -
Joined
-
Last visited
-
Days Won
2
Content Type
Forums
Gallery
Events
Everything posted by unimogjohn
-

Avanti R2, 1963, refresh
unimogjohn replied to unimogjohn's topic in Our Cars & Restoration Projects
Sunday, PM, September 25th. Farm work in the morning, but then I took some time to work on the 1928 Buick. Changed the transmission oil. That 600 weight oil is some sticky stuff. More like honey than oil. To make it flow better so I could pump it, I put the cans in front of a little heater for about an hour. That really made a big difference in being able to pump the oil up into the transmission. It took about two and a half quarts. I also had to transfer the oil from the cans to a plastic bottle with a pump on it. Here are some pics.


-
Not quite a restoration project....a Tommy Gun
unimogjohn replied to Ian_Greenlaw's topic in Our Cars & Restoration Projects
Wow, now it does look like the real thing. Great job with junk on hand. Waiting to hear of all the hoops you are going to have to jump through to get it registered. -
Avanti R2, 1963, refresh
unimogjohn replied to unimogjohn's topic in Our Cars & Restoration Projects
Still Saturday, but late in the evening. Daniel is working late. Brownie the van, is done and in primer. Daniel also said that it might be done on Sunday if he gets a few minutes to spray the body color. Don't laugh, he is using four little rattle cans of Cardova Brown that I bought. We will see how it turns out. Now I am excited to get it home so I can begin my work, the mechanicals! A bunch of us are going to the Fall Carlisle show in PA next week, just one day. Hope to find some Brownie parts.

-
Avanti R2, 1963, refresh
unimogjohn replied to unimogjohn's topic in Our Cars & Restoration Projects
Saturday PM. Spent about six hours cleaning the 1928 Buick. Starting to look pretty good again after sitting idle for a few years. I actually vacuumed the undercarriage after I got it up on the two post lift. Lots of spider webs and other things. The tires were all crudy, both sides. So wiped them down with Fantastic and then put a coat of tire dressing on them. I also washed down the spokes and hub with Fantastic. They look fantastic! I then changed the rear end oil. The oil did not look or small bad, heck, I think I changed in in 1984/85. Tomorrow I will do the transmission. When I bought the car it did not have much of an exhaust system left. So I headed down to the local muffler shop, bent some pipe and put on a muffler that was very similar to the rotten one on the car at the time. They said it was from a tractor. They also decided to put a chrome tip on the end of the exhaust. I guess to dress up the car a bit. But it has been bothering me for 42 years, the bling was obviously wrong and not period correct. So today I got out the grinder and cut it off. Ah, now I feel so much better. My goal for the car is basically to do no harm and keep it as original as I can. So far only the fenders, hood, front and rear valances, and half a door have been painted. The body paint is still original, top and the interior are all as left the factory. Oh, and Alice finished the painting of the pastel green doors, and then we hung them. And there is also the little bag of parts I got for the Avanti. Here are pics from my day's work.


-
Avanti R2, 1963, refresh
unimogjohn replied to unimogjohn's topic in Our Cars & Restoration Projects
Matt, thanks will take a look and see if and how to proceed. But now it is Saturday, September 24th. Brownie the 79 Chev van is about done. I should be able to pick her up early next week. Then I can get started on all the mechanicals and interior work. She will not be a show truck, but will be presentable again. And she will be under cover for the first time in her life. And I got some small parts for the Avanti yesterday. Rear brake springs, throttle springs, and special retainers for the steering post pad. Little things to make the car a bit more complete. I moved the 1928 Buick over to the two post lift. Going to put it up and do a good inspection. While it is up I am going to change the transmission and rear axle oil, and do a good lube job. I figure that this will take about three to four hours. I have to heat up the 600 weight oil to get it to flow into the transmission. Will use a hot water bath for that. And I have to fix that sticky back up light switch on the transmission. Here is a pic of Brownie the van.
-
New pistons for a 1928 standard, maybe Jeep
unimogjohn replied to unimogjohn's topic in Buick - Pre War
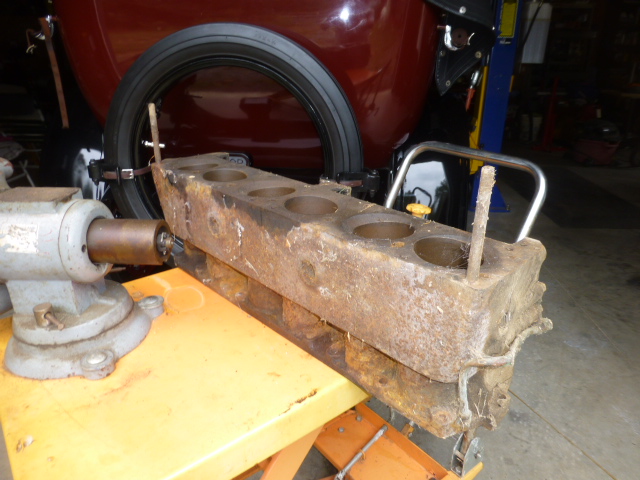
Everyone, this will be my last post on the topic. I visited the machine shop and two of the machinists came out to the truck to look at the block. They gave it a good visual inspection, and said that it would not be worth it to attempt to remove the eight broken studs, unless the engine was the only one left in the world. They said that the cost to remove each stud would be at least $30 each, and more than likely would be more like $100 or more. They looked at the threads left in the block of the remaining studs and they were all shot too, they would never hold a new bolt. So bottom line, the cost just to repair the studs where the head would bolt on would be in the $1,200 to $1,500 range. I have seen complete engines for much less than that so will just keep my eye out for one. Right now my JBWeld repairs are holding up fine and I am going to put in the crack sealer product tomorrow. Hopefully, that will give me many more years of service. Thanks again for all the help. I know the information you provided me will help others down the road. Nice to have the old 28 back on the road again. -
Avanti R2, 1963, refresh
unimogjohn replied to unimogjohn's topic in Our Cars & Restoration Projects
It is Friday, September 23rd. This morning I went to the big machine shop and talked to the foreman. He took a look at the block and shook his head. He said not worth doing. It would cost at least $1000 to $1500 just to get the studs drilled out, and he would not offer any guarantee that the block would not crack. He said to go look for a complete engine. So that is what I am going to do. I do see them from time to time. -
New pistons for a 1928 standard, maybe Jeep
unimogjohn replied to unimogjohn's topic in Buick - Pre War
Leif, 17 7/16 to be exact. They are long rods, threaded into the block and thru the head, and held down with nuts. -
New pistons for a 1928 standard, maybe Jeep
unimogjohn replied to unimogjohn's topic in Buick - Pre War
Final report for now. I have the block all sealed up with JBWeld and am running the engine. No leaks and is running great. Going to take the new block to the machine to see what the condition of the block is in and the size of the bore. Oh, that is oil flowing down the block in the pic, not water. And I changed the oil and filter to get rid of the moca tinted oil. I made new cork seals for the side covers too. Final question, where would I look for the 17 inch long bolts that go into it to attach the head. Pete, you have any of those? TX Pic of the put back together engine.


-
Avanti R2, 1963, refresh
unimogjohn replied to unimogjohn's topic in Our Cars & Restoration Projects
Friday, early morning, September 23rd. I received a progress report from Daniel on the 1979 Chevrolet van. He has completed with the large patch on the driver's side of the van. The entire section was rusted out. I had purchased a replacement from LMC truck, and it is now on the car. Only one small patch on the rear wheel arch to do for the body. And the doors have a little rust at the bottoms, but not thru except for the sliding door has one little corner rusted thru. Getting close to the end game. Here is a pic of the long panel.
-
2009 Suburban 2500 advice
unimogjohn replied to Matt Harwood's topic in Garages, Trailers, and Towing
Matt, if is not the gas cap (I would replace it anyway, heck they are only $13). And I would check for a hole in in the evap line, probably rubbed again the frame or another component. I really doubt that it has anything to do with the fuel pump. You must know someone with a lift. Get it up and look around. Bet you find it. If the tech saw fuel, then a line is leaking. Good luck. See you at Hershey. -
Avanti R2, 1963, refresh
unimogjohn replied to unimogjohn's topic in Our Cars & Restoration Projects
Thursday, PM. I ended up not taking the 28 out, will have to do that tomorrow. I had to run into town and get 20 gallons of real gas. I did not want to get on the road and run out of fuel. Tomorrow is another day. I did start it up again, cranked right up and ran smooth. After about fifteen minutes I shut it down and check the oil and the block for water. Both were fine, I don't think I will have to change the oil again. I then took a few minutes and installed the side covers and the cover for the spark plugs. Looks like a complete engine now. I am going to go over to the Carquest machine shop in Winchester, VA and talk to them about doing the spare block. I would like to get it done if it not going to cost too much. Then I plan to move the white trailer out of the pasture and up onto the roundabout. If I have time I plan to load the 23 and strap her down for the trip to Hershey. Then I can move the 28 over to the two post lift and give her a good checkout. I want to change the tranny and rear end fluid, and do a complete lube job. I also want to put tung oil on the wooden spokes on the wheel. I have the 600 weight oil for the tanny, I will use regular gear oil for the rear axle. I have sure glad the 28 Buick is running again. I am a happy camper.
-
Avanti R2, 1963, refresh
unimogjohn replied to unimogjohn's topic in Our Cars & Restoration Projects
Still Thursday, but late AM. Changed the oil and filter. I use a modern filter painted black instead of the original felt filter as they are no longer available. Works good, and only the Buick owner's know the difference. Painted all black it blends right in. The oil was a nice moca blend. Depending on how the oil looks after a good run cycle I may change it again. Oh, that is oil you see running down the side of the block. I am going to wait a couple of days before I put on the side covers on the engine. I want to make sure that all the leaks/seeps have been caught. Olson's Gaskets wants $30 for a gasket set for the covers, and with shipped it would probably be near $50 to my door. So I decided to make myself a pair. Cost: $0. Only about an hours work. The gasket really does not need to be leak proof, it acts as a dust shield more than anything else. And cork gaskets are correct; glad I got rid of that blue RTV stuff. I hope to get the 28 Buick on the road this afternoon for a little trip.


-
Avanti R2, 1963, refresh
unimogjohn replied to unimogjohn's topic in Our Cars & Restoration Projects
Thursday morning early, September 22nd. Filled the 1928 Buick radiator with water and then checked for any leaks on the block. None. I then turned on the fuel, pulled the choke, and pushed on the foot starter. Nothing for a few anxious turns, but finally the engine caught a couple of cylinders and then they all got fuel and roared to life. I have some moca in the oil so am going to change it before I do anymore engine running. First time I have had it running in about five years. -
Avanti R2, 1963, refresh
unimogjohn replied to unimogjohn's topic in Our Cars & Restoration Projects
Spinneyhill, great idea, that is why I love the forum. So bought this today, will be here on Friday. CRC 401232 Permanent Head Gasket & Block Repair with Nanotechnology, $16. And I took ten minutes and put fuel in the 28s vacuum tank and 5 gallons in the main tank. Am using real gas. -
Avanti R2, 1963, refresh
unimogjohn replied to unimogjohn's topic in Our Cars & Restoration Projects
On a funny note. Alice loves her pastel green Jaguar so she is now painting the house this color too. Actually, just the front door.


-
New pistons for a 1928 standard, maybe Jeep
unimogjohn replied to unimogjohn's topic in Buick - Pre War
Brian, Dave B, Pete and Leif; thank you all for the research and information. I know now that I can go ahead and rebuild the engine if I need to. Right now I am JBWelding the water jacket cracks up. They had been done previously so this obviously is nothing new. I thought I have them all plugged, but found two more small cracks this morning when I filled the radiator with water. So they now have been plastered over and will let it harden for at least 24 hours. My plan is to see if I can make this engine water proof again. I think it was JBWelded sometime in the early 80s, so it has held up pretty well, no reason it should not hold water now. Or at least we will see. I think that the cracks just keep expanding and contracting over time and gradually worked themselves beyond the original repair area. Dave B sold me a great block, no cracks. There are no ridges in the cylinders and nor scoring of the cylinder walls that I can see. I am going to look for a gauge to see if it is still standard or oversized. I have no idea what size pistons are in the current engine, but it would be great to just be able to hone the bores to clean them up, put in new rings and reuse the old pistons in the Dave B block. But I will not know until this engine fails and I take out the engine and rebuild the Dave B block. I may take the Dave B block to a local machine shop and have the eight broken bolts taken out and the bores cleaned up. At least then I will have a serviceable block and will know what size piston I will need. Olson's Gaskets in WA, has all the gaskets for a rebuild at a good price of $400. And they will sell gaskets by the piece also. Here is a pic of the Dave B block before and after all cleaned up, and a couple of shots of the JBWeld repair. The pic of the bore looks bad, but it is really not, just gunk for the most part, I just did not want to start grinding it for fear of making thing worse. Will update this in a couple of days.


-
Avanti R2, 1963, refresh
unimogjohn replied to unimogjohn's topic in Our Cars & Restoration Projects
Still Wednesday, AM. Headed out to the garage with lots of water and filled up the 28s radiator. Decided I better check the my JBWeld patch. Whoa! Captain, more JBWeld. Now that the block is filled with water I found two more pin hole cracks in the block. The same area that I did my repair on. One is near the patch, just forward of it, and the other is on the front where it had been repaired before. Both are dripping and will contaminate the oil if I let it go. So drained the water, will let it dry out a bit, and put more JBWeld on both those areas. I could see no other water issues. I cleaned the block in those two area and will mix up some JBWeld in a couple of hours and do the repair. Should only take five minutes top. Then I have to wait 24 hours for the stuff to cure. In each of the pics you can see the drips coming out of the block. Update: Wed mid-day. OK got more JBWeld on the cracks. Will fill it with water tomorrow morning and see if there are any more leaks.

-
Avanti R2, 1963, refresh
unimogjohn replied to unimogjohn's topic in Our Cars & Restoration Projects
Just a couple of more pieces of trivia on the 1928 Buick. Found some more information in the box of papers that I was sorting through. I sent away for a registration search for the number of model 29 remaining in the USA. That search came back with the number of 23. I have come across only one model 29, Town Brougham, in all these years. It was also an original car and lives in Winchester, VA. As I remember, I think I remember seeing six registered in the Buick Club, but that was a few years ago. Also found a Washington State registration form 1978. The car had 40,800 miles on it then. Here is the section on mileage from my previous post for reference. " There is a oil change sticker on the driver's door jam. It says that the oil was changed on February 21, 1950 @ 40,533 miles. The car now has 43,425 miles. So between then and now, the car has only traveled 2,892 miles. Or about 43 miles per year. I have not been able to find any mileage records of when I bought the car. Our longest trip was in 2000 when we drove the car to the Buick Nationals in Richmond, VA. A round trip distance of about 250 miles." -
Avanti R2, 1963, refresh
unimogjohn replied to unimogjohn's topic in Our Cars & Restoration Projects
Chris, short story. I was looking at a Ford model A for sale at a farm, next to it was a car under several tarps. I said "what is that?" He said, my Grandmother's 1928 Buick, want to look? I said yes, and he peeled off the tarp to expose the radiator, from that moment I had to have it. I was hooked. Love at first sight. So from then on I was into the Buick's of the 20s, and I wanted an open touring car, like bad. Hence the 1923. So that is my story on the Buicks. And I really only like the teens and 20s. But you cannot take them on modern roads so now I have the fastest productions cars in 1953 and 1963, the Jaguar XK 120 and the Avanti R2. -
Avanti R2, 1963, refresh
unimogjohn replied to unimogjohn's topic in Our Cars & Restoration Projects
Tuesday, dinnertime and a report from Daniel on his progress with Brownie the van.

-
Avanti R2, 1963, refresh
unimogjohn replied to unimogjohn's topic in Our Cars & Restoration Projects
Still Tuesday. The Optima battery for the 28 Buick arrived. I immediately installed it. I do not want to start the car as I want to wait at least another 24 hours for the JBWeld patch to fully cure. But I did crank it over without the ignition on and built up 20 lbs of oil pressure. I was so happy that the engine was not stuck. She cranked over really good. Tomorrow, fresh fuel and then we will do a start up. -
Avanti R2, 1963, refresh
unimogjohn replied to unimogjohn's topic in Our Cars & Restoration Projects
It is Tuesday morning, September 20th. Talking to the guys about going to the Fall Carlisle event next week. Looks like we will be going on Thursday. I will be looking for Bownie the Chevrolet van parts and maybe I can find an Avanti/Studebaker vendor or two. I spent the morning going thru the myriad of paper stuff I have for each of the cars. In the 1928 Buick box I found a Buick Bugle magazine from April of 2008, which had the article that I wrote on our 28. Thought I would go ahead and post it here. Also the cover of the magazine shows a 1928-29. The same model as ours. But it is not our car, but looks just like it. Pretty neat that they had articles on the same model in the same issue.


-
1950 Crosley Farm O Road Restoration and more
unimogjohn replied to dalef62's topic in Our Cars & Restoration Projects
Dale, did you see this in the buy/sell forum? -
Avanti R2, 1963, refresh
unimogjohn replied to unimogjohn's topic in Our Cars & Restoration Projects
Monday morning, September 19th. Ten minutes and it was done. Mixed up some JBWeld and put it on the area of the block where it was leaking. Will wait at least 24 hours before I mess with it. The new battery should be here tomorrow or Wednesday. When that is installed, I will put some fuel in the vacuum tank and see if the engine will start. If yes, will fill it with coolant and check for leaks. Wish me luck.


