unimogjohn
-
Posts
4,151 -
Joined
-
Last visited
-
Days Won
2
Content Type
Forums
Gallery
Events
Everything posted by unimogjohn
-
Dwight, if your steering is on the right side, then you have an export model. Everything is the same except that you will have some different levers, etc for the brakes, throttle, advance, and of course the steering. All the body, engine, etc are the same and will interchange. McLaughlin did upgrade some of their interiors and actually used older model Buick parts in their newer McLaughlin Buick. The factory also used a few unique parts in the interior to make them more upscale, for example, the wood dash of my 23.

-
You can try this manual, I think brakes are covered around page 27. I also have a couple of pages for my 28 Buick that I can scan for you if the Dyke's manual does not have enough information. Dyke's automobile and gasoline ... - Google Books
-

Avanti R2, 1963, refresh
unimogjohn replied to unimogjohn's topic in Our Cars & Restoration Projects
It is Saturday, November 14th. Well today I thought it would be the day when I turned the corner from taking things apart versus putting things back on. I was partially successful. Started the day by reading the installation instructions of the Turner brake system, that is novel for me as I usually rip into something and then ask questions later. Well, it turns out that you have to remove the dust shield so I did that first. Then I found out that you have to heat up a couple of collars that go over the spindle to form a new seal surface for the rotors. Decided that it was going to be a Sunday or Monday project. But I did take the opportunity to clean and degrease the spindle and other close by parts. I also greased everything at every fitting I could find. Lots of water and gunk came out and some rusty stuff too; I used two tubes of grease to make sure everything had fresh grease. Then I decided I better tackle the rear brakes. First I installed the two new SS brakes tubes, they went on find with just a little bending. Then installed the rebuilt cylinders and put on the brake shoes themselves. Everything was going great, and then .............. I could not get the drums on either side, they would not fit over the shoes, and the shoes were all the way retracted. Took everything off again, checked everything, put it back on, no go, got out the maintenance manual, looks good, no go.................... After four hours of messing around I think I figured out what is going on. What do you do when the car has no brakes, you use the emergency brake. So the previous owner decided to adjust the emergency brake to the max. So tomorrow I will attempt to loosen the cables and allow the brake shoes to retract so they fit inside the drum. Done for the day, a bit frustrating with the brakes, but at least I think I have it figured out. Sunday will be another brake day, replacing brake tubing and then tackle the front brakes. Also will see if I can brake loose the transmission coolant lines. You can see the nick in one of the lines. I am sure they are original so they need to be replaced.


-
The 2007 roster for the McLaughlin Buick Club of Canada lists two members with 37 specials, a sedan (David Johnson) and a coupe (Dale Shaw). David's email is: adjohnston@shaw.ca Dale's email is: dsjs@nbnet.nb.ca Is these do not work let me know and I will hunt up later rosters.
-
Avanti R2, 1963, refresh
unimogjohn replied to unimogjohn's topic in Our Cars & Restoration Projects
It is Friday, November 13th. Parts, parts, and more parts. Yesterday we got in the brake lines, rear and front brakes, etc, etc. The Jim Turner kit came in two boxes for a total weight of 78lbs. Had to get a wheel barrel to get them up the hill. The kit looks to be very complete. The hardware looks to be very professionally done and coated against rust, etc. Jim says some brake fluid and wheel bearing grease is all you need. His literature also says that you need four hours to do a change over, so we will see. Spent this morning honing and rebuilding the rear brake cylinders, both came out just fine, neither had any pitting. Reassembled them, and they are now ready to go on the car. Also spent a hour or so on the idler system. Pulled the final plastic bushing, cleaned and oiled everything, and took a wire wheel to the pulley. The main bushing had lots of rust and was run dry, so took my time to clean out all the rust and dry oil. Hopefully, the system will go back on the car tomorrow. Tomorrow I plan to replace the transmission to radiator coolant lines, the rear brakes and new tubing. Sunday, the plan is to mount the new front brake kit and tubes. Monday should complete the brake system with the installation of the remaining tubes that go front to back. Then we will be able to bleed the system. If all goes well we will be able to put on the wheels with new tires and test out the braking system. We also got the production build record for our car from the Studebaker National Museum in today's mail. Since our engine is painted red rather than black I thought the engine might be a replacement. I was delighted to find out that she still has her original engine. She had a final assembly date of January 8, 1963. We have had 48 hours of wind and rain, hopefully it will be nice over the next couple of days, and we can get a lot accomplished on the car.


-
Avanti R2, 1963, refresh
unimogjohn replied to unimogjohn's topic in Our Cars & Restoration Projects
Gary, thanks, we just changed our plans to Friday. See you there. -
and when they rusted out or cracked, it let in exhaust. They went out of favor by the early 20s.
-
Avanti R2, 1963, refresh
unimogjohn replied to unimogjohn's topic in Our Cars & Restoration Projects
It is Thursday, Nov. 12th. Yesterday I was not able to do anything. We went by train from Washington D.C. to Philadelphia and back to see the Lady Diana Exhibit. It was a fun trip. But today the weather turned bad. Temperature was 38 degrees all day and the wind is blowing 30 to 40 mph. The trees are singing. But I was able to work in the garage and clean up the rear brake components. So they are all ready to reassemble when it warms up. Even cleaned up the little shoe adjusters to make sure they were clean, working, and ready to put back on. New parts also came in today. I received new rear brake shoes, rebuild kits for the cylinders, plastic sleeves for the idler system, and the new SS brake lines for the entire car. I am expecting the new front brake system to come in tomorrow also. So now I have lots of parts to go back on the car. It is nice to turn the corner from disassembly to assembly. No word yet on the supercharger rebuild, but that right now is a minor issue. I can certainly wait for that. I also was able to find a NOS wiring harness. We are discussing price, but pretty sure that I will get it. We have decided to go to Reedsville, PA on Saturday, Nov. 21st to possibly pick up some good deals on parts. Should be fun. -
Avanti R2, 1963, refresh
unimogjohn replied to unimogjohn's topic in Our Cars & Restoration Projects
Keister, yes they did. I figure that this was the first repair, then it shorted again, and they ran some new wire, but more wire melted than they thought and shorted out more stuff. Will be very careful on the short term corrections I will make. I am pulling out all the stuff they put in so I have a stock harness to start with. My biggest concern right now is the line that is hot just dangling there. On Thursday or Friday will pull the instrument panel to see if I can get at the harness without working under the dash. Figure my meter will be getting a work out. -
Avanti R2, 1963, refresh
unimogjohn replied to unimogjohn's topic in Our Cars & Restoration Projects
It is still Tuesday, found out that Studebaker International has the harness from the dash forward, just what I need. The cost is about $470 with a lead time of 2 to 6 weeks. We are going to Reedsville, PA on the 20th for the regional Studebaker swap/flea/show/meet. We will see what we can pick up there, before we bite the bullet and order a new one. We will not be on the road by then anyway. I will take the time to separate and repair the old wire as best I can so at least there will be no chance of shorting or fire. I will also always disconnect the battery until the wiring is replaced. -
Avanti R2, 1963, refresh
unimogjohn replied to unimogjohn's topic in Our Cars & Restoration Projects
It is still Tuesday. Thanks Ernie for the info. Since Alice is under the car painting away I decided to see how bad the wire fire damage is. It is extensive. At some point in the past they had a hot short and burned up part of the wiring, looks like they put in a patch, and it hot shorted out too, and then they by-passed a couple of wires. However, some of the exposed wires are still hot. Started tracing and cutting back the black tape and found more melted and burned wiring, and other wires completely burned off. This was on the engine side of the firewall, the wiring on the inside of the car looks worse, all fused together, I will take a look at that in a couple of days. This will not be an easy patch job. Looks like I have a big wiring job in my future as I really have no other choice but to replace all the main wiring harness. If anyone knows of a source please let me know. Here are some more pics of the outside and inside.


-
Avanti R2, 1963, refresh
unimogjohn replied to unimogjohn's topic in Our Cars & Restoration Projects
It is Tuesday, Nov. 10th. Fire! Yes, I said fire. Saw Dan Skidmore's ad for radio repair in Turning Wheels so decided to send him a note about my non-working AM radio. He told me the approximate cost to repair, so decided to pull the radio and speaker and send it to home. The removal was not that bad, I did remove both right and left side panels for access. No one told me that there was a screw under the dash for a little brackets that holds the back. But it only took a couple of minutes to figure it out, and with that done it came right out. Took out the speaker also to send to Dan. After I got the radio out I decided to look around with a light (as long as I was in a contorted position with my feet over the passenger front seat. I happened to glance at the main wiring harness and to my surprise there was a bare wire hanging down. Turns out that it was/is the main power wire and about five or six inches is fried. I do not think that it is alive, as I can see where some non-factory wire has been run. But it must have scared someone to death at some point in the past. So now I am going to pull the instrumental cluster and see what is going on in that wire bundle to see if there is any more damage. I can see lights pulled out of the cluster too, and some odd home made wiring too. Will report late on what I find. I just hope that the red primary wire was bypassed, will check that this afternoon with my meter. Right now I have the battery disconnected. So the radio and speaker are heading off for repair tonight. Alice and I have also been painting, painting, painting. Starting to look good under the car. We hope to have most of the underside done today as it is suppose to rain for the next couple of days and be much cooler. Tomorrow we are off to Philly to see the Lady Diana exhibit, so we will be gone all day. Here are some pics of today's work including the burned wires. I also got a call from Jim Turner that the brake kit was shipping today, and would be here before the weekend.


-
Avanti R2, 1963, refresh
unimogjohn replied to unimogjohn's topic in Our Cars & Restoration Projects
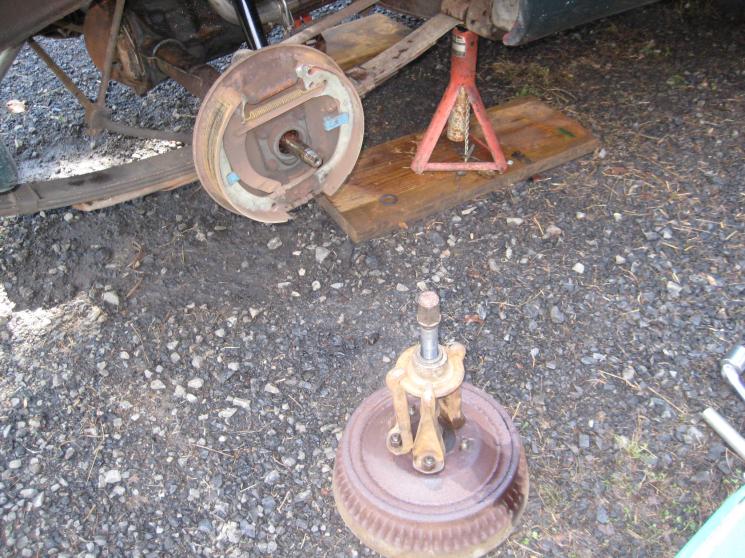
It is Monday, November 9th. Brake Day! Spent the day working on both the rear and front brakes. Took off everything that could come off in preparation for the rebuild of the rears and new Turner system in the front. The rear cylinders looked pretty bad at first. Both had frozen pistons, so it had been many years since they actually did anything. But with a little Kroil to loosen things up, I was able to lightly pound out the pistons. The insides do not look bad, but will need a honing. Then I will see if they will have to be replaced. I have done many, many brake cylinders and never had a failure or leakage. Below you will find the pictures of the brakes, cylinders, etc. I also had some time to do some rust and crud removal on the inside of the drums, they cleaned up just fine. All in all, a very good day. However, no parts arrived today for the first time in about a month. Also did a total of hours spent so far, 154, not including the 48 hours getting the car. Tomorrow, some painting with Eastwood's black rust preventative/incapuslator. Going to do everything that is metal under the car.


-
Welcome To Olson's Gaskets! has them. Just give them a call or send them an email. They will fix you up.
-
Avanti R2, 1963, refresh
unimogjohn replied to unimogjohn's topic in Our Cars & Restoration Projects
It is Sunday, Nov. 8th; and a real nice day, in the 70s. Worked on the front brakes most of the day. Planned to take the calipers, pads, etc off for an inspection and possible re-use. Well, the calipers were frozen, pads broken off of their backing plates, hoses and pipes rusted, etc. The two of the calipers are frozen and will not retract. So after careful thought and looking at my wallet, I have decided to go with the Jim Turner/Turner Engineering disc brake conversion in the front, and keep my drum brakes in the rear. Hopefully I can sell some of my used stuff on ebay to re-coup some of the costs. Have ordered everything to complete the brake job now so just have to wait for parts to show up. Also decided to order the two transmission to radiator hoses that go to the transmission. I also ordered new plastic bushing for the idler arm system. Hopefully, this is the last of the major purchases to get the old girl back on the road. I am way over budget right now, but I will have a good reliable and safe car to drive. Here are pics of the calipers from the left side, the right side was just as bad.

-
I am in need of the two (right and left) hand bumper brackets for my 1928 Buick, model 29 Town Brougham. I have one bracket, but it is missing one of its connectors, but at least it has give me a serial number. It is BUI 18 and then either a L or R. Here are a couple of pics of the bracket, which shows the serial number location. I have a restored/correct bumper, just cannot mount it. If you have something just email me at Unimogjohn@aol.com Thanks.


-
Open car from the teens, ID as 1914 Paige Detroit
unimogjohn replied to unimogjohn's topic in What is it?
Chris, I think that you nailed it. Did a Google image search on several years, and came to the conclusion that it is indeed a 1914 Paige. Thanks for all your help. I would have never figured it out.

-
My neighbor came over and asked if I knew the maker and year of this car. He said is mother was riding in the passenger seat. She was born in 1900. I told him it looked like a teens car, but could not id it. So I decided to post it to this expert forum. TX, John

-
Avanti R2, 1963, refresh
unimogjohn replied to unimogjohn's topic in Our Cars & Restoration Projects
It is Saturday, Nov. 7th. Crack, it made me jump! Boy, that is quite a jolt when the rear drums give up. Got both drums off. Dirty, but not too bad. Cylinders do not look like they are leaking at least through the dust boots. They are going to be redone/replaced. The shoes are at the end of their life, no problem, was going to replace them too. The drums look very good, no scoring or lip on the end. Will measure them to see if they are still serviceable. Also took off the idler pulley system. The little plastic bushing need to be replaced, one was actually worn through. The bottom one had some rust as well. That is about it for today. Oh, I did get an email that the brake line kit had shipped and would be here on Monday/Tuesday.


-
Avanti R2, 1963, refresh
unimogjohn replied to unimogjohn's topic in Our Cars & Restoration Projects
Curt, I do not know if the sediment bowl is correct for the my Avanti. In my original workshop manual, tune up section, page five; it specifically talks about replacing the in-line fuel filter (not the glass bowl filter). In the engine section, page 3, figure 2, it has a picture of the R2 engine and it clearly shows the metal in line filter cannister. I guess it is up to you to decide what is correct for your car. Maybe the R1 has the glass filter. I am going to go with the factory picture and use the cannister when I am satisfied that my fuel system is clean. -
Avanti R2, 1963, refresh
unimogjohn replied to unimogjohn's topic in Our Cars & Restoration Projects
It is Friday, November 6th. A cold, but productive day. I do not like working in the cold especially when it is in the low 40s, but it is suppose to be back in the 60s for the next couple of days. I pressure washed again, still need to do it at least one more time as I continue to find big gobs of grease and dirt that I did not get or see previously. Really starting to sparkle. I did take off the power steering and alternator belts and replaced them. The power steering pump does have significant play in it, but is not leaking and seems to be OK. I know I have some part leaking as I can see the little puddle of cherry juice on the ground. Just another thing to work on at some point. I also took a look at the bad patches of paint on the back deck and top of the car. I took some heavy duty rubbing compound and my polisher, and decided to see if I could get some of it off. It looks like the previous owner had something over the car that actually ate into the paint. The pics below will show what it looked like, and another couple that show what it looked like after a couple of hours of polishing away. It did not completely come out, but with another hour or so, it just may. Also took a video of the car running with its new tail pipes. A bit of smoke, but was just after start up and it was cold. The car is running a bit rich. Tomorrow I do plan to take off the supercharger idler pulley, just ran out of time today. Also will make the first attempt at removing the rear drums. As a note, I still have a firm brake pedal so the bleeding was successful and there are no leaks in the system.


-
Avanti R2, 1963, refresh
unimogjohn replied to unimogjohn's topic in Our Cars & Restoration Projects
Curt, Studebaker Intl has the kits for $60. Page 160 of their catalog. Part number 1558925. They also list a fuel pump for $160, Page 160 of their catalog, part number 1557015 for the R2, and $156.50, part number 1557213 for the R1. Studebaker Auto Parts @ Studebaker International -
Avanti R2, 1963, refresh
unimogjohn replied to unimogjohn's topic in Our Cars & Restoration Projects
Here are a few more pics of the Avanti under restoration. This is how it looks today.


-
Avanti R2, 1963, refresh
unimogjohn replied to unimogjohn's topic in Our Cars & Restoration Projects
I have had several requests for information on the Avanti that I am helping moving around. I get progress pictures from time to time so will post them as I get them. The car is a R2, originally gold, but now going to Avanti Maroon. Has four speed tranny. Owner has just about completed the engine, car is in for paint, transmission is done. He has two others that will be restored at some point. Has owned this one since the 70s. He has many, many old cars, most from the teens and twentys. He is a restoration master. So if you are following this thread, you will get two Avantis to follow. I will keep them separate as much as I can.


-
Avanti R2, 1963, refresh
unimogjohn replied to unimogjohn's topic in Our Cars & Restoration Projects
Ernie, it says in the workshop manual to oil the plastic sleeves, what should I use? I was planning to use just standard motor oil. Yes, I have all new belts to include two matching for the supercharger. I bought them from a Avanti/Studebaker supplier.