


unimogjohn
-
Posts
4,151 -
Joined
-
Last visited
-
Days Won
2
Content Type
Forums
Gallery
Events
Everything posted by unimogjohn
-

Avanti R2, 1963, refresh
unimogjohn replied to unimogjohn's topic in Our Cars & Restoration Projects
It is Friday, March 31st. OMG, I am bleeding ......... Actually going to bleed the brakes this afternoon. Finished installing the rear brakes this morning and into the early afternoon. I really enjoy taking my time with brakes. Fun. Here are the pics from today. And the new trailer hitch should arrive today also. At 4 AM this morning it was 30 miles away in Winchester, VA.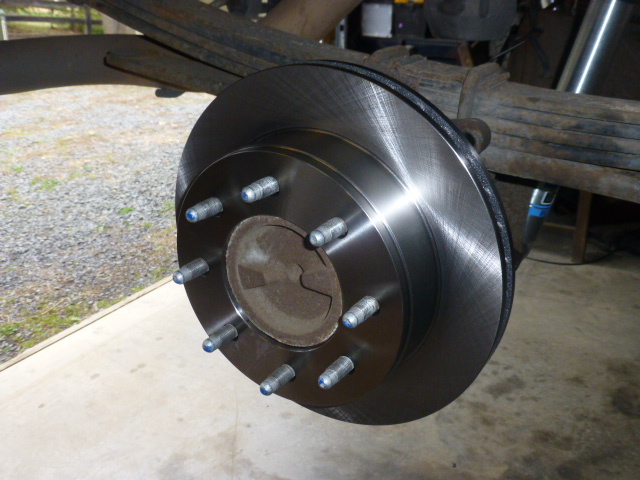


-
Avanti R2, 1963, refresh
unimogjohn replied to unimogjohn's topic in Our Cars & Restoration Projects
Still Thursday. Yahoo!!!!!! The rear brakes from Canada arrived late this afternoon. I hauled them to the garage and did a quick inspection. Everything looks great. It is suppose to rain all day tomorrow. A good day to spend inside the garage. It should only take me a hour or so to put them on. Then I will gravity bleed the system.


-
Avanti R2, 1963, refresh
unimogjohn replied to unimogjohn's topic in Our Cars & Restoration Projects
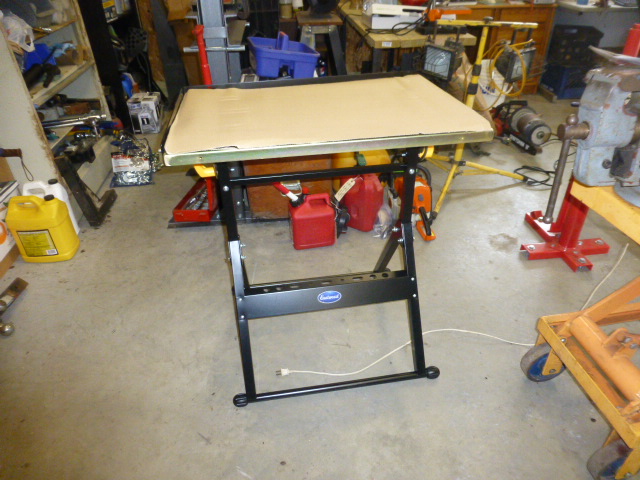
Thursday, March 30th. Dead in the water with the Suburban, waiting for the brake parts and trailer hitch to be dropped at my door. But I did order and assemble a little welding table from Eastwood. Bought it online a few days ago with one of their free shipping and 10% off deals. So for $62 how could I go wrong. Besides Alice has been beating on me not to use her wooden portable table even if it was covered with cardboard. Well, she got her wish. The table is well made and is of good fit and finish. Should last me a long time. It took about 45 minutes to assemble. I am slow. Here are the old and new table.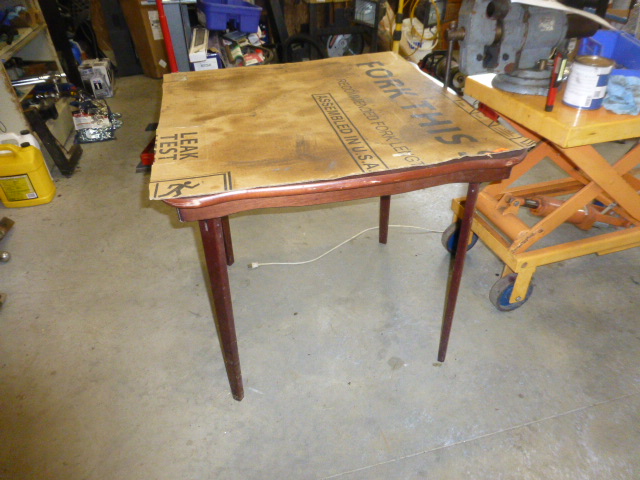


-
Tom, my 28 did not have any webbing when I got it in 1984. And no instructions as I remember. I bought some surplus mechanical belt and cut it to size. I do not know if the following is right or wrong, but it is how I installed them. Pre-load. I just made sure that at rest with the wheels on the ground, about an inch of preload. As I remember a wedge goes in the rectangle hole to hold the webbing in place. In taking pics in a confined space I really could not see how I attached them. Hopefully, the pics will give you an idea. If you cannot figure it out I will pull the car out of its resting place and take a closer look.


-
I use a gloss Tung Oil finish. Does not chip or flake off. Apply every couple years to keep up the gloss. Easy to apply with just a rag. I usually put on three or four coats.
-
Avanti R2, 1963, refresh
unimogjohn replied to unimogjohn's topic in Our Cars & Restoration Projects
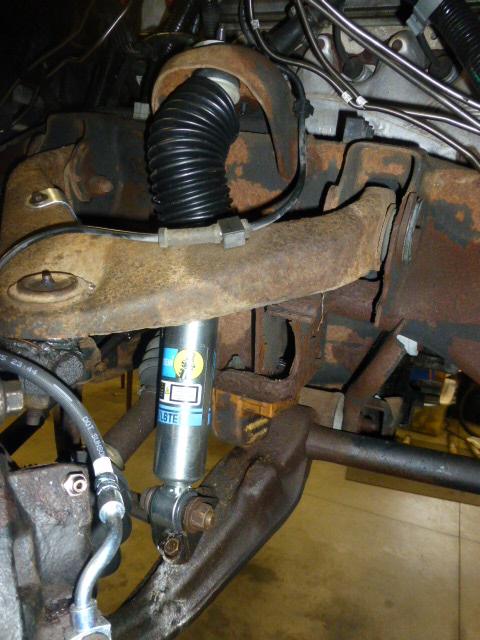
Still Tuesday. Could not stand it............. Installed the shocks. Another project done.


-
Avanti R2, 1963, refresh
unimogjohn replied to unimogjohn's topic in Our Cars & Restoration Projects
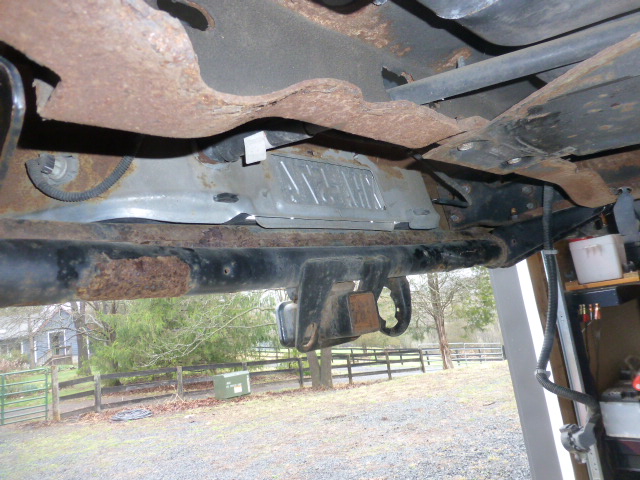
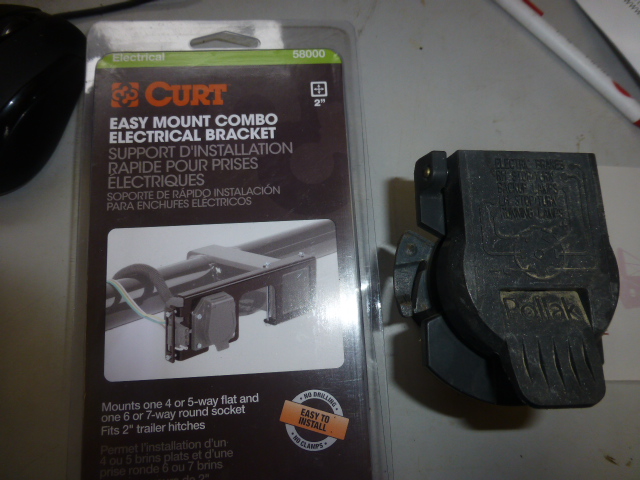
Tuesday, early PM. Up and at it this morning. All four shocks are off. The fronts were actually OK, but the rears were shot. Glad that I am changing them. The UPS truck just arrived with the four new shocks. They will go on tomorrow for sure. Pulled the trailer hitch receiver, 8 big bolts held it on, so with a lot of Liquid Wrench they all spun off. The seven way electric connector is specific to the GM hitch. It is a twist and turn to lock plug. The new Curt cover is a bolt on type. I did not want to buy a new plug, so used the Dremel tool with a little cut off wheel to remove the attachments that held it into the GM base plate. I was then able to use the remnant of the twist attachment and a little bolt to hold it firmly in place on the new Curt plate. Saved about $25 for the cost of a new connector. Did some clean-up on the rear end cover. Brushed off all of the bad stuff and then gave it a good coat of Eastwood's Encapsulator paint. Waiting on the brake rotors and pads to arrive. Hopefully, tomorrow. Also waiting on the trailer hitch receiver.


-
There are many wireless turn signals (rear) for bicycles. All are self contained. Do a Google search and you will find many or visit your nearby bike shop. While not perfect, they are better than nothing at all. Today's drivers no nothing of hand signals, they just wave back.
-
Avanti R2, 1963, refresh
unimogjohn replied to unimogjohn's topic in Our Cars & Restoration Projects
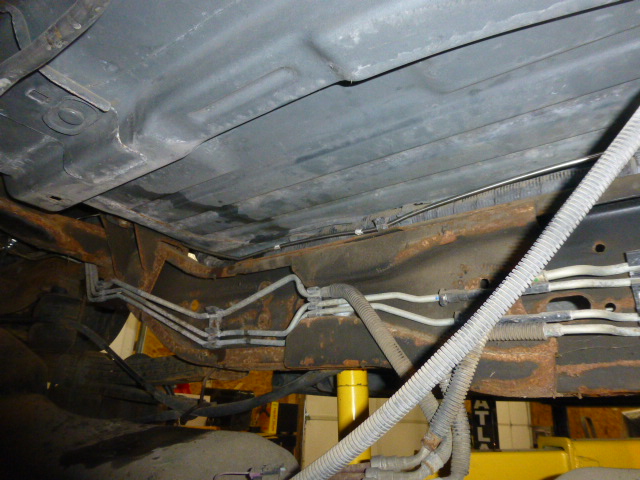
sIt is Sunday, PM. I must admit, this job kicked my butt. It is easily a 10/10 for difficult work. Camaro Steve came over this morning to help me run the brake lines. We dropped the main gas tank and it easily came down to the point where we could cut out the brake line. However, installing the new brake line was troublesome. Lots of bends and cramped spaces. But we got it done. Then we tacked the front two brake lines. OMG what an ordeal getting them fitted plumbed into the ABS unit. Steve did it and it took him almost three hours, but he got in all five lines into the controller. I concentrated on the lines from the controller to each wheel. All the bends put into the lines did not match up with anything. So I had to do a lot of rebending. Got it done, but it certainly does not look factory with all the lines tight to the frame, looks more like a humpback whale. The lines were just too long to lay flat. Oh well, they are done and are not going to come back out for sure. The only things left to do on the brakes is to replace the master cylinder and bleed the system. I decided to buy new Bilstein HD shocks so I pulled the KYB front shocks and have started on the rears. I ran out of gas so to speak in the late PM so will finish up tomorrow.


-
Avanti R2, 1963, refresh
unimogjohn replied to unimogjohn's topic in Our Cars & Restoration Projects
Spinneyhill, I will inspect that caliper this afternoon, and let you know what I find out. -
Avanti R2, 1963, refresh
unimogjohn replied to unimogjohn's topic in Our Cars & Restoration Projects
It is Friday, must be the day for farm chores and maintenance. But I did get a couple of hours with the Suburban. The rear brake lines are fitted and lines tight. One item done. I then put on the new plastic wire loom on the main harness. Another item done. I have decided to replace the brake master cylinder. Only two easy to get to nuts to get it off. Might as well since there is no fluid in the unit now, and probably good insurance. i did not like the fact that I lost all braking even with a dual master cylinder; and the low fluid light on the dash did not go on either. The cost was $80 including tax for a new AC Delco. Shipping was free. I also decided to upgrade the towing receiver with a class V, 12000 lb unit. Pulling the big 26 foot trailer with a big car inside is probably maxing out the factory unit. So for $130 shipped to my door I am upgrading to a Draw-Tite unit. Talked to Corvette Wayne re removing the gas tank as he replaced the brake lines on his Suburban last year. He said that you do not have to remove it, just drop it own about 6 to 8 inches so you can remove the brake line from its clips on the frame rail. I also was able to loosen the line nut at the ABS controller so it looks like the line should come out easily once the tank is lowered. I hope I do not have to disconnect electrical and fuel lines. Forgot to ask about that. Well, another call back is warranted.


-
Avanti R2, 1963, refresh
unimogjohn replied to unimogjohn's topic in Our Cars & Restoration Projects
It is Thursday, PM. It was a good day for more truck work. First, here are a couple of pics of the spare tire. The front is much worse than the back. I bet the tire has never been down before. The first thing I tackled this morning was the removal of the rear calipers and rotors. Wow, the bolts holding on the caliper and it associated bracket were really on tight. Bet they were factory originals. I had to use a three foot cheater to get the start fasteners and bolts to break loose. The all gave up with a loud "crack". When they let loose I thought I had busted the socket. The brake pads were worn different on the outside, one was thicker than the other side. They are going to be replaced with new pads and rotors, which are coming from Canada at a cost of $66 for the pair. I bought from this Ebay company a couple of years ago for the Trailblazer's brake job. They are holding up well. Then I turned to draining the fuel. Got the hose off, and was sure glad it was still pliable It was not too much of a struggle to get it off. I drained out 25 gallons. Ten went into the Trailblazer, five in the van, and the last two will go back into the Suburban when the brake job is done. I then put on the brake lines for both rear wheels. They are connected and loosely fitted. Here are pics of today's activities. Worked non-stop from about 10 AM until 3 PM. Tomorrow's job will be to drop the main fuel tank. Now that should be fun.


-
Avanti R2, 1963, refresh
unimogjohn replied to unimogjohn's topic in Our Cars & Restoration Projects
Dale, you are most correct. To get the brake lines into the ABS controller you have to work your way out. Rear brake line first, ect, ect. So I will see if I have to remove one or both master cylinder lines before proceeding. With that end I did not run the two front brake hard lines. I did work on the rear brake lines. Got the old ones off to include the rubber lines and bleeders. Exact fit with the new hard lines, not so much. I had to stretch one line to get it to reach the junction. I did not mount the other side so I do not know if it will need an adjustment. I ordered two more bleeder valves for the calipers and rubber hose line clips. BTW I used Liquid Wrench on the hard lines, they broke loose with ease. I am impressed. Also decided to replace the rotors and pads on the rear brakes. Either do them now or in six months. Best to do them now. Ordered the parts from my favorite Canada brake vendor. And I think I have solved the gas removal problem. There is a filler hose between the lower/main tank and the upper tank. They are connected via a hose. I will see if I can get the end off and siphon the fuel out from there. Will try this tomorrow. To give me a little more room I decided to take off the spare tire. OMG what a job. It was so difficult to lower the tire and remove it. It took almost an hour. I guarantee you that you would not do this on the side of the road. I am not going to remount it, going to either carry it in the car or do without and call AAA if I have a problem. The tire, which looks to be original, is starting to dry rot, and the rim is rusty and really unusable as is. Lots of folks on YouTube hating this design. And finally...... There are many old pioneer farm houses in the area. This one, a mile down the road, has been overgrown for years and you could barely see it. The property owner decided to clean up the property, and the house reappeared. So neat. Wish it could be rehabbed.


-
Avanti R2, 1963, refresh
unimogjohn replied to unimogjohn's topic in Our Cars & Restoration Projects
It is Tuesday, PM. Got back home from Seattle late last night. Been thinking about the Suburban and its brakes the entire time we have been gone. So this morning I ran to the garage to see how much work I could get done. On a scale of difficulty, this is about a 8, maybe even 9, out of ten. I got all the brake lines disconnected and out. Actually, I cut them out. I got the two lines from the master cylinder to the ABS unit in and screwed in. It was so difficult to get the lines along the frame and through all the tight spaces. It also took a fare amount of time to get the lines screwed into the ABS unit. They had to be lined up just perfect for the threads to catch. I also installed the new rubber brake hoses and bleeder screws. I also took the time to put in a new fuel filter, which was right in front of the ABS unit . That was a job in itself. I was hopeful that the fuel line would drain the tank, nope, the fuel pump must have a check valve in it. Here are the pics from todays work. Tomorrow I hope to get the lines attached to the master cylinder, and then to run the lines to the brake calipers. I have not idea how I m going to get the lines in place. Going to be an ordeal for sure.


-
A MODEL A RESTORATION LIKE NEVER BEFORE
unimogjohn replied to Willie Wurke's topic in Our Cars & Restoration Projects
Would love to follow along the build. Welcome aboard. -
Avanti R2, 1963, refresh
unimogjohn replied to unimogjohn's topic in Our Cars & Restoration Projects
Still Sunday, spent an hour or so on the Suburban. Got the brake lines removed from the rubber lines, and the rubber lines off the car. Had a devil of a time removing the bleeders from the calipers, they were really rusted on there. But with heat and Kroil, and vise grips, I got them both off. Will get new ones tomorrow. The ones I got from Rock Auto were wrong, they had fine thread and longer than the ones on the truck. And they have a coarse thread. So will pick up the correct ones at NAPA tomorrow. Hope to take off the lines on the master brake this afternoon or tomorrow morning.
-
1950 Crosley Farm O Road Restoration and more
unimogjohn replied to dalef62's topic in Our Cars & Restoration Projects
Dale, everything looks great. Cannot wait until it is sitting on all fours and right side up. Thanks for keeping us updated. -
Avanti R2, 1963, refresh
unimogjohn replied to unimogjohn's topic in Our Cars & Restoration Projects
Frank, that is a great idea. I just bought a new fuel filter and was going to replace it in the when I replaced the brake lines. It is Sunday morning. Spent the day yesterday getting ready for a major snow storm. Lots to do on the farm to get ready. Predictions are all over the map, from 5 inches to 18. It is suppose to come in on Monday evening and last through Tuesday. Of course we are suppose to fly to Seattle on Tuesday morning. Looking iffy right now. The new fuel filter and special anti-corrosion marine spray came in yesterday. And I did get an hour or so to release the big plastic clip for the brake lines and wiring bundles. It is attached to the frame and holds everything in place. Not an easy piece to disconnect and remove. It looks like the driver's side brake line gave out first, but they were all ready to go. I am now ready to start removing the old brake lines.


-
Yes, you have to remove it from the inside out. DO NOT attempt to pry it out from the front. All you will do is destroy the badge itself. Here is what I recommend. The round disk is brazed to the back of the emblem. That is a very weak point, and easily snapped off. So you have to be very careful. Use your favorite rust penetrator, WD 40, Kroil, PB Blaster, or the AFT/acetone mix. Put it around the the disk and the shell, let it soak for 24 hours and keep applying the penetrator. You do not want to ding the disk with a punch to get it to move, that will misshapen the disk, and you will have a terrible time getting it straight/round again to fit easily back into the shell hole. Go through your socket set and find one that fits snugly on the disk, then gently tap all around the socket and see if there is any movement of the disk. If not put on more penetrator and try again, and again. At some point the disk will give up and push through the front of the shell. Make sure the emblem and shell are supported with something soft and has some give so as to not damage the badge or the shell. Good luck. Let us know how you do. I would not use any heat, as you will melt the disc from the badge. When you reassemble the badge into the shell, put some JBWeld dabs or heavy duty glue on the back edge of the disk. You do not want the badge to fall out the front.


-
Avanti R2, 1963, refresh
unimogjohn replied to unimogjohn's topic in Our Cars & Restoration Projects
Forgot, I may have to rethink my replacement of the rear brake line. You have to drop the gas tank a few inches to feed the new brake line over the tank. Corvette Wayne has lent me a ratchet style stand to do this, but the problem is that the tank is full of fuel, all 36 gallons. It is way too heavy to use the stand. I tried several times to put down a clear hose into the tank to pump out the fuel, but it keeps hitting some obstruction and will not go into the main tank. So I now plan to replace the the to master cylinder lines and the front brake lines, run the truck for a few weeks and then replace the rear lines when I have a near empty gas tank. Any other suggestions would be appreciated. -
Avanti R2, 1963, refresh
unimogjohn replied to unimogjohn's topic in Our Cars & Restoration Projects
It is Thursday, March 9th. Weather change is coming. Today it was 72 degrees and tomorrow it is going to be 37 degrees and frigid cold for next week or so. With the cold weather coming I had to prep the farm for the freezing temps. With that done I was able to put in a couple of hours on the Suburban. While I did not work on the brakes, I did work on the wiring harnesses that are along the frame rail with the brake lines. Both of the bundles were toast, the plastic looms just crumbled when you touched them. I had ordered a new loom for the smaller of the bundles, and have now ordered a 2 inch loom for the main bundle. I repaired the small bundle and have prepped the large bundle. Tomorrow I can turn my attention to the brake lines. Here are the pics.


-
Avanti R2, 1963, refresh
unimogjohn replied to unimogjohn's topic in Our Cars & Restoration Projects
JWL and David, thanks for the comments. I will keep the compressor below max for sure. A really good tip. It it Wednesday, March 8th. Jon (1937 Hudson Terraplane) and I headed out this morning with his 85 Honda in tow. Took about 90 minutes to get to the "shop". Actually, it is down a very long dirt road, about two miles or so, and on an old farm. The shop has been there since the 50's doing repairs for the community on stuff a normal repair business in town would not touch. Alex is the current owner. He has his workshop with one ancient lift, a storage area for his Studebakers and farm stuff, and then a barn that is crammed full of old parts, engines, transmissions (I was not taken in there). But Alex did show me the Avanti R2 engine and transmission that he just bought in CA and had shipped to the shop, his R1 yellow Avanti, which will get the R2 engine and manual transmission, and his Studebaker Avanti powered Hawk. The shop was like stepping back in time. Lots of old repair equipment, but still working. The shop had a rare 2 door 1956 Studebaker President in the background taking up space, it looked like it had been there forever. I had a great time talking to Alex. He is old school for sure. Here are pics of what I saw. And a pic of the new Eastwood blaster. Some of the brake rubber hoses came in today. So tomorrow I can start the replacement process. Going to take my time for sure.


-
Avanti R2, 1963, refresh
unimogjohn replied to unimogjohn's topic in Our Cars & Restoration Projects
Update. Amazon is sending me a new Optima battery. Just gotta love Amazon. And the Eastwood blaster arrived this afternoon too. It is a good day. Our local Tractor Supply has the special abrasive for it also. $7 for 50 lbs of the sand like material. Of course they have glass bead, etc for a much higher price. Most of my work will be done on thick metal. Sure glad now that I have that new, big air compressor. I am going to need that air power/volume for sure. -
Avanti R2, 1963, refresh
unimogjohn replied to unimogjohn's topic in Our Cars & Restoration Projects
Still Tuesday, but PM. The Avanti will not start again. The Optima battery discharges over night and when I put it on the charger the battery gets really hot to the touch. According to the WWW the battery probably has an internal short of some kind. Bought the battery from Amazon and they have a three year replacement policy, and this battery is about two and a half years old. So hopefully I will get a replacement. I got the new LED light bulbs in the little Kubota tractor. They work great. Had to glue in the bases to the headlight housing as the mounting tabs had all disintegrated. Pics of the old lights, the repairs, and installed. And Jon came over with is 1985 Honda Accord, and we put it up on the trailer for it trip to the shop. He has had the Honda since it was new. It now has 240,000 miles on it. He said that the engine and tranny are original and have never been opened up. And only one timing belt and one clutch. Looking under the car, it does need a new exhaust system. It is going to the shop for a carb rebuilt and a general tune-up.


