


cutdown
-
Posts
221 -
Joined
-
Last visited
Content Type
Forums
Gallery
Events
Everything posted by cutdown
-
Hi Mike. I think you are right. Looking at the photos of the seat frame, I can tell there are great similarities between yours and mine, so I think mine is original. Its probable that whatever support was used, had rotted away and someone has improvised. There are signs where repairs have been made on my body that suggest it had got very rusty. Our climate conditions in NZ are not very car friendly. Not like Aussie where it is mainly dry perhaps. I presume you live in the States. We'll get there. I am hoping to get my engine back this month so getting a bit concerned that I wont have the seat finished before I am ready to drive the car.
-
Mike, in the other post here has a different version [ 1925 ] than the one I have. Can anyone shed any light on what's missing from mine. I am missing the bits that attach the seat back to the car. My car had an unfinished seat fitted, where the back was just hanging off the wooden strip by 2 pieces of cotton cloth strap. The seat cover was fitted the same way, but never finished at the edges or the bottom. Mine also had a boxwood lattice resting up against the back of the seat body.

-
Hi Mike. Thanks for that. As you can see from the below photos, there quite a bit missing from mine. Mine has a wire frame around both edges whereas yours shows the solid frame [ which appears to be the rear frame for the seat ] that is attached to the car. The 2 rear uprights on mine are made of the same material as the 3 rear cross pieces. Yours shows the rear frame is more solid looking with the three cross pieces like mine attached to the solid frame and has 3 supporting wires attached between top and bottom of the front wire frame. Mine has 2 pairs of supporting wires that cross vertically between opposite wire frames ie front wire to back wire. Looks like its true. All Dodges are not the same. The front wire frame on mine is attached to the springs one coill back from the end as well.


-
An interesting point about that picture is also that I was able to make use of the buggered shackle pins as pins in my axle stands which I made to do the job.
-
Hi Mike. Are you able to show some extra shots of the back frame for the front seat and dimensions please. The back of the main surface of my seat has had a section welded in probably as it must have been very rusty, and lost those 3 uprights pictured above. Many thanks Dereck
-
Hi Ron. If you look closely, you will see the grease nipple.
-
I had to remove the rear guards to enable better access to the front of the rear springs. since they have fitted 21 inch wheels on the rear, in order to have a lower deck, it has put the access to the front of the springs out of alignment with the access hole in the box section. I had another look today and decided the tray is a bit too low so will remove it and see if a 20 wooden space will be enough to lift it in order that the guards will fit again giving better access to the spring mounting area . As I have used new 5/8 UNF bolts for the pins, they have a bigger head that the original and hence not enough room to get a socket on them. If I have to replace the bolts in future, it will make the job easier. Buggered if I know why the image is upside down,. It's the right way up in my computer. Just turn your monitor over.

-
I have successfully rebuilt and re-upholstered the seat squab. It looks ok [ for a first time job ]. I removed the seat back frame and found that there are bits missing. :Looking at Mikes picture, i am missing the 3 uprights that the seat is supposed to plug into and I am also missing the the matching pieces that plug into he previous 3 uprights, that are supposed to be connected to the seat-back frame. Someone has positioned a boxwood lattice [ that is full of borer ] and just held up the frame with cotton straps tacked to the wooden bead around the seat back. Looks like I am going to have to make up those bits. I also noticed the main seat frame is a bit flimsy. Have to sort that out as it form s the back of the cab in front of the tray.


-
My seat is made from Lyonide Moose Black. I purchased some more of it to finish the seat better that it was [ as per previous post of mine ] and got enough do the whole seat squab again using the fold stitching technique which was in the video you sent on to me. Once you have done that, you may decide it looks so good you will be happy to use that permanently.
-
Mike. I suggest you make the first seat cover out of vinyl in order to get it right. Then get some hide and make the real one. Wish I had one of those sewing machines.
-
I have been sorting out taps and dies at our "Men's Shed" for ages. [ heaps of double and 12x ups to sort out. ] Today I came across a no 12-32. I looked at the wall chart and saw it started at 1 right up to 12 then 1/8 upwards. Cant remember but I think there may have been a couple of number not listed on the chart. Ron. You were bloody lucky to get that undone. How many do you need. there may be more available in Aussie or NZ.
-
Once I have this car back on the road I will probably understand all the driving hints you are giving me. I have only once driven one of these and it was a bit scary at first. Heavy steering and a tendency not to self steer [ or that's how it felt ]. Brakes that need a lead time before you need to stop. Its all stuff I will sort out once i get it on the road. Still l probably will be waiting another month before I get my engine back, then have to refit everything and check it out. Re registering it is going to take time because I basically cant do anything till it's finished and the VCC man has seen it.
-
Definitely 7/32 or 5.55mm. One owner I know showed me a better way to start these cars. He removed the float bowl top, turned the tap on his fuel pump, and raised the fuel level above normal, turned off the tap and refitted the top of the float bowl. Turned on the tap and started his car not trouble. Less messy and quicker. Another tip he gave me. Start it in gear with clutch depressed. That way you can get it going without graunching the gears.
-
All finished. Made 2 keys from my dummy switch. All good now There was only 1 screw left with the switch. 5/32" x 32 TPI. I had a few longer ones around so shortened them to the right size. Funny though. My screws are a slightly looser fit in the switch than the supposedly original screw, Never mind, they don't need to be fastened that tight.
-
7/32" O D and 32 TPI
-
My seat squab was sewn without folding the top layer over before stitching. You can see the stitches. Where he has demonstrated narrowing down the end by rolling over the ends , I have narrowed down the ends by stitching from below to Vee the seem down to get the correct distance between seems on the flat surface. Its simply my way of working out what to do. I probably should have found a video like that, but my way does not create the directional roll at the end. End result is the same though. My stuffing looks like old rags stuffed into nylon stockings, then pulled through. Great video. Many thanks. I don't have an industrial sewing machine so I have hand stitched those seems as you can see. I will probably have to hand stitch the skirt to the squab as well. When its fitted to the seat frame, the wrinkles will disappear.


-
Thanks Mike. The previous owner has tacked the top of the seat back to the frame. Your pictures explain it well. The tubes I mentioned are like in your picture. 11 across the seat squab. Each "TUBE " measures approx 85-90 mm across [ stitching to stitching. If you draw the ends across, you may spread the unfilled section to 110 mm. if you stitch that to the skirt without tapering the ends of the tube, your skirt will measure up to 200 mm wider than your seat squab, so you have to pucker it to make it fit the base. I think you get the drift. Do you know if the seat base is compressed slightly when the upholstery is fitted. I am going to make up a "canvas" cover for the base prior to fitting the vinyl so need to know the size to make it. All the best and many thanks. I can keep working now knowing what to expect. I ordered enough of the vinyl last Thursday to finish the squab, and to make sure it is the same colour etc.
-
They are expensive keys. I spent a lot of time making the key blank that I might as well finish the job, now i know exactly what to do with this lock. Very hard to tell what the number is but it may be DB78 or possible DB18
-
I dreamed about that switch last night. I didn't mention that one of the springs on the head lamp rotator was missing. I realized last night, that there ought to have been a spring under the mag cut out rotator as well. That would spring load the rotator against the contacts and also earth them out as well. That's why they would only earth out yesterday when the key was right in. I also thought about how I could shape my dummy key to work with the detents. Very simple in this case. Thanks for the info on the keys you guys. I have at least a month now till I get the engine back so I can concentrate on the upholstery now. Looking at my lock again, I can't tell what the number is. Doesn't matter anyway as I have mixed up the tumblers now. Bugger.
-
I removed the switch from the Dodge yesterday and managed to free it up but it would not pass any current. Could not get it apart so had to bend the 3 tags away to let the pins pass when unscrewing it. I worked out how it was supposed to operate then went about cleaning all the contacts. That got it working so lubed them with so silicone grease. I stripped the whole mechanism for the mag short out and made a key blank [ after removing the 9 brass interlocks for later work ] then had to make a key blank to test the operation. It appears the mag can only be shorted out if the key contacts the revolving cut out disc. I have rebuilt the switch temporarily just to get things going, and will add a bypass so that the key does not have to be the main contact when stopping the engine. Looks like I will need to order a key blank. Would anyone know where I could get one.
-
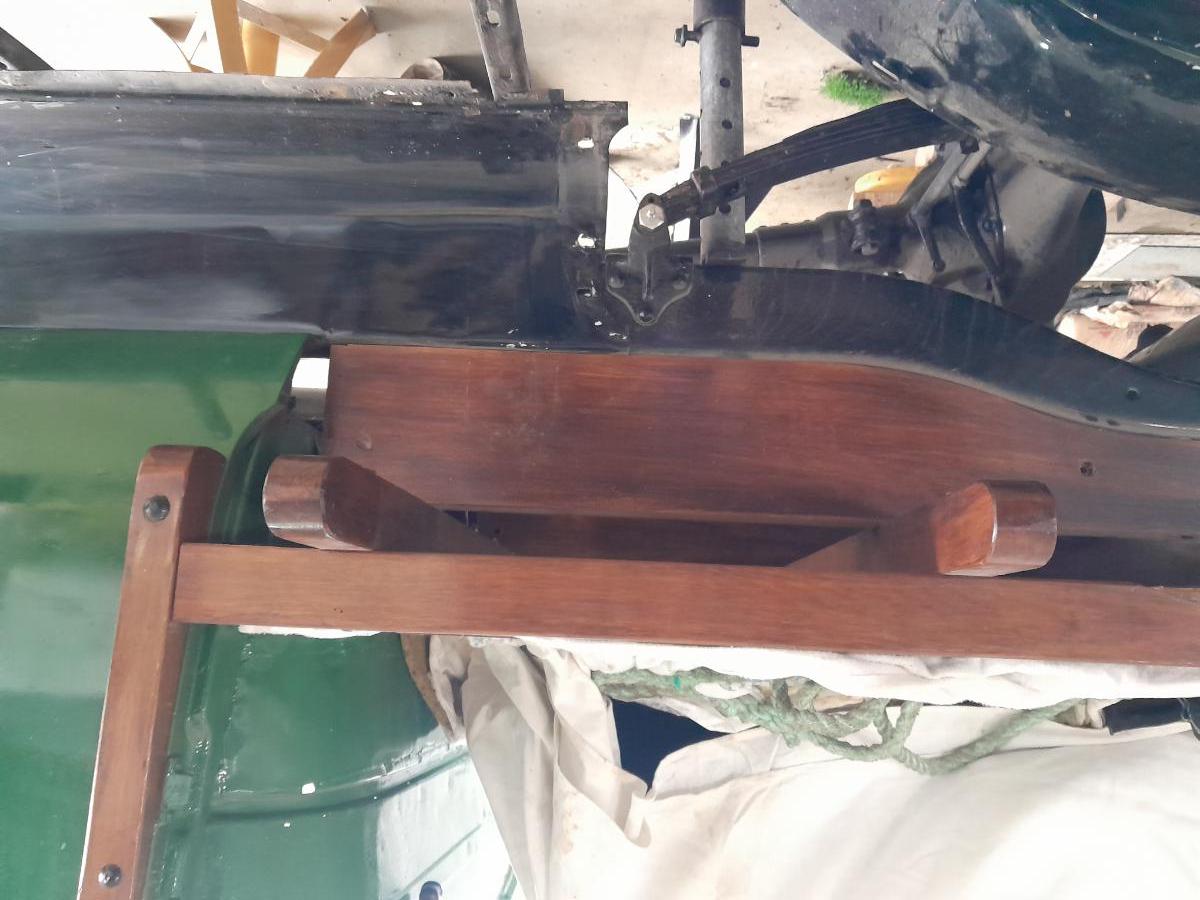
After studying the attempt to redo my seat by a previous owner, I decided it was all wrong, so stripped it completely. I had to repar the 3 fore and afte braces then sort out the spring locations. The front of the seat frame now sits 8 1/2 inches high at the front. Looks like the original cloth covering of the frame showed it sat 7 1/2 inches high. My upholstery is approx 2 1/4 thick above this. Does this seem right. I also need to see photos of the details of the front seat, how it looks and how the back is secured to the seat frame. I haven't removed the back of the seat and it looks like a half assed attempt to install it. two pics below show what i am up to. After fixing the frame, I loosely sewed a pc of synthetic canvas to the top. I cut a pc of carpet to fit over that and in the pic you can see the original pc of cushioning that came with the seat. The seat cover has been partially restored by me. The original owner had not narrowed the front edge of the cover where the tubing look joined the front skirt. As a result when they fixed the skirt to the frame, it had to be gather in various places because it was too wide compared to the seat. [ sorry I dont know what you call this type a seat design. the width of the "tubes was approx 88mm, but the material to do this was 95-100 mm wide. It should have tapered down to match the width of the "tube effect" of 88mm ] The original repairer of this seat had winched the top done with a whole lot of nylon stockings so the the skirt they joined with the seat top was only 5 inches wide and the top frame was bent and twisted out of shape..


-
records of Dodges shipped to nz. re 23 car
cutdown replied to cutdown's topic in Dodge & Dodge Brothers
I have spoken to some VCC club members in Whangarei and got in touch with the man who does the checking of the vehicles for authenticity and that they actually exist. You have to start the process with the VCC. This is what his reply to me was. Hi l am the person to contact as l do the inspections but not until the vehicle is assembled + photographed . you need to fill in the usual application forms 7pages. if you contact the V C C website you can get forms for this or your local secretary . [ I have left off personal details. You can PM me for more info, but I am a novice. ] You need to be able to give some idea of its history [ who you bought it off etc ] as far as you know, and also send of 3 copies of photographs of the completed vehicle. If there is anything on the car that proves it was registered in NZ before, then you are halfway there. A rego sticker or photos of the car with previous rego plates. -
You have to be able to hold the bolt [ and nut ] in order to snap the bolt. If you cant when access is impossible. .???????
-
Finished remaking and rebuilding the suspensions on the Dodge today. A lot of work. When boring the bolts for the grease supply, I must have had to re-sharpen that 1/8 drill 40 times. Lots of hard spots in those HT bolts. It was a good drill though because I tried using what must have been a cheap set for DIY and it wouldn't look at it. Only problem with the rebuild was when removing the left rear guard. The idiot that put it together used ordinary slotted screws with square nuts. He had fitted the screws from inside the housing that covers the 5/8 bolts at the front of the rear spring. Could not get a screw driver onto the heads apart from at right angles and the square nuts, being close to the chassis edge meant only 1/8 turn of the nut at a time. To cap it off. One of the bolts was 1 1/2 inch long. I did manage to get vise grips onto that nut but it was a hell of a job getting it undone. Bugger me though, when I got the nut off, I discovered the lovely chap had put 2 nuts on this bolt. The bottom bolt would not come loose so I had to hacksaw it partly through in for positions them get the vise grip to break the nut away from the bolt. Too much bending over has given me a sore back so wont be doing to much over this weekend. Spoke to the engine reconditioner again on Friday and not definite time for completion so probably another 2 weeks to wait.
-
Got it sorted. The Auto Sparky sold me clockwise spun cable, which is the correct type for anticlockwise drive.


