


1930 Kram66
-
Posts
196 -
Joined
-
Last visited
Content Type
Forums
Gallery
Events
Posts posted by 1930 Kram66
-
-
The boss let me spend some time on the sewing machine over the holidays.....
I finished the side curtains finally.
Cheer's Mark


-
 3
3
-
-
Worked back a few hours yesterday to finish up the rest of the inserts for the side curtains before knocking off work for 3 weeks. ( yippee !!!)


Merry Christmas to all.
Cheers Mark
-
2
-
-
Since my last post I have made the side curtain frames for all 4 doors, I had one original to copy from- they are made from 3/8 inch round bar bent into a rectangular shape ( I made a simple jig using the original for reference to make them the same size and shape ) the ends are welded together. Two small spigots are welded on the lower rail of each frame to allow the curtain to plug into the inserts on each door.
Also, I am in the process of turning up some curtain inserts for the top's of the door's, from 1inch diameter aluminium round bar on the lathe at work, have made 4 at this time.
I have finished both the rear most curtains and have just finished the drivers side rear door curtain to-day.
I have been giving the side curtain window 's some thought - hence the blue tape - not sure which way to go, small like original style or larger for better visibility. Either way they will be not the best to see out of, but I probably wont be driving it in the rain anyway, right?
Cheer's Mark


-
2
-
-
Some more progress ......
Basically all the panels for the roof are now made and tacked in position. Next job is applying the edge binding. and fitting the rear window frame. But ....
Having trouble getting the edge binding that I want to use, apparently I wont see it until next year now. So I will move on to the side curtains while I am waiting for the binding to show up. That will certainly keep me busy, as I need to make the metal frame's for each door as well.
Cheer's Mark


-
3
-
-
Thanks Matt
Enjoy your day in the shed 😊, we need more old Chrysler's out there.
-
The fun continues......
Finished the practice run on the roof......Fit's like a cheap suit, but I learnt what not to do.
Undeterred by my less than mediocre effort I decided to actually start cutting out the "good" stuff while all of this was still fresh in my mind.
Here is my progress to date, slow and steady as she go's.
Cheer's Mark


-
4
-
-
Let the FUN begin.....
Using my plastic templates, I cut out 2 left, 2 centre and 2 right curtain shapes.( inside and outside pieces) Next I joined each panel halves together, sewing very close to the edge's all around the shape ( making a double layer shape).Using a combination of double sided tape, tack's, magnets and spring clamps I positioned the parts on the car. Once happy I marked the position's of the lift the dot posts at this time.
I used small self tappers ( just for mock up) to hold the bottom of the curtain's in place and marked out the stitch lines and snap fastener location's.
Removed the parts again and sewed on some edge binding and ran stitches about 2 inches in from the edge's of each panel where required. Lot's of off and on with this work, so to help keep the panels from being refitted slightly off, I drove a few small nails in to act as positioning dowels. Finally I cut out and removed the inside layer of material very close to the stitch line just mentioned. This double layer is only need where fastener's are placed. I am not planning on actually fitting any fasteners to these mock up pieces at this time - but that may change as things progress- I may need the practice !
On to the top center and side panels next.
I am very happy that I decided to have a practice run at this first. I learnt a lot ... better to balls up (which I did) on this cheaper material before using the good stuff. !!!
Cheer's Mark


-
5
-
-
Well, this is this week's effort......
I mocked up the roof in plastic sheet - so that I can make some templates to cut out the panel's required in top material and as well identify possible problem area's that I will have to deal with.
I see many 😐. - getting the fit correct around the exposed rear bow timber and also lots of fullness along the top side panels.
So at this stage I am going to wimp out cutting out expensive material, instead I am going to have a trail run making the top using ute torneau cover material. At least I will get more accurate pieces to use as template's on the good stuff.
Cheer's Mark.


-
3
-
-
Thanks,
To coin a well used phrase "How hard could it be! "
Let's say I am finding this work very challenging to say the least. To me, it shares a lot of thing's in common with wood work strangely enough- except wood does not wrinkle at the drop of a hat !
Also worth mentioning again -having access to information generously provided on this forum certainly help's too!
Cheers Mark
-
1
-
 1
1
-
 1
1
-
-
With the front bow covered I moved on to covering the remaining bows, I used some medium weight out door canvas material for this. I cut out strips of this material approximately 300mm wide - cut on the bias to allow the fabric to form around the curved sections of the bows.
Next the covered bows were refitted to the hood irons, so I could make the tensioning straps that hold the second to rear bow in it's correct position relative to the rear bow.
For these I used some top material- cut into strips about 150mm wide and folded it on it's self twice to form a strap 50mm wide.
Now with the roof structure assembled I could start making the top pads - for these I used top material for the bottom part ( visible from the inside) and heavy cotton drill fabric for the top pieces (not visible) that cover the jute webbing and padding -these flaps are hand sewn together on completion.
Finally after fitting the top pads I nervously lowered the roof just to make sure all was well. To my surprise no ripping sounds were heard !!!
The next task is making patterns for the roof pieces.
Cheers Mark


-
3
-
-
Hi Gunsmoke,
Once again, thanks for your interest in my project.
Let's see if I can help, by "pocket" -you mean the thing I called a visor?
I should have taken more pictures of how I did this part so I will try and explain the steps.
1/ As mentioned in my post I covered the front bow and the visor in the same material that the top is made from.
2/ Next I cut out a piece of metal ( 20ga gal sheet) to fit between the mounting brackets on the inside of the bow, it's deep enough to bridge the gap between the bow and the top of the windscreen frame. In my case It is approx. 4inches wide by 42 inches long. It also has a slight curve formed in it that allows for some padding to sit in -along the top of the windscreen frame.
3/ This metal piece is screwed to the underside of the bow with 9 - 10 screws. Holes are pre- drilled in the bow before covering, and the uncovered at this stage metal piece is fitted after covering the front bow.
4/ With the bow covered you need to find the pre-drilled holes (use an awl), next sandwich a piece of top material sized to wrap around the metal part and large enough to be tacked to the top of the bow between the bow and the metal part.
5/ Screw the metal part on then wrap the material back and around the metal and pull it up to the top of the bow and place some tacks, also place some padding on the underside at this time.
6/ Tuck the ends of the material into them selves on the ends between the mounting brackets.
Hope that makes sense. and answers your question.
If you are going to do your own top, the detail in the post from Hubert 25-25 is fantastic for taking a lot of the unknown about how to do this job.
Good luck with your project.
Cheers Mark
-
Firstly, I would like to thank Hugh Leidlein (Hubert_25-25) for posting some very informative information in the Pre-war Buick section on how he did his own convertible top. Anyone contemplating doing their own top will find this information invaluable.
I started by covering the front bow using 3 pieces of material, one long piece for the straight part of the bow, and 2 square pieces, cut on the bias of the material to cover the curved parts.
I also made a metal visor to fill the area between the top of the windscreen and the bottom of the front bow, this is also covered with material and provides a neat look to the windscreen and top junction and a seal on the top of the windscreen frame on the inside of the car.
Next job is covering the remaining bows and then making and fitting the tensioning straps.
Cheers Mark


-
2
-
-
While working on tensioning the hood bows, I soon worked out I needed some hood rests ( up until this point I was using a couple of pieces of dowel shoved into the rest mount holes on the side of the body to allow me to lower the hood and not have it crash into the rear of the car) so I made a couple of rests that will do the job for now, I would like to find some original ones if at all possible - still haven't found what I am looking for 😐
Also I decided to make a part for my front bumper bar- can't seem to locate the type I need 😐 - so this will do for the present. Finally I made a cover plate for the floor where the gear lever tower and hand brake lever live. To seal around the gear box tower I made a rubber gasket that pushes on to the tower before the plate is fitted, around the brake lever I used an off-cut of auto carpet underlay to help seal the slot that the lever to moves in. To hold the underlay in place, I cut out a metal shape slightly larger than the slot and sandwiched the underlay between the top plate and this with 4 small bolt and nuts.
The material for my top finally came in this week so I can now make a start on this part of the restoration, first job will be covering the front bow with top material.
Cheers Mark


-
2
-
-
G'day Ron,
Thanks for the compliment mate - as for the gaskets I got a repo set from Old Auto Rubber in Penrith NSW about six years ago.
Cheers Mark

-
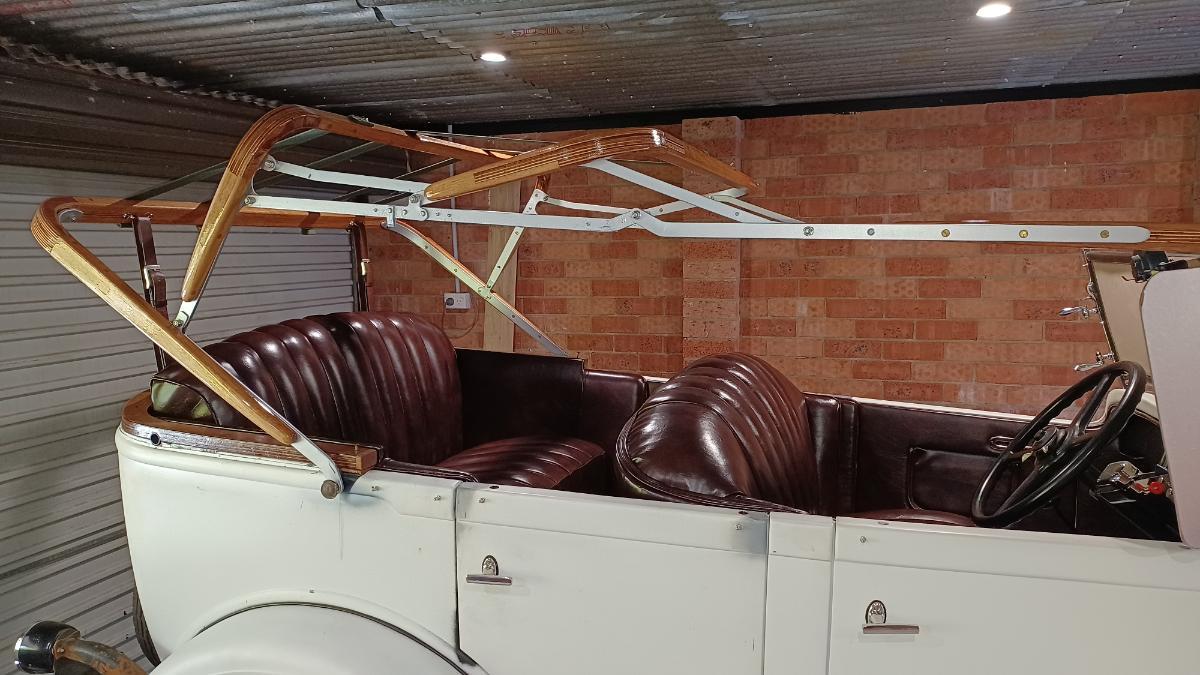
Spent the best part of today setting up the hood irons and bows.
The hood irons and bows on this car were buggered - that is the sockets that receive the ends of the bows were completely rusted out and all bows had broke at some time and had been patched with number 10 fencing wire and random bits of wood and nails - some time in the distant past.
Last year I made new bows and replaced the sockets with steel flat bar.
So today- firstly I attached 4 ratchet straps to the second and third bows and anchored them to the bumper bar mounting bracket.
Also I made some tension straps and attached them to the same bows. I will replace these later with straps made from the top material. Also I mounted tensioning belts to the rear bow.
Next I braced the fourth bow roughly where I thought it should go using a stick and a couple of wedges.
Then I started tensioning the ratchet straps to pull the second and third bows into their correct positions relative to the fourth bow which I had levelled to the windscreen bow.
When happy with how things looked I attached the tension straps to the fourth bow- thus holding the second and third bows and irons in place.
Next I slowly released the tension on the ratchet straps thus lowering the front irons down to meet the windscreen bow and finally screwed them in place.
After removing the ratchet straps much to my surprise it all stayed in place and did not sag in the middle- happy days.
Cheers Mark


-
1
-
-
Thanks Viv for that information. 😊
Well all the doors/pockets, side trims and seats are done. I think overall it all came out decent for my first attempt at upholstery.
I have started cutting out some underlay for the carpet in the rear section and under the rubber mat in the front.
All that's left to trim is the timber rail that runs behind the rear seat on the belt rail -it's going to have to wait until I set the hood irons, bows and tension straps in place.
So that's the next job.
Cheers Mark

-
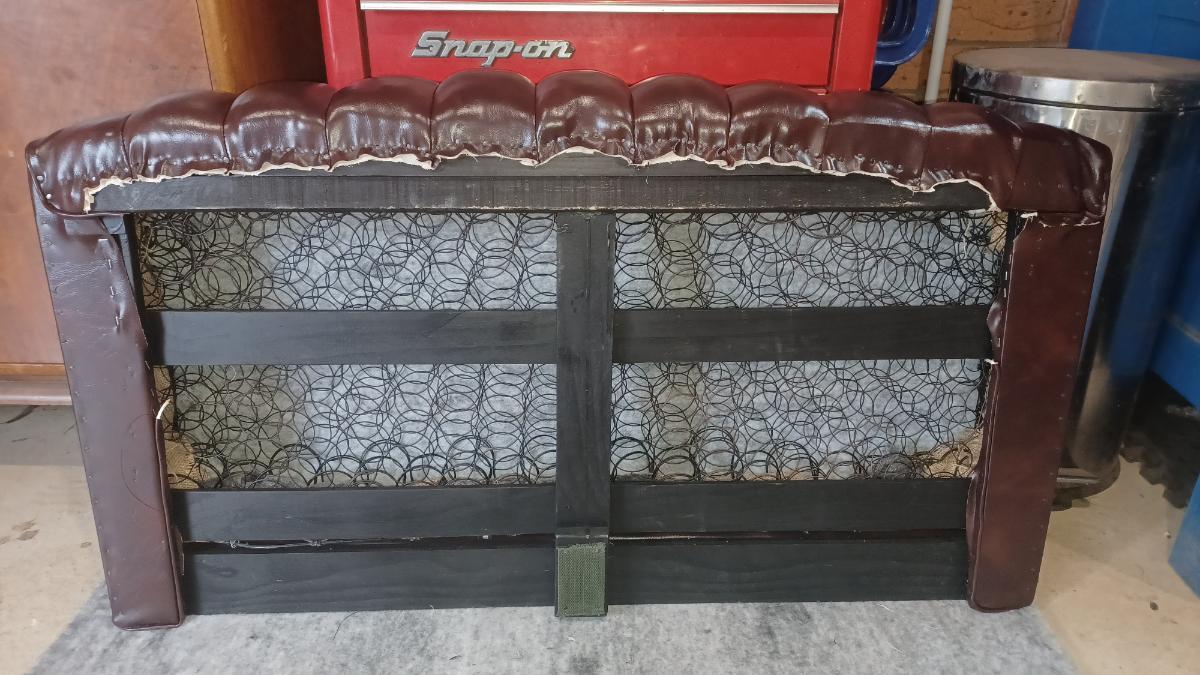
I finished sewing the cover for the rear seat back rest over the weekend.
Spent a couple of hours today fitting the completed cover to the seat frame.
Now that both front and rear seats are finished, all that is left to upholster are both rear door covers and pockets and covering the tack rail that runs around the body behind the rear set.
Cheers Mark


-
2
-
-
I put the escutcheon on the left front door today, while doing this I realised I have no idea as to how the actual pocket was made that goes behind the flap on the door, was it a actual box made out of fiber /cardboard or was it maybe a fabric bag of some sort?
I would really appreciate any input or idea's on this.
Cheers Mark


-
Vintageben - Thanks for the kind words and your continued interest in my little project, I appreciated it.
Cheers Mark
-
1
-
-
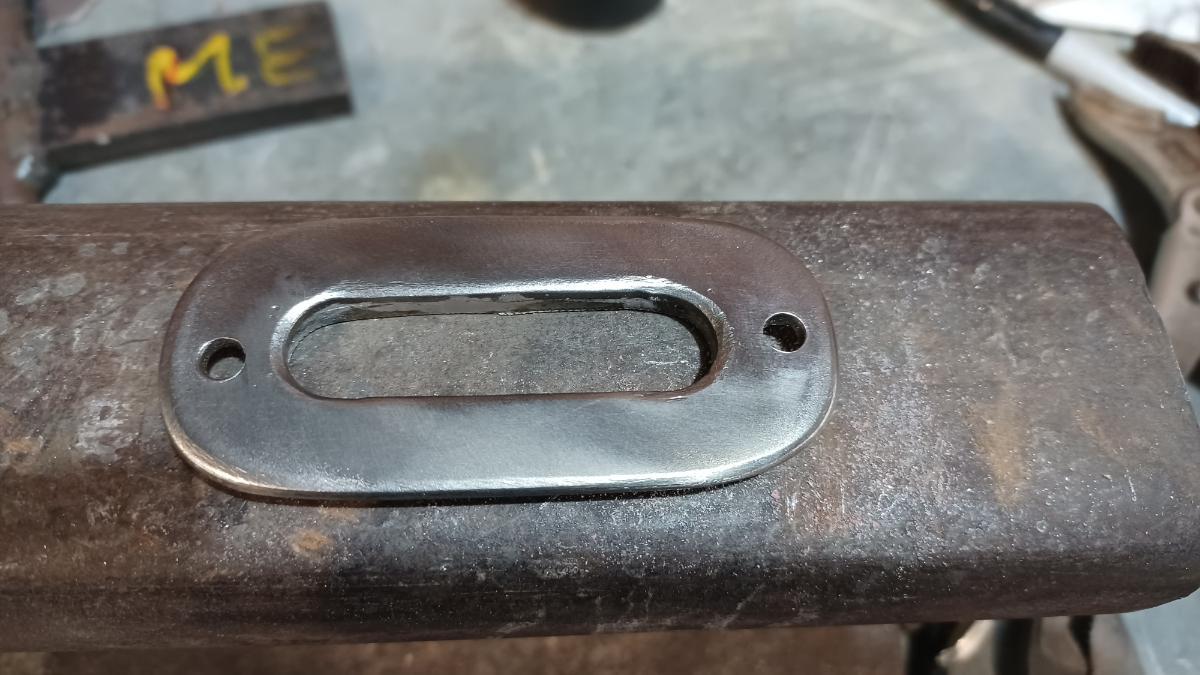
A few posts back I trimmed the front doors, at that time I was unsure as to how I was going to deal with the fact that I had no escutcheons to fit around any of the inside door handles, front or rear. So for a fun little job today I made a couple for the front doors.
I still may order reproductions ones down the track- when I save up enough 😀 However these will keep my eyes happy for now.
I had some 1/8 x1 1/2 inch steel flat bar, I cut 2 pieces 3 1/4 inches long, next drilled 2 1/2inch holes in each, next I cut a slot between the holes about 1 1/2inches long and finally drilled some holes for mounting screws. After the cutting and drilling was done I soldered a 1/8 inch wide strip of tin around the edge of the slot on the back to give a deeper look to the slot when viewed from the front. Next was shaping the radius on all the edges followed by sanding then polishing the completed parts, all that was left to do was to Nickel plate both of them.
Cheers Mark


-
1
-
-
Since my last post I have been working on the rear seat bottom cushion, at this point the cover is just pin tacked in position, Still need to work out some looseness on the rear panel and trim the surplus material on the base then finish tacking the cover in place. I will leave it for a few days before I finish tacking it for good.
Cheers Mark


-
2
-
-
Got the front seat assembly finished to-day and temporarily installed back in the car. 😊
Cheers Mark


-
6
-
-
Worked on the seat back today-not quite finished at this point but very close. May get a couple of hours on it tomorrow if the boss lets me.
Cheers Mark


-
3
-
-
When replacing Voltage regulators were I worked, our procedure was- prior to fitting the regulator to the vehicle- remove the cover and clean the contacts/points with contact cleaner to remove a protective coating on them. Do not sand them.
Next mount the regulator on the vehicle and connect the wiring.
Regulators do not need to be polarised, generators are polarised.
Next with a AVR meter connected we would start the vehicle and check the electrical settings and adjust as required.
As you may not have access to a AVR (Combined Amp and Voltage meter) to check if all is working as it should, I would suggest this-
Slacken the fan belt adjustment bolt on the Generator and remove the fan belt from the Generator pulley and tuck the belt out of the way.
Next with the cover still off the Regulator and the battery connected, manually close the cut-out points on the Regulator to cause the generator to "motor". Just push the contact with your finger, watch the generator and hopefully it will start spinning. Let it spin for a few seconds then open the contacts to stop it or just disconnect the battery.
This does two things -1 Proves that the generator works and 2- repolarises it at the same time.
If the Generator does not "motor" it is faulty and needs to be repaired. Good Luck.


The Fun of Early Chrysler’s 1928 Chrysler 72 Coupe
in Chrysler Products - General
Posted
Hi Vintageben,
Excellent new project..... I'm jealous, who doesn't like a basket case challenge 😊.
Here are a couple of pictures from the Fisher Body Service Manual.... it's worth tracking a copy down if you can.
Looking forward to seeing your progress on this one.
Cheer's Mark