


1930 Kram66
-
Posts
196 -
Joined
-
Last visited
Content Type
Forums
Gallery
Events
Posts posted by 1930 Kram66
-
-
Had a few spare days this week to continue with the front seat upholstery . I made the seat base top, front and rear panels and the back rest top panel. I stuffed the channels on the seat base with cotton - sorry no picture I got carried away and forgot , then and sewed the front and rear panels on ready to fit to the seat spring base. With a bit of luck it might fit.
Cheers Mark


-
Got the left front door trim and pocket in place- two down, two to go.
Because of my OCD 😀 I decided to cover the back of the front seat before moving on the the rear door trims.
First I glued on some padding, then cut out a piece of material big enough to cover the seat back.
I tacked it in place and massaged it in position, lots of pulling and tacking and re-tacking.
To finish of the bottom edge I made some hidem trim to cover the tacks and raw edge of the covering.
Cheers Mark


-
 2
2
-
-
Guess I am making a top boot for my 30 Chrysler Tourer now.😊
Thanks for showing how you did this in such detail.
Very nicely done.
-
1
-
-
Well, I found myself at the sewing machine again today, this latest lockdown has made me start the upholstery a bit earlier than I had anticipated, anyway got the drivers side door trim and pocket done today.
I am using a Singer 31k made in 1947, I got it from a guy who used it to completely reupholster a E type Jaguar in the 1980s.
One door down three to go.😀
Cheers Mark


-
4
-
-
As I have been pretending to be an upholsterer over the last week or so, I had a go at trimming the panels I made for the rear quarters. Many hours watching You-tube have given me next to no skill at upholstery so the best way to learn a new skill is to actually have a go at it and learn from your mistakes and I made many 😐 after a couple of aborted attempts this is what I came up with.
Cheers Mark


-
1
-
-
With the rear seat timber frames made I could now mount the spring frames to them. As I did not have an original set of springs to use I cut down a set from a 1959 model Mercedes Benz rear seat.
Luckily the Merc's seat was the same depth and height it was just a tad to long ,so I cut it down to the length needed. Next I cut some strips of metal to mount the springs to the timber frame.
Next job was covering the seat back and cushion with hessian.
Cheers Mark


-
2
-
-
Got the rear seat wood frames made and positioned in the car. I also was lucky enough to be able to reuse two pieces of original wood 😊 ( If you look closely they live on the top cross piece ) how good is that! I still need to mount a couple of hinges on the bottom cross piece to allow the seat to hinge forward and work out some sort of method of holding the seat against the top rail frame of the car behind the seat.
The seat base just locates on two dowels that protrude through the frame.
Cheers Mark


-
Excellent job, thanks for sharing this information will definitely help others with Chrysler 66's.😊
-
1
-
-
Hi Viv,
Once again great information and pictures, thank you. I know how much effort is involved in posting such a informative reply. its appreciated. Its very hard to find good photos of original detail, these pictures will definitely help me out and more importantly other's reading this thread in the future.
Cheers Mark
-
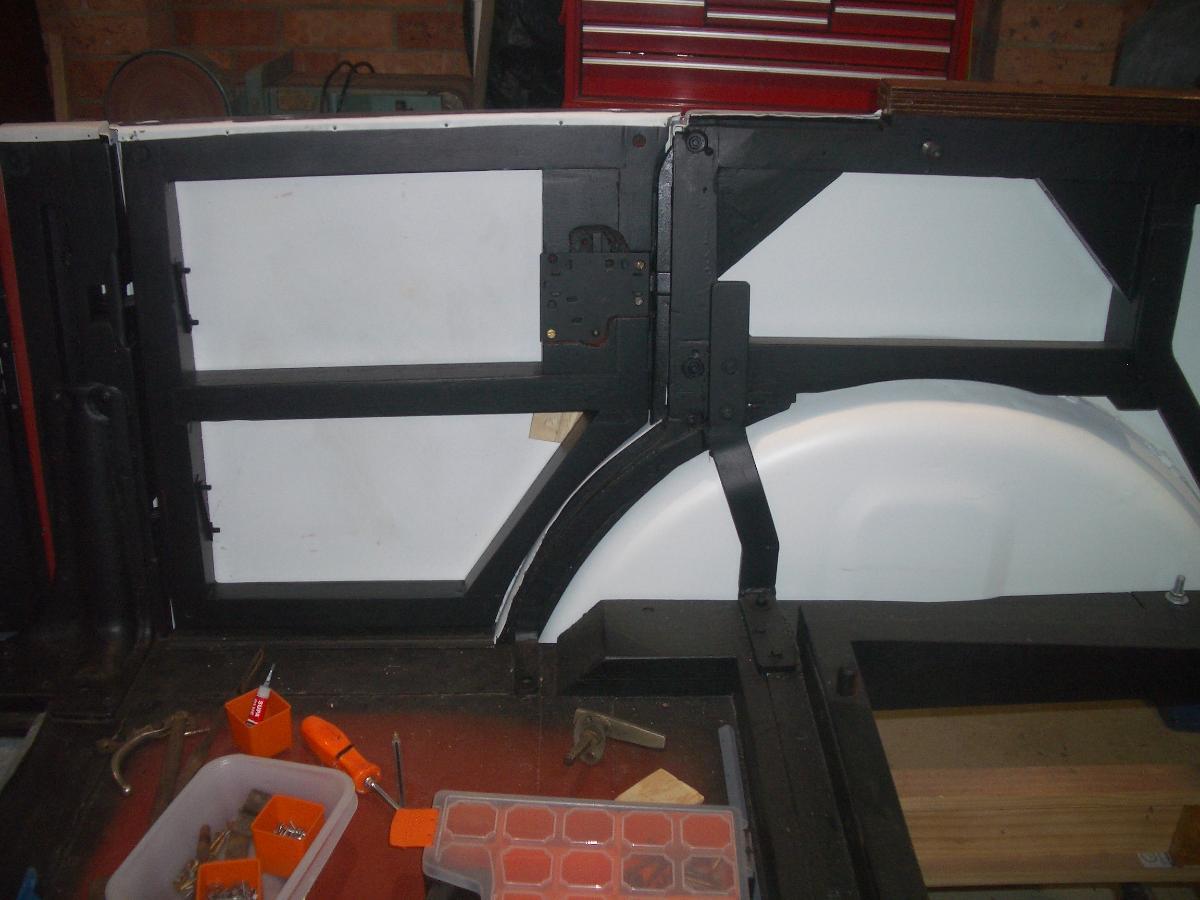
Over the last couple of weeks I've been working on the the rear section upholstery "foundations" and also the rear seat base and back rest spring frames. Todays post is about the "foundations".
I built them up by first using pine for the upright section near the rear door opening and along the belt line, then I glued MDF to this frame. The area around the door opening requires a lot of shaping to give it a pleasing look, using the thick pine in this area allowed this. As MDF is not water proof I coated both sides with a mixture diluted Tite-bond water proof glue to seal it, then I painted both sides with some bitumen paint to make it completely water proof.
Cheers Mark


-
2
-
-
Hi Alex
As 28 Chrysler said -
Here's a picture of what the'' 66'' emblem looks like
Cheers Mark

-
1
-
-
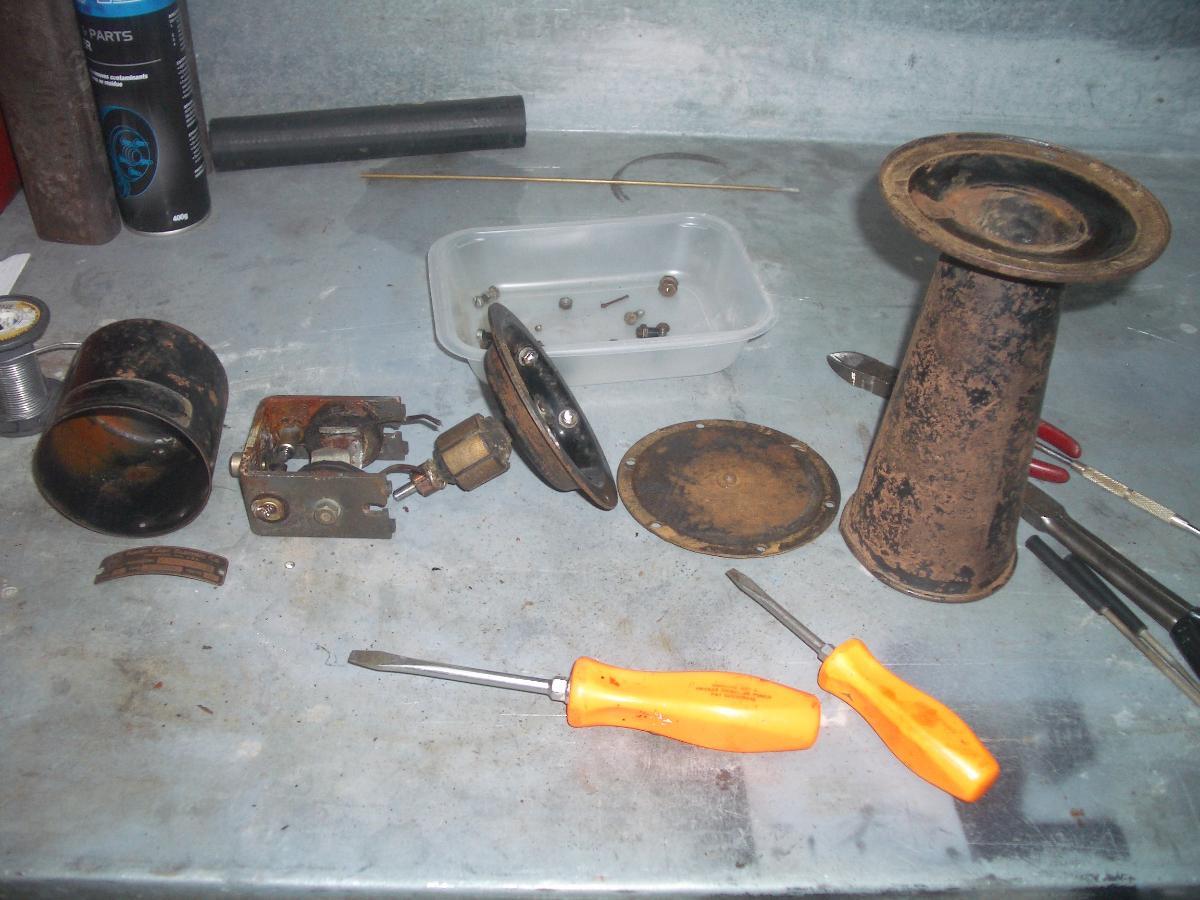
While keeping an eye on flushing the block out, I took the opportunity to take care of a few smaller projects that needed attention. One of these jobs was restoring the horn. I dismantled the unit completely and found a lot of brown stuff inside.😐
After I cleaned things up a bit, I removed the old paint and surface rust from the metal parts, tapped out a couple of small dents in the metal bits, after which I primed and painted the metal parts gloss black. While the paint was curing I removed the motor coils so that I could replace the rotted insulation on the coil leads, I used some clear electrical insulating spray to seal and protect the windings. Next the armature was mounted in the chuck of my drill press and I lightly polished the armature commutator, after this I cleaned out the grooves between the copper bars. I also replaced the split pins that retain the brush springs at this time . All that was left to do was reassemble it and to adjust it's tone. To do this I set up some test leads from a battery to the horn with a amp meter in the circuit, I stuffed a rag down the trumpet to muffle the sound ,next connecting the power to make the horn sound, I adjusted the nut on the end of the armature so that the least amount of current was flowing consistent with fastest spinning of the armature, by placing the rag in the trumpet I could hear just the armature rubbing on the serrated centre on the horn disc, when this sounded happy I knew the horn would work well. With it adjusted and sounding great I mounted back on the engine and tried it out just a few more times,( this time with out the rag) ,enough to annoy the people next door.😀 Happy days
Cheers Mark


-
1
-
-
When I first pulled the tin covers that allow access to the water jackets off this engine ( after first breaking half the bolts that hold them on) I was greeted with the sight of caked crud 1/3 of the way up the cylinders. Much scraping/poking and cleaning just as you describe. Been there done that 😊 I ran this motor on a test frame that I made for it prior to rebuilding the engine in 2014. As the engine has been sitting around for the last 7 years, I know that some surface rust had formed inside the water passages so that's why I ran the rust remover through the block. It probably would have been ok as is, but I just wanted to be sure.
Cheers Mark


-
2
-
-
Since getting the body on the chassis and bolted down, I have been working towards getting the car assembled as completely as possible, before I pull it all apart and remove the body again to allow me to finish the body work and prep for painting, as well as sorting the various mechanical systems at this point. Trying to make sure things fit and work correctly now so that hopefully I wont have any nasty surprises when it goes back together after painting. The major work of fitting the engine and running gear happened soon after I started back on the project in 2019. Speaking of the engine it has been dismantled and cleaned, mains and rod bearing checked, they showed very little wear, cylinders also checked out nicely, new rings where fitted and the cylinders honed ,valves and seats tidied up and a new timing chain, rear main oil seal and head gasket were also replaced. Prior to starting the engine for the first time and before running coolant through the new radiator, I thought it would be a good idea to run some rust removing fluid through the engine. More for my peace of mind than anything. So I set up a small pump, a 12 litre metal container, a heating element to heat the solution and some clear plastic hose to connect to the inlet and outlet of the engine. I ran heated Thermocure through the engine block for a total of 12 hours over 4 days. I was surprised at how dark the solution became in this relatively short period of time. First photo today is of the engine after I assembled and painted it in 2019, notice how clean the water jackets appear to be. The next few are of my crude set up for flushing. Notice the change in colour of the fluid over time as it was circulating through the engine. In hindsight I should have used better quality hose, as the hose I used tended go soft and collapse on its self at around 130 degrees F. I hope to run the engine in the next few weeks ,still have a couple of small things to take care of before that can happen.
Cheers Mark


-
1
-
 1
1
-
-
I also know of at least 3 others here in Australia. (possibly the same one's that Vintageben mentioned) one is owned by another forum member ( Hi John K) and is a little further along than mine in it's restoration , the other two 66's ( recently advertised for sale have changed hands ) all cars I know of are in Queensland. I agree that its very likely that there would be a few others around.
From memory, Production figures for Holden Bodied cars in 1929 -Chrysler(CC) 66 Tourers- just under 200 built ,the next year only 5 were built. As Viv mentioned sales for open cars were rapidly declining and of course the recession was not far away. I don't know if any of the other local body builders built bodies for Chrysler.
-
3
-
-
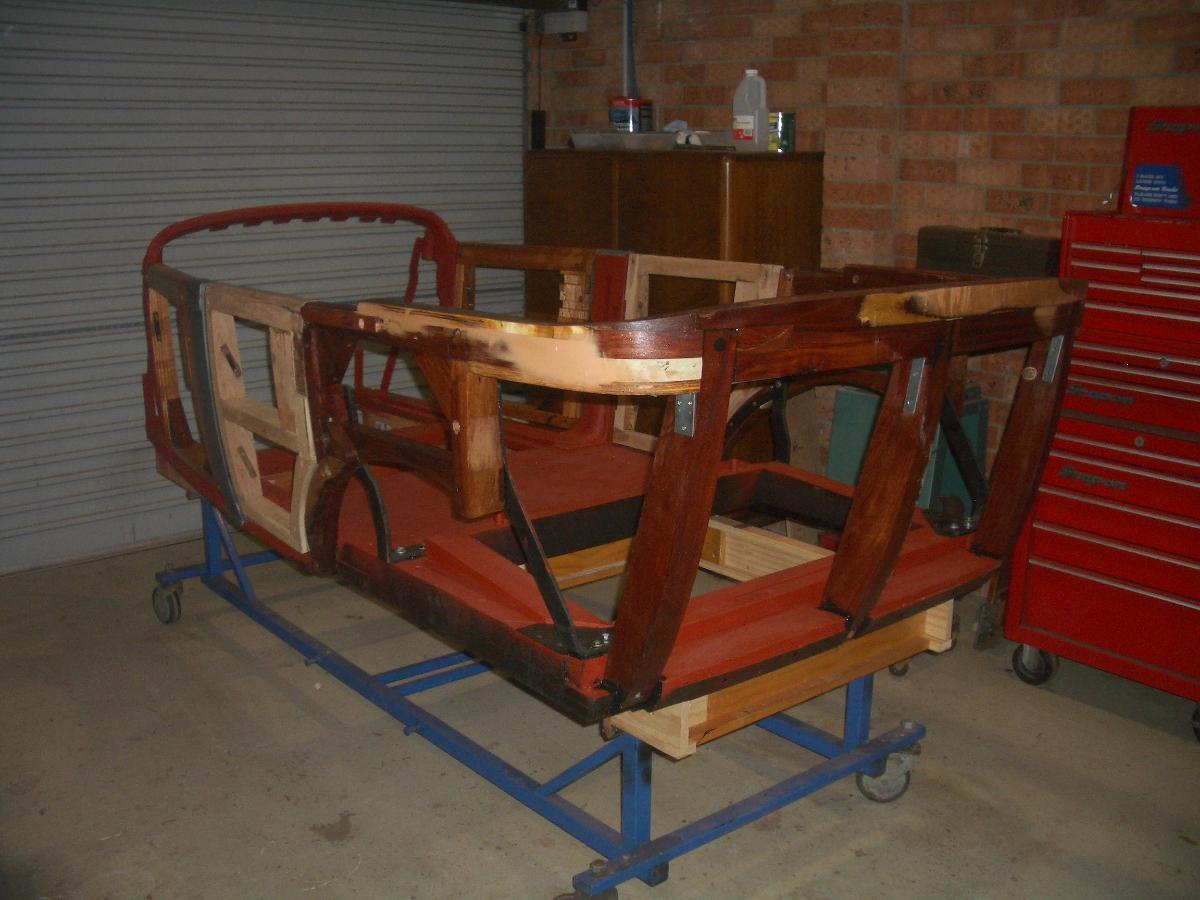
Most of the photos posted so far span work done between 2011 and 2015. That's when things came to a screaming halt.
Let's just say life threw up some challenges for me. ....... My Dad passed away in September 2015.
I must admit to debating whether or not to include this in this post, but I decided to, because it is part of my story and it did have a huge effect on me and the restoration. I lost motivation to work on the car, so it sat for nearly 4 years before I started back on it in 2019. As well as dealing with Dads passing, and everything that went along with it, there was also a change of jobs that involved working very long hours, I got Shingles ( because of the long hours and stress) and I had a knee reconstruction as well. Thankfully most things are back to normal now. The first photo today, shows how the car sat during that time and the next few show how it actually looks today. ( I took them this morning)
Apart from a few photos taken recently for some posts in ''What are you working on right now?'' ( Thanks to Jeff Perkins for starting that thread). Not many photos were taken of getting the car to where it is presently. Which I now regret.
From now on posts will be of actual progress as I continue along working at a brisk snails pace.😀
Cheers Mark


-
3
-
-
Thank you Gunsmoke for your continuing interest.
Yes, agree 100%. with your comments.
Certainly was a challenge to get all the doors fitting decently. Quite a few curse words were used at different times.😀
Since those pictures were taken the body is back on the chassis and bolted down. Its starting to look like a car again.
-
2
-
-
Today's post shows the completed timber frame work, some door timber detail and finally a few photo's showing the sheet metal attached. Prior to painting the timber I brushed on a few coats of boiled Linseed oil thinned with Mineral Turps to help preserve the wood, I let this soak into the wood for quite some time before priming and painting the completed wood frame black. For those guys that might be contemplating doing their own woodwork here a a couple of books that I can recommend – Fisher Body Service Manual and also -Tips on Auto Body Woodwork by Don Marsh.
By some miracle it also appears from the photos that the rear tub has magically repaired it's self and all the sheet metal parts have been primed in epoxy primmer, how about that!
Cheers Mark


-
4
-
-
Using clamps, scrap wood and a couple of ratchet straps I jury rigged the rear tub sheet metal assembly squarely on the chassis, using a string line to indicate the chassis centre and a plumb bob to ensure the assembly was in its correct position relative to the chassis centre line. I started by clamping the top rail of the rear quarter panel frames in their position on both sides. Next I made the corner pieces and the top rail that connects the quarter panel frames together across the belt line of the body. As I didn't have any old wood for templates to copy, I had to make my own. I used a contour gauge to show me the shape of the metal that I had to make the wood conform to. Next I copied those lines obtained from the gauge to some scrap wood to mock up the shapes required before cutting into the good stuff. As the curve across the back of the body is the same on both left and right sides I only had to make a template of half of the body, mark out one side then flip the template over to mark out the other side. Once happy with the shape of the mock up pieces I used them to cut out the actual pieces required in Coach wood. With those parts now cut out and in place I next made and fitted three upright members that connect the top belt rail to the rear timber chassis cross member, using the same technique as outlined before, now that all the parts were in their final positions I reassembled the previously made timber frame of the rear quarters, this time gluing those parts of the frames together.
Cheers Mark


-
5
-
-
Don't want to seem like the prophet of doom here, but may I respectfully suggest that you check that your generator armature has not been damaged because of the cut out sticking closed.... even for a short period of time.
As Flivverking said, the generator tries to act as a motor if the cut out sticks closed with the engine off. But it cannot rotate because of the friction of the fan belt ( if correctly tensioned} . While this is happening lots of current flows from the battery through the generator. Not only discharging the battery quickly but also overheating the generator causing the armature to get very hot very quickly, stressing the windings and insulation of the armature and solder joints on the commutator . Many generators were burnt out because of cut outs sticking closed when the engine was switched off. As to why it's sticking one common cause is- as the points open and close material is removed from one contact and deposited on the other( just like the points in your distributor) causing a hole on one and a mountain to build up on the other (figuratively speaking], if enough material builds up it causes a mechanical latching of the contacts, thus causing the problem. Have a good close look at the cut out contact points and at a minimum remove the cover band on the generator and have a look at the armature for signs of overheating , hopefully you will find it looks good.
-
1
-
-
G'Day Lambroast
As Sasha said it is one piece of wood [assuming a Holden body] from cowl to rear ,with another piece laminated on it around where the dicky seat floor starts.
Here are some pictures of a 66 roadster I re-wooded.
Hope these help.
Cheers Mark


-
2
-
-
G'Day Alex. Yes, Holden body as well. Body #20
Car # H121SY Date 3/3/1930. I was able to obtain a copy of the Build Sheet from the Chrysler Historical Services in 2012.


Still looking for one of these.😀
Cheers Mark
-
1
-
-
G'Day Alex.
Well, you learn something new every day. Have not seen those markings before. Don't be shy posting more pictures.
Thank you.
Mark
-
G'day Alex,
Thanks, Glad my pictures might be helpful for your woodwork job, is your '65' a Holden bodied car?
Cheers Mark


Aussie 1930 Chrysler 66 Tourer Restoration.
in Chrysler Products - General
Posted
After a lot of pulling and stretching this is how the base came out. Overall for a first attempt I am fairly happy with what I came up with, the rear corners are very ordinary . At least they are not seen in position. I am going to live with them for the time being. On to the back rest tomorrow should be fun.
Cheers Mark