Laughing Coyote
-
Posts
2,355 -
Joined
-
Last visited
-
Days Won
2
Content Type
Forums
Gallery
Events
Everything posted by Laughing Coyote
-

1961 Mercury Meteor 800 restore
Laughing Coyote replied to Laughing Coyote's topic in Our Cars & Restoration Projects
It's been a busy week last week so I didn't get much car time. I did manage to change out 6 body rubber mounts and got the pan clipprd in. Now I just have to pull it back out, clean it up and weld it in. Then I can do the side patch and get ready to re-seal all the seams in the floor and getting looking pretty again. The adhesive I used on the steering wheel is all cured and ready to start sanding on it. Still have a bunch to seal up.

-
Nice find Commodore. I will get with them and find out when they may be geeting more in. I did find a company in Canada that has the blanks in all sizes. It's Saskatoon radiator sales and service. Maybe be a source for others that are having a hard time for a heater core and can reuse their old caps. Thanks
-
1961 Mercury Meteor 800 restore
Laughing Coyote replied to Laughing Coyote's topic in Our Cars & Restoration Projects
Today I had to make another little patch panel that will have to go on the side area of the pan I have to replace. At least it was a simple one. Since I had the steering wheel pulled I cleaned it up and started to repair the cracks. I had a friend of mine get me some good adhesive they use in the aviation world. Needless to say if it works on a jet that does 9 g's then I think it will work on a steering wheel. I also took my heater core to a radiator shop and had them double check it. It's shot and I can't find replacement. So I figured if it's no good I would de-solder the ends and try to find a new core blank. Just have to do some research. I'm sure someone makes them.


-
Had the heater core double checked at the radiator shop and it is shot. Since it is no good I de-soldered the caps and cleaned them up. I just need a 8" x 8" x 2 1/2" core blank and then I can put it back together. Anybody know a source for blanks??? :confused:
-
1961 Mercury Meteor 800 restore
Laughing Coyote replied to Laughing Coyote's topic in Our Cars & Restoration Projects
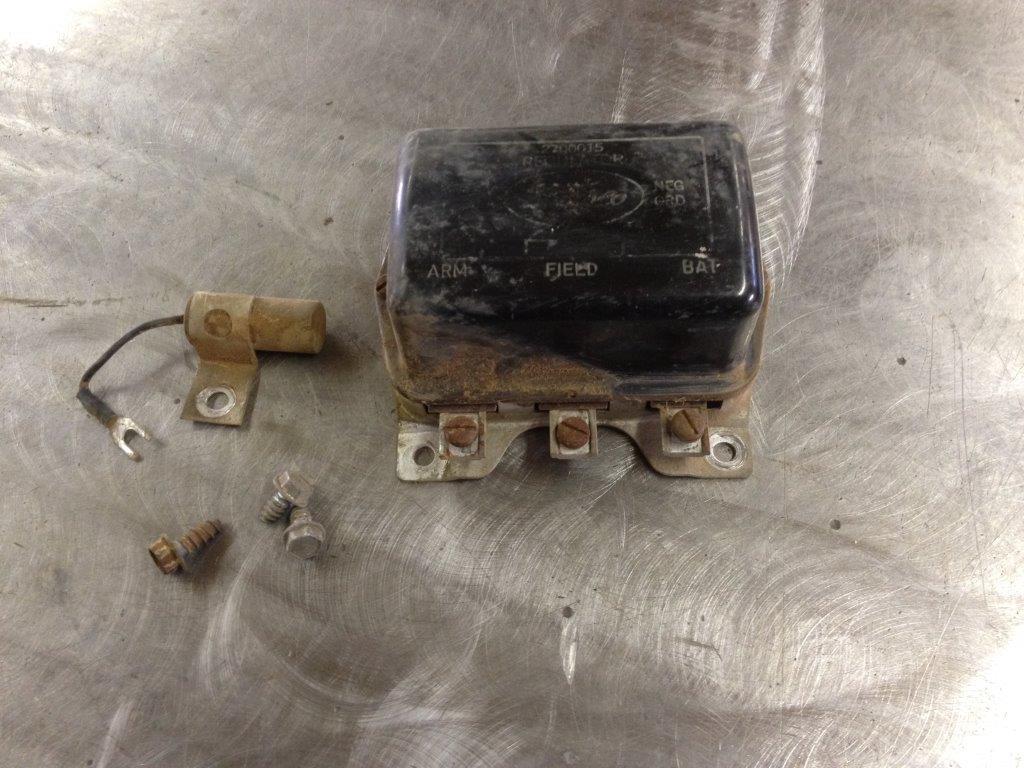
Looks like I'm not going to have much time this week to tackle the pan repair. Worked on some smaller parts. I was able to get the master cylinder cleaned up. Sand blasted it and put a coat of clear on it to seal it up. I will be blasting the outsides of the power booster so that will be ready for the rebuild kit when I get it. I also finished the fresh air vent and voltage regulator. Just waiting for the decals so I can put the final clear on it and put in the done pile with everything else so far.


-
I would, but I can't see it. I used a magnafying glass and a bright LED light and still couldn't see it. It maybe a hairline crack??? I don't want to chance it and put to much heat on the delicate fins area and melt a big hole in it and really screw it up.
-
Try Mouser or Allied electronics online. They have tons of electronics and even the digital number displays. Worth a look.
-
Not yet. The leak is in one of the little fin areas. I have the area pin pointed, but I sure can't see it. Hope to have time later next week to see what it would cost.
-
1961 Mercury Meteor 800 restore
Laughing Coyote replied to Laughing Coyote's topic in Our Cars & Restoration Projects
Well I decided to start the pan next week. I took the power booster of the firewall to check it out and it's not bad, but a rebuild will be in order for it. I also starting to work the drivers fresh air vent that was missing a louver and the bottom piece. Looked all over the place for a replacement and no luck. So I will fabricate a few pieces and mold in the rest and clean it up. Fresh coat of paint and that will be done.

-
Nope. Everyone is listing it as the replacement. Here is what it looks like.

-
1961 Mercury Meteor 800 restore
Laughing Coyote replied to Laughing Coyote's topic in Our Cars & Restoration Projects
Yep, a few hours of shaping and we have a pan. You're right Roger, the after market ones just didn't look all that good. Wanted to keep it looking like a factory stamping. As far as making it Landman. I made a simple die and form. Then used my neighbors 20 ton press and made a good inprint. Then I used some round bar and a shot bag and pounded away to get it where I wanted it. A bead roller would be nice. Thought of buying one, but would have to do more of this work to make it a worth while investment. -
She's got a tiny hole. Darn the luck. All the replacement ones don't even look close to it either. Hope this repair doesn't set me to far back.
-
1961 Mercury Meteor 800 restore
Laughing Coyote replied to Laughing Coyote's topic in Our Cars & Restoration Projects
I made my template and fabricated the new floor patch pan. I know it's not a OEM Ford replacement part, but you can't beat the price. Now just have to set some time aside to start cutting and preping to install it. Hope to have it all in in a few weeks and ready to seal it up.


-
Try Waldon exhaust. They make them for a lot of different cars and you can choose different mufflers for different sounds.
-
Maybe a simple car in the 60's like a Ford Falcon or Comet. Easy to work on and parts are available. Not alot of chrome and fancy stuff on them. I'm in Vail outside of Tucson and I see them all the time on Craigslist and priced fair. You won't have to deal with a lot of emissions and vacuum issues like the newer used cars. You won't have to do emissions on an older cars either. Just food for thought.
-
1961 Mercury Meteor 800 restore
Laughing Coyote replied to Laughing Coyote's topic in Our Cars & Restoration Projects
Thanks guys. Having a blast doing this restore. I know some of the pictures are not that great, but a cell phone and a dim lit garage doesn't help. I got the foam material for the internal heater box doors. Got it from McMaster Carr. It's 1/4" thick and has an adhesive backing to it. A 24" x 24" sheet was $12.00. Just like the factory foam padding. Works great. The number for it is 86225K53. I also attached the photos of the back half of the inside of the car. Not much excitement to it. I will try to start to fab up a new pan in a day or so. I'm shooting for early February to have the floor all coated and done. I will post the progress of the floor pan as I go. I can't wait to get it a done and drive it.


-
I'm doing a restore and pulled the heater box out of the car. I pulled out the heater core and I was wanting to know if there is an easy way to check it for leaks, or do I need to take it to a radiator shop? I looks very good and doesn't show any signs of corrosion any where on the outside. I ran water thru it and it's coming out clean. I just want to be sure before I put it back in the heater box. Thanks
-
1961 Mercury Meteor 800 restore
Laughing Coyote replied to Laughing Coyote's topic in Our Cars & Restoration Projects
Well I finally got the rear seats pulled and was able to see what was hiding under there. Just your typical loose change, gum wrappers, and more beer can openers. I cleaned it out and wiped everything down so I can see what I will need to do for the back half of the floor. Not too much rust, at least not as bad as the trunk. Still has good metal except for the left passenger side floor pan which has a few bad spots. I guess I will be doing another pan job. At least it's not as big as the trunk. I will fabricate this one from scratch. I know they have after market ones, but they don't look the same. I also pulled the parking brake assembly and drivers side fresh air vent. I sandblasted them and gave them a fresh coat of paint. I will post some photos tomorrow. -
1961 Mercury Meteor 800 restore
Laughing Coyote replied to Laughing Coyote's topic in Our Cars & Restoration Projects
Here is the stuff I pulled out of the defrost vents. Suprised if they worked at all with the blockage.
-
My neighbors 1960 era Sand Flea made by National Auto Glas back in the 60's (not the window glass co.) It has a 140hp Corvair Citation engine with 4 carbs, and yes ET mags.


-
1961 Mercury Meteor 800 restore
Laughing Coyote replied to Laughing Coyote's topic in Our Cars & Restoration Projects
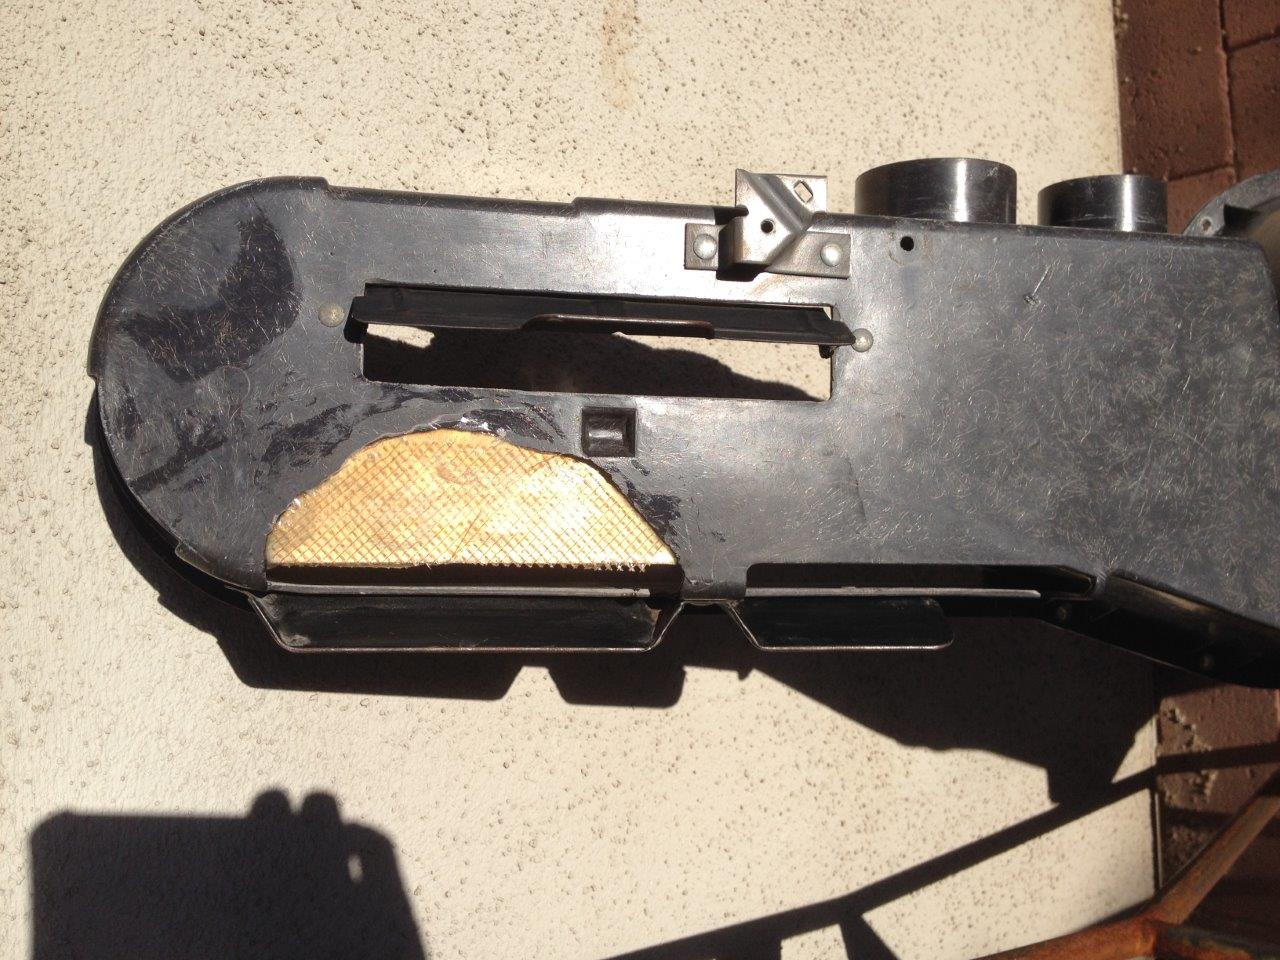
Here are some pictures of the blower motor all ready to go. I also included pictures of the heater housing. After doing the reapir I spray painted the housing with a dark grey primer that was very close to the original fiberglass color. Then I used a acid brush and fanned out the bristles so I can duplicate the light color fiberglass strands in the housing. I used white craft paint. After I did the faux strands I then lightly hit areas with the primer again to knock down the brightness of it. Once dried I applied a semi gloss poly clear to give it that factory sheen and bring the darker color back. Then I painted the rivets with silver model paint and then assembled the back panel. Just have to work the heater core and water control valve and it's off my list. Now onto the emergency brake assy.


-
My first car was a 1970 Toyota Corona 4 door. Good starter car. Took a lot of abuse in the high school years. In my senior year I ended up purchasing a 1965 Malibu SS for $700 in Colorado in a guys front yard. I called it a mutt since it had a 66 GTO 389 motor and a Ford 3 speed top loader trans. I had to get rid of it after I graduated high school. Went in the Military and Dad wanted it gone so he didn't have to bother with it. I wish I had it today.
-
1961 Mercury Meteor 800 restore
Laughing Coyote replied to Laughing Coyote's topic in Our Cars & Restoration Projects
Well I have been picking at different parts on the car and I decided to pull out the heater fan motor since it was easy picking and not alot of work to remove it. Went to check it out and no go. Disassembled it and found the the board that holds the brushes was broken. I repaired the board and reassembled it and it works nice now. Cleaned it up and repainted it. Looks like new. I also pulled the heater housing of the fire wall. It had a good size hole where some on kicked it. I repaired that and in the process of the final detailing of the housing. I will post the pictures of the progress. Found alot of goodies in the defroster vents too. Suprised they even blew out any air with all the stuff in them. -
What does everyone use to heat the garage in the winter
Laughing Coyote replied to junkyardjeff's topic in General Discussion
I'm looking into building a solar heater for my fab shop. The thermometer shows 46 in the winter time. Way to cold for me. They're posted all over Youtube on how to make them. Not sure how well it will work for you being in Ohio. I'm sure the days are overcast alot and you don't get much sun. Just a thought and cheap to build and no fumes and free heat from the sun. -
Wow!! That's some snow. I lived in Michigan, Wyoming and Ohio. I had my share of the white stuff. Hope you get some build time in between digging out.