


jw1955buick
-
Posts
118 -
Joined
-
Last visited
Content Type
Forums
Gallery
Events
Posts posted by jw1955buick
-
-
Only finding the send it in thing or DIY kits, kinda funny that '55 was a super high volume year yet you can find NEW units for seemingly every other year
I'd rather buy new than rebuild my old flake of rust, blasting the rusty insides, pitted bore, all that stuff I'd rather avoid if I can.
-
I drained the oil first thing and refilled adding one quart of MMO to the regular motor oil, never put any in the gas, I only run pure 91, guess I'll throw some in there too, I tried to do a thorough job of shooting MMO at the valve stems when I had the shafts off, turning it all by hand, no telling if that had any effect, again, the valve train appears to be moving correctly but that's just observation from the top side, studying rocker tip and valve tip wear discussions over in the V8Buick forum, they all appear to be in decent shape.
I was really hoping for a better running engine after cleaning all the valve train stuff and new shafts but it made no discernable difference.
I'll buy a few products and run it for a longer duration as was suggested and report back.
-
 1
1
-
-
I’ve got a tiny summit gauge in the line showing 5psi, I think 5-7 is the range if I remember but it does act like too much pressure
it looks like the original master cylinder so I think that’s next.
it’s entirely likely this engine wasn’t broken in properly and then not driven enough miles afterwards, the fella had a battery drain issue and brake problems after the engine was installed and hardly drove it before just parking it indefinitely
the miss is slight, not terrible like a dead cylinder or anything, again, It’s been improving the more I do, got it to idle without help around 550-600 rpm then twisted the distributor for max vacuum but that needle won’t stop fluttering
I don’t know what else to check internally, if anything, I can put my vacuum gauge on my fuel line and verify the pressure, other than that, get the brakes sorted, top off the leakyflow and try to drive it.
-
1
-
-
Drove it around the block until the plugs fouled as I was still messing with timing and the carb, got those two things pretty well figured out, then the brake pedal decided to stay on the floor, new rear cylinders later, I still have a leak someplace to track down before going around the block again
Used vacuum gauge for the timing and and have had the engine idling for awhile just to see what it would do,carb sent off for professional rebuild, this is the best the plugs have looked as of yet, it starts but not easy and then won’t start after it’s hot, acts like flooding or vapor lock and this is with an electric fuel pump
Pulled and replaced the rocker shafts as they looked pretty groovy, just eyeballed the valve train movement just to make sure it’s all free, there’s no way for me to tell if something is not getting full travel or not, it all looked fine based on my untrained eye
it doesn’t idle smooth and I was hoping it was that cam, sounds like a miss and the vacuum gauge was never steady, I haven’t pulled the heads but maybe that’s next?
-
Been fiddling with this for awhile now, finally did a proper compression check after getting it started, it has never run well so this wasn't totally unexpected, I just didn't think it would be this bad
A little history, engine rebuilt 9 years ago in a very cheap manner from what I was told, it came out of a Super so the guy might've just installed new gaskets and an RV cam, whatever that means, then it was driven sparingly for about a year then driven into a barn and parked for seven years with no starting or anything, no fluids drained or checked the entire time, I pulled it out about a year ago and have slowly been cleaning it up, put oil in the cylinders, turned be hand, everything moved easily and the old oil actually looked good, should've done the comp check at this point but I thought it would be alright...guess not so much


-
From what I understand, you always need liners when running tubes, it keeps the tube from kinking upon initial inflation and keeps the tube from improperly rubbing a metal edge on the rim when in motion
the stem is usually predicated on the rim style, for instance my 47 WD21 has the factory budd 16’s and requires a “bent” stem for proper access
hope this helps, Jim
-
Thanks all for the wisdom, after taking a good long look at these and knowing how these grooves will haunt me, I bought new from caRs
The insides of the rockers look good, now the aluminum stands have some dark spots but they're stationary anyway
Is the shaft supposed to be able to wiggle or flex even a tiny bit when bolted down? didn't know if there's a certain amount of "play" built into the design after studying those large, through stand bolt holes.
-
That’s what I had hoped but I’m also the guy that can’t put a rusty bolt back on to something without cleaning it up
What’s the best way to clean these pretty smooth with basic hand operated tools?
-
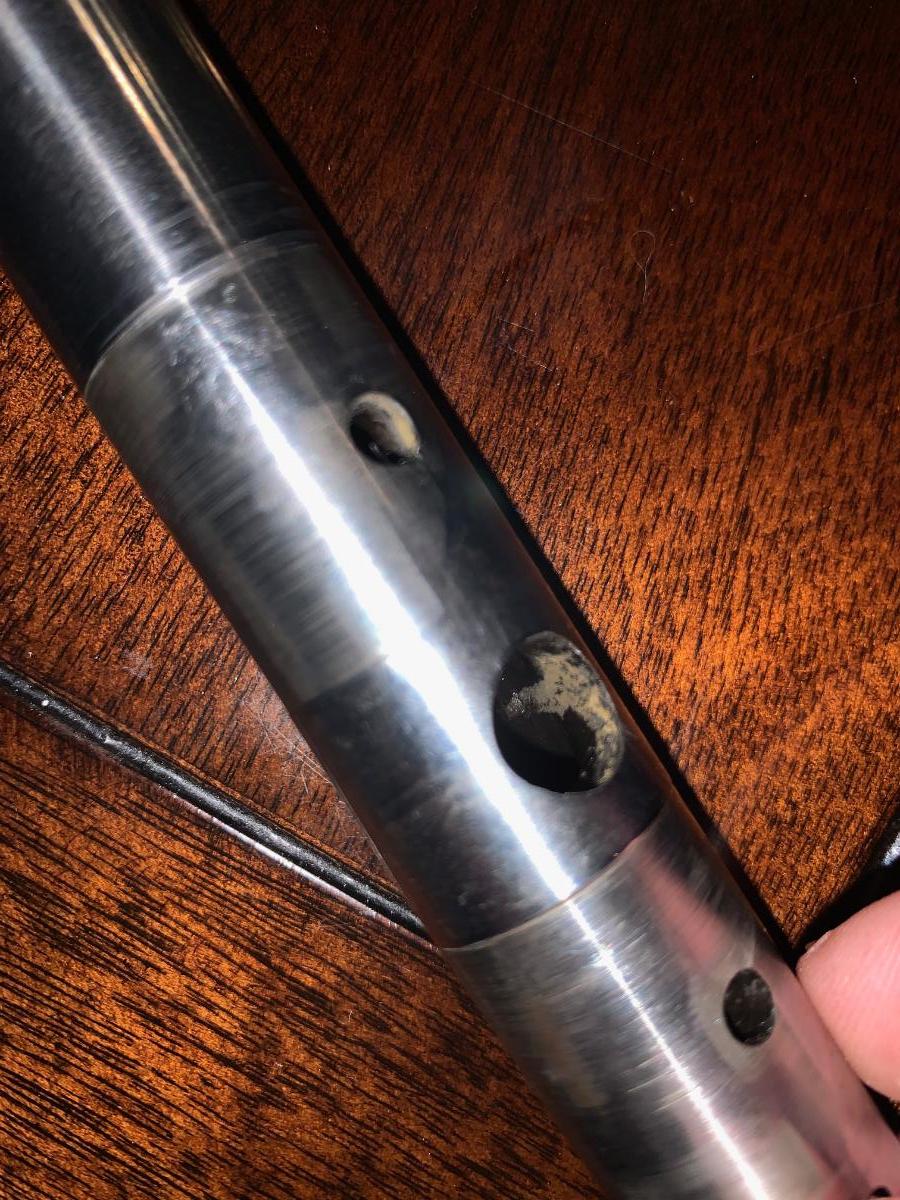
Still reviving this engine that's been sitting, decided to check out the rocker shafts since they're known for getting sludgy and not dripping like they're supposed to, most rockers moved smooth but a few had some tight spots, the pics are after doing a sand job with 600 then 1500, one side has twice the wear of the other with noticeable ridges down the length.
The question, for a basically stock older rebuild with an "rv" cam, what are my concerns if any?, will this be fine just smoothing and cleaning and running it or will it throw the timing off somehow or something else? All the valves seem to move pretty good from the top, comp. check came up consistent, rocker arms show what I would think as usual wear. One of the aluminum stands has a crack at the top so I guess I'll need one of those. Can these shafts be turned down slightly and still be serviceable? what's the best way to knock off the ridges or just get new shafts? Thanks fellas
-
-
-
Cleaning out some neato parts, i've had these about 20 years now, had the outer rims powder coated when I got them, never had the centers polished out, these are very nice, straight, clean wheels that'll fit most full size GM products from around '59 to '70ish, of course, they're more at home on a '65 Catalina 2+2 but who has seen one of those lately? You'd be guaranteed to have the only SS Impala at the show with these extremely rare wheels, you can see in one picture where I spent about ten minutes with some Mothers polish on one spoke, these will have no issues getting to show quality with a polish job, just add your trim rings and center caps easily found in the aftermarket. These are in Tulsa, I can ship but don't know the cost, I'd prefer someone pick them up if possible, if you're familiar with these rims, you'll know they're beefy and heavy duty. Come look at them, pick them over, you will not be disappointed. Asking $2000 OBO I'm Jim Heath in Tulsa you can text or call 9186882232, leave message, thanks.


-
In my quest to locate the problem, I pulled apart and inspected the brand new airtex I bought on Ebay and the oldy, they both looked perfect, the older diaphrams didn't look as "fresh" as the new but still serviceable, when I bench test them pumping the levers, they're very firm and seem to be in operating order, the new one was on the car and driving then I back into the driveway stopped and it acted like it just ran the carb smooth outta gas, which it did, checked the tank, it had some flakes in it so I replaced it and the sending unit, blew out line both ways, new fresh pure gas, put back together, can't get anything out of either fuel pump after cranking forever and ever. I'm perplexed, I've got nowhere left to go except try to get carb fuel a different way.
-
New tank, new sender, old hard line (blown out) new fuel pump, can't get fuel from the pump no matter what, it was working, even hooked up gas can directly to the pump to eliminate everything behind, nothing, tried an older pump that was supposed to be working, nothing out of it either. Now I've never installed an electric pump, I'm good with tubing and lines but crap with electronics, cruising the selection of Youtube pump install videos has not been fruitful, ideally, someone has a super crazy detailed step-by-step video of this install, explaining and more importantly showing exactly where everything hooks up. The application is a '55 special with a bone stock 322 out of a Super. Too much to ask probably?
Jim
-
 Okay I can’t figure out what you’re talking about, can’t find a reference to that in the manual, I do know that I have the needle under the pump jet and the check ball under the hat underneath the acc pump, is it in the pictures I provided earlier in the post?
are you talking about the “plug and gasket “ in the above photo at right? That’s in there
-
No offense at all, I was waiting for your reply, I’ll double check that
-
I was able to stake that cover down, what was interesting was the hole the check ball is in, it looked a little tight, I guess it just goes up and down slightly, anyway, that wasn't a big deal. I bought a very old carb kit on ebay and used the leather pump in it hoping to make the difference, no change whatsoever.
So is the idea so far improper acc pump seal? where does the vacuum come from to hold the vacumeter piston down against the spring?
-
took carb apart bench tested the acc pump with some gas, squirted fine pushing it up and down, good steady stream out of the two top nozzles, when I installed on the car, it doesn't work like that, it stumbles hard right off the bat, if you increase throttle super super slow it comes up as it should but if you try to apply in any normal fashion, it instantly stumbles. I pulled the little pump cover off and noticed when I tried to give it gas, the needle bar setup was popping right up at the same time it bogged, loosing vacuum with piston perhaps, when I increased throttle real slow, the needle bar came up slowly
Fuel line checks out clean and fuel pump is putting out a real good pulse of fuel so am I loosing vacuum somewhere? Still hard to start but idles okay once you get it. Help please
-
It does, don’t have much of a place or tools to fabricate so much, but if I can’t find something suitable then I’ll have to
this my first visor and my first old truck, I’m not sure how it attaches
repro center supports seem easy enough to find for $30, it’s really the sides that I can’t figure out
-
Got a swinging deal on this visor for use on my dodge truck, hopefully someone here can identify what hardware is needed to complete and possibly where to buy it
there’s no identifying marks on it for help


-
Dang! A ‘59 convertible with a stick, that’s gotta be extremely scarce
-
Don't need a whole carb kit, just need a new Accelerator pump check ball and retainer cap for a WCFB 2197 for a '55 buick
I'm hoping someone has this from a spare carb kit, can't find it on eBay without buying an entire kit, thanks
Jim in Tulsa 1955 Buick special
-
I’ve got those, it’s in there so tight it bent the cheapo hook, that’s the first thing I tried
sounds like I’m down to the drill bit, I was afraid of that
-
No the bugered up check ball retainer thing
also does this look like the right acc pump for the ‘55 wcfb?

-
1
-


source for new 1955 master cylinder
in Buick - Post War
Posted
It’s manual, I watched Mud’s video before making the post because I’d have to pay someone to blast it clean, then send it off for the sleeve, then rebuild kit, by the time I’ve paid for all that.....
but it appears there’s no choice in the matter