


jw1955buick
-
Posts
118 -
Joined
-
Last visited
Content Type
Forums
Gallery
Events
Everything posted by jw1955buick
-

37 plymouth heater install
jw1955buick replied to sherwood3333's topic in Chrysler Automobiles and Parts - Buy/Sell
You shouldn't have to drill or tap anything, your head and water pump should already have plugged holes in it, pipe plugs of some variety usually exactly as in Hwellens pictures, if your water pump for some reason doesn't have the little T shaped top piece, it can be bought from DCM in Michigan and others. install a shut off valve on the one at the back of the block for summer time, also available from DCM, you can also upgrade to a cable controlled valve for the same location if you want a "ranko" type water control from inside your cabin. Run one hose from the water pump location to one nipple on your heater core and the other hose from the rear of head shut off valve to the other nipple, the model 36 deluxe heater was a common dealer add on, it functions well and would be correct for your application, used ones can be found around the interweb.

-
I’m with you on the bias tires and I’ve also had 54-59 caddy coupes that were original, nothing compares to that tall thin look without the “puddle pooch” at the bottom of the wheel when sitting like a radial it seems just to be a matter of preference since that was right in the transition years from bias to radials, I had that Coker tire you posted on a 68 coupe deville, drove as fine as a bias tire could and I drove that on highways in Houston with no issues, then I had a 68 Bonneville convert with cheap radials that definitely drove better but didn’t look near as good, It’s all about what makes you happy If you ever feel the desire to upgrade that Cadillac, I’ve got a factory 2x4 manifold for cheap and some Sabres just collecting dust, but you already have those...
-
How much shaft wear is too much for basically stock 322?
jw1955buick replied to jw1955buick's topic in Buick - Post War
Success! got '56 rods, installed, tuned it over many many many times by hand, didn't use those brass shims either, it all works, runs really great now, decent lope to the cam but idles pretty good, like most, it smooths out with additional rpm As i was fixing a freeze plug issue, i thought it was a good time to replace the water pump. The old one that was on there looked like it could be the original, the more I dig into this "rebuilt" engine, the more I'm disappointed with workmanship or complete lack of.....anyway, runs better than ever now which still makes me think that I bent these rods while trying to crank it over after dormancy, lesson learned. -
How much shaft wear is too much for basically stock 322?
jw1955buick replied to jw1955buick's topic in Buick - Post War
Thanks fellas, I'll get to that bolt tomorrow, so I checked all the inner and outer springs on both banks, it all looks great, seems to be plenty of space, wasn't able to really see the guides through both of those coils, tried to wedge a screwdriver in there and peak but I couldn't make anything out, I'm amazed at how good everything looks with all the nonsense going on. Monday i'll order the rods and then we'll see. -
How much shaft wear is too much for basically stock 322?
jw1955buick replied to jw1955buick's topic in Buick - Post War
I will Ken, after a bite and a little football, thanks for you and everyone else's input here, there's no way I would've ever known what to look for, can't wait to get this thing on the road Turning the engine over, I noticed my balancer bolt came loose, didn't expect that, what's the best way to tighten that thing in the car with everything attached? -
How much shaft wear is too much for basically stock 322?
jw1955buick replied to jw1955buick's topic in Buick - Post War
Hmm, pumped up a lifter best I could, got a few air bubbles to come out, rods and "up" lifters measure right at 10, max height of valve tips from the valve cover lip averaged 1.49 but one or two were as high as 1.52 I have at least seven straight rods so I installed those on the right bank, removed the shims and installed the shaft assembly, this time installing just the seven that were low down towards the base circle of the cam, everything went smooth, turned it all over and it all looked great, seemed to rotate perfectly, watched springs for binding and found nothing even close, measured one valve tip at full compress and it measured 1.26 from valve cover lip (pictured) even fully compressed, you could get a screw driver in the outer spring and wiggle it a little, my next test will be to install the shaft assembly on lifters that are at the top of the lobe, see if I have to crunch down the rocker assembly like before then observe. I think what's most likely taking into account my skill level is that I messed something up, either bending them upon start up or when I installed the new shafts the first time, but then the mystery of the shims still remains. I feel better knowing the adjustable push rods can install short, then be run on out to length, a little progress.

-
How much shaft wear is too much for basically stock 322?
jw1955buick replied to jw1955buick's topic in Buick - Post War
I canceled the '56 push rods, come Monday, i'm going to call Centerville about the adjustables, might need something even shorter than the 56 rods, going to do some tests today. -
How much shaft wear is too much for basically stock 322?
jw1955buick replied to jw1955buick's topic in Buick - Post War
I’m hoping that I just tweaked them when I first turned it over, either way can see what happens here when they come in and I can always fall back on adjustable I guess, not too stressed about it I tried to push on one of the lifters with a rod, I couldn’t get any movement, it felt solid as a rock, same with another randomly chosen example, how much give should these have as far as being able to depress by hand? -
How much shaft wear is too much for basically stock 322?
jw1955buick replied to jw1955buick's topic in Buick - Post War
5 issues going at once with this thing, working on the brakes, the valve train issue and a freeze plug that’s welded itself to the head, you can definitely tell that I strayed from my own rule of buying something already running and driving good, ugh!! Anyway, the brass shims seem to be cut from the same stock and have the same thickness, definitely not machine cut edges, they’re some home garage stuff, I have the 56 rods on the way but I’m thinking I should got adjustable, while I’m waiting on those, I decided to pull the weeping, rusty freeze plug, it’s not having ANY of it!! There’s no pulling anything out, I had to punch everything in so far and fish around the water jacket with a magnet, the outer lip is still there and has pretty much become part of the head, it’s kicking my backside for sure, I’ll have to grind or drill the edges out to hopefully end up with a clean surface to put in the replacement Anyone know the size to order?


-
How much shaft wear is too much for basically stock 322?
jw1955buick replied to jw1955buick's topic in Buick - Post War
KAD 36, what lifters and rods would be chosen for that aftermarket cam of yours? The washers under the shaft bolts are mismatched on mine, a few weren't even there but I'll see if i can come up with something. I guess when install the rods, I'll leave the shims in there, see how it all works, then try without. How would i pump up or preload the lifters? -
How much shaft wear is too much for basically stock 322?
jw1955buick replied to jw1955buick's topic in Buick - Post War
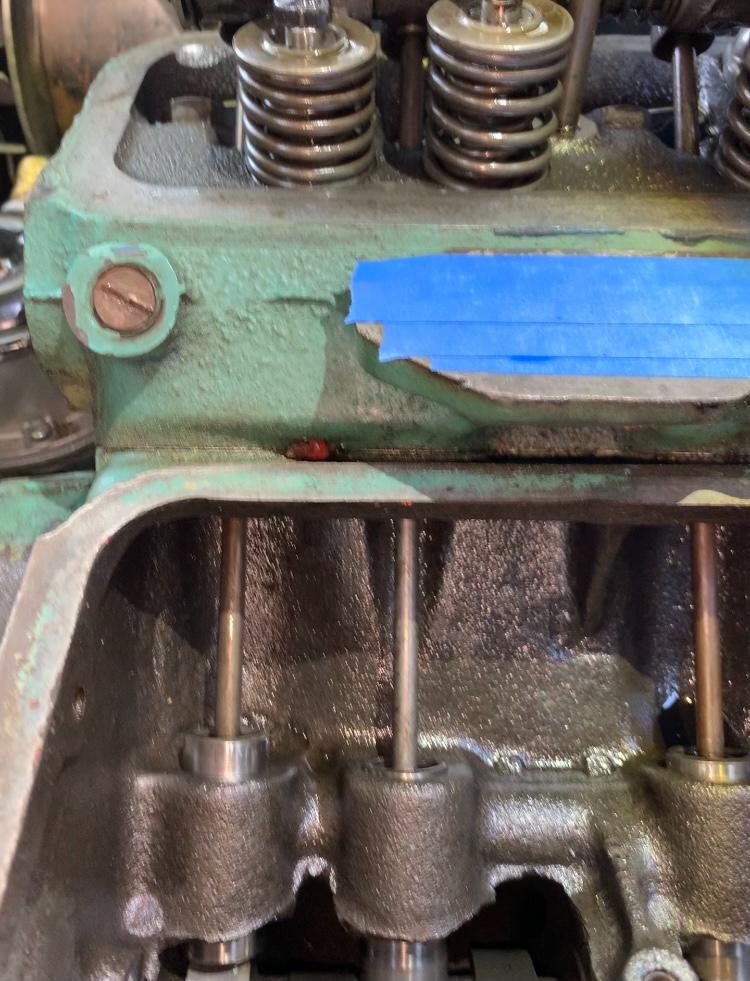
Photos back from the crime lab, you can clearly make out CWC on one section then 8-57 on another and a number 2 on yet another section, put a straight edge over the valve tips, most are even then a few are 1/32 off and one or two are 1/16 lower, very random but that doesn't seem too alarming to me, idk, hit each one with a mallet and they all seem to pop back up with about the same spring rate, nothing looks crooked. I'm worried about installing the new rods then when trying to tighten down the shafts, I have to crush them down with the shaft bolts again and I'm right back where I started, there's one brass shim under each stand, does this sound like what it should normally have?.jpg.0ffccbcf88009460f9bc8781e131bf28.jpg)


-
How much shaft wear is too much for basically stock 322?
jw1955buick replied to jw1955buick's topic in Buick - Post War
Some beginner mistakes were made by me, I’m pretty sure, looking back, knowing this sat for 7 years, I should’ve pulled the valve covers, lubed everything up and pop each valve with a mallet to make sure it moved before turning it over, the learning curve has been steeeep and unforgiving the oil looked brand new so I grabbed the fan and starting turning, then tried to start it, I’ve learned a lot since then, since I got it running, it’s always been rough with erratic compression readings so I think I bent these rods or they were already for some reason I’m not really sure how to tell if a spring is binding, I guess I don’t know what that would look like on this engine, all I know to do is measure each stem top, at the top and bottom of it’s travel and compare, I guess when the valve is completely seated, that should be a standard measurement regardless of cam, hoping they just come in equal meaning the valve job was decent, if it’s a high lift cam, then the compressed measurement would seem to be the wildcard, are my ideas correct on this? Then again, I’m just looking for uniformity to confirm that they’re opening the same amount because cam specs are unknown and it’s pretty much all I can do, does that seem right? -
How much shaft wear is too much for basically stock 322?
jw1955buick replied to jw1955buick's topic in Buick - Post War
There's no telling with this thing, it was pulled from a '55 super, I ran the numbers a year ago when I got it and it checked out for that year and model, a local old car guy rebuilt it and he was not known for his quality, just his price. Is there a way to look at the cam and tell if it's cast or steel down in there? Between the lobes maybe? At least it seems like an easy fix -
How much shaft wear is too much for basically stock 322?
jw1955buick replied to jw1955buick's topic in Buick - Post War
Well...Hit a big snag, the rods I received from Fusick are very different, they're about 3/16 longer, have no oil holes in the ends and are much thicker in the middle, the head is perfectly round where mine is more like a dish. I ordered part # PR48004 for 53 to 55 322 and 264, called them and they said it's correct for the application and didn't know what to tell me. Now I have to somehow confirm exactly what I have and hopefully find them someplace, now back to the UPS store which I just can't stand to do. I sent an email to Fusick detailing the issue and asked if they could provide the specs of the '56 push rods, does anyone have a picture and the details of a '56 push rod??

-
53 started but starter re-engaged when gas pressed
jw1955buick replied to Bulldog Car Guy's topic in Buick - Post War
If the noise is not starter related, it could be valve train related if it's been sitting, have you done a compression check? The nailheads seem to be known for stuck valves when they sit, I know it's been rebuilt at some point but it wouldn't hurt to check. -
How much shaft wear is too much for basically stock 322?
jw1955buick replied to jw1955buick's topic in Buick - Post War
Hopefully these are correct lifters for this engine, they all match and appear to be in decent shape, I haven't done any kind of tests on them as I've never done that before, push rods are all the same for what that's worth, the springs don't look funny from what I can tell, they look consistent and mostly straight up and down, valve tips look worn evenly, nothing that I can find unusual, possibly the cam is a little more than the stock valve train bargained for, I don't know Looking on other forums, adjustable pushrods are mentioned and I think available by Centerville for even the oldest of nailheads but those are all hot rod dudes so I don't know, seems to me with the unknown cam stuff going on, that might be an avenue to provide a bridge btwn old and new. What are the differences btwn '55 and '56 lifters and pushrods?? -
How much shaft wear is too much for basically stock 322?
jw1955buick replied to jw1955buick's topic in Buick - Post War
.jpg.3428391ab9d92b29d7d73f3f23541f80.jpg)


-
How much shaft wear is too much for basically stock 322?
jw1955buick replied to jw1955buick's topic in Buick - Post War
If the valves were stuck, they are no longer, all appears good when rotated by hand as far as eyeballing no information if the parts are correct for this year or not and I wouldn’t know how to tell, all the stands have little rectangular brass shims under them My original question, did I install the shaft assembly right as far as procedure? Going to order all new rods from Fusick, now I’m wondering if I should tear it down even more, checking the lifters, springs for who knows what Info on the engine: it came from a ‘55 super, had a budget rebuild with an RV cam, I have no other information such as new lifters with the cam or any of that -
How much shaft wear is too much for basically stock 322?
jw1955buick replied to jw1955buick's topic in Buick - Post War
I verified movement of all parts before taking off the shaft assembly for inspection, it’s possible they were already bent but again, as I re-installed the new shafts, when you line up the rods to the tips and torque it down, you’re kinda crushing the rods and everything together to get to torque I must be doing this the wrong way, how would you add the push rods after the shaft assembly for example? Spring compressor maybe to be able to have slack in the rocker arm, then slide the push rod in? Again, I have no idea this sat for seven years, it’s possible that I bent them when I first turned the engine over to revive it, I just discovered the bent rods after pulling the manifold and valley cover to do some cleaning, painting, new gaskets, the engine has run rough this entire time -
How much shaft wear is too much for basically stock 322?
jw1955buick replied to jw1955buick's topic in Buick - Post War
Update, I read the manual and there are no specific instructions on installing the rocker assembly, when I set it on, the pushrods are holding part of it in the air as you install the bolts, I figured the springs would take up the “give” as I lined everything up and tightened the bolts, apparently I was incorrect and now I have five bent pushrods Whats the proper procedure for doing this? What am I doing wrong here? I can’t figure this out. -
Pulled the carb off, shafts seem pretty tight and I mean good, not stiff or anything, plates look nice and snug when seated, I guess I have the correct vacuum leakage as others have mentioned, very nice knowing I don't have to deal with that. I found some leakage with the upper gasket btwn the two top halves so a little work to do there. That upper gasket almost seems too thin to really seal well, has anyone had this issue and if so, what was the fix? surely you can only snug down those top carb screws just so much, which I've already done, maybe a tiny bit of sealant or double gasket?? Also anything special to do with the carb to manifold gasket? Or just install it dry and bolt down the carb? I wasn't able to tell if I had leakage there on account of the close proximity of the leaky shaft area on both sides, didn't notice anything when shooting at the direct front and back though so I'm hoping that area is good, the manifold vac port to the old vac fuel pump is plugged so the only other thing is the vac advance line to the distributor. One thing that sticks in my mind is I can't get any reaction from the idle adj screws which I was always told meant a vacuum leak someplace, thoughts?
-
Yep carbking, I tried to enlist you to rebuild it at that time but you no longer did that service, you said you just sell the kits. To be sure, it does smooth out with additional rpm’s but don’t all vacuum leaks do that? ill do a caliper check this evening to see what’s what thanks for the specs Jon
-
2carb40 I’m not finding any matches for that Brl&eqop outfit you mentioned
-
ARRghh! One step forward, five steps back...started it today after adding seafoam and MMO to the gas, after running for a bit when it was warmed up, I decided to spray carb cleaner around the base of the carb, lo and behold big leakage around the throttle shaft and a little around the upper gasket on front side of carb. I sent this off about 8 months ago to a reputable carb shop in California, the thing looked perfect, they mentioned how it was tested on an engine....obviously that couldn't have happened and all for $700🤬 I'm definitely not a tuning guy and this is my first foray into a Buick plus I've never dealt with a WCFB so I've been fighting my own mistakes and inexperience for the last few months, I'm optimistic though, it has gotten slightly better on my watch and I know it'll be back on the road eventually, anyway, I'll answer a few questions asked and start looking for another carb shop that can rebuild the throttle body. I'm totally guilty of just buying things and bolting them on in the hopes that it'll magically run well and be reasonably dependable, it's got a new coil, cap, condensor, rotor, plugs, wires, ballast resistor and points, as far as the engine goes, throttle shafts already mentioned and the stinko carburetor that should've been good. Ran the comp test with the screw in type gauge, I re-tested that one cylinder that came in slightly lower when wet, same results, who the heck knows... Tried my hand at rebuilding the stock fuel pump and failed, it would just eeek a little fuel, not enough keep the carb going though, installed cheapo electric pump and instantly the fuel problems were over, I tried to put the old pump back on and run them both but the old rebuilt pump was somehow restricting the flow, so now just the electric pump, I sent my old dual action to Fusicks this week for a redo, I'd like to run it if I can and have the electric as a backup, that seems to be the best use consensus after reading through the different forums, we'll see. So I don't have the tools or experience to redo the throttle bushings, does anyone know a good carb builder that can be trusted? I think the top half is fine, just that leaky throttle shaft, so should I send in just the throttle body or the whole carb?
-
I’ve got exactly the same carb and engine you have meaning, you can make that auto choke work if you really want to and they work very well. Buy the little tube kit from cCars or whatever they’re called that runs from your choke downward and just sits in a little hole on the inside of the passenger side exhaust manifold, then work on adjustment, detailed instructions are in your manual and are not difficult Mine was not hooked up when I bought it, installed that pretty quickly having never done it before, the tube just bends by hand, cut it to fit, I think it came with the little ferral or nut to secure it to the choke housing, I first tested the thermostatic spring with a torch, takes a few tries getting it adjusted properly as you have the engine on and off, getting to temperature then cooling off period, but it’ll work great


.jpg.0ffccbcf88009460f9bc8781e131bf28.jpg)


.jpg.3428391ab9d92b29d7d73f3f23541f80.jpg)


