


chistech
-
Posts
2,816 -
Joined
-
Last visited
-
Days Won
24
Content Type
Forums
Gallery
Events
Posts posted by chistech
-
-
The tubing works must easier and make much cleaner holes than a hole punch using a hammer. What is really good about it is you can put the gasket material in place under the item (like the engine pan) and cut the holes right in place while holding some down pressure on the pan. The holes in the pan guide the tubing. No need to mark the gasket and "hope" you get the punch in the right place on the mark. I use K&S brass tubing sold in RC modeling stores. I take one end and sharpen it on a bench grinder.
-
 1
1
-
-
With the motor progressing, I made up the gaskets I didn't have or that I had, but were unusable. Turns out my NOS cork pan gaskets had shrunk beyond use so I made up new ones with 1/16" cork. I made the pan gasket as per the original, in four pieces with 1/4" tabs to interlock at the junctions. The motor has quite a few paper gaskets, more than some, with gaskets on all the oil pump pressure lines and the pump itself. There are also more gaskets on the outside of the motor for the oil cooler/water pump heat exchanger unit. Good eyes, sharp knife, and good small ball peen hammer, some hole punches, sharpened brass tubing in a drill, and patience are all needed to make quick work of the chore.


-
1
-
-
Received my newly poured and machined connecting rods from Paul's Rod and Bearing. Russ did a phenomenal job restoring these rods. My machine shop said they are some of the best he's ever seen. When I was at the shop, he showed me my finished crank and the block. It was bored .020 over and it was in the boil tank getting de-greased. The motor had .018 worth of taper at the top of the bores. The .020 cleaned the bores up to nice and straight. Things are looking really well and progressing quite quickly since the motor work started Jan. 10th. Ordered the pistons today from Ross Racing pistons and they are out approx. 4wks. The package from Ross includes the new forged aluminum pistons, rings, and oversize (.866) wrist pins.


-
Thank you gentlemen. I have built scale radio control aircraft (WWII warbirds mostly) and that building/modeling experience helps with items like this. Will post pictures of the actual cast lever when I get it back and machined.
-
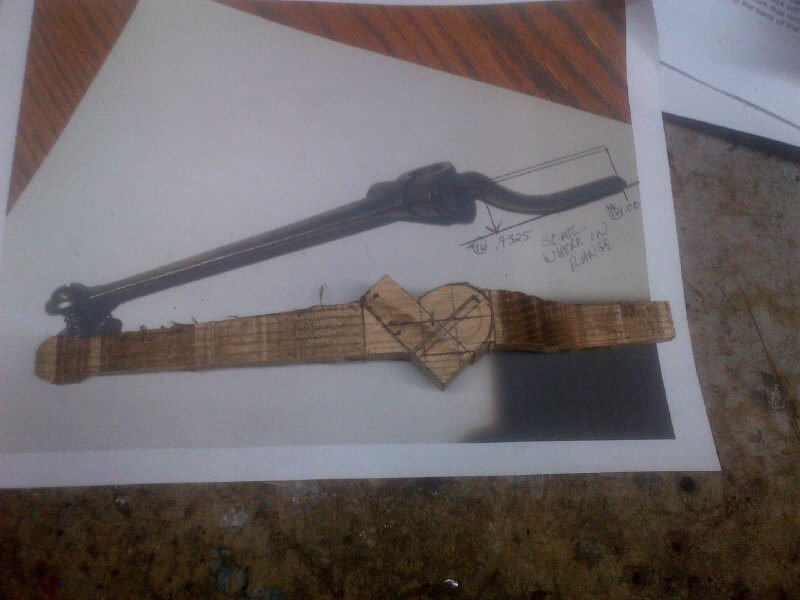
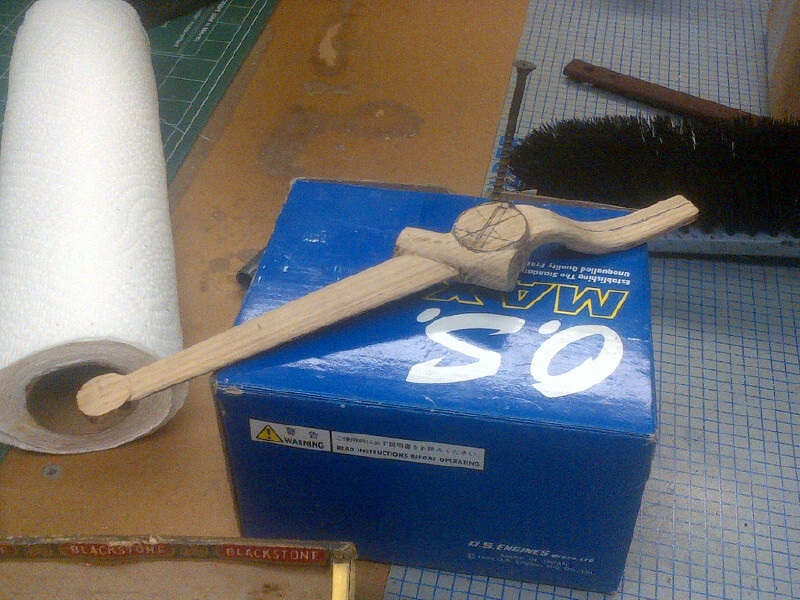
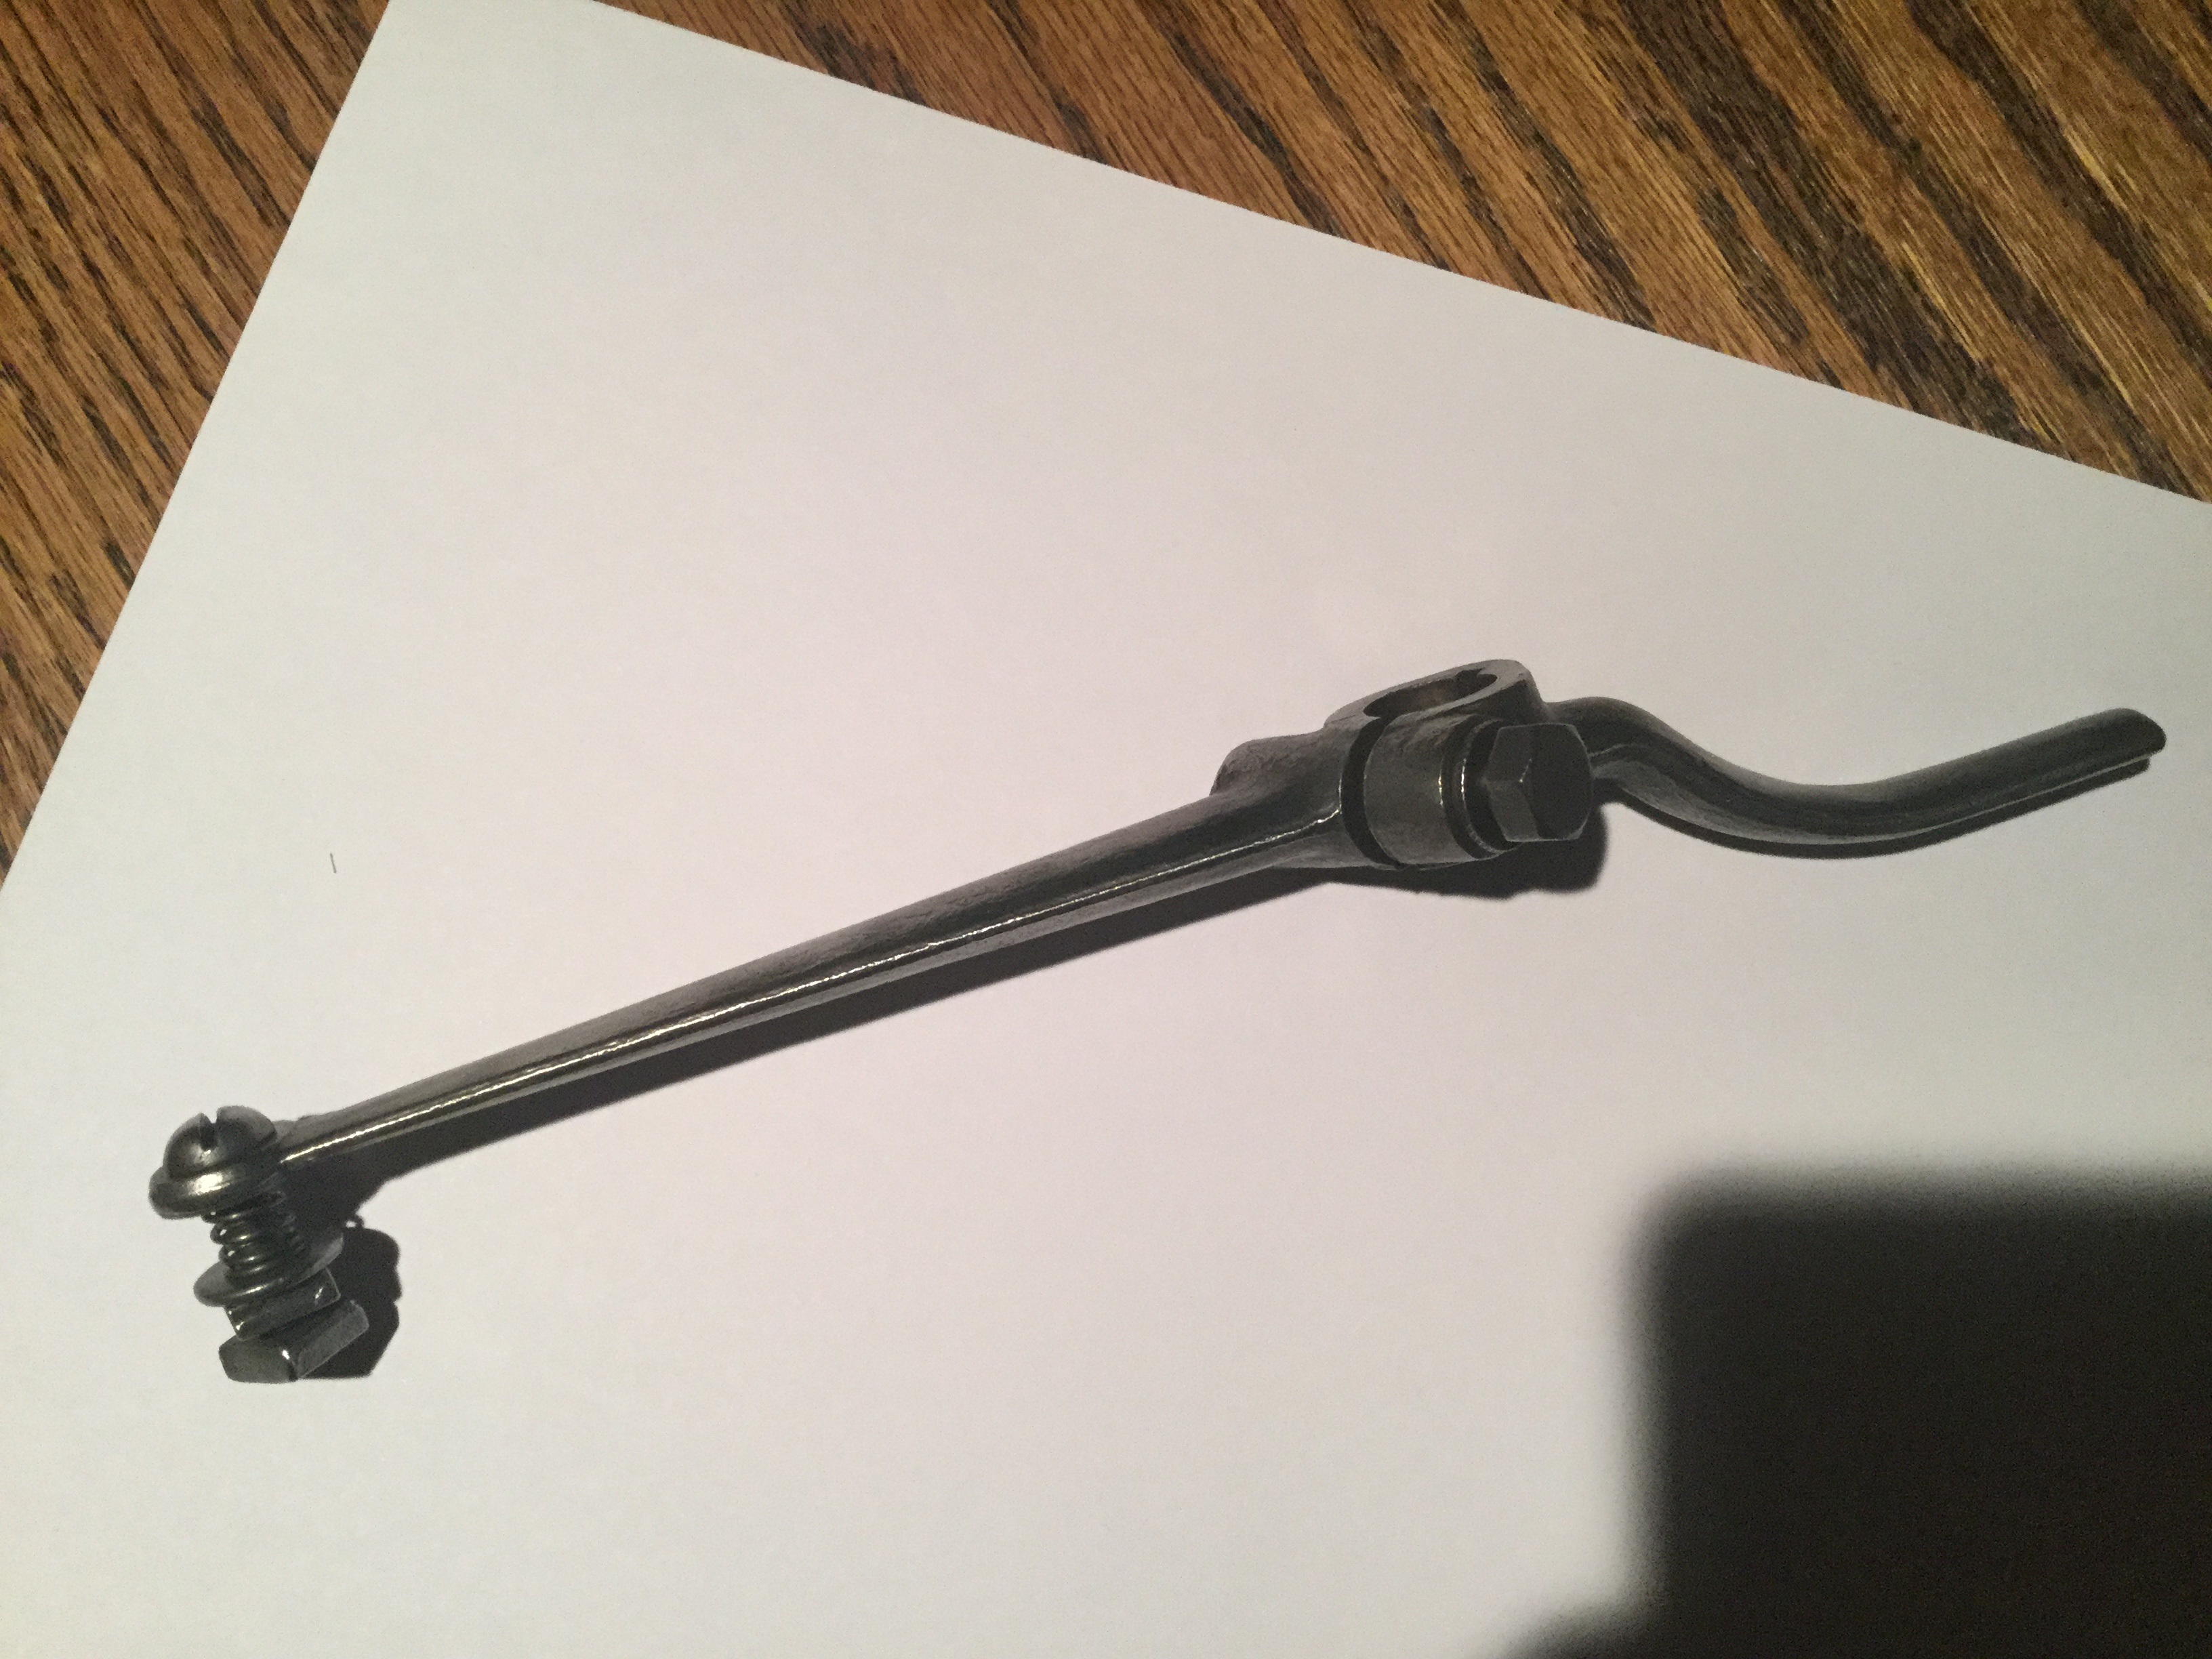
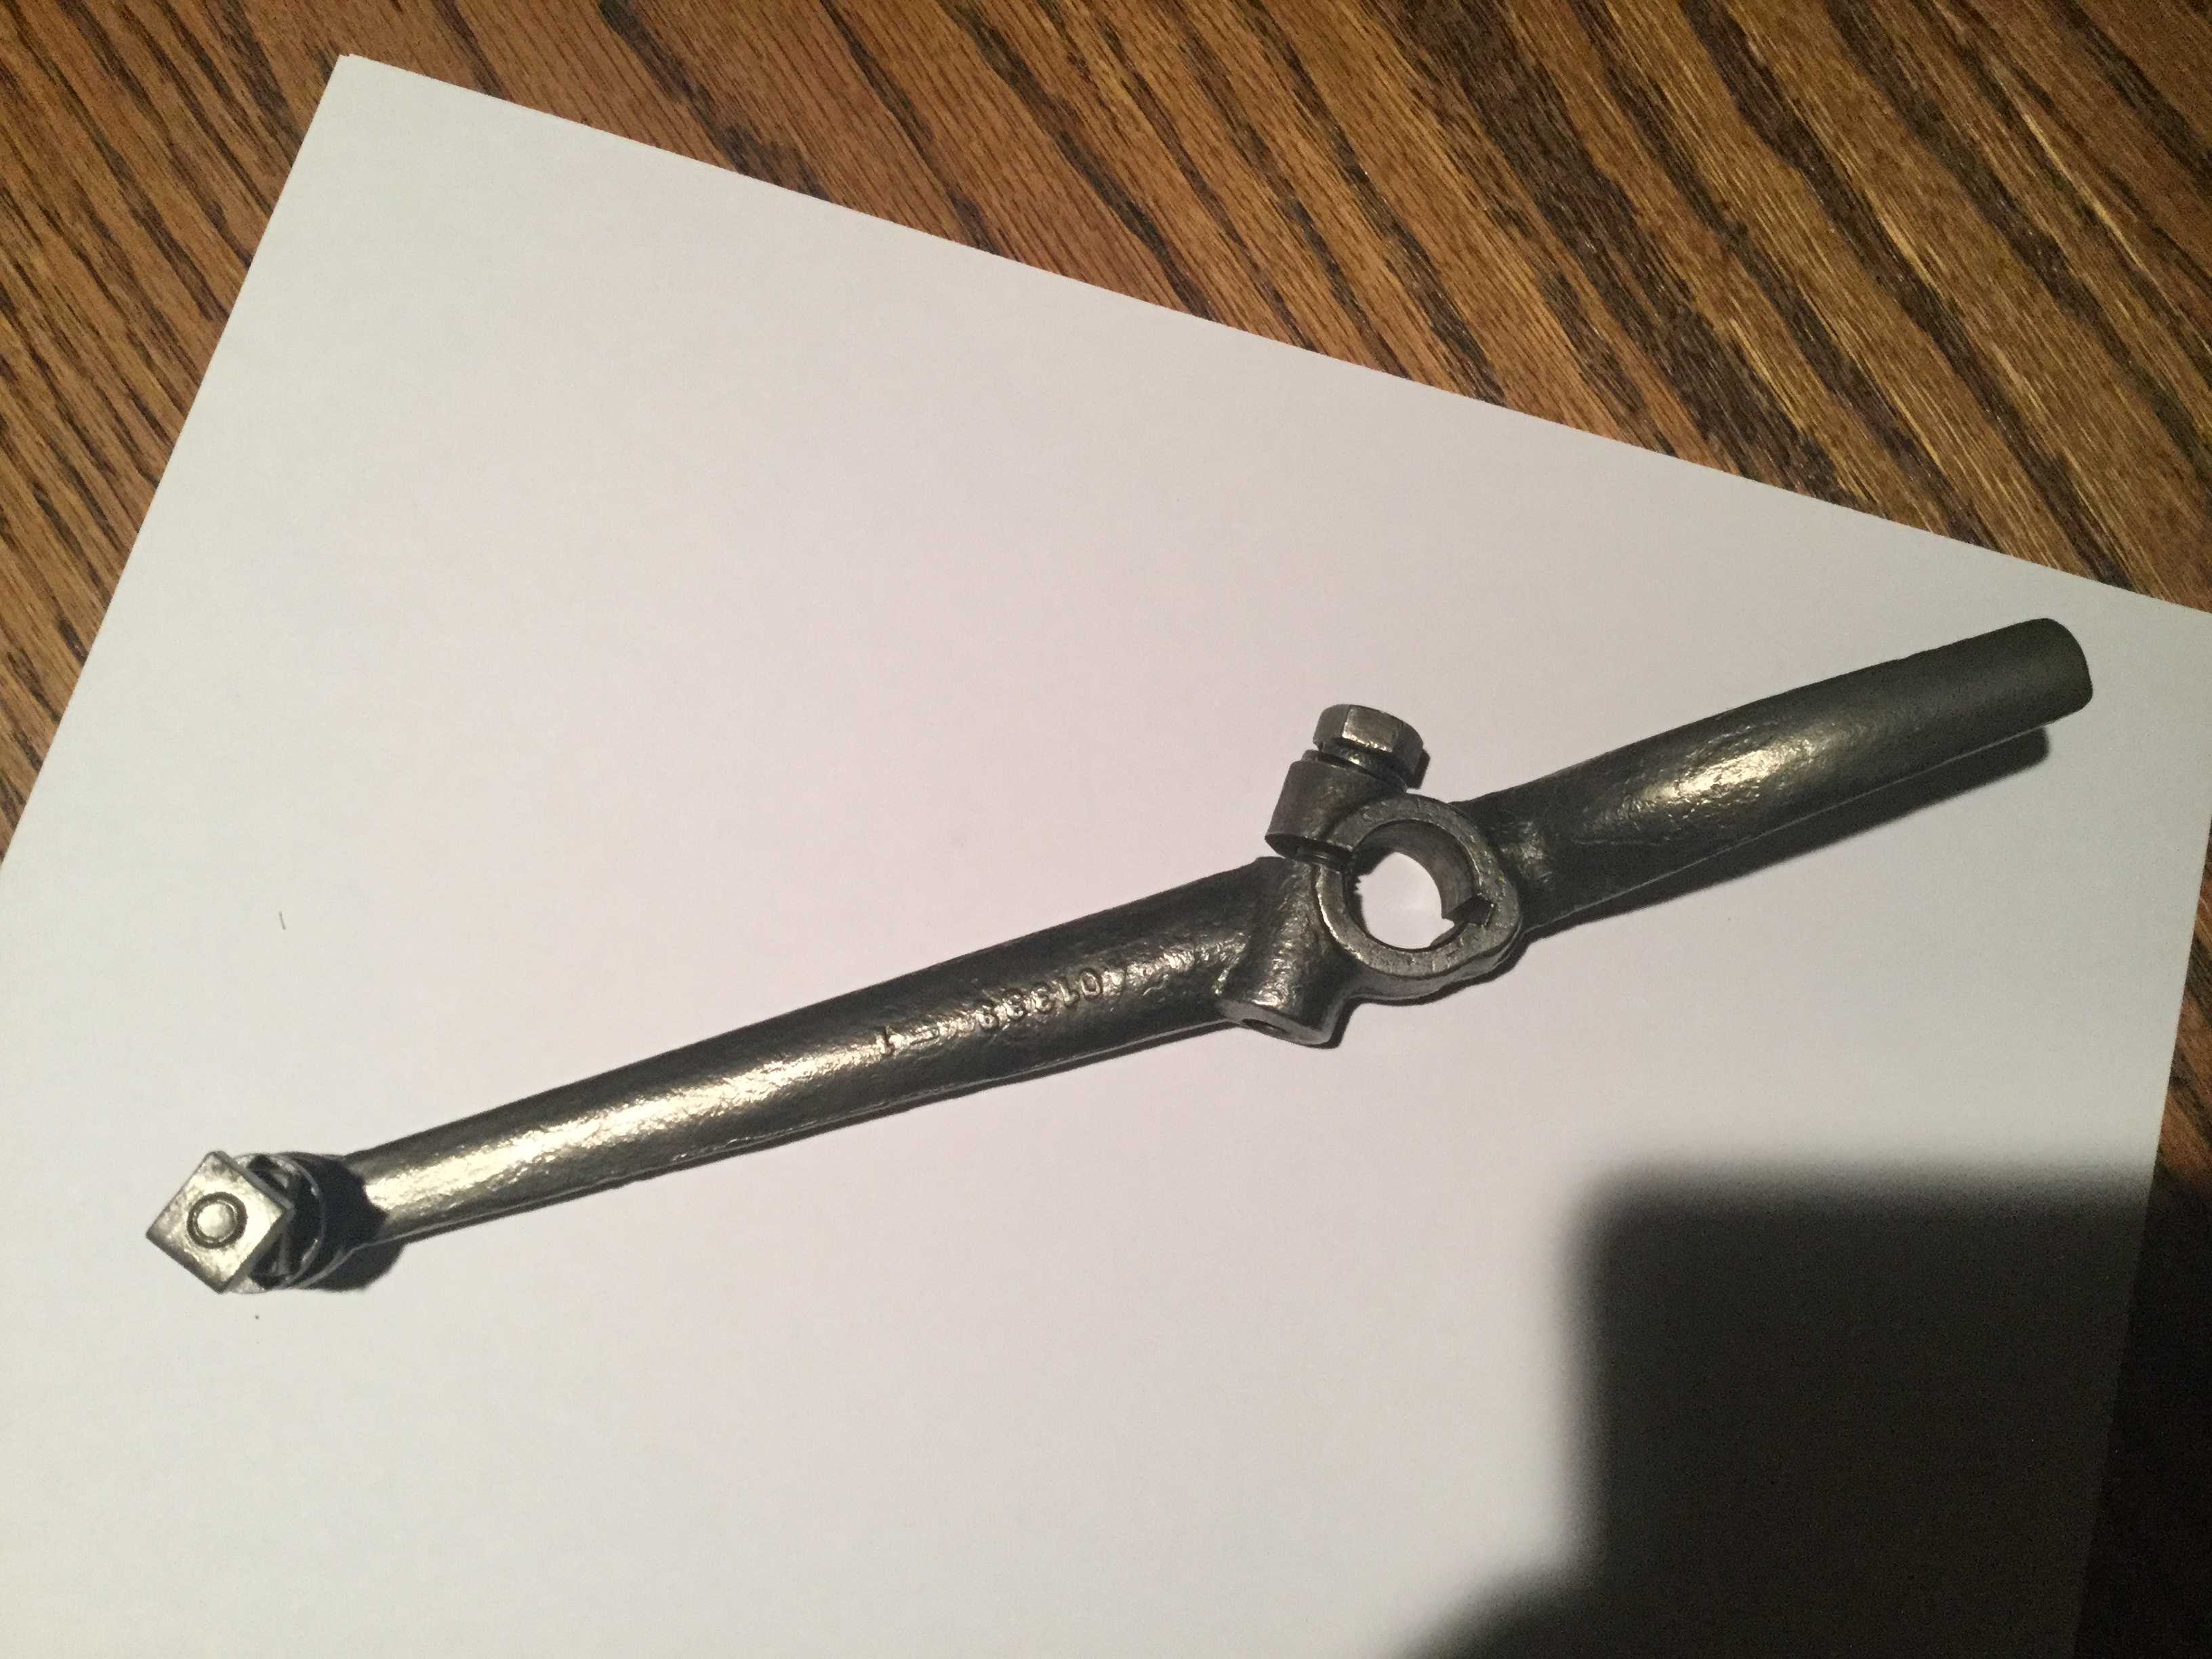
Took a nice long needed vacation away with the wife and now I'm back at it. Been working on the 31' Chevy 5 passenger mostly and fitting in small things for the Olds. One thing I've been looking for is parts for the free wheeling system on the Olds. My internals have been altered so that the free wheeling is no longer operational which is fine but I want all the exterior to look 100% original. I was missing the freewheeling lever and most of the linkage/lockout brackets. With the help of my good friend, Joe Pirrone, I was able to make up a wood lever out of ash. Joe supplied me with pictures of his original lever and all the exact critical dimensions. I have spoken with Greg Coleman and once Joe confirms my wood pattern to his original, Greg with be casting up my new lever. I will be machining all the holes and pinch bolt slot after the lever is cast. It will be made out of cast iron as was the original. While it took a little time making it out of the hard ash, it should hold up well to the molding process. The first three pictures are of Joe's original lever. The others are of my wood pattern, from initial band saw cuts to finished dimensions and shapes. Some further fine sanding to remove any file and knife marks was done after these pictures. While it might not be perfect, it should be correct enough to be fully serviceable and unnoticeable as non-original to most. 1932 Olds Free Wheeling.pdf


-
2
-
-
Since I started restoring my 32 Olds, I've come to realize how nice of car the Oldsmobile models were and how much more advanced than others of the period. This appears to be a very nice car.
-
Took the fuel tank and radiator to get flushed, cleaned, and checked out. The radiator had no leaks, not dented fins, and seemed to be in great condition. The fuel tank had old dried up fuel in the tank and also had a couple pin holes that will be soldered up. Before I took the tank I realized that the rear corner on the neck side had a good size dent that also buckled in the side of the tank. I made up a knocking dolly out of some 3/4 round, worked on the lathe to round the corners, drilled and tapped at an angle to attach a 3/8" round shaft. Putting some specific bends in the 3/8" shaft, I was able to insert the dolly through the tank filler neck and hammer out the corner dent. I then bent the shaft again to work the sides of the tank with the dolly and hammer to get the side back out where it belonged. Using the sunlight coming in through my shop window allowed me to better see exactly where to apply the dolly pressure and where the light hammer the outside skin. I didn't take a before picture, only an after picture, but the tank corner dent is now gone and only a light crease or two are in the tank. Some light body work on the outside of the tank will clean up those small areas.

-
Been busy working on a 31' Chevy for a customer but have fit in some work on the Olds. Got three wheels completely stripped of all paint, blasted all the metal, and primed them. I will start stripping the 3 varnished wheels I have to make up the matched set of six. Took apart the two horns, blasted the horn frames and bodies, cleaned up the electrical sides, then blasted the tubes of the horn trumpets. Unlike other cars of the period, the Olds horn trumpets were not totally chromed, only the bells were. The tubes of the trumpets got painted the fender color of the car. The horn frame/bodies got primed and painted with the trumpet tubes getting primed. The bells will be chromed later and then the trumpet tubes will be painted when the car is painted. Put the steering box and column on the chassis, installed the driver's side engine pan, and installed the new lower chassis wire harness. Ran new wire up the column and soldered the wire to the contact button. The driver's side engine pan had some rotted areas that were welded and restored to original condition for me by John Lima of Extreme Paint and Collision. I purchased my wiring harness from YNZ and opted for the hidden electronic directional controls. YNZ wires the harness so the front fender mounted parking lights will now operate as both directional and parking lights. The tail lights will also flash independent of each other. The Olds harnesses were advanced over other brands in that the area where the cowl joins the chassis, all wires plug in other than one single wire to the generator cutout. This allows you to remove the body from the chassis by simply unplugging all the wires and simply removing the single wire from the cutout. You can completely wire the whole body and dash of the car while the body is off the chassis.


-
All the small details add so much time to our restorations for sure. Just keep plugging along Jerry, the end of the tunnel is near!
-
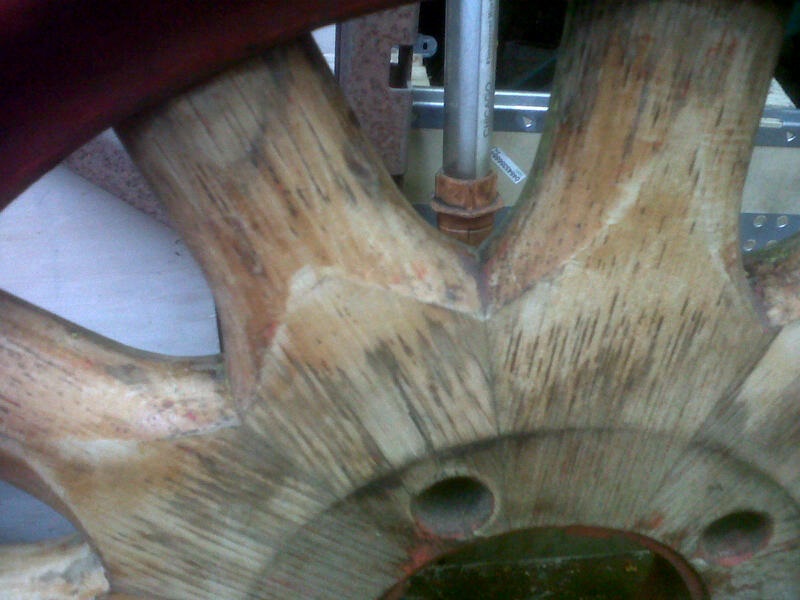
Worked more on the wheels today. Got another two scraped and then used the oxalic acid on two wheels. Quite pleased with the results. Now the spokes will get masked off and the rims blasted in the cabinet, then etch primed. Once the spokes are all sanded and finished, the finish paint will be applied to both the rims and the center hubs. Going to scrape more paint tonight. Will probably do all 6 of the red wheels and use them as a group so the color all matches correctly. As I said in an earlier post, I believe these red painted wheels were original to my all black DCR. In the pictures you can see the remains of a 1/16" white or "cigarette cream" pinstripe on the rim. This would be the correct pinstripe color for the all black DCR model. The rim and center hub w/sprocket painted pattern was also on these wheels under all the red and yellow paint.


-
Brought some new parts to the machine shop today. Got new exhaust valves, guides, springs, and timing chain. The shop owner and I discussed how my rebuild was going and how everything looked. He showed me my intake valves (they looked brand new) and my exhaust valves (that were shot!). My main bearings and all journals, both the crank and rods, are in very nice shape and will only get polished. No other issues have been found and once he journals are polished later this week, he'll let Russ @ Paul's Rod and Bearing know the size so he can ream my re-poured rods to he correct diameter. Once the block is bored, Ross Racing Pistons will be notified so they can machine up 6 new pistons.
When I disassembled the motor originally, I found the timing chain extremely loose to the point where you could almost remove the chain off the sprocket. When we checked my new NOS chain against the old one we discovered that the chain that was in the motor is one half link longer. We believe that at one time someone put the wrong timing chain in the motor. The new chain fits both gears perfectly and is a better fit than the chain that was in the motor. The machine shop owner told me he thought something was wrong as he has never seen an all steel chain timing chain like that, stretch so much. Now we know why it appeared that way.

-
Thank you Pacerman.
-
The wife and I have been discussing the colors we want to paint the Olds. There were four color combos in 32' and the two tone brown is out (because of my 31' chevy in my picture, and the black fenders with maroon body is out. It leaves a two tone blue and the all black schemes. My car was originally an all black car with natural wheels. I've included a factory promo picture of an all black one with the black painted wheels. There appears to be no pinstripe or any color "saddles" at the top of the door which would be cream colored which leads me to believe this was a pre-production photo. The all black looks very classy and would be VERY easy to paint. Downside is the hard up keep to having it look great all the time.
Did some more fine hand scraping with a concave cabinet scraper. Also used some lacquer thinner with a small fine wire brush. The two in combination have just about removed all the paint. Tedious work yes but coming out good so far. Will have to try the oxalic acid on it, Put he wheel in my blast cabinet and blasted the rim and hub. Put some etch primer on the inside of the rim and the outside edges just to keep any surface rust down. Need to mask the spokes to finish the priming. Going to have a friend make up vinyl stencils for the sprocket pattern on these wheels so the hub painting is easier once I get to that point. It will be nice having all he wheels done.
Motor rebuild is advancing nicely. The rods have been poured and are just waiting on the measurements from the machine shop on the polished journals so Paul's can ream them to fit. My cam, lifters, intake valves/springs/guides are all good but I needed new exhaust valves/springs/guides and a new timing chain. A NOS chain came from North Western and the valves/springs/guides all came from Then and Now in Weymouth, MA (my own back door!) I should have he valves tomorrow and will be dropping them off at the machine shop. Still waiting on the new bore dimensions so the pistons can be ordered from Ross Racing Pistons in CA. Hopefully another 4-6 weeks and the motor might be home.
Got the driveshaft all finished up and made new plugs for the greasing holes. There should be a plug in both ends but most are found with zerks installed which actually causes an imbalanced drive shaft. The plug is made to have a very low profile once installed. The driveshaft will also be going for balancing.


-
8 hours ago, 42319DB34 said:
Oxalic acid , cleans and bleaches wood ....
Thanks for that info. I have one wheel completely cleaned out and there's some dark spots I'd like to even out with the rest of the wood. I'll give it a try.
Ted
-
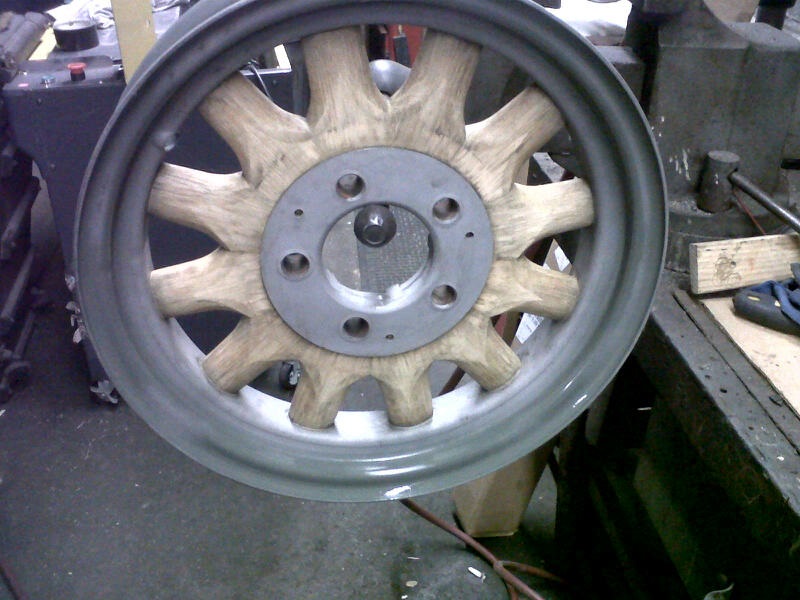
 My 32' Olds came with two sets of wood wheels. One set natural varnished and the other set painted red. Three of the natural varnished ones (the finish I want to use) were damaged by raccoons. I decided tonight to try and scrape the paint from one of the red wheels to see how hard it would be to clean them down to natural wood again. Once I started scraping on the back I realized that the paint was coming right off and there was varnish underneath so very little of the red paint penetrated the wood grain. On the front of the wheels as the red scraped off, there was yellow underneath. The same yellow as the car had been painted years back. Unfortunately, before the yellow was painted they must have lightly sanded so some yellow has penetrated the grain but still not bad. A light soda blasting should remove most if not all of it. I will still need to media blast the steel parts after the wood has been masked off for protection. Once the site is fully up and running my pictures should upload.


-
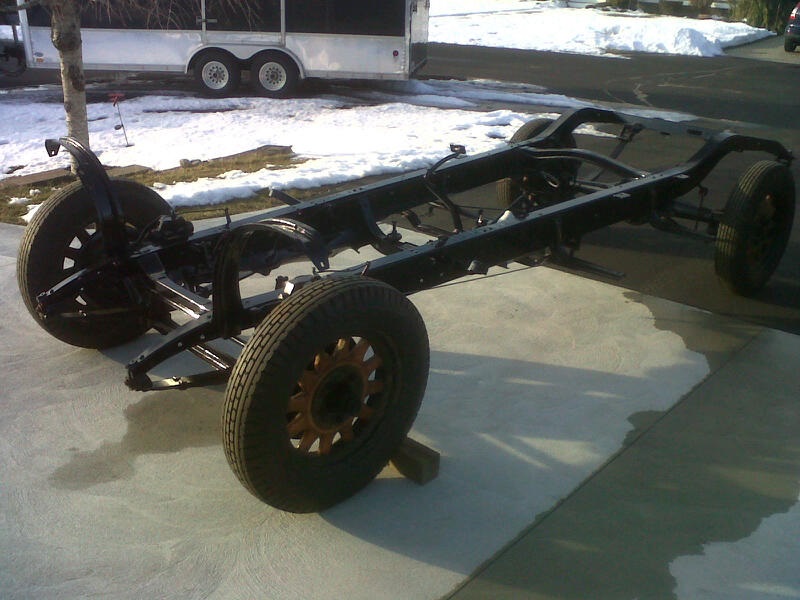
Got the frame off the rotisserie and on it's un-restored wheels. Rolled it outside for some fresh air and loaded it in my car trailer to store it while I'm working on another car. Found all the parts for my engine rebuild and the rebuild is coming along nicely.


-
1
-
-
Disassembled both the starter and generator replacing the bearings on the generator. It is a full ball bearing unit with a through shaft. The generator is in a fixed position on the Oldsmobile and the water pump is driven off the back shaft. Both units were pretty crappy on the inside so the field coils were removed and the housings fully bead blasted and painted. Once the generator was reassembled, I put it on my lathe to adjust the 3rd brush. It is running right at manual specs, 8.5volts cold. Both units had their respective labeling applied and will be stored until needed.


-
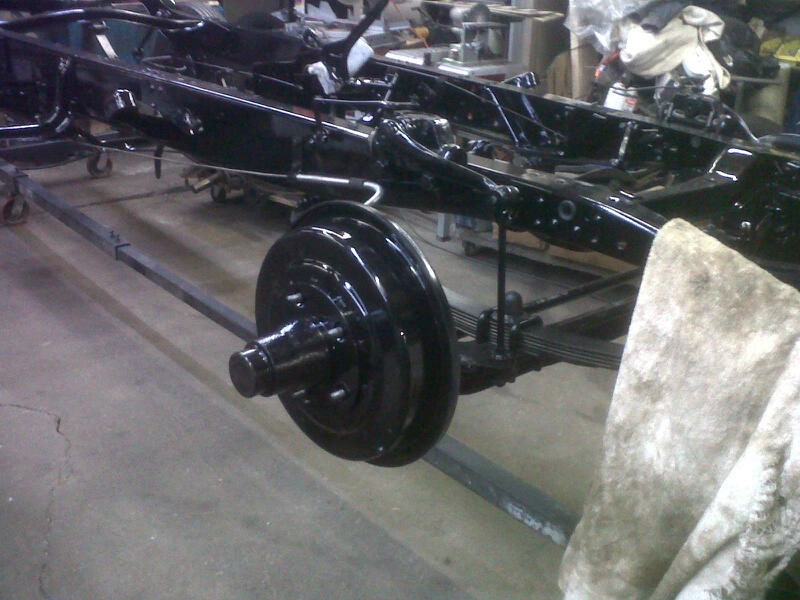
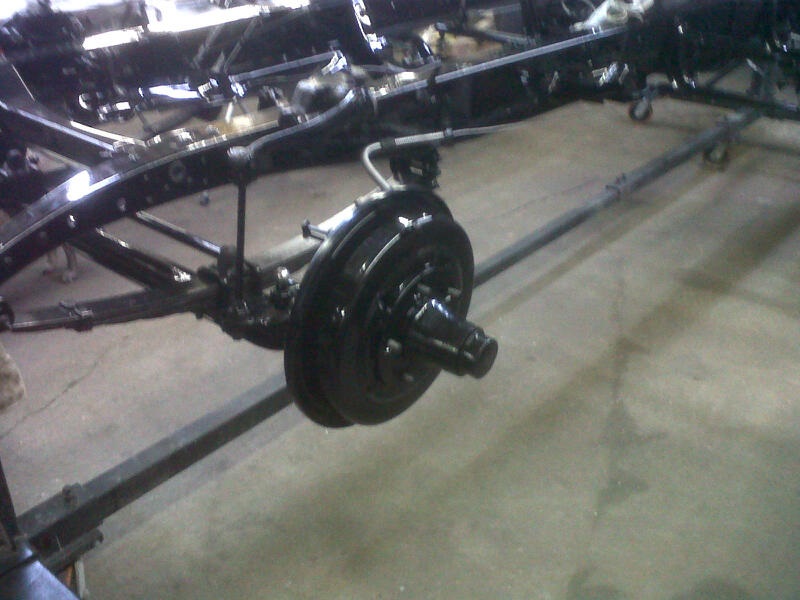
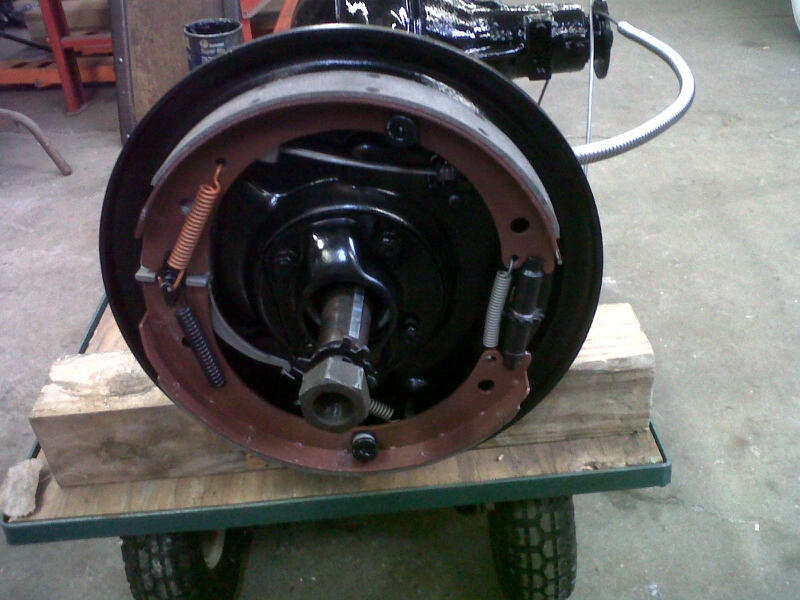
Picked up my brake drums, drive shaft, fender supports, floor pans, and tool tray from the paint shop. All the sheet metal has been put away until needed. Completely checked/cleaned all the bearings and replace one inner front race. Bought new modern seals for the inner bearing on the front. Installed all 4 drums then adjusted all the brakes per specs in the manual. Installed the brake/clutch pedals, stop light switch, and put the wheels on so I can drop it off the rotisserie. Still need to do the wheels. I have two full sets (12) with 3 of the natural ones damaged from raccoons. I will be soda blasting three of the painted ones I have to get them back to natural.


-
Hello,
I am in need of 6 exhaust valves for my 32' olds 6 cylinder engine. Part #399874. I was told that 32' Pontiac 6cyl also fit. Any help is appreciated.
-
I am in need of 6 exhaust valves for my rebuild of my 32' Olds 6 cylinder. Part number is 399874. I was told that 32' Pontiac 6 cylinder valves fit also. Any help is appreciated.
-
Beautiful car!
-
Keep plugging away Jerry. How is the motor coming? it will be good to see your car on the your so you and your family can enjoy it. Are you shooting for this summer for completion?
-
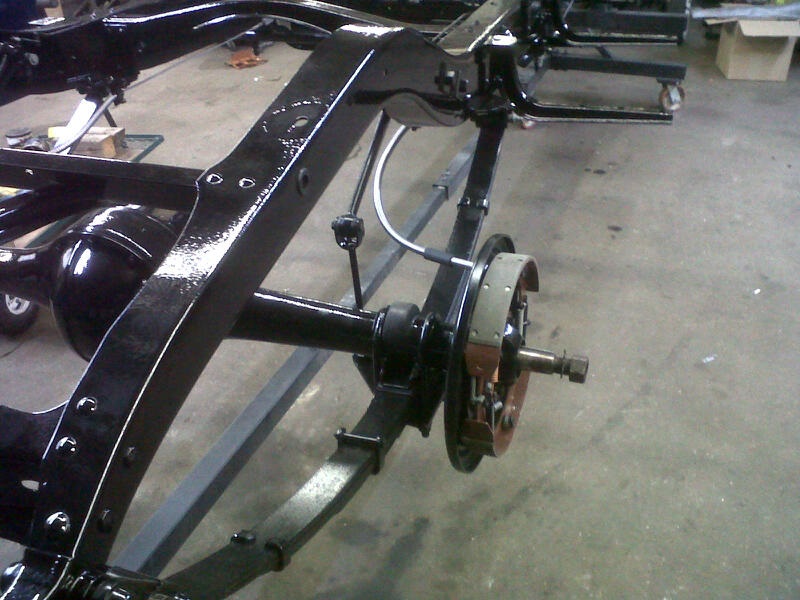
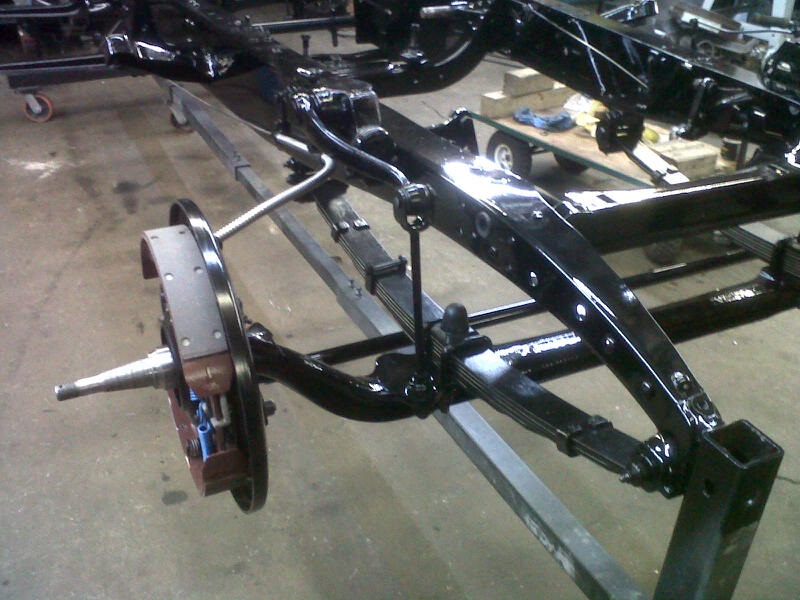
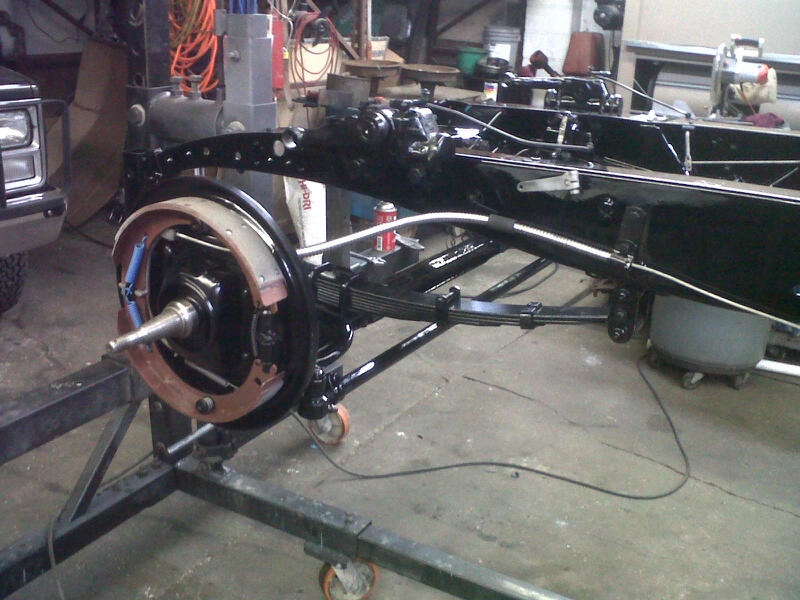
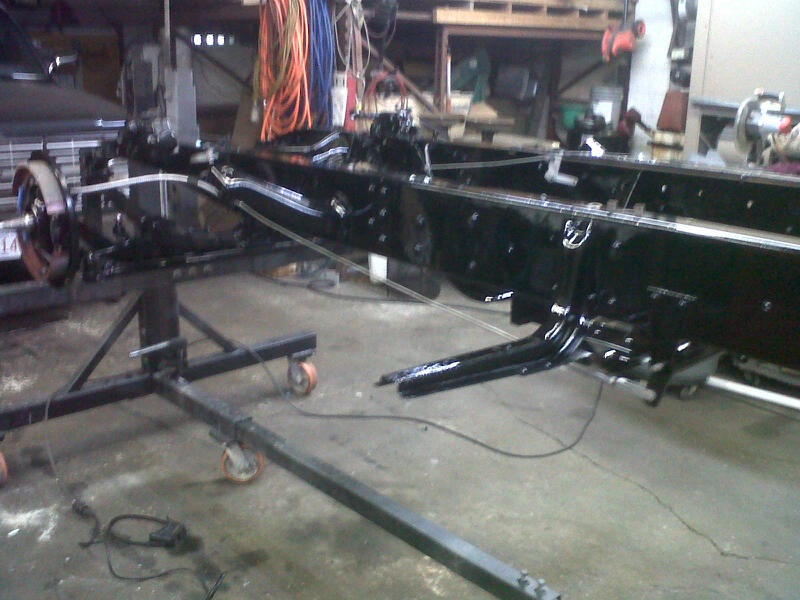
All the rubber parts came in today and got both axles all bolted up tight. Installed all shock arm bushings and connecting link bushings, then bolted all up tight. The new front rebound bumpers on he front axle fit perfect and the rear axle got mounted with all new spring pads. The shock valve control rods were all mounted and new rubber eyelets run on the supports. This chassis is virtually new to this point and should go down the road real nice and quiet.


-
Thanks Jerry. It keeps coming along. Blasted the drums today and with take them for paint. Installed the brake cross shaft with a new stainless steel 3/8" shaft. Put 1 1/2" pieces of heater hose on the front brake cables for anti-chafe and mounted the casing ends in their brackets. Temporarily attached the cable clevis to the brake cross shaft. All brakes will be adjusted to specs once the drums are on. Finished installing all brake components on the rear axle preparing it to be mounted to the springs. Got all the shock control rods blasted, primed, and painted.


 My 32' Olds came with two sets of wood wheels. One set natural varnished and the other set painted red. Three of the natural varnished ones (the finish I want to use) were damaged by raccoons. I decided tonight to try and scrape the paint from one of the red wheels to see how hard it would be to clean them down to natural wood again. Once I started scraping on the back I realized that the paint was coming right off and there was varnish underneath so very little of the red pa


32 Nash 1063 convertible sedan
in Our Cars & Restoration Projects
Posted · Edited by chistech (see edit history)
It's the rear of the roof, mounting below the body line that give the impression to me that the roof is higher. Both the drawing the the bottom picture show the roof attached at the belt line. You car seems to have the roof drop about 4" below the body belt line. I think that is what gives the vision of the differences. But the rear of your car drops that low so the drawing is wrong but what about the picture? Is that a different make but a similar model?