


MikeC5
-
Posts
2,511 -
Joined
-
Last visited
Content Type
Forums
Gallery
Events
Posts posted by MikeC5
-
-
I'm not sure what my '25 has in it but it cruises pretty comfortably at 40 - 45 (actual speed).
-
I know Snyder's does this and I did use them to recreate the seat backs which were more complex due to the 3D shape of the frame. I wanted to do the bases myself since they are relatively simple (having them made ain't cheap either).
-
 1
1
-
-
Hi Bob,
I did the best I could with a protractor and (eye balled) tangent points between end of radius and straight section. The accuracy was not better than a degree despite my extra significant digits. This is what was left of the original spring...
-
This may be a bit esoteric but maybe someone has run into this before. I'm remaking the seat base spring assemblies for my '25 DB (they were rusted beyond redemption) and have just realized that I cannot find replacement coils with near the top/bottom diameter of the original coils (~ 3.5"). I've looked and looked but everything I find at places that sell these springs are 4 1/4 to 4.5" diameter. What's the big deal? None, I hope. What it means is that I will have to reduce the number of coils to fit in the same frame (45 vs. 31). The diagrams show what I mean. My question is will the reduced number of larger diameter springs make for an unsupportive/uncomfortable seat? Does anyone know of a source that sells coils closer to the 3.5" diameter?


.jpg.b79aaf579f4ef3da4098c7d4ffdfffa5.jpg)
-
1
-
-
Thanks Ron! Sometimes I'm envious of those Model T guys where almost anything you need is just a few clicks away.... Not much challenge it that though...
-
2
-
-
I think driving any pre-WWII with rear-only brakes will force you to be a better driver (or you won't be doing it for very long). I look at what's going on much further down the road than before I began driving my '25 DB. I had a few close calls at first... Of course, that won't protect you from the moron looking at his phone that rear ends you....
-
4
-
-
That Gulf station is way cool!
-
1
-
-
Front seal frame completed.


-
6
-
-
I think the Lark wagons were the best variant of the Lark. I think it's very well proportioned and solid looking.
-
1
-
-
Good stuff Ed. My first time there was 1982 and it was amazing. I do kind of miss it being in the fields (and mud)....
-
1
-
-
I always find it funny when Edsel styling is criticized because, let's face it, 1958 was not exactly a high point of American car design. I find the Edsel to be restrained compared to some of the chrome laden beasts coming out of GM at the time... The '59 was downright conservative compared to some of the competition. Styling is always subjective, I know...
-
1
-
-
I think mine does the same thing (it's a sort of high pitched squeaking that seems to come from the forward part of the body but I can't pinpoint exactly where). The range is smaller than what you describe though. I'll have the car back on the road for the summer season soon and will pay more attention to what speeds it happens and report back.
-
Yea, I wish there were replacement brake drums available but I haven't seen any...
-
1
-
-
Gotta like those headlight covers!
-
1
-
-
It wouldn't hurt but I think you'll want to double check the static timing per the MIM after you reinstall just to be sure it's correct. My car has a distributor but I image it would also be very easy to lose timing with the magneto as well.
-
1
-
-
Hi Adolimpio, welcome to the forum.
These cars have '3rd Brush' regulation (of current). It can be adjusted but I suspect that isn't the problem. Here is an excerpt from the Northeast
Equipment manual. The field fuse protects the system from over voltage in case of wiring faults. Should the Starter-Generator voltage ever rise too high as
a result of poor connections or broken wires, this fuse will blow and stop the machine from generating. If the Starter-Generator ever fails to chargetherefore, inspect the fuse to see if it is blown or loose in its clips. In replacing a blown field fuse, never use anything but a standard 10 ampere fuse"
Before a new fuse is put in, the entire car should be gone over carefully to locate and correct any loose connections or open circuits. The Battery should
also be inspected to see that it is properly filled and free from corrosion or other difficulties that might interfere with the operation of the Starter-Generator.
Always be sure the fuse flts snugly in the clips. Drain holes are provided at each end of the fuse cup to d.rain off any moisture that might collect. Do not
allow these holes to become clogged with dirt or grease.
I've also attached some other information that came out of a Dyke's manual (I think). Does your car have original wiring?


-
I'm glad you had that helmet on Peter! I hope for a speedy and full recovery.
-
2
-
-
Thanks Matt. Here is the tube all welded up. It will need just a little tweaking to lie flat. The next step will be to weld on the u-pieces that will serve to crimp onto the edge of the perimeter coils (at bottom of spring). This and the tack strip were all accomplished with one piece on the original seats. I don't think the piece was extruded but bent from flat sheet (~ 0.040" thick). I'd like to see the tooling they used... I'll be using this u-shaped piece which is 0.125 opening but I could only find them 1" long. I'll be cutting them back to 1/4 to 3/8" and then will weld the bottom of the 'u' to the inside edge of frame.


-
4
-
-
1.5 turns lock to lock on that Loco? I'll bet that's a bit twitchy at 60 mph!
-
So many interesting machines! Looks like a good time and beautiful countryside.
-
2
-
 1
1
-
-
Thanks guys. Yes, the top will be edge wire bent to a somewhat more rectangular shape and I'll be using coil springs of pretty close to original diameter. The number of coils on each spring increases toward the forward end of seat (thickest at forward edge and tapers down by roughly 3 inches at aft edge) I'll show some additional photos of original spring assy.
-
2
-
-
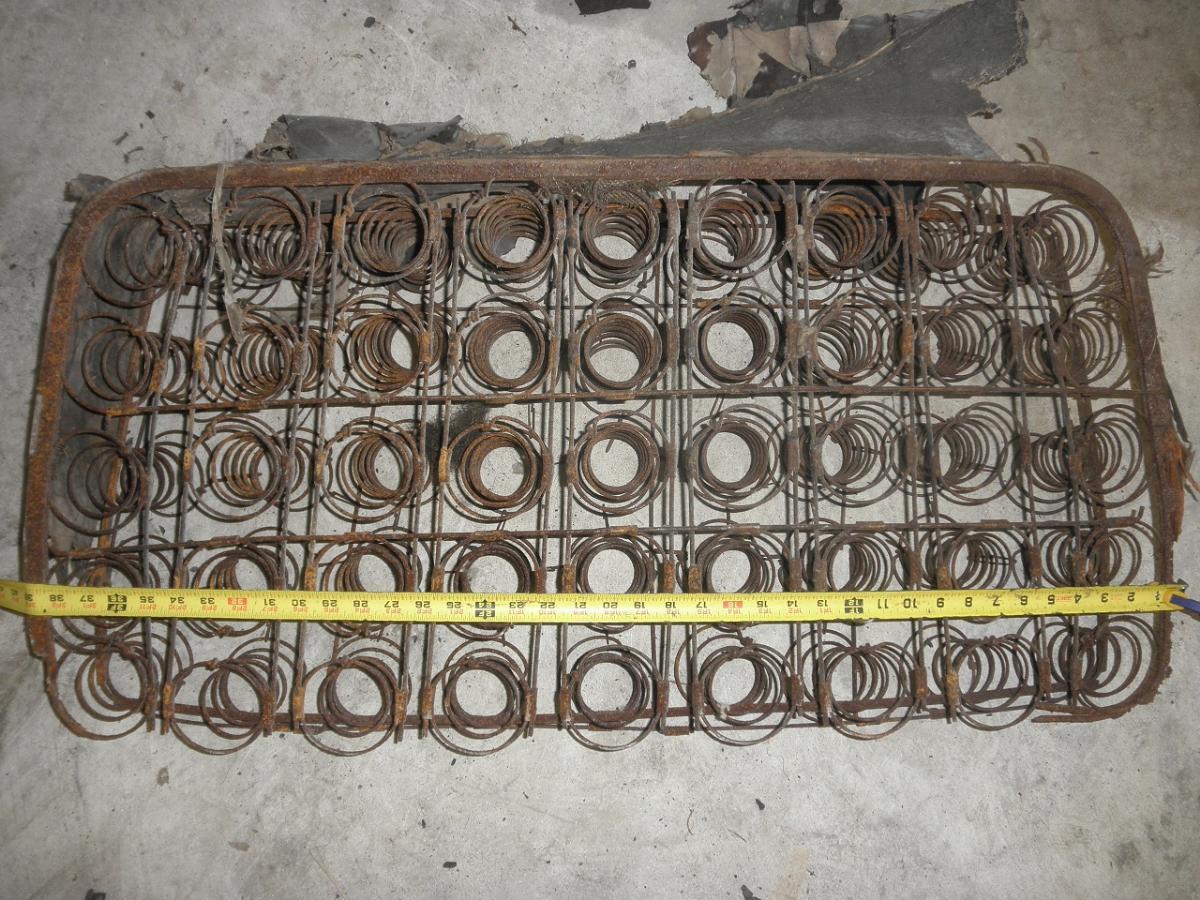
I thought this might be of interest to anyone with a '25 vintage DB with rusted out seat springs. I'm trying this on the seat bottom springs since the framework is 2 dimensional (unlike the seat backs which require some 3D bending). There is at least one Model T/A parts vendor that can make seat springs to order but it is very pricey.
The tool you see here is the Harbor Freight tube/Rod Bender (https://www.harborfreight.com/compact-bender-38470.html). It looks identical tot he Eastwood model at less that half the price and seems pretty robust. The tubing I'm using here is 1/2 x 1 rectangular tube, 0.062 wall. In order to get this to smoothly bend without buckles, the inner diameter dies were modified as shown in the photos (there are Youtube videos showing similar). So you do need access to a metal lathe. Also, in order to make things bend easier, I heated up the tube to bright orange with an oxy-propane torch with rosebud tip. I do have AutoCad drawings for the dies I machined if anyone wants more detail. I also had to buy some larger diameter stock to make dies for the larger radius bends.
The bottom frame of the original spring assembly is shown first. Please note that the original has a crimped in tack strip for holding the seat cover on. This was too complex for me to reproduce so I'm planning to use hog rings.


s.jpg.a50d2b7fa8825654501f480693ca0067.jpg)
s.jpg.e81a788a501019dca9e95e216eb0196a.jpg)
.jpg.55ef805796b25dfed8a658c1977d9e47.jpg)

-
7
-
-
-
I can't believe Cadillac would have still used a vacuum tank on anything by 1941. Fuel pumps were in widespread use by then. Could it have been a vacuum accumulator for something?


.jpg.b79aaf579f4ef3da4098c7d4ffdfffa5.jpg)


s.jpg.a50d2b7fa8825654501f480693ca0067.jpg)
s.jpg.e81a788a501019dca9e95e216eb0196a.jpg)
.jpg.55ef805796b25dfed8a658c1977d9e47.jpg)

What do I have
in Dodge & Dodge Brothers
Posted
I like it! The yellow looks good on it.