


JV Puleo
-
Posts
5,188 -
Joined
-
Last visited
-
Days Won
22
Content Type
Forums
Gallery
Events
Posts posted by JV Puleo
-
-
I sent the engine of my first brass car to a well known professional...someone who came highly recommended and who I know had done a few Silver Ghost engines. I later assembled a car he'd done the engine on so I know he was reasonably competent. (But I have to say that it was never quite as good as the SG's I've worked on where the engines had never been apart.) With my engine he took a number of outrageous shortcuts, including spot welding the cams to the camshaft (it was a camshaft with separate cams - a type common before WWI) so that you could no longer get it out of the crankcase because it wouldn't go through the center bearing. It seems to have been a case of "young guy, doesn't know much, car will only be used for local parades (I never do parades) etc. There are any number of excuses for doing a poor job. There were other items as well. Because I was running out of money, I brought it home and it was then I discovered this. I resolved then that I had to learn to do this myself or I'd never be satisfied...but, I once had a receipt from a highly respected engine rebuilder for the work he'd done...and it was worthless.
-
 2
2
-
-
2 hours ago, edinmass said:
The car had antifreeze in it.....the shaft was not leaking.......go figure.
The shaft was definitely nickel plated..........not a good choice. But then again, it’s almost 104 years later. I enjoy working on the car, because the last time almost anything was touched, it was in Cleveland Ohio when it was assembled.
It isn't quite that odd. Nickel plate was thought of as an "anit-rust" coating. That may have been it's original purpose. The Springfield Armory (you must remember that well!) nickel plated about 100 trapdoor Springfields around 1885 for testing in the field. They did some Colt SA revolvers too. It wasn't as successful as they expected - or hoped. The revolvers went to the Indian police and I think the rifles were simply sold off as surplus. On rare occasions when a nickel plated trapdoor shows up people claim it must have been one of those. They usually aren't, just parade rifles made up by some GAR post. It turns out the serial numbers of all the originally plated rifles were recorded and are in the Armory records in the National Archives in Waltham.
-
1
-
-
That is all electrolytic corrosion. It has nothing to do with wear, it's just what happens when you have unlike metals in contact with water. As bad as it looks, it took 100 years to get that way. My guess is that it had no effect at all during the car's working life. This is a great example of why you have to examine any water pump no matter how few miles the car has on it...the deterioration will be there if the car had 0 miles on it.
-
1
-
-
I hadn't thought of that but it's reasonable.
-
2
-
-
14 hours ago, Restorer32 said:
We have restored cars for clients who eventually sell the vehicle, say to a dealer. Said dealer then calls us wanting copies of all our invoices relating to the restoration. While we will give the dealer a full list of what was done we are not about to release copies of our billing. If the previous owner wants to do so that's fine, just don't act huffy when we refuse.
Absolutely correct! That is entirely between you and your customer. If the cstomer wants to release it, that's his business but I can't even imagine having the nerve to ask you.
-
1
-
-
So...does it have plain bearings or ball bearings? I really like it. I is the sort of over the top engineering that I thoroughly appreciate.
-
I'm finally back to my engine. I was able to get the material to make the hard fiber washers. It's actually a vulcanized rubber sheet. Apparently referring to as "fiber" is old fashioned which kept me from locating a source. I bought 2 pieces, 12" x 12" and cut one into 2" strips.

Then into 2" squares and punched the 15/16 holes. Because I had a short piece of copper, I made 4 ore of those as well although if the fiber works as I think it will I won't be using them.

Then on to the fixture and turned down to an OD of 1.4"


I had more squares than would fit on the fixture so I made a few more, this time without the copper to stiffen the ends. It did not make any difference.

All done...

That was so successful I went ahead and made the 13/1`6 ID version.

These have been a lot of work for a gasket but they came out as close to perfect as anything I've ever made and, realistically, you can't take any chances with the oil connections...a place where failure would really be catastrophic.
-
6
-
-
Re the water pump...I wonder if you could build up the exterior of that tube with Devcon aluminum epoxy (the Industrial stuff) ? It's expensive but nowhere near as expensive as making it over. I don't think I'd consider it for a permanent repair but short term it may be ok.
-
1 hour ago, edinmass said:
"It's all caviar and champagne cocktails along the James River." U.S. Grant, 1864.
That said........here is more water pump fun...........another easy restoration.........
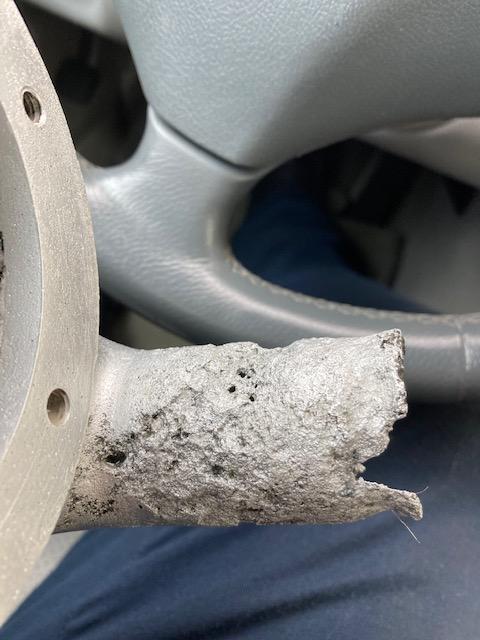
Now THAT is a challenge. I've no idea how I'd go about it but I might well make a new casting and machine it. The aluminum they used was not suitable (although they didn't know that and I'm sure they weren't thinking "this will rot out in 100 years". I'm a little surprised they didn't use bronze but the entire automobile world was in love with aluminum in 1917. I wonder what the wall thickness was? It might be possible to cut it off, counterbore the hole and make an insert with a slightly reduced threaded diameter to screw in. It would be a VERY touchy job...
-
2
-
-
Ed, I'm really curious to see this water pump shaft. When you do get it apart could you post a picture?
-
I'm not certain it would make any difference to me if the seller had a receipt but I take a very skeptical view of "rebuild" when people say that. If you haven't seen the car, heard it run, driven it etc. it is premature to be asking for receipts as if the seller is a liar. If someone was out to fool you, a fake receipt from a shop that is no longer operative would be easy enough to create. I've seen all sorts of work described as a rebuild - at most it is usually an overhaul and its value entirely subject to the skill of the person who did it. Price is no indication at all...the worst workmen can charge high prices.
-
1
-
-
I've been using - and completely satisfied with the "Super Grip Flat Belting" from McMaster Carr. It's a lot cheaper than leather - which is why I bought it in the first place - but the belts on my lathe and drill press have now been fine for more than 10 years so I guess its durable as well. Would 1-1/4" work? I think I have a long piece that was on my surface grinder but didn't work all that well there. I replaced it with a piece of conveyor belting ... you are welcome to it if you want to try it and I can throw in a strip of alligator clip. If it will fit it's worth a try.
-
2
-
-
Ted, I've found that when using a milling cuter that way it helps a lot to hold them in a collet. I bought a cheap set of ER collets that I use with a MT adapter in the tail stock. If you are opening up a hole (i.e. most of the center is already drilled) it works better still. So, were I going to put a flat bottom 3/4 hole in something I'd probably drill it 5/8" so that the point of the drill is just a few thousandths short of the bottom, then go in with the end mill to clean up the sides and flatten the bottom. That's what I did with the ends of the shackle bolts I just finished.
-
3
-
-
I sold some things on ebay 10 years ago. Since then it has gotten so much more difficult that I would rather give my extra parts away - or scrap them - than sell there again. It will take time but, inevitably, their greed will open up an opportunity for someone else. Presumably Facebook is already taking advantage of that. I've no interest in Facebook, don't use it and don't wish to use it but if they can straighten out their operational system it may be just the sort of knife in the back ebay needs.
-
That has got to be the most over-built fan mounting ever made. Nothing RR did on the early Ghosts or Phantoms comes even close. They just used belts albeit, with generous bearings for the fan spindle. I wonder why they though the fan needed a heavy duty silent chain? I think it's bigger than the silent chain on the late 4-cylinder Cadillacs and they drove the camshaft.
-
18 hours ago, lump said:
I took an old rusty Sparta brand 5/8" socket, and took it to my brother-in-law, who is a talented tool & die guy (a model maker for GM, back in the day). I had him to bore out the 3/8" drive hole so that a spark plug porcelain top would slide through it, and then cut a hex on the outside for a boxed-end wrench. The socket worked perfectly! I just slid it over the hex of the spark plug, and accessed the outside end of that 5/8" socket with a 19mm wrench, and backed the plug right out.
😜
That was an EXTREMELY good idea. As someone who often does things the hard way, I really appreciate clever tools and that is one of the best I've ever seen.
-
2
-
-
To drill the holes for the cotter pins I squared off a block of steel. I think it's 3/4" x 1-3/8" but the size is not terrible important.

Then into the drill press to put a hole through it the long way.

Reamed to 1/2". It's purposely off center top to bottom to give the set screw that will secure the bolt a few more threads.

Without moving the vice, I turned it down and put a center hole in for the pin hole, them moved it down to drill a tap for a 1/4-20 set screw. By keeping the same orientation on the piece these holes will come out perfectly centered on the long hole without having to measure anything.

I then moved ot over to my small drill press and drilled the pin hole through the block. The hole size is about .100 for a 3/32 cotter pin.

Then it's just a matter of putting each bolt in the fixture, locking it with the set screw and drilling the hole.

All done, or at least as done as I can now. The last two bolts at the front of the line are not threaded yet. Those go through brackets that are riveted to the chassis with bolts in them that will have to be cut off. The brackets have to come off to be bushed so there is nothing to be gained by not waiting until I have the bracket in hand to measure before trimming and threading the bolts They are, otherwise, finished.

I packed everything away on a shelf in a box labeled "shackle bolts"...
Now I can go back to the engine.
-
12
-
-
That is really a good looking car, from a period when very few seem to have been really attractive. The great ones are really great but most are, to me, fairly ugly (and I like the period...at least the mechanical aspects).
If you haven't already thought of it, can you take the muffler apart? It may well have one of those mufflers with the removable cast ends. It might be a good idea to make sure it isn't full of mouse nests.
-
1
-
-
I think we have to ask ourselves "what modifications are needed" if we want to use old (by that I mean pre-war) vehicles rather than cart them around on a trailer. The changes you've made to this truck are both subtle and, given we aren't going to drive them on the roads of the 1930s, in keeping with safety and modern circumstances. The truth is, nearly ALL "restorations" include some modifications...some for reasons of driveability but more simply because the material and techniques used at the time are no longer available. How many restorers brush paint a brass car...yet they were ALL done that way...or use iron pistons in an engine which are, for the most part, unobtainable. A car like Edinmass in currently working on is exceptional and it's appropriate that everything be done to preserve it as is but that isn't applicable to 99% of the "restorations" out there. If I have any problem at all with restoration its the hypocrisy of saying "your modifications are wrong but mine are ok"...
Cars are mechanical devices meant to be used. As such, keeping them working is a chore and it always involves a certain amount of creative engineering. Personally, I detest "rodding" an early car but I don't think subtle changes for the sake of remaining usable falls into that category. There are plenty of cars left that are beyond any practical use other than making them into something they never were... I only wish the "rod" community would stick to those. If they did, It would hand them the ethical high ground regarding preservation...like making an old brick factory building into apartments. We could be thankful for what is preserved.
-
4
-
-
If I were going to try to fix those threaded holes I would bore them out and make a brass or bronze sleeve, with a fine external thread secured with Locktite and the internal thread as it is or, if whatever attaches there can be modified, a slightly smaller inside diameter to add thickness to the sleeve. I wouldn't do that until after the stitching is done but it would give you a threaded diameter that is completely free of whatever flaws the stitching leaves. The truth is, there aren't many people who could make the parts but you've demonstrated that you are one of them! I've made sleeves with a wall thickness as little as 1/16".
To bore the holes accurately I'd use an end mill ground to the desired diameter...that may be had to find or someone to grind it so if you needed one I'd be glad to organize it for you and mail it. It will also be necessary to buy a special tap...those are readily available. Fine threads are not generally used in cast iron but I don't feel that applies when the piece is going to be locked in place forever.
Oh...and I'd make the sleeves first so you know they will work...a little long so the surface can be fly-cut after they are in place.
-
2
-
-
Today I drilled and tapped the holes for the Zerk fittings.

Then set the drill press up to drill the little holes the grease comes out of. I did this with a small center drill which will give me a tapered hole and made certain to go through only one side of the bolt.

With all the holes drilled. I blew them out to get rid of any small chips and screwed in the grease fittings.

All that remains to be done is to drill the holes for the split pins. I'll make a fixture for that. I have them for 3/8" and 7/16" but I've never made one in 1/2".
-
4
-
-
That's interesting. I wonder if there was any standard for carburetors on vehicles sold to the government? I expect not... I cut a lot of odd threads. In fact, I learned to single-point threads because what was available over the counter was often not what I needed so I can empathize with your problem.
-
4 hours ago, John_Mereness said:
When the Selden patent expired, what had been the technical committee of the ALAM reorganized itself as the Society of Automotive Engineers. The current SAE is the direct descendent of the ALAM. The SAE threads were standardized by them after WWI when the government decided it would not buy any motor vehicles that did not use a standard threading system. This resulted from the logistical problems multiple threads caused during the war.
-
That is good to know. I had presumed that proper lubrication of the shackles was important to the ride and the handling but I've never undertaken this sort of job with a car I drove afterward. I don't think I've even taken out an original bolt that didn't have the hole in the center plugged with hardened grease.
-
2
-


Your past antique auto mishap events
in General Discussion
Posted
Driving through Seekonk Mass one evening in my 26 Cadillac, the arm on the transmission that operates the clutch split at the keyway. I had no clutch and 20s Cadillacs are hard enough to shift with a clutch - driving without one is near impossible.. I was with a friend - also an antique car guy and when we decided there was no way we could patch it up to get home we decided to phone my father,. There was another transmission in the garage with the arm so we asked him to take it off and bring it to us. He succeeded, which may not sound remarkable except that my late father (1st viola of the RI Philharmonic Orchestra) was as un-mechanical as anyone could be. He really shouldn't have been allowed to own a screwdriver so I've no idea how he managed to do it...his idea of tools was a set of Craftsman open end wrenches he bought when he got married and never used. I'm using them today. We fixed it in the parking lot of a drug store and drove home.
Another time, the driveshaft of my 1910 REO broke while getting off the Orient Point ferry. I was coming back from the Vanderbilt Cup commemorative car show on Long Island, having driven from Rhode Island to Long Island and back. The break was the result of a poor repair I'd done (I was in my 20s at the time and have learned a lot in the intervening 40 years). I pulled over to the side of the road on the grass in front of an electrical transfer station and started taking the car apart. A few minutes later a truck with a Gas & Electric Company crew pulled up and the guys offered to help. "Aren't you guys supposed to be working" I asked. "no problem, we're union" was the reply. We got the drive shaft out of the torque tube and the foreman drove me over to another part of town where another crew was installing gas pipes. The chief welder set it up on his portable rig for welding pipes and put it back together. We then drove back to the car and installed it. In all, my broken drive shaft delayed me about 1-1/2 hours!