


Gary_Ash
-
Posts
2,214 -
Joined
-
Last visited
Content Type
Forums
Gallery
Events
Posts posted by Gary_Ash
-
-
2 hours ago, TAKerry said:
Seems funny to me how many 'race' cars there are to be found in Argentina?
This might be why: https://www.thebrander.com/en/lifestyle/reklus
https://issuu.com/emiremux/docs/2021.05_reklus_brochure
-
 1
1
-
-
This post should be down in the Studebaker section. There are always parts stashes in people's basements or garages, some of them have sets of bearings. You may get lucky, but it won't be quick or easy for a Studebaker straight 8 engine. Best chances are for standard size bearings. The ultimate option is to have someone apply a new, thick layer of babbitt to the original shells, install them in the block, and line bore them to final size.
You didn't say where you are in B.C., it's a big place. There must be some capable shops in the Seattle area. Try contacting the LeMay Museum in Tacoma. They may know of some shops that could work on your engine. I'm in Massachusetts, not much help to your project, and the guy who did my 1937 engine is no longer working.
Here is the drawing for the thrust washer that goes on the front end of the crank. I never found any of these, reused the old one.


-
From yoyopart.com:
Descripition:
Inside Diameter: 28.58 mm,1.125 in
Outside Diameter: 39.93 mm,1.572 in
Width: 4.75 mm,0.187 in
Interchange: Timken/National 240151, Fel-Pro 14134, and lots more numbers from Yoyopart.com
BUT, it is Studebaker part number 190276, apparently still in use right to the end. Most Studebaker vendors will carry this part.
See this one on Ebay: https://www.ebay.com/itm/182528349508
-
Here is the drawing from the 1929-1940 Chassis Parts Catalog for the 1930-31 transmission for 8 cylinder Commander and President cars.

-
 2
2
-
-
My recollection of the Bell System exchanges was that there were standard exchange names that had some local relevance, like PEnsylvania 6-5000. Other areas might have the same numbers on the dial but different names. As a kid in Baltimore in the 1950s, our phone number was BElmont 5908 but later upgraded to BElmont5 5908. As I recall, they then issued Belmont 7 and Belmont 9 numbers. There is a website on line that will link your current 3-digit number exchange to the old names.
-
2
-
-
-
1
-
-
@michael.stumpf Michael: Pre-war race cars used magnetos because they didn't have batteries, generators, and sometimes no starter, to save weight. While there are new modern and used old magnetos around, some machine work would be needed to adapt one to your engine. And, you said you only have $$ not $$$$$, so that may limit you. In any event, your 320 engine isn't going to wind up much over 4,000 rpm, so a good distributor should be more than enough.
See this about transmissions:
https://www.jalopyjournal.com/forum/threads/buick-straight-8-manual-trans-choices.716745/
A 3-speed transmission with overdrive might meet your needs for limiting highway rpms, but did Buick have one? Adapting something else will take some engineering. Otherwise, see the Gear Vendors website for an add-on overdrive unit which would work with your current transmission.
-
Here in southeastern Massachusetts, we had about 89% totality, just a few wisps of clouds in the sky. My small weather station records temperature, humidity, sunlight intensity, etc. We saw the sunlight intensity drop from about 700 watts/square meter down to 25 watts/square meter. At the same time, the temperature dropped from 62 °F to 54 °F. While the sunlight and temperature recovered somewhat, it was already late enough in the afternoon that the sun was getting low in the sky.

Sunlight intensity during eclipse.

Temperature drop during eclipse.
-
1
-
-
2 hours ago, Angelfish said:
If you come out one morning and find that someone has stolen your speedster, it was me.
I have a backhoe here and I know how to use it!😁
-
3
-
 1
1
-
-
Many people have used Uvira, Inc. in Grants Pass, OR, 541-474-5050. They do a vacuum deposition process that is more durable than silver. You probably need to have your reflectors nickel plated first before sending. The cost is about $75-80 each.
-
1
-
-
I went through this process in Massachusetts for my replica 1932 Studebaker Indy car. It was created from scratch, including the chassis, but used engine, transmission, axles, steering, etc. from pre-war Studebakers. Once I had an application for a title filled out and a fee paid to the Registry, they sent me to a state police inspection station that usually deals with cars rebuilt from wrecks. I brought the car in my trailer. I presented my pile of receipts and signed bills of sale for many of the pieces I bought along with photos of their original condition and during the build. The police inspector looked through them, said OK, and put a state issued serial number on the chassis of the car. I was exceedingly lucky that the state policeman wrote on the application that it was a 1932 car because that meant I could get antique car insurance and I didn't have to have fenders, as now required for any car post-1948 in MA. Annual inspection is also easier for antiques.
I then went back to the Registry where they also went through the pile of receipts. This time, they wanted to add up the cost of the car so that they could charge me 6% sales tax on the value. Apparently, I had enough to satisfy them, and they didn't count the thousands of hours of my labor in the value. I paid the tax and title fee, was issued a title and then got license plates.
While it did take some time, all the people I dealt with were courteous and helpful, a pleasant surprise. I recommend talking to the person at your state registry/motor vehicle dept. who is in charge of interpreting the rules. There will be one, the trick is to find him/her and have a chat about what you are trying to do. The words, "I need some help, please" will go a long way. Keep the person's phone number handy if you encounter a problem at the registry.

-
6
-
3
-
-
Would a later BXOV-26 also fit. This was the model used after 1939 on Commander 6 engines. It might make your search a little easier. Here's one on Ebay: https://www.ebay.com/itm/234782339106
-
The series 82 President used the 250 cu in straight 8 while the series 92 used the 337 cu in engine. The big engine is about 4 inches longer. The 250 cu in block looks the same up to 1937; after that the water pump was moved from the side to the front of the engine through 1942, but internal parts are mostly the same. The frame pieces and engine mounts are different between models 82 and 92. Switching between engines would not be simple.
-
1
-
-
MicroMark carries the SolvaSet and other chemicals for water-slide decal work. I usually top coat the dried decals with a water-based acrylic varnish like Minwax Polycrylic using a fine camel hair brush, just a thin coat.
-
3
-
-
We have a 2022 Ford Expedition XL with the V6 and twin turbos. The truck weighs 6,000 lbs, easily hauls my tall 20 ft enclosed aluminum trailer (2500 lbs) and any of my antique cars. We’ve driven from Mass. to Indiana with the loaded trailer. Normal mileage is 18-20 mpg, about 10-12 with the full trailer, depending on how hilly it is.
Seeing what’s behind the trailer is tough. I need to get a video camera that mounts on the rear of the trailer.
-
1
-
1
-
-
@Aussi John 1 No, I didn't, but now that you mention it, I think I know where to get one. Thanks.
-
Like this:

-
2
-
-
Most non-conductive materials, like 3D printed PLA or ABS, can be painted with a graphite containing paint, like AquaDAG. It just needs enough electrical conductivity to let copper start depositing from the plating solution, then it can go into the chrome bath.
The real problem may be that PLA and ABS have about 10-15 times the coefficient of thermal expansion of chromium. This could cause crazing of the plating as the parts see hot sunshine and cold winter temperatures.
But, there are car parts and bathroom faucets made from plastic with chrome coatings, mostly using a sputtering process in high vacuum to put on the chrome coating, no need for electrical conductivity in or on the plastic. They seem to hold up for years.
-
2
-
1
-
-
2 hours ago, Gunsmoke said:
As for those up here in Canada (and most of the civilized world), 32' is just over 9.75M!
Alas, it should be 9.75 m. 😁
-
2
-
4
-
-
When a car is described as ‘32, it’s supposed to be an abbreviation of 1932. Note the position of the apostrophe. Like a 1932 Packard.

On the other hand something described as a 32’ means it’s 32 ft long. Like a 32 ft yacht.

-
9
-
3
-
3
-
-
It is simple enough but not as simple as you might wish. The rear cover has to come off, then remove the cam lever arm. The switch assembly at the bottom should be removable with a couple of screws - it needs to be cleaned up anyway. Loosen the nut and square-headed screw and undo the big clamp nut. You may need a very large wrench with long handle to undo the clamp nut with the housing secured in a vise. Then you can pull the shaft and worm out of the box. Replace the two bearing races and the balls - parts for 1940s-50s Jeeps should fit. Replace the two bushings for the cam lever arm and ream to size, also replace the seal. Adjust number of shims on back cover to minimize play with worm and cam in center position. Fill with grade 00 semi-fluid grease.
Here were the parts from a Ross box in a 1929 Studebaker President that sat outside in the rain for 40-50 years.

-
@alsfarms When you get tired of trying to bend the U channel around a corner and it keeps buckling, maybe make corners from cut pieces and TIG weld them together, grind the U to shape.


-
1
-
-
@alsfarms From the photos you show, the fenders will be about 14" wide and 5 ft long. 16 gauge steel (1/16" thick) weighs 2.5 lb/square ft, so each one will weigh about 15 lbs. The U channels for the edges can be bought as "U edging", available to slip on 16 gauge metal, though they seem to be available only in 1" width and have flat sides. A steel shop could water jet or laser cut them down to the ~1/2-inch width in the photos. The steel shop could also cut the 16 gauge pieces for the fenders and put them in a slip roll to make smooth bends, easy if you give them a template of the curve. Since it's hard to get the slip roll curve in exactly the right position, start with a 6 ft or 7 ft length, and trim after forming.
Bending the corners in the U channels will be difficult without kinking them. Maybe you can make a jig from 16 gauge steel with a 2" radius, press the channel on the jig, and heat the channel red hot to bend it around the corner. It's going to want to pucker on the inside of the curve. I think I'd make the four (good) corners, then weld on straight lengths to make the full border. Good luck!
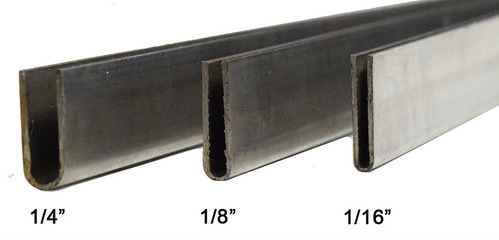
From Metals Depot web site
-
1
-
-
So, Al, what parts are you trying to make? How big? How complicated? How many?
-
1
-


Studebaker 1927 for sale
in "Not Mine" Automobiles For Sale
Posted · Edited by Gary_Ash (see edit history)
@VintageRacingCar Fred: There were rumors that one of the Studebaker Indy cars was sold to someone in Argentina about 1935. The Studebaker car #46, now in Switzerland, was re-constructed (maybe) in Indiana in the late 1970s or early 1980s, supposedly using a chassis and other pieces that had been shipped from Argentina to Germany and then to Indianapolis. The parts of the old car were imported to Germany by Manfred Eiberweiser, a Mercedes dealer in Deggendorf.
Are there any racing records or photos that would prove that one of the 1932 Studebaker factory cars ever raced in Argentina?
I posted the Reklus link just to show that some of the cars from Argentina are not really original. Neither are the PurSang Bugattis, but the PurSang cars are very good, as you say.