

.jpeg.d8dde1ea34fe3ced20d1c5fb643b2899.jpeg)
195354
-
Posts
299 -
Joined
-
Last visited
Content Type
Forums
Gallery
Events
Posts posted by 195354
-
-
Thanks to everyone for the help in locating my part
Once the tops are loose I will clean one up and install it. I will save the second one for my other project. Does anyone know of a vendor that has just the gasket for the lid or will I need to make the gasket?
I did pickup PB parts at the wrecking yard that is close I will see if the vacuum motor works soon.
Steve

-
 1
1
-
-
Nice looking car and l second the welcome!
When it comes to wiring do your research also look over your harnesses if they are original equipment they could be damaged from many things. Sharp edges rubbing through the outer insulation, mice and poor repair practices and age. On my last project l purchased a new harness to replaced the original, after it was out l was glad l did. Had all of the above problems and it could have caused many a problem. It is not easy if you replace your harnesses tag and mark everything, before removal then pictures. This will make a huge difference in how it goes in. You might have a battery shutoff if not put one on, l never leave my cars with the battery connected.
I know you say it stops good check the brake lines the rubber and steel. lf you were in my neighborhood l would help you out on this. This is the first place l go on a project is the safety , l just need to know it will stop.
Prchase manual's they are a big help.
Good luck on your project
Steve
-
I have a wrecking yard a few hours from my house the owner who is up in years is not sure if he has the reservoir or not. He is also not sure if they had power brakes or not, he does have a 53 RM and possibly a 54.
My parts book only lists power brakes. I would think manual brakes were standard and power brake was an option. If a car had manual brakes is the reservoir the same as a power brake car? I would like to know before driving to his yard Saturday and striking out.
Thanks for any information
Steve
-
Thanks for the information, I will now include 1954 in my search.
Steve
-
My parts book goes from 1928 to 1954, it just has a listing for 1953. It says Reservoir, power brake master cylinder part # 1162601 for 1953 -50-70. Buick must have made changes in 1954 going by this book? Here is the part number for the cap gasket just in case someone needs the info #1162919, the cap is not listed separate.
Thanks for the offer.
Steve
-
I am in need of the brake fluid reservoir, I had a vendor try and coat mine and they are now damaged and not usable. Here is a picture of what they look like.
Please let me know what you have
Thanks
Steve

-
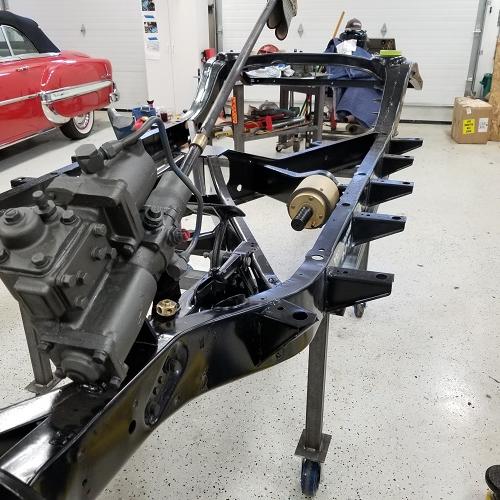
Willie Thanks for the response, the orientation is fool proof just like your 55 it only goes one way. The new torque ball seal is going to work it will ride in the smooth areas.
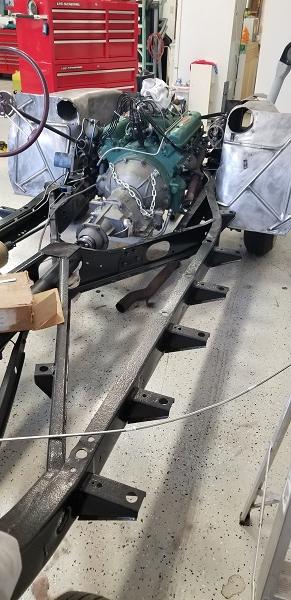
I made some progress this weekend engine and transmission is in chassis at last. Here are a few photos
Steve


-
5
-
-
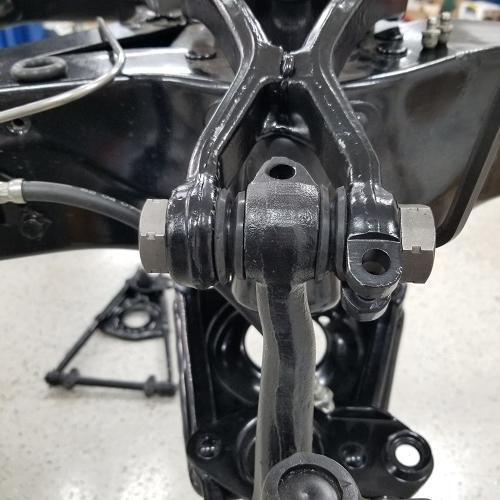
I have torque ball corrosion, the socket ball has corrosion to me it does not look like it is in the seal area. A torque ball retainer with the seal is on the way should arrive late this week. Then I will be able to confirm the area it runs on. If I fix this corrosion area, my thoughts are JB weld or similar product and smooth it out as needed. Has anyone run into this before, and come up with a fix? I have not looked in the manual yet it is not with me today does the torque ball have an orientation? I would think the oil hole in the bushing is at 6 o'clock
Thanks in advance for the advice
Steve


-
A few pic of mine hope this helps
Steve


-
1
-
-
Pontiac 1953 thanks for the picture of your Brake reservoir; did you use a paint product that will resist brake fluid? My reservoir is not done at the coating company here in town I am little concerned that it is taking this long.
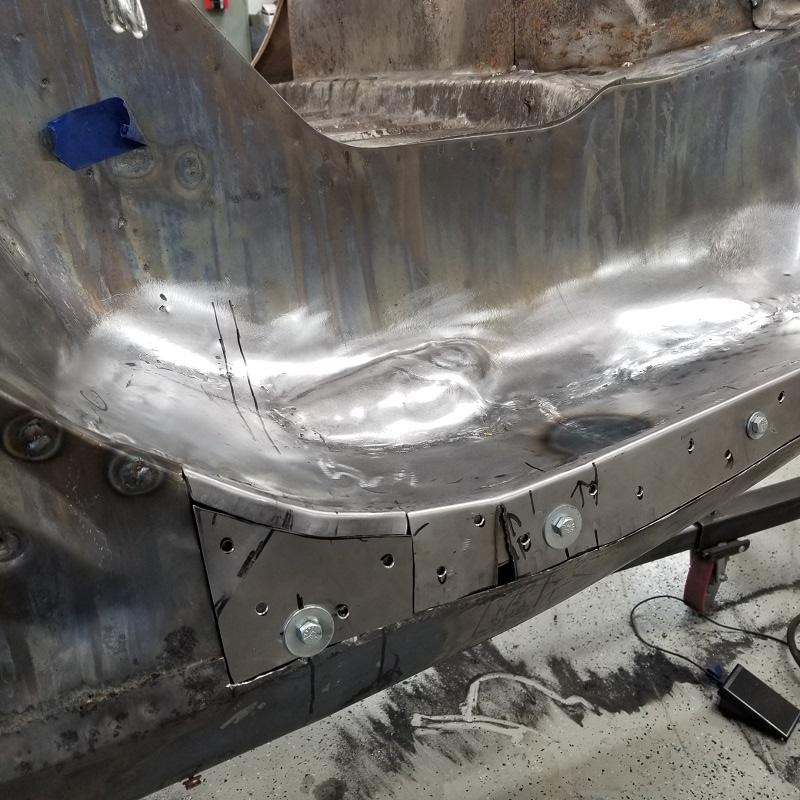
I have been working on the right rear inner fender, need to finish sand a few spots but it is close to done. The inside needs a weld in a few places and the rubber stop mount for the convertible top welded back on. I plan to add a few more spot welds and call it good; I test fit the panel through the process to keep everything in line. The left inner fender needs rust removal and repair also but it is not as bad as the right side.
Steve


-
4
-
-
I have been working on the inner fenders, Right inner fender was in OK shape other than the front splash apron was in tough shape. I had a set of inner fenders from the car and a set from a parts car; I cut and welded a good set for the car. Left fender was good other than the rear splash apron was damaged in an accident back in the day and the front top was rusted and gone. I removed needed parts from the parts car fenders and spot-welded the parts on. I had to make modifications to one panel; the original has a removable panel. The parts car is at the end of production for 53. My car is early production as time marched on Buick must have made changes in these. Notice the notch in the splash pan at the front latter production does not have this; same with the removable panel, latter inner panels are one piece.
They are test fitted on the chassis and ready for primer . Here are few pictures
Happy new year!
Steve


-
7
-
-
Here are a few pictures of the vacuum check valve for the brake booster. After cleaning it out and testing it does not hold vacuum. I see a small impression were the rubber seal seats against the cover this is most likely the leak. Many years ago, I had parts that had a rubber seat repair vendor replaced the seats in parts for air brake valves, it was about this size. I will try the vendor but I doubt they still offer this service. .
Has anyone had these apart and repaired them with any success, I could just put an inline check valve in one of the rubber hoses to resolve this if needed.
Steve


-
1
-
-
I have my chassis moving around on tires for the first time in a few years big day for me. I am thinking the factory must have added some kind of marking on the differential cover when they added oil Does anyone know if the factory had a check mark?
I am also wrapping up the brake lines, does anyone have pictures that would show the clamps that go on the brake lines these are the bolt on clamps around the brake booster to reservoir. I have holes for bolts in the frame the parts book only shows two clamps but it looks like a few more clamps are in order. The line that goes to the rear axle from the brake switch is the one I think needs some type of clamp.
Thanks for the help
Steve


-
7
-
-
Mike I agree with Al the white top is a pain to put it lightly on keeping them looking good. Black is what I have on my Chevy convertible the only downside is they are hotter than blazes in the sun but it is a convertible easy fix. One thing I should have researched is the rear window they are easy to put marks in maybe I am doing something wrong but it happens. I wish they had a zipper in the bottom panel so the window could be removed then it could be put it in some type of protective cover, or be changed it if is needed. This is one of my research projects on my soft-top project when I get to it. The rear window is one of the first things that will show use at least it does in my case, Early morning drives require the top up here in the northwest.
Mike will you stick with the hydraulic system for the windows and seat, I have heard of the windows being converted from hydraulic to an electric set up. I have not seen a car converted yet.
Keep posting pictures like to see how you are doing.
Steve
-
Mike
Looking good I wish I could make this much progress. What color are you going with
Steve
-
1
-
-
I am looking for a core transmission to rebuild for my 1953 V8 322 the two units I have found are water damaged. My books do not tell me if a 54 will work; I believe a 54 is the same but with product improvements if anyone knows how new I can go it would help.
Shipping to Oregon Fastenal will be best option I believe.
Thanks
Steve
-
I need a little advise on the rear wheel bearing lube. The manual just has WBL called out and check when relining brakes, is this the standard wheel bearing grease? I am thinking of trying a synthetic wheel bearing lube like Mobil Mobilith SHC 007 I have used this at work and it works great, wheel end maintenance does go down with this type of lube. With modern seals I would think it would work. Has anyone tried a synthetic lube on wheel ends?
Steve

-
Little more progress, I am now on the hunt for a transmission should have looked at mine earlier in the project it is a true basket case.
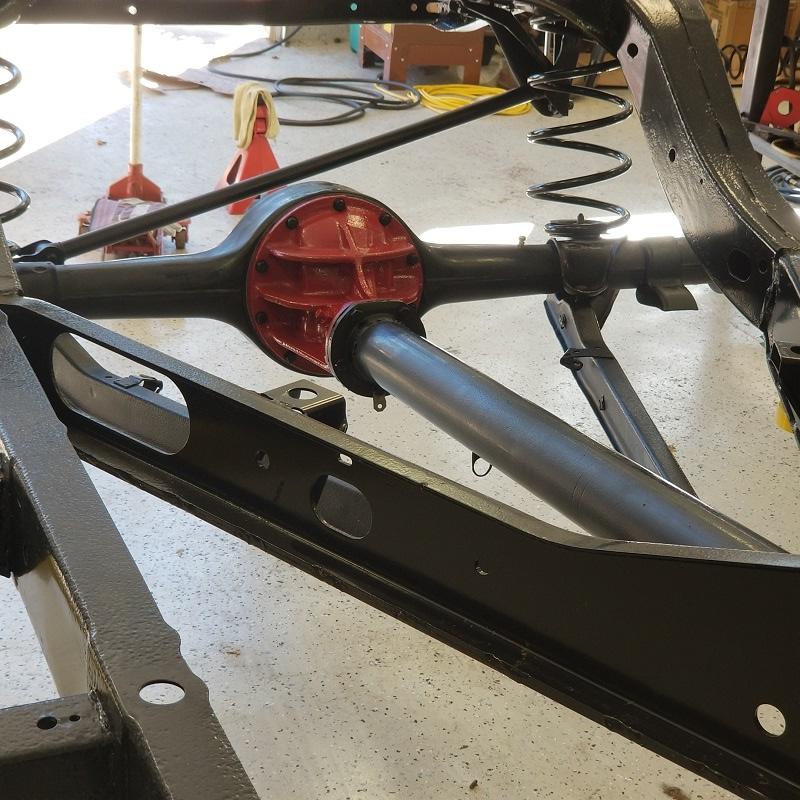
I changed the rear bearing races. I also installed the drive line on the differinatal and slid the assembly in the chassis.
Steve


-
6
-
-
WTB Harrison cooler part# on unit 8520994 here are a few pictures mine has rust holes from sitting on the ground. I am still in need of the cooler.
I am also looking for 1953 Dynaflow V8-322 transmission that I can rebuild. Pulled mine down and not much is useable been in the weather way to long. Looking at parts books it looks like one year only?
Thanks
Steve


-
Al thanks for the pictures of the brake fluid reservoir, I am working on a paint that is close on color and might hold up to brake fluid. I have also contacted a shop in town that does some anodizing also Zinc plating, they say they can get close on color will see.
The Differential am I close on the color I have used?
I have made a little more progress on my project. I try to do something on this project every day, clean and paint or locate parts for the next step. Front springs are installed Backing plates are going on and brake lines are on the run. Will be working on the rear axle soon
Steve


-
3
-
-
Ken I have been watching your 1940 project you are making progress and doing a great job, keep posting pictures as you go. When I see other folks, doing the impossible it fuels my engine.
My project is going slow, I now figure about double or triple the time on any one item. Mine was pulled apart years ago before I purchased it so it is a slow go, hunt for parts, check parts books, and hope I have the correct part. I tell myself where is Waldo some days he is easy to find and some days not so much.
Ken you put this in one of your posts
I’ve met some terrific people in the BCA that have helped me along tremendously with parts and their knowledge.
I have also meet great people at three national meets this group is very helpful and welcoming. Unfortunately, not many Buicks in my area so I need to travel for my Buick fix. Thanks to those that have helped me with my project, I would not be this far without it. Many of you have helped and do not know it; I look for pictures and ideas on how to do parts of my car in the forum.
Steve
-
3
-
-
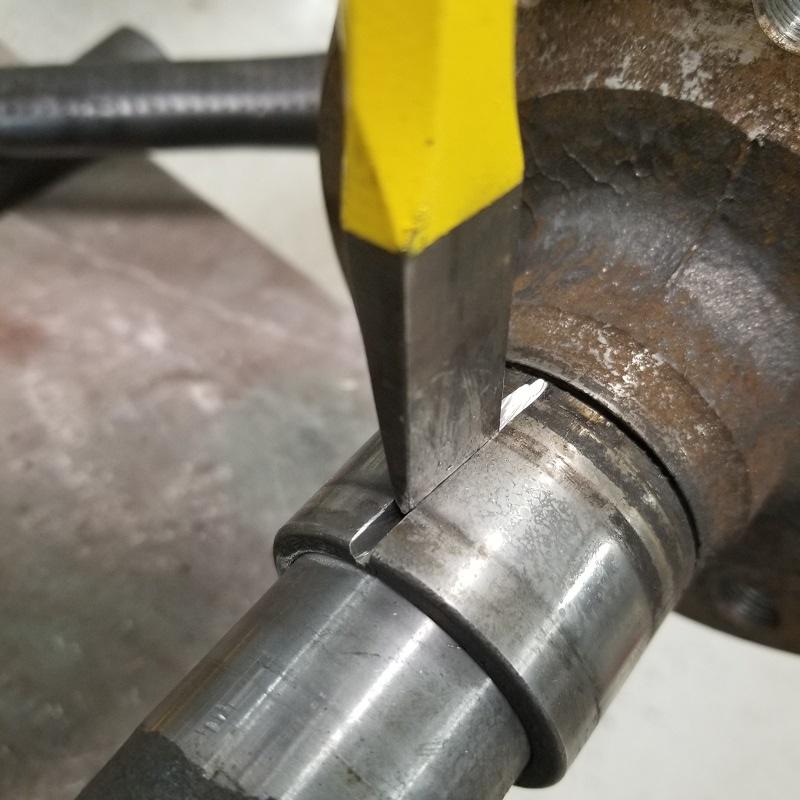
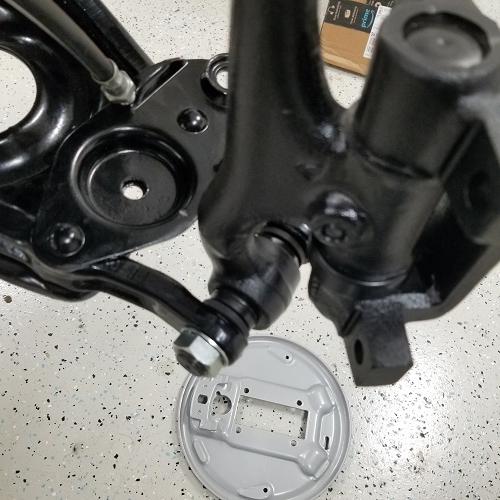
Made progress on seals after a night’s sleep they went on with a little help moving the spindle up and down and a hook to get the seal over the pin, did this before the lower was installed. The lower pin and seals are very straight forward. I plan to add a little paint on the new parts and this side will ready for the backing plate and brakes. I have added few pictures of the seals and other parts. The brake reservoir is also pictured I have two with the mounting tabs and one that is missing the tabs, it will be in the junk soon.
Does anyone have a color picture of this so I can try to match the color, and a paint or coating that will resist brake fluid? I also have a picture of the differential any color information on correct paint for 1953 diff would be a great help.
Thanks
Steve


-
5
-
-
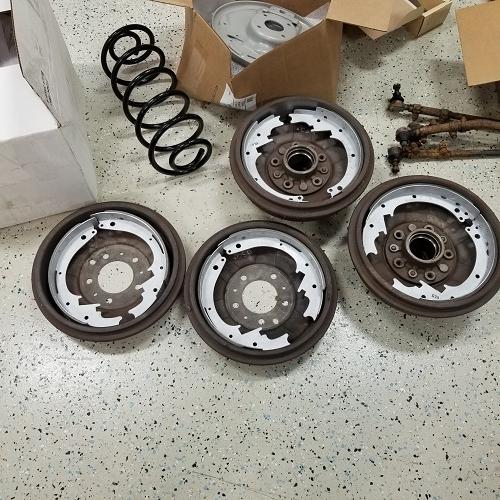
I am working on the front end, kingpins and springs. The dust seals for the upper outer are a giving me trouble. The manual says pull them over the shock arm and pull the seal back over the pin when done. The seal looks like it will tear if I do this, if someone has a method that works on installing dust seals let me know. I have attached a few pictures. I suppose it is possible I have been sent incorrect seals.
I also have my drums and brakes back, shoes relined and arching done that will match each drum. The last shop that I knew of that did this this type of work closed. One of guys that worked there for 40 plus years opened a small shop and now does custom work, best part is he is 30 minutes from my house
Steve


-
8
-
-
I have somehow deleted the project form the forum so I will start over with the story of my project. That must be why at work they say stay away from the computer.
My project was so rusted most people would have said that it is a parts car. I am far enough along with the rust repair I can see the light at the end of the tunnel. I will keep pressing on, I was lucky enough to find a four-door parts car with little or no rust. It had the drivetrain removed and some other parts pulled but the body was still intact it has provided many needed floor parts.
I have floors cut out and replaced, Trunk floor cut out and replaced. I will post a few pictures before and after. I am working on the frame and chassis now, Engine assembled and test ran broken in on test stand, ready for install, once the Dynaflow is ready. Differential has been taken apart checked out and is ready for install. Brakes are at the reline shop now, found an old hand that does this just up the road he will arc the shoes to the drums when he is done, Brake booster is back and installed it should stop as it did back in the day. I have come to realize how important pictures are when working on a project. I use this site checking how others are dealing with their project; this helps me keep going forward. I also use my parts books cross checking part numbers and looking at the exploded view. I wish I had taken this car apart but I did not I found it lying all over the floor and on shelves and some parts missing, I must like a challenge.
I want to thank everyone that has helped me get this far on my project
Steve


-
11
-


1953 brake fluid reservoir
in Buick - Buy/Sell
Posted
Above picture is before I had them try to plate or coat my reservoirs, now the threads are damaged to the point the cap will just lift off and the body has holes in it. I will clean my new used parts up and move forward, I do not need the heartache on this item. I have a photo of one of the damaged reservoirs so you can see why it is not useable.
Steve