Roger Zimmermann
-
Posts
3,125 -
Joined
-
Last visited
-
Days Won
24
Content Type
Forums
Gallery
Events
Everything posted by Roger Zimmermann
-

Roger's handcrafted 1:12 scale models
Roger Zimmermann replied to Roger Zimmermann's topic in Our Cars & Restoration Projects
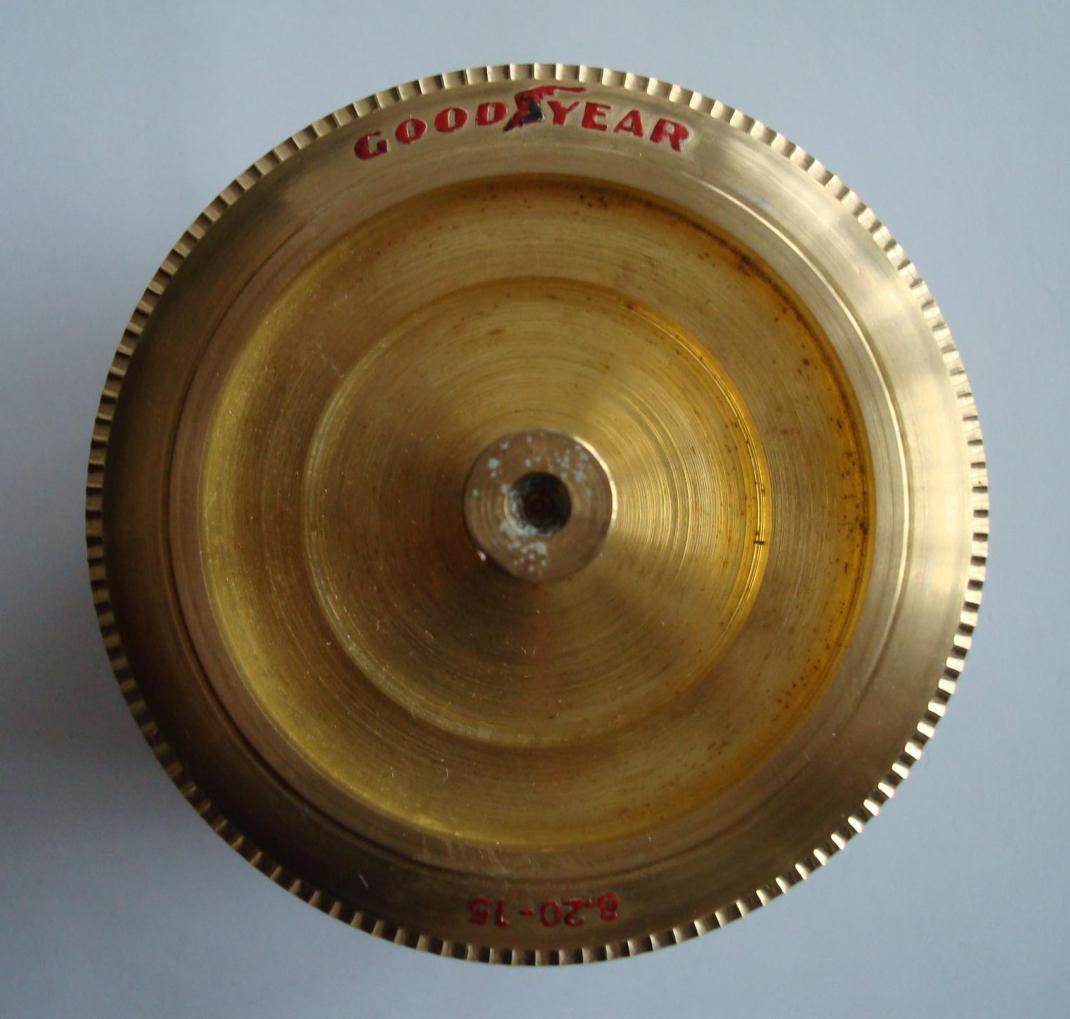
The lettering is over. There is enough paint on the characters to be seen on the real tire. One correction is still to be done: the "Y" is not quite the way it should. Minor corrections can also be done on the polyester moulds. I'm not yet that far!
-
I believe that this unit is to be installed on top of the instrument panel, not outside! I have 2 Cadillacs equiped with that system, the "bad eye" is installed on the left of the instrument panel. From 1959, the Autronic Eye was installed in the middle of the IP on Cadillacs.
-
Roger's handcrafted 1:12 scale models
Roger Zimmermann replied to Roger Zimmermann's topic in Our Cars & Restoration Projects
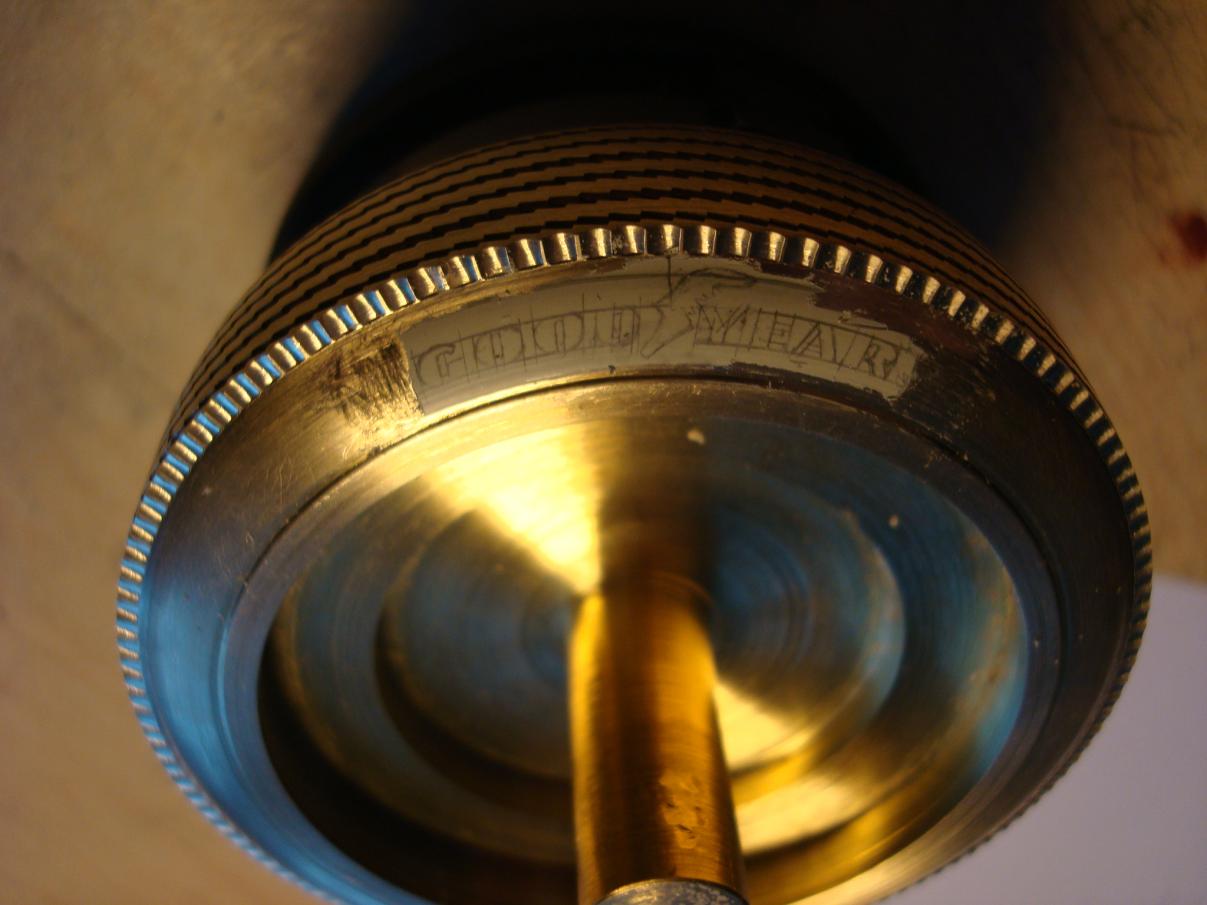
Gerald Wingrove wrote in his book that the tiny imperfections are reproduced with fidelity by the silicone rubber; he wrote also that the best way to add the manufacturer name and dimension is done with paint. I did that with success on my 2 first models; the technique will not be modified. First, I sprayed some filler on a portion of the tire; once dry, I "wrote" the name and dimension on the paint as you can see on the first picture. Then, with a sharp piece of brass, I just scratch the unnecessary paint to form the letters. A magnifying glass is needed for that, of course. The letters are far from perfect; I have as a reference a sticker I got once in a plastic kit. If I screw up, it's possible to correct with paint and, when viewed at a distance, these imperfections are unnoticed. The second picture is showing the contour of some letters; I do the easy ones first!

-
Roger's handcrafted 1:12 scale models
Roger Zimmermann replied to Roger Zimmermann's topic in Our Cars & Restoration Projects
You are welcome Dale; I'm glad that you like it! -
Roger's handcrafted 1:12 scale models
Roger Zimmermann replied to Roger Zimmermann's topic in Our Cars & Restoration Projects
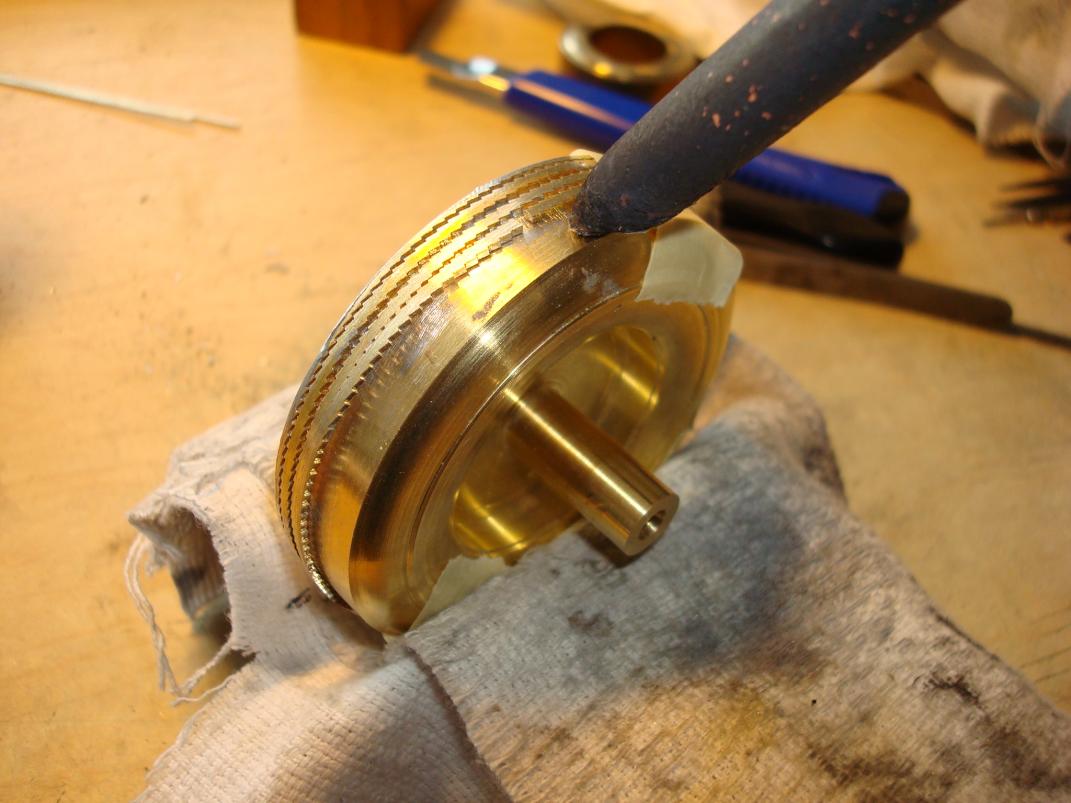
At least, all the bands are on the tire. After some finishing work, the master tire is ready. Ready? Not quite. Usually bias-ply tires have ribs on the side; I'm attempting to reproduce them. The first picture is showing the milling; the second one is showing how this is done on my small but versatile machine. After 120 indentations on one side, the other side is also to be done. It seems a lot of work but it's indeed quickly done. Pictures 3 and 4 are showing the master tire from front and rear. The cavity in the front is the space for the white wall. You will see it in pictures; it's easier to understand with pictures than an approximate explanation. And now is the master tire ready? No! Not yet: I have to write the brand and dimension. How? Quite simple: with paint.


-
Roger's handcrafted 1:12 scale models
Roger Zimmermann replied to Roger Zimmermann's topic in Our Cars & Restoration Projects
Tom, I try my best! There is no secret to have so many pages: to post on a regular basis with something new. I will do it too. About the translation done by a machine: I used to translate for GM or correct text translated by machine or people who are not specialized in technical matters: I had sometimes to request the original text in order to understand what I had to verify/correct! -
Roger's handcrafted 1:12 scale models
Roger Zimmermann replied to Roger Zimmermann's topic in Our Cars & Restoration Projects
Thank you Scott to respond to the question from Sweepspear! By looking at the French forum you may have difficulties to understand unless you can read French. At first the vehicle is complete, then there is a new frame and a funny one, then again something which makes no sense. Here is shortly the reason: I began the model in 1963; it was ready in 1966 I believe. When I was put in early retirement, I had a look at that model and decided to refresh it a little bit. At the end, it was a reconstruction at 95 %. Therefore the first pictures in the French forum were posted somewhere during the reconstruction. It will be different with the Mark II model: pictures will be posted since the beginn.<!-- google_ad_section_end --> -
Roger's handcrafted 1:12 scale models
Roger Zimmermann replied to Roger Zimmermann's topic in Our Cars & Restoration Projects
Thank you Scott! In fact, I began in 2003 with the restoration/reconstruction of that model. The first work was the construction of a new the frame and suspension. I began later to post in the French forum; they had before a strange system to insert pictures I never understood. It took so many years because I'm not all the time doing that; it may happens weeks without activities on the model. Summer time is a bad season for models: as you can see in my signature, I have 3 older Cadillacs which need work or maintenance. From time to time, I'm overhauling 1956 to 63 Hydramatic transmissions for other people; I like to do that too! The fact that many people are looking what I'm doing is an incentive to go further in the details; I like to surprise people! Another factor for the time spent: my very basic equipment. With a sophisticated milling machine, the master tire would be done in one afternoon. then, everybody with a little flair could do the same. With my limited tool park, it's a little bit different... -
Roger's handcrafted 1:12 scale models
Roger Zimmermann replied to Roger Zimmermann's topic in Our Cars & Restoration Projects
To mill the bands was annoying, very repetitive. To install them on the stock is not so repetitive, but annoying too! The first one is soft soldered around the perimeter of the tire; to get the tire hot enough to sold it takes about 8 minutes and no question to position the first band with the hands, its too hot... Once the first is soldered, it's time for the second one. The whole has to cool down to adjust the next band at the proper length. At first I wanted to fix them on the tire with small pins; I abandoned the idea because while boring the band shifted. At the end, I positioned it with masking band and soldered at 10 places. One band needs about half hour to be soldered. Then, the whole has again to be cooled to clean the excess solder. Then the next one is installed...

-
Avanti R2, 1963, refresh
Roger Zimmermann replied to unimogjohn's topic in Our Cars & Restoration Projects
You are too kind John! By looking at the French forum you may have difficulties to understand unless you can read French. At first the vehicle is complete, then there is a new frame and a funny one, then again something which makes no sense. Here is shortly the reason: I began the model in 1963; it was ready in 1966 I believe. When I was put in early retirement, I had a look at that model and decided to refresh it a little bit. At the end, it was a reconstruction at 95 %. Therefore the first pictures in the French forum were posted somewhere during the reconstruction. It will be different with the Mark II model: pictures will be posted since the beginn. -
Avanti R2, 1963, refresh
Roger Zimmermann replied to unimogjohn's topic in Our Cars & Restoration Projects
Thank you for the explanation John. The explanations from Greg make sense. -
Avanti R2, 1963, refresh
Roger Zimmermann replied to unimogjohn's topic in Our Cars & Restoration Projects
Thank you John to your interest to my model! You may go to: accForum :: Voir le sujet - Avanti au 1:12 it's a French forum with a lot of discussion between pictures. Some pictures have been posted in this forum by Barry Wolk: http://forums.aaca.org/f169/way-too-cool-278189.html As the model is now completed, I will publish here pictures when I can do them outside. For the moment, it's too cold and gray... -
Roger's handcrafted 1:12 scale models
Roger Zimmermann replied to Roger Zimmermann's topic in Our Cars & Restoration Projects
After two days of milling, the bands for the tire pattern are ready; there are more than 1000 teeth milled one by one! I know, I'm mad. As you can see the vice of the machine is way too short. After about 40 mm (1.5") I have to release the band and reposition it. This method does not allow to have a very precise pitch, but who cares? The bands are now ready to be soft solder to the blank.

-
Roger's handcrafted 1:12 scale models
Roger Zimmermann replied to Roger Zimmermann's topic in Our Cars & Restoration Projects
OK, I understand better. As far as the Toronado is concerned, bad luck. I have very few pictures. It will be better with the Avanti as I posted on a regular basis to the French forum. The first pictures were first with a traditional camera; since 2007 a digital one came home. Since that day, I did a lot of pictures and was (and still) amazed with the quality of the pictures at short distances. -
Avanti R2, 1963, refresh
Roger Zimmermann replied to unimogjohn's topic in Our Cars & Restoration Projects
Thank you John for the comments. I'm wondering if there is still some casting sand ready to go after more than 40 years! By reading in the Avanti Magazine (I got some issues as a reward for the pictures from my Avanti model) it seems that the Avanti is prone to overheat. It would be my first concern. -
Roger's handcrafted 1:12 scale models
Roger Zimmermann replied to Roger Zimmermann's topic in Our Cars & Restoration Projects
He and the other readers have to be patient! Sometimes what I do is a repetitive work not worth to photography, sometimes I have other activities. Don't panic: since I have a digital camera, it's so easy to publish almost immediately failures or great parts! I'm a little bit reluctant to post pictures from my other projects; it distracts from the real subject and can confuse people. What do think the people who are looking at that thread? -
Avanti R2, 1963, refresh
Roger Zimmermann replied to unimogjohn's topic in Our Cars & Restoration Projects
Does that product/paint not prevent a good heat evacuation? In other words, the oil is carrying away much of the engine's heat. This coat can act as an insulator or am I wrong? -
Roger's handcrafted 1:12 scale models
Roger Zimmermann replied to Roger Zimmermann's topic in Our Cars & Restoration Projects
Up to now, you saw only my fingers. During summertime, they would no be so clean as I'm working from time to time to my real cars. But how is looking that funny guy from Switzerland? As the publisher from Strudebaker toys asked for pictures, we did some this morning. Here are two at the "working" place...

-
Roger's handcrafted 1:12 scale models
Roger Zimmermann replied to Roger Zimmermann's topic in Our Cars & Restoration Projects
Bingo Scott and Keiser31! You are right: the band will be milled and fixed on the blank. This is a long process, you will see later how this is done. If I had a sophisticated equipment, I would mill the tread directly on the blank. Would that be fun? For the name and dimension, it will not be done with that. There is another procedure, again completely foolish. To be honest, I did not "invent" the process to make tires. I got it from a book I bought in Reno at the famous museum in 1979 if I remember well. The book is: The complete car modeller from Gerald A. Wingrove. He must get the credit for it. When the weather will permit it, I will do a serie of pictures from the Avanti with outside light and will publish them Those who follow the construction of this new model must be patient: the planning go from 6 to 10 years... -
Roger's handcrafted 1:12 scale models
Roger Zimmermann replied to Roger Zimmermann's topic in Our Cars & Restoration Projects
Now that the Avanti model is almost completed (2 small parts will have to be added later, I forgot to let them chrome), I can continue with the saga with the tires for the Mark II. On the picture, you can see the "tire" and some brass bands. What can those bands to have in common with the pattern? The answer tomorrow if nobody could find the reason!
-
Roger's handcrafted 1:12 scale models
Roger Zimmermann replied to Roger Zimmermann's topic in Our Cars & Restoration Projects
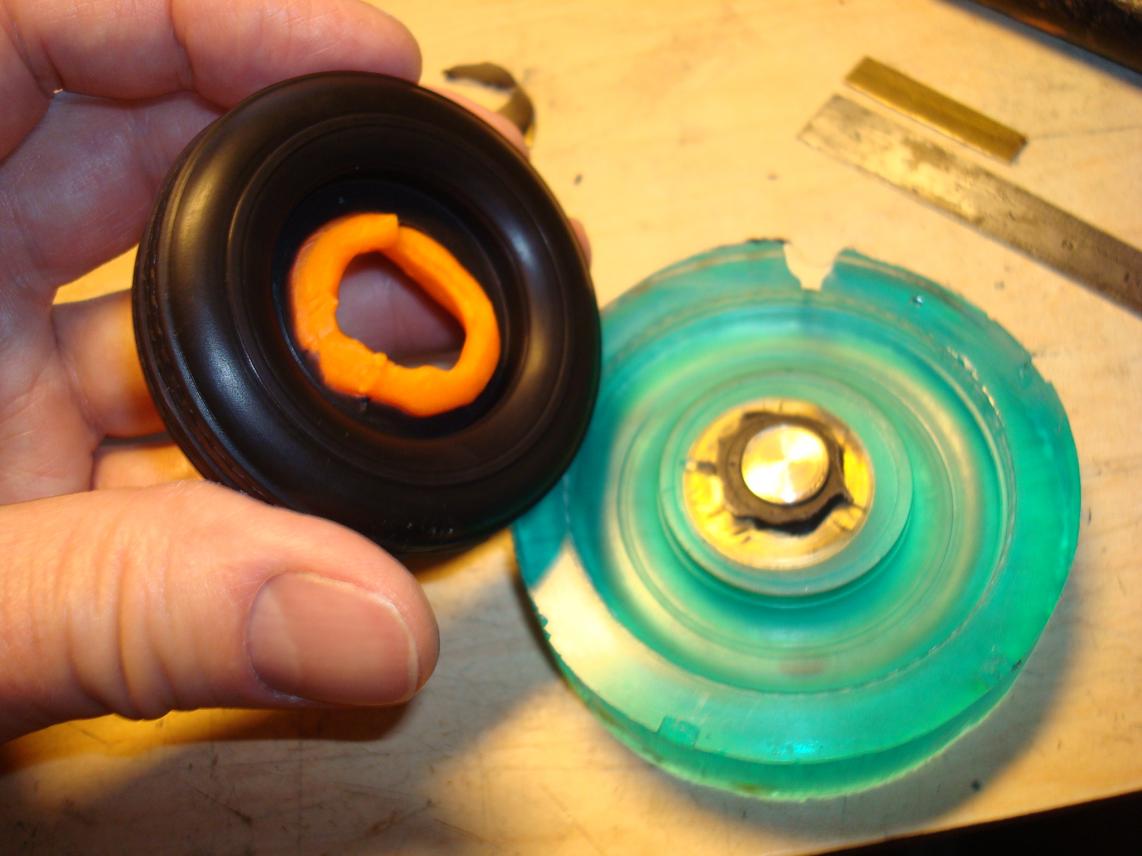
Then, with some pressure on the tire, it is gently removed from the other mold. It's the minute of truth! Fortunately, the last tire is also good and can be used. I did the pictures only with the last tire because I was too nervous before to think at pictures. With that run, I had 2 bad tires; I had to scrap them. Once the center is cutted away and the tire cleaned, I can insert the white wall into the recess I molded and the tire is ready to install on the wheel, and the wheel on the car. The whole process is rather complicated; it will be explained in detail when I will be ready to do the Mark II tires.


-
Roger's handcrafted 1:12 scale models
Roger Zimmermann replied to Roger Zimmermann's topic in Our Cars & Restoration Projects
After the necessary curing time, the excess material at the outside can be peeled off. A small screwdriver is inserted then into prepared notches to separate both mold's halves, taking care no to apply too much force. When one mold is removed, the excess rubber around the tire is taking away with a cutter.


-
Roger's handcrafted 1:12 scale models
Roger Zimmermann replied to Roger Zimmermann's topic in Our Cars & Restoration Projects
Some time ago, I put the tire pattern for the Mark II on side to finish the Avanti's tires. This morning the last tire was taken out of the mold; I have the impression you may be interested by that. First, some clear silicone is prepared with a black paste and catalyst. Then, the product is poured into the forms. The pictures show that a lot of air is entraped into the silicone; this air is removed by placing the forms into a desiccator. The needed vacuum is created by a hand pump, which is good for the muscles! After almost one hour of this treatment, all air bubbles are gone, the molds can be taken out of the desiccator. After 2 hours, when the product is still sticking but no more flowing, it's time to join both halves together and press them firmly to let escape the unneeded silicone. As you can see, I put all the wheight I found on the molds. Will the tire be good? I will know it after about 8 to 10 hours. Fortunately, you will not have to wait so long!


-
Roger's handcrafted 1:12 scale models
Roger Zimmermann replied to Roger Zimmermann's topic in Our Cars & Restoration Projects
Thank you for your comments Tom! However, for the moment, there is nothing complicated or real delicate. The small and complicated parts will come later , you'll have to wait some weeks/months/years! -
Roger's handcrafted 1:12 scale models
Roger Zimmermann replied to Roger Zimmermann's topic in Our Cars & Restoration Projects
The work on the tire's pattern is going faster than anticipated. The tire's back side (picture) is almost ready. The tool to form the sides is a flat chisel. It cut into brass almost like butter! Of course, the chisel is held by hand; this technique requires some habit. At the moment, the weight is less than half it was at the beginning. <!-- / message --><!-- attachments -->