Roger Zimmermann
-
Posts
3,097 -
Joined
-
Last visited
-
Days Won
24
Content Type
Forums
Gallery
Events
Everything posted by Roger Zimmermann
-

Roger's handcrafted 1:12 scale models
Roger Zimmermann replied to Roger Zimmermann's topic in Our Cars & Restoration Projects
Found another site. The material is getting liquid by 1200 degres F or 630°C. What you are calling soft solder is liquid at about 400°F or 220°C. This art of fixing parts together will be used for the remaining parts of the valve covers for practical reasons. -
Roger's handcrafted 1:12 scale models
Roger Zimmermann replied to Roger Zimmermann's topic in Our Cars & Restoration Projects
It's what I'm doing, with a brass/silver rod. The bonding agent is called "Castolin 1802" I wanted this morning to get the specification of this product; unfortunately, the site is not working. -
Roger's handcrafted 1:12 scale models
Roger Zimmermann replied to Roger Zimmermann's topic in Our Cars & Restoration Projects
Me too, on your Avanti! You are publishing pictures I would have love to get when I was doing that model! You are asking a difficult question...Never count the hours, just the years...I think I had up to 10 hours for what is done now. Usually, the second piece is done quicker; anyway, as most is done manually on this kind of part, there will not be a great difference with the second valve cover. To Barry: I'm using a rod with 45% silver content and a propane torch. Is that what you had in mind? -
Roger's handcrafted 1:12 scale models
Roger Zimmermann replied to Roger Zimmermann's topic in Our Cars & Restoration Projects
Today, I brazed the upper part with the base. The base is much too long; the ends will be trimmed when that end caps are soft soldered in place.
-
Roger's handcrafted 1:12 scale models
Roger Zimmermann replied to Roger Zimmermann's topic in Our Cars & Restoration Projects
Not quite: it's mostly inspiration or imagination and right now, perspiration! When the available equipment does not allow to replicate the way it was done originally, you have to be a little bit creative! By the way, thanks to your pictures, I was able to dertermine the proper dimensions of these parts. Again, thank you. -
Roger's handcrafted 1:12 scale models
Roger Zimmermann replied to Roger Zimmermann's topic in Our Cars & Restoration Projects
While I was waiting for the brass to turn the forms for the wheelcovers, I decided to begin another pair of interesting parts: the valve covers. For those who don't know how is looking a Mark II valve cover, the first picture is showing a dirty real one. How to do that? An aluminum casting like the original parts? Unfortunately, I'm unable to cast something except silicone rubber... I imagined two ways. The first one was to do a valve cover with a sheet of brass, then cut grooves to insert thin brass pieces to form the fins or ridges. Unfortunately, I had no tool of the proper shape for that task. Therefore, I had to turn to the second solution: I cutted 31 pieces of .8 mm brass with a hole in the middle to fix them during the rework. (second picture) Then after some hours of filing with rather high tempereature (should be a winter job), I got the definitive profile of the cover. (third picture). After that, I cutted 32 thinner pieces of brass, again with a hole in the middle and assembled one thin part with a larger one, then a thinner one, and so on, like a sandwitch. (fourth picture) The shape was done again with a file (due to the odd shape, machining is not a solution) and then the assembly was brazed. (last picture) The next step will be to finish the shape to the correct dimension and braze the assembly to the base.


-
Roger's handcrafted 1:12 scale models
Roger Zimmermann replied to Roger Zimmermann's topic in Our Cars & Restoration Projects
Phil, it's an interesting method! Fortunately for me, the tires problems are solved. I had also the luck to have a product which was not too thick with a 2 hours curing time, letting enough time to avoid problem with air bubbles. -
Roger's handcrafted 1:12 scale models
Roger Zimmermann replied to Roger Zimmermann's topic in Our Cars & Restoration Projects
The brass needed for the wheelcover will be available next week. In between, I finished the wiper motor; the mounting plate was still missing. Thanks to the various dimensions I took from a real car, I could complete the motor. On the picture, it's amazing to see the dirt on the part; it will surely be cleaned before painting! Total length is about 1".
-
Roger's handcrafted 1:12 scale models
Roger Zimmermann replied to Roger Zimmermann's topic in Our Cars & Restoration Projects
During my vacation, I studied how I could do the vanes or fins for the wheelcovers. As I had a lot to do after my return, I could not try my plan immediately. I dit it this morning and created the prototype of the vanes. It took about 1 hour to get it; once the set-up is done, it will be quicker, at least I hope so: there are 40 vanes per wheelcover. As the result is the way I expected, I ordered 10 feet of 1.5 mm thick brass! I ordered also round brass diameter 40 mm to do the dies for the "dishes". I still don't know if I will do the wheelcovers in one piece or if I will be forced to do the center as one piece and the outside diameter as another part, soft soldered together. With steel dies and a strong press there would be no problem; however, I can only work with brass and if ripples are formed during the process, they will damage the dies if too much pressure is applied, without eliminating the ripples as I learned when doing the wheelcovers for the Avanti.

-
Roger's handcrafted 1:12 scale models
Roger Zimmermann replied to Roger Zimmermann's topic in Our Cars & Restoration Projects
I'm back from vacation. During my absence, Barry Wolk sent me about 50 manufacturing drawing details from the Mark II. It will help with some dimensions... -
Roger's handcrafted 1:12 scale models
Roger Zimmermann replied to Roger Zimmermann's topic in Our Cars & Restoration Projects
Finally, all 5 wheels are ready; the centers are soft soldered to the rims. They are still unpainted as it would be premature to paint them now. I'm still busy with the white wall: on the pictures only one is OK, the other 2 white inserts are retracting and a gap is visible between the black and white parts. I let cure the good one for 3 weeks and installed it; after 2 or 3 weeks I then will see if a longer curing time prevents the white silicone to shrink when in contact with the black silicone. If not, I will have to choose another product. What next? Well, the wheelcovers are waiting! I still don't know how I will do the 40 ribs or vanes per wheelcover; a solution will certainly come in time. Anyway, it will be time consuming.

-
FOR SALE: 1951 Ford owner's manual
Roger Zimmermann replied to Roger Zimmermann's topic in Ford and Mercury - 1932 to 1953
Yes Mike, I still have it. The manual has 32 pages + the cover. Dimensions are 4.8" x 6.5". Thank you for asking. -
Roger's handcrafted 1:12 scale models
Roger Zimmermann replied to Roger Zimmermann's topic in Our Cars & Restoration Projects
Last week I could take some measures on a Mark II located in Switzerland. In fact, it was disappointing as the man has many cars (too much for one life) in various stages of repairs. I doubt that only one could be driven. Anyway, the 2 afternoons spent with a pencil, camera and paper will let me occupied for the next few months. The first part I wanted to measure was a wheel center. Finally, he found one which was not installed on a car... Doing the wheel center on a lathe is not that complicated, it makes just a lot of brass chips! There are some details which cannot be done on the lathe: the stamped reinforcements near the studs' holes. How to reproduce that? Well, I prepared 5 small pieces of flat brass for each wheel (first image), bored each small part (second image), temporary glued them in place on the wheel center, bored the wheel center (third picture) to be able to put a small pin of 0.5 mm. After removing/cleaning the contact glue, I could soft solder the small parts on the wheel center. The pins have the only task to keep the small parts in place during the soldering. Then I cleaned the excess solder (fourth picture). The centers are not yet completed, the reinforcements need some more work to be acceptable. The last picture is showing 3 centers; only two more to do!


-
Avanti R2, 1963, refresh
Roger Zimmermann replied to unimogjohn's topic in Our Cars & Restoration Projects
Strange...I would also like to know what happens. The bottom of the tappets is not good looking; I suppose that soime debris went in the oil circulation and damaged the main bearings. I heard some strange stories how to break-in new cam and tappets: let drive immediately the engine at about 2000 rpm for 10 minutes (don't remember exactly how long). To me it's a non-sense as the engines in production were not subjected to such treatment. -
Roger's handcrafted 1:12 scale models
Roger Zimmermann replied to Roger Zimmermann's topic in Our Cars & Restoration Projects
Thank you Dale! To my taste, there are too few updates; I have other activities which are taking too much time; that's life! Roger -
Roger's handcrafted 1:12 scale models
Roger Zimmermann replied to Roger Zimmermann's topic in Our Cars & Restoration Projects
After the windshield wiper, I'm doing another futile part at this stage: the power brake assembly. It's less complicated than the wiper motor because it's larger! The picture is showing the part which is not yet finished.
-
Roger's handcrafted 1:12 scale models
Roger Zimmermann replied to Roger Zimmermann's topic in Our Cars & Restoration Projects
Yesterday, I did a discovery by accident: as I saved a white insert which was not good for the model, I inserted it into the brass tire of the Avanti. I removed it and saw that its dimensions did not changed! I assume that there is a reaction between the black and the white material, letting the later shrink. I placed an O-ring into a new white wall for the Mark II; unfortunately, the O-ring went down into the mold and is slightly visible. Not a good idea. In between, I began a futile part: the wiper motor. This part is looking so simple: "it will be quickly done" was my first reaction. With a nearer look, the part is not that simple; some days I was even discouraged (need a lot to me). Anyway, it's almost finished; some small details and surface finish are still needed: an afternoon of work... In retrospect, the same amount of time will do a good part of the frame!

-
Roger's handcrafted 1:12 scale models
Roger Zimmermann replied to Roger Zimmermann's topic in Our Cars & Restoration Projects
Yesterday, I noticed that the white wall of the tires are now loose! It seems that the white silicone rubber is retracting with the time. I will have to think about a system (maybe an O ring embeded in the white part) to prevent the problem. The white walls of the Avanti are also now loose into the tires; it's less of a problem here, I can do the wall wider, but not on the tires for the Mark II. -
Avanti R2, 1963, refresh
Roger Zimmermann replied to unimogjohn's topic in Our Cars & Restoration Projects
Many of the pictures you are showing now would have been very helpful for the construction of my Avanti model. Too much details were just guessed. -
Avanti R2, 1963, refresh
Roger Zimmermann replied to unimogjohn's topic in Our Cars & Restoration Projects
Hard to find? They are currently manufactured and not difficult to get! So many cars are using them... -
Roger's handcrafted 1:12 scale models
Roger Zimmermann replied to Roger Zimmermann's topic in Our Cars & Restoration Projects
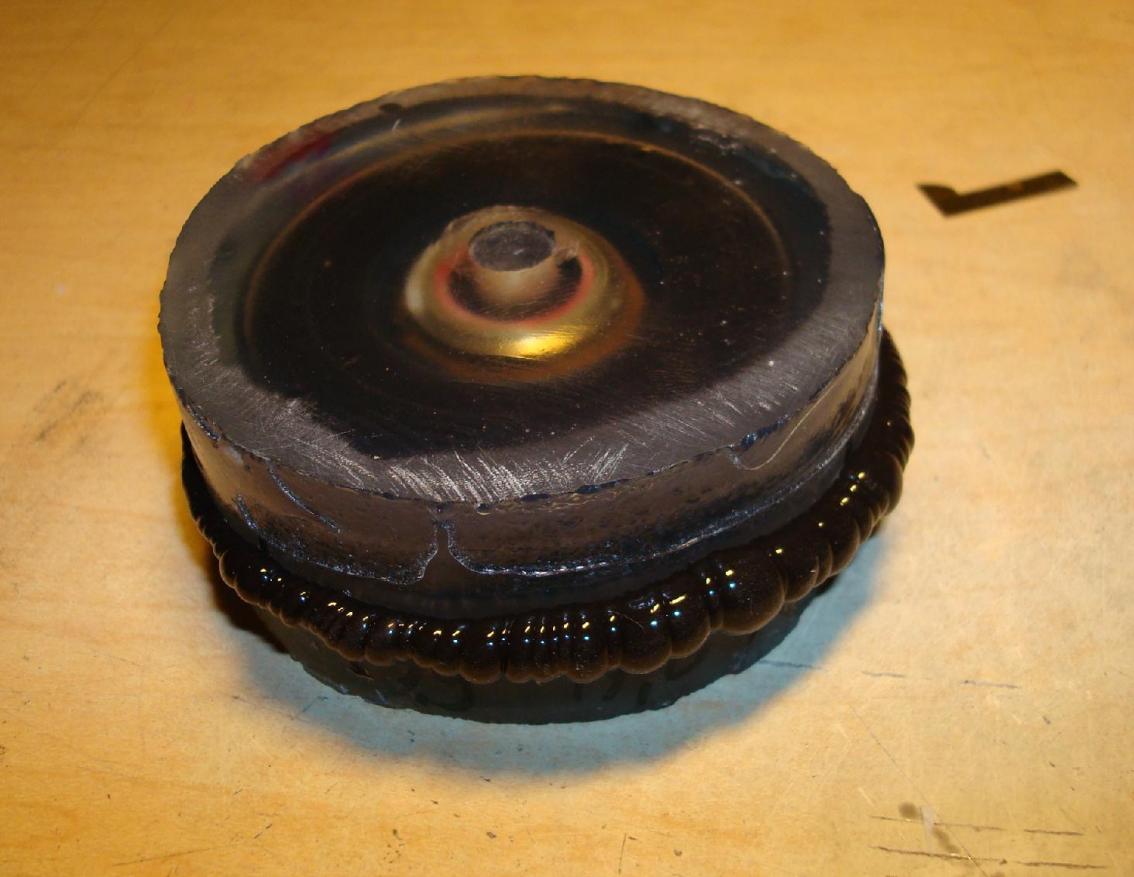
Late in the evening, I decided that the rubber was cured; I attempted to release the tire from the mold. When it was out, I noticed that some bits of the mold came with the tire. After inspection, the damage may not be noticeable; I will do another tire to verify. If the result is not good enough, I will have to do another polyester mold. I did also a white wall. The form is brass and it was designed that I can put a plate in the back to have a perfect piece. Unfortunately, my plan did not work as intended. Probably during curing, there is a recess of the material. If one part is exposed to the air, there is no problem. If the mold is completely closed, the recess is creating a bubble inside the mold. Each day is an opportunity to learn something! I installed the white wall into the tire; on the picture the problem cannot be seen; however, the white wall is scrap.


-
Roger's handcrafted 1:12 scale models
Roger Zimmermann replied to Roger Zimmermann's topic in Our Cars & Restoration Projects
All the pictures could not be sent together... The second picture from this serie is showing the raising volume of the silicone under vacuum; unfortunately, the camera is taking the lid as focus and not the molds; sorry for the bad quality.


-
Roger's handcrafted 1:12 scale models
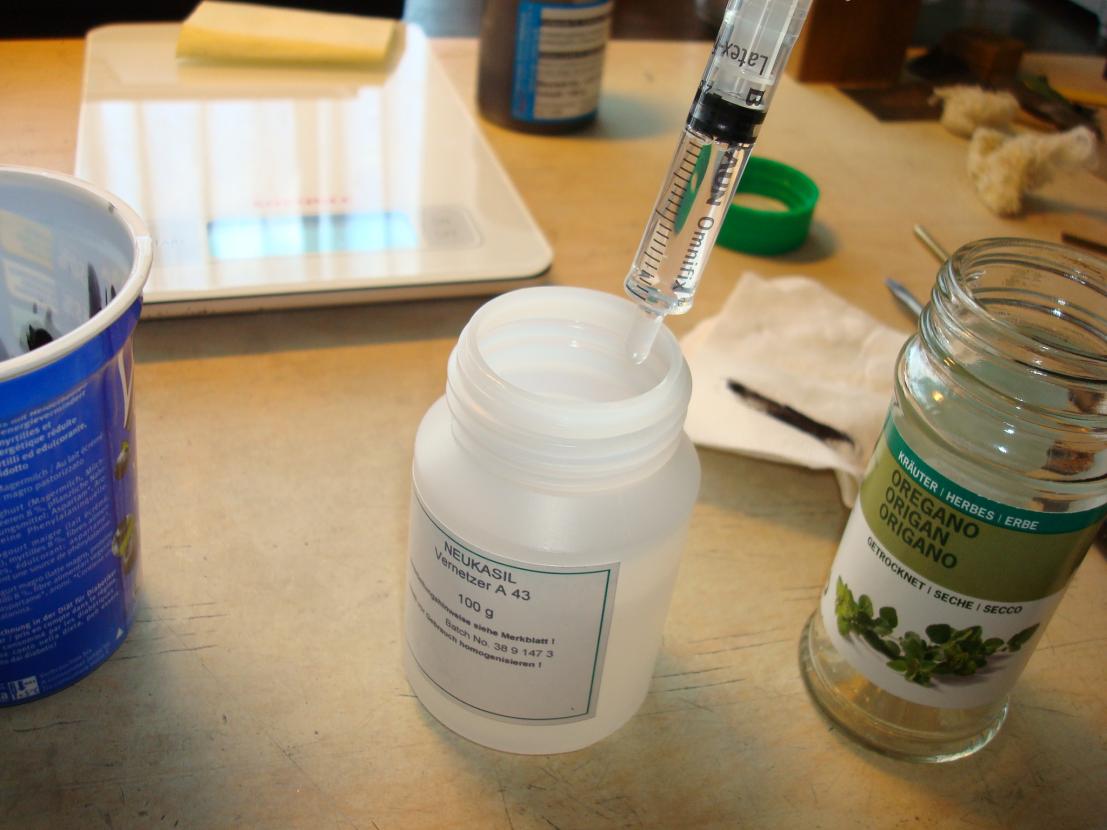
Roger Zimmermann replied to Roger Zimmermann's topic in Our Cars & Restoration Projects
Today, April 20, I did a new tire. As promised, I did pictures of the steps to show what is involved. First, I'm pouring the material into a plastic recipient, a little bit more than the real weight of the tire to have enough excess material: 45g (the scale shows 51 g, this is with the cup); as you see, the material is translucide. As I don't like translucide tires, a black paste is added to the silicone; very few is needed: less than 1 g. It's important that the mix is well done. Then the catalyst is coming: 10% of the wheight. A syringe is ideal for that. Once the product is well mixed, it is poured into the forms, however they are not completely full. Both forms with the cup are placed into a desiccator to remove the air trapped during the mixing. The silicone is kept under vacuum for about one hour; at the beginning, the volume is raising, this is the reason why the forms are not full. After one hour, the molds are back to normal pressure and more silicone is poured into them. Now, it's waiting time...I have to wait until the silicone is no more flowing; it happens usually 2 hours after the catalyst is added. Today, it was a little bit less; maybe because the temperature is higher in the room. At the right moment, both molds are put together and pressed to expel the excess silicone. Some weight is added on top of the forms to have as little silicone as possible between the parting lines of the molds. The result is for tomorrow, the silicone must cure for 8 hours.


-
Roger's handcrafted 1:12 scale models
Roger Zimmermann replied to Roger Zimmermann's topic in Our Cars & Restoration Projects
Thank you John for your comments! As you probably noted, my pictures are not coming on a regular basis. This is not my sole occupation and, to publish pictures, I have to do parts first! When the mold for the white wall will be ready, I will publish step by step how such a simple part like a tire is done. -
Avanti R2, 1963, refresh
Roger Zimmermann replied to unimogjohn's topic in Our Cars & Restoration Projects
This hole may be there to avoid odors and vapors in the car. In this location, you will hardly have dirt entering.