


Gary_Ash
-
Posts
2,220 -
Joined
-
Last visited
Content Type
Forums
Gallery
Events
Posts posted by Gary_Ash
-
-
I was missing the feedthrough block in my Delco Remy 662M distributor. I 3D printed a new one from ABS plastic and used a modified brass screw to make the connections.

-
 5
5
-
-
I saw this car in a hotel parking lot. An interesting solution!

-
2
-
 4
4
-
-
call Tom Van Meeteren in Nebraska. He is usually on this forum.
-
2
-
 1
1
-
-
Yes, Keiser has the correct ones, I think. But, it also depends if you have a "65" or a "75".
-
1
-
-
Yes, it was the guys with the auger-type screw jacks to lift the foundation that gave me the $30,000 quote a couple of years ago. I was turned off by the “slick willie” salesman who kept giving me the high pressure treatment but few details of what they planned to do.
The soil here is what dropped out of the last glacier as it melted 10,000-15,000 years ago. It consists of clay, gravel, dirt, and lots of boulders, some as big as a car. When the original excavation was done 22 years ago, the big boulders uncovered were pushed to the edge of the site and used to form a kind of retaining wall. A huge Cat excavator was able to do the work. Unfortunately, that only covered the rear part of the foundation. Once the new foundation wall is in place, we’ll build a high retaining wall to the front to prevent any future ground movement and backfill to the foundation wall. I’m somewhat limited as the site is defined by the town as “bordering designated wetlands”, so I can’t add fill with impunity. But, with a permit, you can do almost anything.
I’m just hoping we don’t hit any really big boulders when putting in the new wall. My small John Deere tractor can pick up 600 lbs or so in the backhoe but can nudge larger stuff. Of course, there is always dynamite!
-
Not me, it was Paul (Oldsfan) who identified it, I just found an online photo. I’m a good Googler.
-
1
-
1
-
-
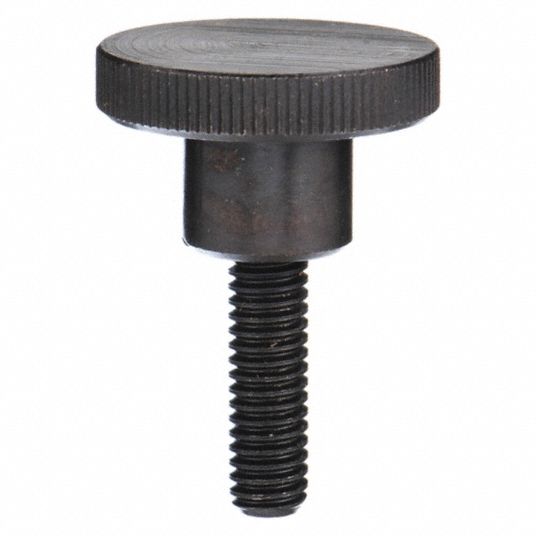
Herman, you always need to remind us which model Rockne you have: a "65" (model 30) or a "75" (model 41) because the parts are frequently different. The 1929-40 Catalog of Body Parts says that model 30 cars use a "thumb screw". Maybe it looked like this:
This photo came from the Grainger catalog. The diameter of the head is 1.25" (~32 mm), threads are 5/16-18. The head seems large enough to be able to tighten it securely
There are also thumb screws is smaller heads, may be more difficult to get tight enough to hold the windshield in place. The Studebaker parts catalog says there should be a washer and washer retainer, as well. Check the thread size in your car.
However, if your car is a model 41, then an "Adjusting Arm Handle" was used, part numbers 253533W and 253534W. They came in right-hand and left-hand threaded versions, used nuts, lock washers and spring washers. I don't know what these looked like.
Here are some options from Restoration Supply Co. (restorationstuff.com).

-
1
-
-
From the Hemmings website, a 1937 Oldsmobile 6:

-
1
-
-
Glenn Curtiss and the Wright brothers went from bicycles directly to airplanes, skipped the whole car thing. That said, Curtiss did try to make a plane that could be driven on the road in 1917. Maybe the road part was OK, but the plane was too heavy to really fly. Curtiss did drive his own V8-powered motorcycle to 136 mph in 1907.
-
2
-
-
James, you may have misunderstood my question. When I referred to a "lost wax" type of process, I really meant "lost PLA". I've been successful in having investment cast bronze parts made by creating a model in CAD at 100% size, then 3D printing a PLA pattern at 102% size (for shrinkage allowance). The PLA goes into the plaster investment and is melted out and burned out during the firing of the investment, just like wax. This saves the processes of making a silicone rubber mold and a wax replica. Have you tried this?
Here is a sample pattern in black PLA and some bronze water pump impellers made by the lost PLA process. Other types of 3D printing filaments may not work as well. I've tended to use clear PLA more recently to be sure there is no residue in the investment after burnout - any remaining clear PLA will burn to CO2 gas and water vapor. I haven't needed any Zamac parts but will keep you in mind if I do. Your work is impressive!

-
9
-
-
What is your process to get from the 3D scan to the cast part? Do you use a “lost wax” type of process from a 3D printer pattern or something else?
-
I'm getting things ready for the reconstruction of the garage foundation, had to move lots of stuff stored in the garage. My wife was happy that lots of it went to the dump. The work crew will arrive about Aug. 22 to demolish part of the foundation, dig deeper for new footings, and pour a new concrete wall. We'll use my John Deere compact tractor with front bucket and backhoe for some of the excavation and moving of about 6000 lbs of broken concrete. The guys doing the work are from a company that mostly moves or lifts entire houses for foundation work, so this is a small job for them.
I took some more photos on the inside of the garage. The walls were built with 2x4's, insulated, and covered inside with 1/2" oriented strand board (OSB) so I could hang things on the wall. The outside is sheathed in 3/4" thick T1-11 siding, heavily painted. During construction, a treated 2x6 topped with a plain 2x6 were bolted down to the anchor bolts cast into the concrete. The walls were framed in sections and tilted up so that the sole plate of the wall rested on the doubled sill plates and were nailed down. To be able to get to the nuts on the anchor bolts, I sawed off the lower 18" of the OSB to get inside the wall. Fortunately, the OSB was screwed to the studs, not nailed, easy to take off. At the front corner, signs of the settling is seen in the 1"-2" gap that now exists between the sole plate of the wall and doubled sill. The nails through the sole plate have just pulled out of the sill plates. As I look in to where the big crack is, the sole plate is in contact with the sill plates. It seems the wall is stiff enough to provide some beam strength though some sagging of the wall has occurred at the front corner. Wood is pretty bendy. As the foundation has sunk, it has also tilted away at the top, leaving a large gap on the inside wide enough to get my hand it.
Soon the jack hammers will arrive to fix all this!

Inside front corner of garage with 18" of OSB removed for access. There is a wide gap between the floor slab and foundation wall.

Gap between sole plate of wall and sill plates on foundation. Nuts on anchor bolts just visible.

At the big crack about 10 ft in. Note that the sole plate is now resting on the sill plates at this location.
-
My 36 ft x 24 ft garage was built 22 years ago. Unfortunately, the left front corner of the garage has settled several inches, cracking the foundation and apron in front. The 18"x12" footings were supposed to be 4 ft underground to survive New England winters, but the backfill left only 2 ft under the soil. Rainwater from the downspouts helped to make the remaining soil soggy at times and allow the soil to flow away from the garage. The gaps in concrete are now very large and the side foundation wall has tilted away from the garage. The floor slab seems to be still in the right place, no big cracks.
I talked to a company that would use steel screw jacks to lift the corner of the foundation but they wanted $30,000 to do it and there wasn't going to be something new under the concrete wall. I recently talked to an older gent who is in the house moving business. He suggested putting jacks under the garage wood structure at the front to lift it back in the right orientation, jackhammering the broken foundation parts away, excavating another couple of feet, and pouring a new section of 8" wall. This sounds like a better long term plan, and that is what we''ll do. He should get started in a few weeks. I'll add posts as it happens.

The garage foundation as poured in 2001.

The big crack in the side wall.

The big crack in the apron. The left corner of the garage has sunk at least 2 inches.

The driveway has settled, too. There is a steep drop-off to the left and wetlands below.
-
Here are the timing instructions for the Studebaker straight 8 with dual points. Image courtesy of Richard Quinn.
In these older cars, setting the timing is made more difficult because the TDC/UDC marking is on the flywheel, so you have to open the inspection panel on the bell housing and be on your hands and knees under the dash to see the marks. I think it wasn't until 1938 that marks were put on the harmonic balancer on the front of the engine with a pointer attached to the block.

-
2
-
-
Studebaker had a great bird ornament in 1931, used for a couple of years. When the Studebaker Indy cars were being fabricated for the 1932 Indy 500, birds appear on the radiator shell. Of course, they never raced that way, would not have been allowed on the track at Indy with something as deadly to other drivers. They always had flat caps.
I did shell out big bucks for a bird thinking I would use it for shows, but I wound up using a remote radiator fill under the hood, if only to comply with current rules for antique speed events that require overflow/recovery tanks. I used a bolted clamp to hold the flat cap solidly on top of the grille because at today's car shows, pocket-size shiny bits can disappear quickly. I need to find a place on my desk for the bird.

Three of the five 1932 Studebaker Indy cars during assembly, birds in place. Clearly a posed shot, and no other photos ever show the birds in place, only flat caps.

Replica bird, possibly by Ken Thornton.

My grille shell with bolted flat cap (backwards; I turned it around later). Note remote fill behind radiator.
-
4
-
-
Blockley and other companies make tubes with metal stems and lock nuts. MWS Wire Wheel in the UK carries them:
http://shop.mwsint.com/productsList.asp?catid=137&pagenum=1&mode=list
-
1
-
-
My 1929-40 Parts Book shows 69" of 1162XB "Strip, Radiator ledge filler" in Section B25-2 for Model 71 cars. As illustrated in my 1941-48 M truck parts catalog, 1162X anti-squeak fabric is listed as 1/32" thick x 3/4" wide. The 419-12XX rivets are listed as "New Standard" part numbers. While 419-1211 isn't shown, it should be a tubular rivet with 3/16" dia. shank and 11/32" length.
In many cars, the anti-squeak was attached to the radiator shell with split rivets. I used them on my 1932 Studebaker Indy car replica which used a 1931 President radiator shell. I located the holes in the shell, drilled through the fabric, and inserted a split rivet, then used rivet setting pliers to spread the legs and crimp them tight. I think I got the pliers from a Model T/Model A Ford supplier, maybe the brass split rivets, too. The pliers and split rivets are easier to use than trying to spread tubular rivets. The rivet head recesses into the fabric enough to prevent scratching the hood. Restoration Supply carries the split rivets, as well. Here is the tool at Lang's:
https://www.modeltford.com/item/4060RST.aspx
-
Surely, Ford had no problems recouping the investments in the flathead V8. The production of those engines continued into the 1950s in the U.S. and even later in France, Germany, and Brazil. See the Wikipedia article on the Ford flathead V8:
https://en.wikipedia.org/wiki/Ford_flathead_V8_engine
-
Joe, I fired up my 2014-vintage Mac mini now running Mac OS 12.6.7 (latest) and Chrome. No problem going to this forum and typing in a response - as I am doing just now.
Thinking about the window you got wanting you to load a picture, I'm wondering if at some point in the recent past you were creating a post and were trying to load a photo when something went crazy. Somehow, your Mac wants to go back there and finish. One solution might be to try it again, and if you are asked to upload a photo, do that and see what happens next. It may clear the problem. But, also in Chrome, click on the three dots on the upper right, then click More Tools, then click Clear Browsing Data.
-
2
-
-
I don't think you need to wipe it, could take many hours of work and waiting to get everything back.
-
1
-
-
Yes, Mac OS 10.11.6 is approaching it's 8th birthday, was marked obsolete in 2018. But, hey, it still runs on your Mac and I understand about wanting to run old, familiar, irreplaceable software. I'll fire up my old Mac mini and see how Chrome looks on that. Normally, I'm 98% PC/Window here. And, even though I have the latest Windows 11, it can also run a virtual machine running Windows XP and some 25-30 year old software in a window.
-
1
-
-
Joe, are you seeing a box like this one below or a similar one asking about loading existing images? If so, it almost seems like you are double clicking (or more) and somehow tapping on the "Other Media" button which can bring up this box. I am not able to duplicate that effect on my PC, however. Sometimes, a mouse will go bad, especially Logitech, and send a double click when you only want one, but I don't see how even that would get you to an "insert image" box. It might happen if your initial click is on the right side of the screen. Try clicking on the left side of the reply box.
You may have some "cookie" or other item in your browser history that is causing this. In Chrome, click on the three dots on the upper right, then click History and when a small window pops up, click on History at the top left of that box. A new browser window will open and you will see 'Clear browsing history" of the left side panel. That will clear a bunch of cookies - including your auto login to this Forum - but it may need to be done. Then reboot and try it again.

-
2
-
-
Joe, back up a bit, please. What do you mean by "upgraded off"? Are you an Apple or PC user? What upgrade made it not possible to post here? What error message did you get? We can fix this! You can't leave us all hanging about the Mitchell, and we all value your opinions on other projects and issues.
-
6
-
-
In the aircraft world, there is a big distinction between bolts used in tension (e.g. cylinder head bolts for cars) and those used in shear (e.g. wrist pin bolts or spring shackles). The ratings for bolts used in shear are much less than in tension, even for the same bolt. For shear bolts, it is made clear that there should be no more than 2 threads in the shear area, the load should be placed on a smooth shank. Loading a threaded portion of a bolt in shear leads to very quick failure due to a variety of causes.
Fastenal has a good web page on bolted joints: https://www.fastenal.com/content/feds/pdf/Article - Bolted Joint Design.pdf
-
4
-


Plastic Piece for Distributor
in General Discussion
Posted
My distributor is from a 1937 Studebaker President 250 cu in straight 8 that I used on my 1932 Studebaker Indy car replica.