


95Cardinal
-
Posts
1,126 -
Joined
-
Last visited
-
Days Won
5
Content Type
Forums
Gallery
Events
Posts posted by 95Cardinal
-
-
2 hours ago, Leif in Calif said:
Is that big steel plate on the frame normal? Looks like the high school medal shop class did it in the first week of school.
Yes, sir; that is an original Buick frame component.
You can see mine in the bottom right corner of this photo:

-
E4LB indicates 1984 Mark VIII
This is a helpful post:
https://www.blueovaltrucks.com/tech-articles/how-to-decode-ford-part-numbers/
-
 1
1
-
-
1980's era - GM high-back buckets, probably J car (Cavalier, J2000, etc) OR Camaro/Firebird.
-
If it cranks when you press the accelerator, the switch is working.
Fuel in the carb doesn't necessarily mean there is fuel entering the cylinders.
I would check compression first.
Also check for clean, tight engine-to-body and engine-to-frame ground straps.
Check spark plugs, plug gap, correct firing order.
In my experience, the timing needs to be right at spec (5 degrees BTDC).
-
2
-
 1
1
-
-
might be a 1915 Cadillac Model 51 sedan.
-
It will be great to have more brass and nickel cars this year.
Will we be driving in together on Saginaw?
-
On 2/12/2024 at 9:11 AM, bkyrd_wrench said:
A great restore effort. I've noticed that many photo links are "broken". Looks like the place where they were (flicker?) removed them? Very sad.
Yes, I closed out my Flickr account and am slowly re-linking the images. If you follow the thread, you'll be notified as I make updates.
Joe
-
1
-
-
My 68 GTO

-
4
-
-

 Decisions, decisions....
-
3
-
-
Looking awesome, Ron!
-
1
-
-
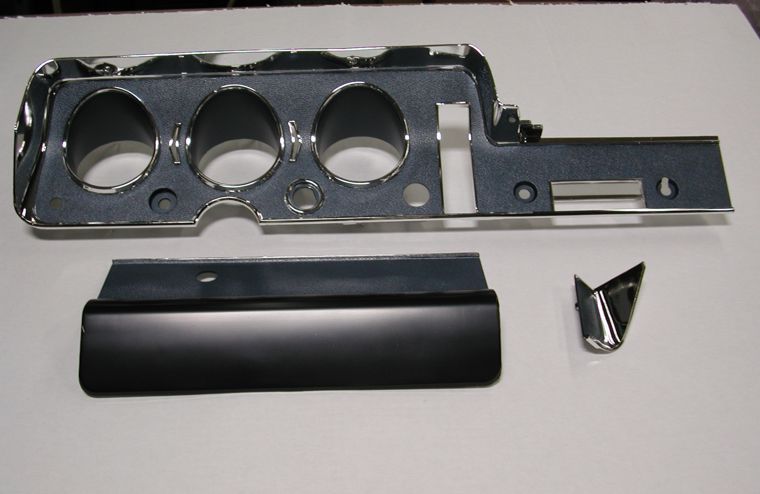
2 hours ago, John Byrd said:
Guys, thanks for the explaination of the chromed plastics, I really didn't know how it was done, and always wished my Mustang and Falcon "chrome" parts on the doors and dash had looked better, lol. Of course my friends back then told me a lot of different versions, always ending with "you can't have them fixed"...
Your friends were wrong....
I have had MANY plated plastic parts restored by Vacuum Orna-Metal. Fantastic work and "good as new" results!
https://vacuumorna-metal.com/content/restoration
These are the dash panels they plated for my 1968 GTO.
-
4
-
-
Welcome to the forums.
What a GREAT car you've got there.
I did not know that H&E made convertible conversions of those "C" body vehicles. I bet it's a great touring car.
-
The chassis number is stamped onto the top of the left front frame rail, just rearward of the front axle.
There should also be an aluminum frame number plate riveted to the outboard side of the left frame rail in that same area.
This picture shows the aluminum plate on my 1933 Pontiac frame.

-
1
-
1
-
-
Ruben,
Your car is a 1934 Pontiac, not 1933. The hood side trim is 1934 only.
Bloo is correct; a 1934 Pontiac should have a straight 8 engine.
You will need to identify that engine before you can order any parts; it does not look like a Pontiac 6 cylinder.
-
2
-
-
On 12/1/2023 at 10:49 AM, SBRMD said:
Going to go look at one, what code should I look for?
And....the package includes posi, right? G80?
And while we're at it: where is the SPID sticker? Inside the spare tire cover maybe?
Thanks in advance.
The SPID label will be on the passenger side jamb of the tailgate. Open it like a door and look on the jamb adjacent to the passenger taillight.
Yes, G80 is posi.
V92 is the tow package.
Here is a link for a helpful RPO list: https://rparts-sites.s3.amazonaws.com/dec399b0838336997484042ed2af1004/design/rpoCodes.pdf
-
1
-
1
-
-
-
I can't wait to see it "in person"!
-
Terry,
I am so sorry for your loss.
Joe
-
The paint on the needles loses it's reflective properties over time.
Re-painting the needles might also help.
-
1
-
-
On 10/26/2023 at 2:09 PM, sebastienbuick said:
Hello, thank you very much for the internet links.
I just looked on this site and there are a lot of clips for modern cars.
I will send them a message with photos to see if they have it.
Was this clips only for Buick ? or did the whole GM group have the same clips ?
I haven't looked on Rockauto yet, I will look soon.
THANKS")
Yes, some clips were shared with other GM divisions, but most of them are unique to a particular vehicle.
There are many "standard" clips that you might be able to use, so be sure to also look at the universal clip designs.
-
1
-
1
-
-
Also try clipsandfasteners.com
-
1
-
1
-
-
Great find, Adam!
-
1
-
-
On 8/24/2023 at 4:50 PM, sebastienbuick said:
Then I wanted to check the electrical continuity of the cigarette lighters to see if they work, and no they don't


so I disassembled the back of the cigarette lighter to see better

it's rusty/oxidized

Contact sanding


I added a small axis inside to help the contact to do this, then reassembly and continuity test

This time it's good it works :), now second cigarette lighter.
it also doesn't work, so I also disassembled the back

it's even more rusty than the other one

So contact sanding

But for this small part there is no electrical continuity

So I took it out of its holder

And test the support, which is fine

The problem therefore comes from this part, the current does not pass

So I pierced it, and lots of blue oxidation powder fell into it.

And its second part y and fall too

I will put an electric wire to make the contact


Reassembly, and the contact is there

Sebastien,
I am just reading these updates from August; EXCELLENT work, as usual!
However, there is one change I would suggest.
That part at the back of the cigar lighter is a fuse.
If you want to replace it, they are sometimes available on eBay and other places:
I chose to replace my failed fuse with an inline fuse so it is easier - and much cheaper - to replace.
Sorry, I don't have any photos of what I did.
I would definitely add a fuse to that circuit; the power feed is direct to the battery and a short circuit could damage your wiring or cause a fire.
-
1
-
1
-
-


 Decisions, decisions....


1969 Pontiac Tempest Sprint
in Our Cars & Restoration Projects
Posted · Edited by 95Cardinal
removed sentence (see edit history)
Ted,
Welcome to the Cammer world!
I have always thought these were interesting and cool engines.
My current project is a 1933 Pontiac sport coupe - with a 1966 OHC-6.
Enjoy your Sprint!
Joe