


jiminyfixit
-
Posts
105 -
Joined
-
Last visited
Content Type
Forums
Gallery
Events
Posts posted by jiminyfixit
-
-
I have been selling on eBay for 11 years now & pretty much agree with all of you. I buy & sell DJI drone cameras, along with repairing them for several dealers. Fortunately, I have only had 3 "bad guy" sales of refurbished cams where they all filed a bogus claims & returned their damaged cameras. Fortunately I was able to fix those cams & resell them. I put them on my "no sell" list, but couldn't get eBay to settle in my favor. However, with one of the sales, eBay did do something clever. They told the buyer I didn't have sufficient funds in my account to refund the full amount, so I at least got a partial refund along with his camera that I was able to fix. These bad guys got me to alter my "business model" & started recording the sale date, buyer's name & serial number of every cam I sold. Presenting these "facts" to eBay is probably what prompted them to go 1/2 way with me. I politely reminded them buyers don't support eBay, sellers do with the fees we pay.
So far, eBay has been a great source for locating some scarce items for my 34 Dodge, like script tail light lenses & many other goodies. I just have to check eBay every day , which is just part of my routine. Some of the DPCD F.B. groups are good too, with one specifically having an administrator who bans scammers without hesitation. AND, let's not overlook the quality of the like-minded collectors in the AACA forums who are a constant source of valuable info & occasional goodies.
-
 2
2
-
-
2 hours ago, countrytravler said:
I have not forgotten about you. Been fighting this Pneumonia thing for a month now.
Dave
My gawd man!!! I wish there was something I could do for you!!!! I hope the Pneumonia gets bored & leaves.
I wish you a healthy & profitable New Year Dave!!!! Get well sooooon!!!!!
Jim
-
1
-
-
Thought I would follow up on this inquiry. Thanks to "Country Traveler" who was able to supply L&R brackets. The L one was a reproduction crafted by Al Smith some years ago when he was making reproduction parts for these old mopar cars. It's either made out of a solid piece of brass or cast bronze, but is a perfect reproduction. The R one is an original with "33 convertible" written on it. The only issue is the Brougham cowl is 1 1/2" longer than the convertible brackets, which is not really a problem. I'm in the process of making 1 1/2" aluminum spacers that will fit on the front end of the brackets. Adding a spacer is certainly easier than trying to fabricate these from scratch. I won't drill a hole in the "A" pillar until the finished brackets pass my QC. Many thanks again Dave!!!!!
-
3
-
-
16 hours ago, countrytravler said:
I may have the brackets.
Catalog is from 1990. Cost has tripled.
.jpg.4a976ac30af6f6aa943868a59351c5f0.jpg)
.jpg.2db26be2172ecd1acd651772713609e5.jpg)
Understood & accepted. How much for a set of brackets with link plates? You amaze me Dave!!!!:)
-
I stand corrected by AACA members smarter than me. These are coupe brackets. Ian's luggage rack has the sedan brackets, which I am now looking for. Chrysler was smart, they used the same holes in the sheet metal & frame for the spare tire bracket AND the luggage rack. This made it a no-brainer for the dealer ship to accommodate customers' whims. I now have some coupe brackets available. Live & learn. I'm having fun!!!
-
BTW, it would also be for a Chrysler & possibly DeSoto. Plymouth had a raised bump where the emblem goes & Dodge & Chrysler were flat.
-
1
-
-
This looks like a 33-34 sedan rack. The brackets are typical of sedans. I notice that the emblem is upside down, & the rack has been "whomped" on a bit but who cares. I am in need of one just like this if it is for sale, even if it isn't for sale.
")
-
SIMPLY STUNNING!!!!!!
As some say down under; "good' on'ya mate"
-
33 minutes ago, JACK M said:
I wonder how hard it would be to make those.
Especially if you cannot see them.
I have that option in mind if I can't find originals. Fortunately, Ian provided me with enough photos to make effective substitutes.
-
2
-
-
After exhausting a few other sources, I thought I would post this inquiry. My 34 Brougham sedan came with side mount fenders that replaced the original non-side mount ones. No holes have been drilled in the "A" pillar for the short bars that attach to the main irons. I need the interior brackets that go from the A pillar to the firewall, inside the car. (14 1/2" long X 2" wide). Photo attached, courtesy of Ian. If there are any parts cars out their without the front fenders, the easy way to see if the car had side mount fenders is to spot the hole in the A pillar, about 2" down from the lower belt line. The brackets were riveted to the cowl, at the front end, and bolted to the lower part of the dash, at the back end. These would probably have stayed in the car if the fenders were used to replaced damaged ones, since they wouldn't need the brackets. Many thanks in advance for any help!!!

-
Some many months ago Scott Bonesteel showed photos of the ingenious hood supports, (part no. T-162), he purchased from Roberts Motor Parts, but unfortunately they were out of stock. Well, yesterday I was called by them to let me know they are now in stock & ready to ship. contact them at sales@robertsmotorparts.com. if you are interested.
-
 1
1
-
-
On 9/4/2022 at 3:55 PM, Ian_Greenlaw said:
Got some colour on the gear shift boot to get rid of the brown stain. Unfortunately its sitting up about 1" from the floor. I guess I'll have to cut it to fit. I thought it would just fit but it looks like the stem going into the gear box is too high......bugger !

I went through the same issue with the gearshift boot & probably drove Burnbaum nuts after swapping the boot 3 times. Since I put the 37 Chrysler overdrive in the car, the correct 34, shallow bump boot was off the floor the same amount as yours. It matched the 4-holes in the floor board, where the 36-37 bump was taller but only has 3 holes. Fortunately the 3-hole boot just barely covers the 4 holes on the new floor mat, but fits perfect after carefully grinding out the shift rod hole. Just need to get the oval-head screws to penetrate the floor mat backing & screw into the floor board plate.

-
1
-
-
WOW!!! Thank you for the helpful hints!!!
So far, the front end parts seem to be pretty tight. No loose tie rod ends or king pins. After turning a full circle, & letting go of the wheel, the steering turns by itself back to almost straight ahead. I will investigate more to see how many adjustments haven't been tightened through the years. I will post when I get a solution with results.
-
1
-
-
13 hours ago, Ian_Greenlaw said:
Fitted the handbrake boot and connected up the handbrake extension. Attached the new knob I had made at the same time when I got a new one for the gearshift made.


Where did you get the hand brake rubber boot/gasket???
-
Since I don't have a Hollanders' & I haven't found any recent posts on this topic, I thought I would ask the question. I am looking for a worm gear for my 34 Dodge steering box. I'm sure Chrysler gave part numbers to the combo of the worm & its tube, (different lengths), BUT, what years are the worm gears all the same?
I hate to say it, but I'm kinda getting used to the very sloppy steering, but I really hate to perfect the skill that some of my passengers may not appreciate as much as I do. Many thanks in advance for any input.
-
On 8/29/2022 at 7:19 PM, Ian_Greenlaw said:
Careful....there is a right and left one also.
Thanks for the confirmation. I'm now on the hunt for these brackets, OR enough dimensional info to make some.
-
On 8/25/2022 at 6:52 PM, Ian_Greenlaw said:
Towards the cowl otherwise the wheel wouldn't have fitted as you suggested. We tried that first and fitted perfectly.
Rock solid now. Its actually surprising how sturdy they are once all tightened up.
Next moving onto the horns. I have an original pair of restored New York 1934 Number Plates I'll pop on the car.
I designed a bracket to hold the number plates so hopefully these should all go together.
Since you are deep into the side mounts; is there a long brace, inside the car, that goes from the "A" pillar, up to the cowl to support the mounts? I've seen photos of one for a convertible, but wasn't sure if the sedan needed it. You are doing a beautiful job!!!!!!!
-
On 7/11/2022 at 12:13 PM, 34dodger said:
Happy to help. Hope it goes well for you.
Here is follow-up on good advice from "34 dodger". I finally got the overdrive in the car & couldn't be more pleased. Not only was the 5lb. setting on the fish scale helpful in getting a base adjustment on the clutch mechanism, but Bill's recommendation on "1/2 turn = 2mph", was spot on. The only minor issue was with the new Coker WW tires that decided they were objecting to 60 MPH. This was expressed with the front tires who were getting "worked" more than the rear. 2 short 20 mile trips produced black streaks emanating from the bead & streaking across the fresh white walls. The 60 mile trip yesterday only produced one small streak, so I guess granny has broken in her new sneakers in spite of the sloppy steering "working" the front wheels. A steering box rebuild is the next project. Any recommendations?
BTW, 2 of the tires that came with the car had mfgr. dates of Aug 45. The other 2 were '65. The "45" tires are 3 months older than me, yeegaaads!


-
On 4/12/2022 at 10:56 PM, Ian_Greenlaw said:
Well looks like some force is warranted. Thanks heaps for the advice. I'll do the top one first as suggested ! Wish me luck...
Top one first, then line up the 2 on the bottom & use your foot. They snap right in. I used a little silicone grease on all 3 balls.
-
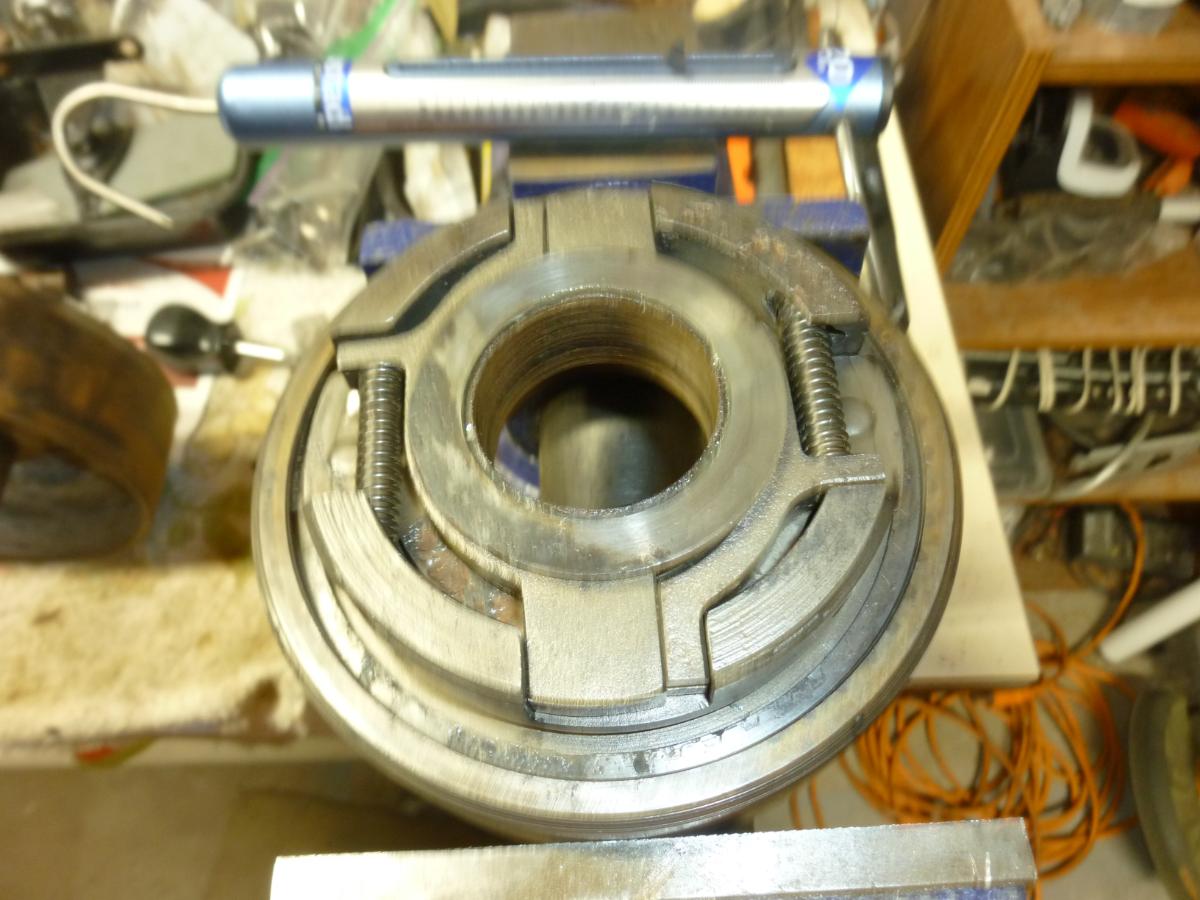
OUTSTANDING!!!!! Just the info I was looking for! I adjusted the screws in tight, as far as I was comfortable with, checked the tension with a pull type fish scale, (10lbs), & backed it off to 5lbs. I now feel at ease knowing I won't have to remove the trans to re-adjust, if needed. Everything else with this transmission has been pretty straight forward & brings back memories of when I overhauled a pristine OD, 40+ years ago for my 34 Plymouth.
Thank you so much "34 Dodger"!!!!!!!
-
2
-
-
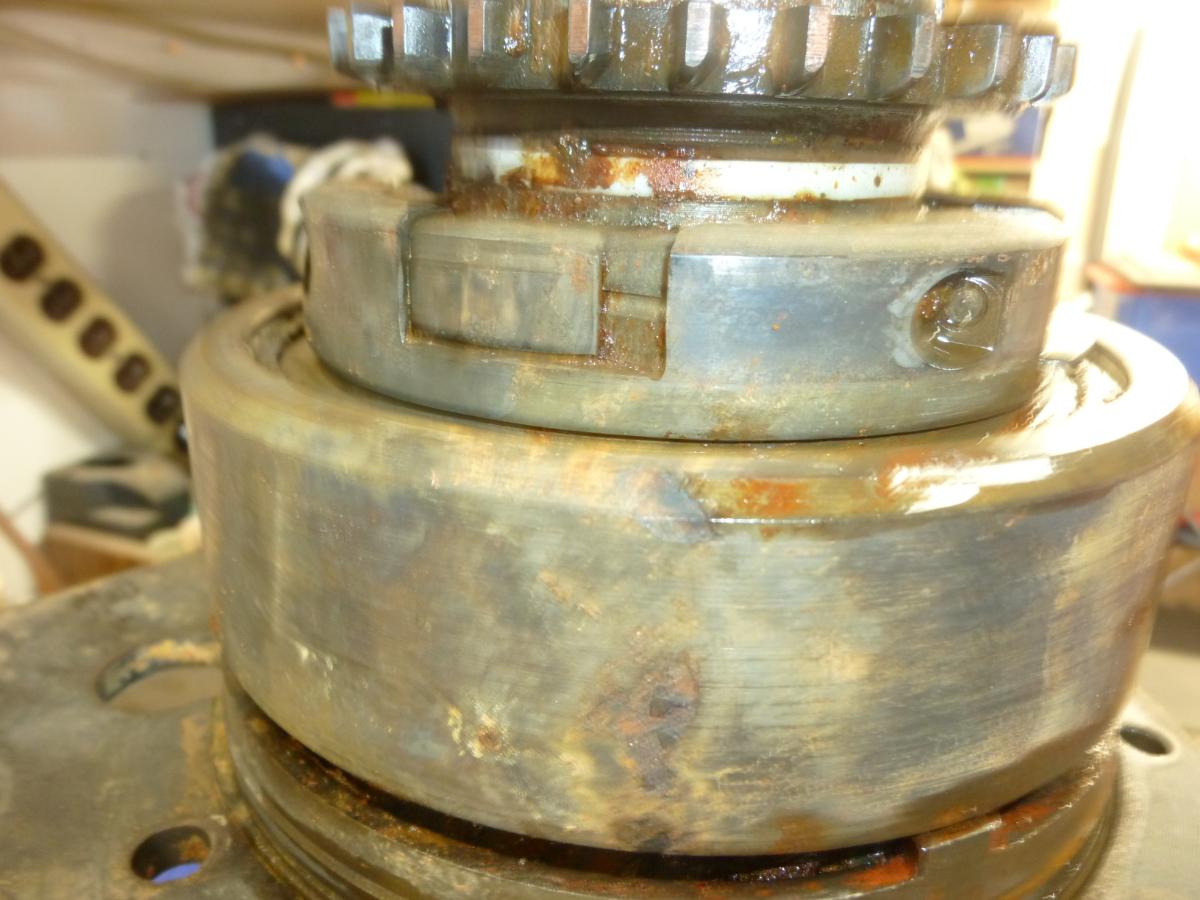
The tried & true saying about not being able to judge a book by its cover rings true with transmissions, especially when they are 85 years old. On the outside this trans looks pristine, but on the inside, the OD section was another story. If mice could eat cast iron, well.......it would still be a real mess. Fortunately, most of it has cleaned up fairly well & the only replacements needed are bearings & gaskets. However, it did require dismantling EVERYTHING, right down to the centrifugal weights in the annulus clutch unit. The problem is that I wasn't able to count the turns on the adjusting screws that control the weights. This is important since they determine what speed the OD kicks in. They also have to be matched. I haven't been able to find any specs on this adjustment & really don't want to have to remove the trans if I don't get ti right the first time. Has anybody come across any info on this. I have a hand scale, (for weighing fish), that I can use to get the adjustments even, but need to know how many pounds to set the screws to. I did come across a 24 page "Overhaul" manual that has great photos & details on how to rebuild this T-86, R-6, '37 Chrysler OD trans, but the weights were not removed. If anybody wants a copy of this manual, let me know.

-
3
-
-
20 hours ago, Steve9 said:
That’s a handsome looking 34. I like the 4 suicide doors on them. I’ll bet the old Buick got the most looks of the day. So who hauled home the trophies?
It was a no-trophy, no fee event. Who needs a trophy when there were so many new folks to meet with great stories & interesting leads, plus, the goals met to even get here. Got to fine tune brakes, tranny & steering.
-
3
-
-
18 hours ago, JFranklin said:
The gold one looks to have run into the back of a freight truck! Which one is yours?
Top photo, 34 Aero Brougham sedan. The blue 41 Ford belongs to my neighbor who followed me to the show.
-
Made the 50-mile round trip in the 34 Brougham yesterday to the Father's Day car show in Yreka, Ca. (171 cars), without losing any parts, with no smoke or excessive speed, (50 MPH was scary enough with very loose steering & 57 year old tires). My neighbor followed me just to be sure & I was glad to disappoint him. (41 Ford owner): This was a great shakedown cruise with the tranny being the major issue. Low gear is in horrible shape & there is a mysterious, occasional, loud whining sound coming from it. I have no idea what the internals are of this worn out freewheeling trans. Fortunately, it had been locked out into standard trans mode.
No trophies, but met a great bunch of collectors & saw some very interesting cars, along with hot dogs & 50's music.
2-cars over from mine, a fellow had a 41 Plymouth truck who had an uncle that sold me his obsolete Studebaker inventory back in the mid 70's from his Mt Shasta Chrysler/Plymouth dealership. He always wondered what had happened to the gorgeous enameled big "S" sign & the parts, so we had a lot to talk about.
The one car that was most impressive to me was a 1917 Buick that was reassembled from all of its parts after being pulled out of storage for MANY years. The owner drove it into the show in it's weathered, original condition. Truly a miraculous machine. Photos attached.


-
6
-

.jpg.4a976ac30af6f6aa943868a59351c5f0.jpg)
.jpg.2db26be2172ecd1acd651772713609e5.jpg)


F/S 33-34 Factory Dodge/Plymouth luggage rack Lowered Price
in Dodge & Dodge Brothers
Posted
Hi Dave,
I hope you're feeling better!!!!
5 of the brackets appear to be for coupes & the 2 that are stampings are for earlier year Mopar coupes. The catalogue from Al showed the sedan brackets which have a round post that goes through to the same holes in the frame that the spare tire mount attaches to. The part that attaches to the rack are the same for coupes & sedans, along with the curved & straight link plates.
Thanks for the photos, hope you have some for the sedans.
Cheers,
jim