
.jpg.96c274d4c94fb20f3934f7d01d2934f5.jpg)
.jpg.92398e9b87ed962c5ab0309062d9b281.jpg)
TC KER
-
Posts
42 -
Joined
-
Last visited
Content Type
Forums
Gallery
Events
Everything posted by TC KER
-
My cousin drove his Hellcat out to our place to orchistrate the repair; couldn't help to think of you when he opened up the hood...............

-
Picture 1 we removed the cover in front of the radiator and the cover over both lights. We loosened the 3 nuts on the shock tube plate as shown on picture 3 Picture 2 and 3 shows me using a wrench to push down on the shock tube from the small space that is behind the headlight and lifting the bumper up at the same time as some else tightens back the 3 nuts on the shock tube plate. We did this on both passenger and driver side of the car. Picture 4 shows it completely repaired. Hopefully we figured out the best way to do this; it took us about an hour and we did not have to crawl underneath the car. Thank you both for your input. Kerry


-
Hi, I plan to get this fixed in a couple weeks; I'll post an update when completed. I'm adding these pictures of the issue just for the record. The photos are the passenger’s side; the driver's side is just a little loose too (the bumper has no evidence of being hit; it's just some type of reflection on the photos). Kerry


-
Hi Hemi, Hopefully you can put me on the list of things to do after you get your hand repaired first. Garnet and Gold sent me an email with a photo regarding the slider but I haven't dove into that yet since when I pull up the bumper with my hand and look underneath the hood I can see movement in the area that you pointed out. The #6 bolts in your diagram appear to be tight so I re-attached your diagram edited to point out where I see movement along with a “possible” solution. I’m wondering if it would solve the problem if I were to loosen up the 2 bolts pointed out in the diagram and then hold the bumper up and tighten them. Perhaps try the same with the #6 bolts? Are the holes for any of these bolts elongated? Is the best way to access them by removing the headlight? Could it be that something broke inside the area I see movement? Thanks and get better soon, Kerry

-
Thank you all for the info. I'll post an update once I figure it out and repair it........
-
1990 Chrysler TC by Maserati 3.0 V6. This is my 30th year anniversary of owning the car. The front bumper is loose and it slid down about 1/4" on the passanger side and the driver side is a little loose. It did not run into anything or been hit, it just did it on it's own. I'm thinking that some bolt came loose and just needs to be tightened. I Iooked under the hood and couldn't see where I need to start. I tightened the bolts undereath the bumper with an allen wrench and that did not help. Can someone post a schematic so I can see what I need to do on this project? Has this happened to anyone? Thanks, Kerry
-
When I pushed the driver side power lock button it made a continual running sound but it didn't lock the door. I took the door panel off to see if it was something easy to fix. Turned out it was. The before and after pictures are inside the driver side door toward the top left side close by the lock that the key goes into. The bent metal rod came out of the hole because the plastic part that secured it broke. I provided a picture of the plastic part that broke along with a before picture and after picture of the repair I made. I wouldn't recommend anyone do it like I did but it did the job. I'm thinking the plastic part that broke might be a common thing to find since I could see many of them inside the door. If anyone knows the part number it might be helpful for anyone who runs into a similar problem with the power door locks.


-
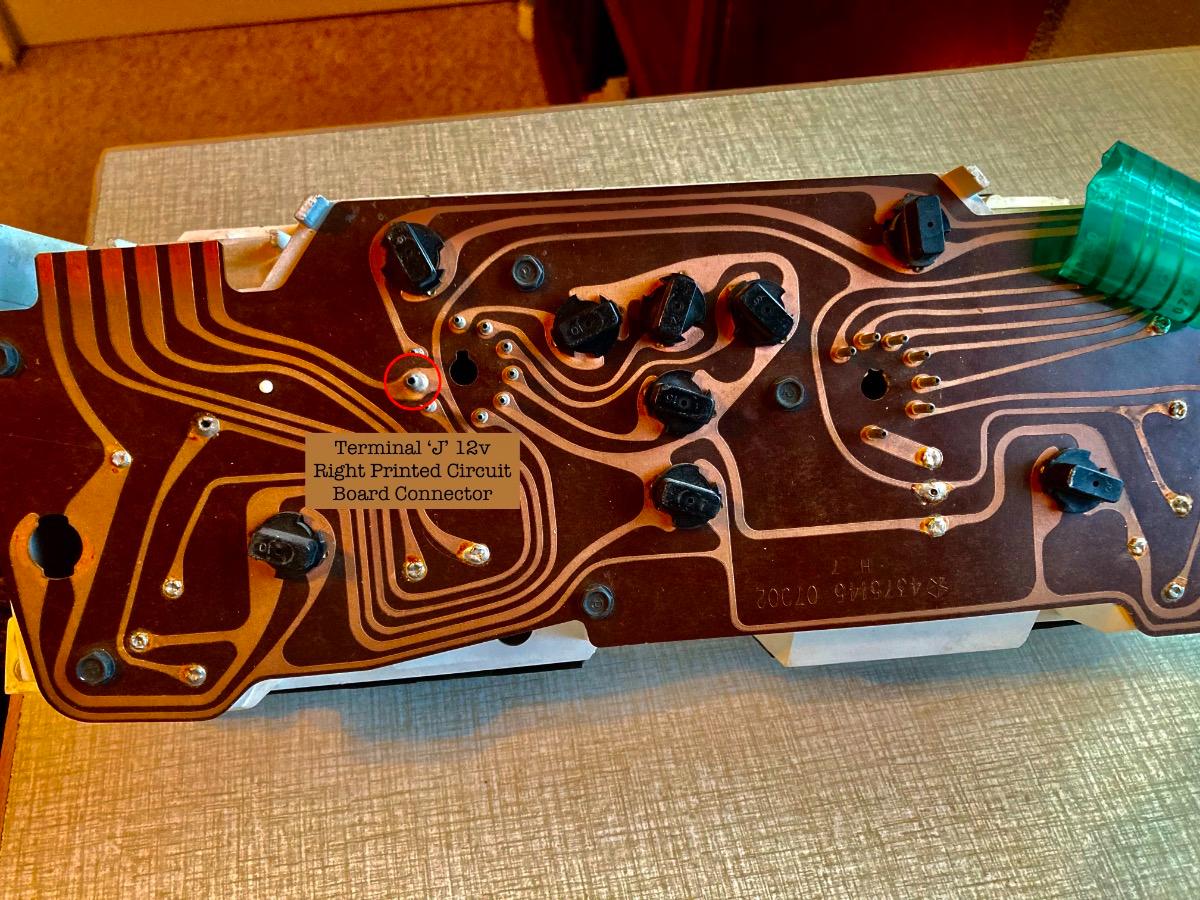
UPDATE: I took the instrument panel out of the dashboard. Before I took all the wiring off the instrument panel I decided to twist the electrical green ribbon in different positions to see if I could activate the lights when I turned the ignition on. It worked so I taped the green ribbon wire to the instrument panel in the position that it was working and all has been working like it was designed to do. The original tape that held the ribbon to the instrument panel was no good so I replaced it. There is probably some sort of loose connection but it works great.
-
Thank you for the pictures Hemi.........

-
Thank you JerryLG. Any chance you have a picture pointing out the connector you are mentioning. If not, I know Hemi does since when I met with him a couple years ago he brought some dashboard parts.................
-
I had an a/c guy do this project and it was indeed the cut-off switch that went bad. Yes Hemi, the switch is screw-in on the expansion valve and he did exactly what you said in our private message which was to replace the switch and fill the system. The system was low on refrigerant so the compressor wouldn't kick on and the 30amp fuse was not the issue; all is working good now. The pictures attached are of the switch pulled apart after I cleaned a pool of oil out of it and the picture Hemi sent me of the cut-off switch.


-
.thumb.jpg.64a17ba5bc76adf5e926eeedfe6b8b59.jpg)
How to remove the Cluster Cover?
TC KER replied to Roger Thomas's topic in Chrysler's TC by Maserati
Hi, I successfully completed the odometer repair. When I was putting the cluster back into the dashboard I found this little black plastic washer and am having trouble identifying where it came from. Does anyone know where this goes (see photo).

-
Thanks for the info TexasJohn; any chance that you would know where that fuse would be? The 30A fuse under the steering wheel for the A/C is good; I pulled it out and it appears that it is for the fan that blows air out the vents.
-
1990 TC 3.0 Liter. The heater works as does the defroster, floor, bi-level and panel buttons. The push button to turn on the A/C stopped illuminating blue and simultaneously cold air stopped coming through the vents. Has anyone experienced this or are there any suggestions for the fix of it?
-
Thank you.............
-
Does the 1990 3.0 TC have a cabin filter for the A/C?
-
It's been about 5 months so I felt I needed to give an update on this. I didn't do any of the suggested fixes for this and may not do any because over the past few months the warning lights have been operating as they are designed to for around 90% of the time . I haven't been able to put together any specific reason as to why around 10% of the time they are completely dark. I'll give an update if anything helpful arises from this.
-
Part Number 747-001 that I ordered from Auto Zone is the perfect replacement for the top pull down motor housing. It does not come with the plastic gear (my cousin made me an aluminum gear about 20 years ago to replace it with so I didn't need one). The picture shows the clear plastic but mine arrived as the durable black plastic newer type one. Now the pull down feels really strong and works great again.
-
I ordered one from Auto Zone. I'll let you know how it turns out. I shopped around a bit but not sure if I got the best price. I'll write an update after I put it back together. AutoZone.com Item Description QTY Price Total Dorman Trunk Release Motor Housing 747-001 Part Number: 747-001 Warranty: Limited Lifetime 1 Unit Price: $42.99 Core: N/A $42.99
-
Does anyone know if I can buy a new clear plastic housing part for the top pull down motor? All other parts in my top pull down motor are in working condition.

-
There's GOT to be a way...Brake Accumulator
TC KER replied to Mad_Bohemian's topic in Chrysler's TC by Maserati
It's nice to have her up and running like normal again. Hopefully this journey to track down a bad pressure control switch can help someone in the future. Hemi, I'll look you up next time I'm in your area and let know when you're near Indio. Thanks to all who contributed.
-
There's GOT to be a way...Brake Accumulator
TC KER replied to Mad_Bohemian's topic in Chrysler's TC by Maserati
The brakes are fixed and I’m on the road again. They feel like they are back to new again. FYI Hemi, the 4 warning lights started working again and all of them went off like they are supposed to; then as sudden as they worked they stopped again; hopefully they will come back on again, our good friend time will tell. I have a question on the brake fluid level. I pumped the brakes 25 times until it was hard with the ignition off and the level was at the full mark but when I took it for a drive as you can see in this photo the fluid level is up to the words "DO NOT". Is this acceptable/correct? Not that I’m recommending this but this is how I got the old pressure control switch off. I bought this random socket that I saw at AutoZone for around $30. It's open on one side and for some reason it fit onto the pressure control switch perfect. I put it on the pressure control switch with the cut out of the socket pointing up and then drilled a hole in the pressure control switch and put a screw in it because the socket wound up stripping the pressure control switch. My wife held a crow bar wedged in next to the accumulator post because the whole unit moves when you try to take it off. I used an pipe over the top of the ratchet and it broke loose.


-
There's GOT to be a way...Brake Accumulator
TC KER replied to Mad_Bohemian's topic in Chrysler's TC by Maserati
I can't seem to remove the pressure control switch with the water pump pliers. I've all but destroyed it and it won't budge. Any other suggestions on how to remove it?
-
There's GOT to be a way...Brake Accumulator
TC KER replied to Mad_Bohemian's topic in Chrysler's TC by Maserati
Ok, The new pressure control switch is supposed to arrive 1 week from today so I'll install it soon after that. I already put a new accumulator on about a week or so ago; I paid $280 for it on Ebay: https://www.ebay.com/p/1142294990 Total amount: $280.00 USD Order Description: New ABS Brake Accumulator - Jaguar JLM1907 - Saab 4002267 - Delco 25528382 Message: Item Id: 382980992739 Buyer's Vehicle: 1990 Chrysler TC Maserati Base Convertible 2-Door 3.0L 2972CC 181Cu. In. V6 GAS SOHC Naturally Aspirated Hi Kerry,Yes it will definitely fit your 1990 Chrysler TC.Thanks,Dave I'll let you know about the success story soon. Thanks again, Kerry. -
There's GOT to be a way...Brake Accumulator
TC KER replied to Mad_Bohemian's topic in Chrysler's TC by Maserati
I'm thankful to hear that it should be a relatively easy operation. I was curious what would happen if I tested the new pressure control switch by plugging the 5 pin electrical connection in it without screwing it in to the brake unit and turning on the ignition. Would it make some sort of sound or vibration?
.thumb.jpg.64a17ba5bc76adf5e926eeedfe6b8b59.jpg)


