


RichBad
-
Posts
731 -
Joined
-
Last visited
-
Days Won
1
Content Type
Forums
Gallery
Events
Posts posted by RichBad
-
-
Good news, just don’t let a hoon use it again:). Hope you’re on the mend too.
-
 1
1
-
-
Cracking progress last week by Trevor, John and Lindsay - shouldn’t be too long before we had her up and crank her over (petrol tank is cleaned and ready for juice).
New radiator hoses fitted with a removable filter in the top hose.


Dash all fitted and wired up and modern temp gauge added for safety (as a club car various people could be driving her so don’t want to leave anything to chance).

Door catches and latches fitted to all four doors (thanks for plating Matt).


New front seat wood base made.

Seat spring frames cleaned up and painted.

New bumpers and custom mounts made and trial fitted. They have come up really well. They have been made from stainless steel and will be polished - that will look very close to nickel and any scratches and scrapes can easily be polished out.


-
 4
4
-
-
3 hours ago, Mattml430 said:
I don’t think paint stripper will do much to that you’ll have to cut it out. Unless you still have some of the good old school paint stripper that ate everything. We can’t get the good stuff anymore it make the ice melt in Antartica.
I remember that stuff. I put some in a container, went to put some gloves in and by the time I came back it had eaten through the bottom of the container! Stung worse than a bee if you got a splash on your skin.
-
1
-
1
-
-
I’m still crying too! Time to buy a lottery ticket as you’ve had more than your share of bad luck and must be due some good luck.
when you repair it I think you need to stick one of these on the back…

-
1
-
1
-
-
Bit more done and another question…
Spare wheel carrier back on.


Front seat back nailed in place. How does the front seat back spring frame attach? Does it just attach to the top wood and hang down against the metal back frame or should there be some vertical wood strips for attachment?

Also, there aren’t any attachment points on the spring frame - would they just attach with a metal p clip?

-
2
-
-
16 hours ago, Mattml430 said:
I bought a plate from Myers that goes on the toe board. I don’t think the victory’s had one on the dash.
Making a brass plate like that you would have to get it cnc routered out.
A friend of mine that does my stickers has one I should run it past him.
Thanks for all the info guys.I think they can acid etch them too, don’t know exactly how but think they use a negative sticker and let the acid eat away the rest? Not sure if anyone who does it here though.
-
1
-
-
19 minutes ago, Minibago said:
The one I posted was for the earliest Dodge Brothers cars sold through Cheney in Adelaide. Cheney was the Sales Manager for Ford Dealer Duncan and Fraser before becoming the very first Dodge Brothers dealer in Australia starting in 1916 and when he left, the company became Waymouth Motors.
He moved to Melbourne in 1920 and took up the Chevrolet dealership.
I thought you might like to make a plate for Canada Cycle and Motor Co using the similar layout.
Interesting, thanks! Yes, would be cool to get a Canada Cycle one made for our Vic Dodges:). My dash has two holes so I think it would be the oval type badge. Did you have any holes in your dash Matt?
-
Here's one from another 1928 - I think is says
Sole Agents
Waymouth Motor Company Limited
Waymouth Street Adelaide

-
1
-
-
29 minutes ago, robert b said:
The left side of dash would of had a dealers plate fixed where the two holes are , like Standard Motors [ Sydney ]. Austral Motors [ Brisbane ] etc . bob
Thanks Bob. What about at the top where the tabs/screws hold the dash to the wood - does that have a piece of trim over it?
-
Started re-fitting the wiring.

Dash light works:)
Steering back in. Don’t forget to loosen the steering box to chassis bolts when re-fitting the column to the dash to make sure everything moves freely. Also refitted windscreen.
Front floor fitted. Much easier to connect up the wires to the starter switch before re-fitting the floor.

Fitting front seat support.

Rear floor back in

-
3
-
-
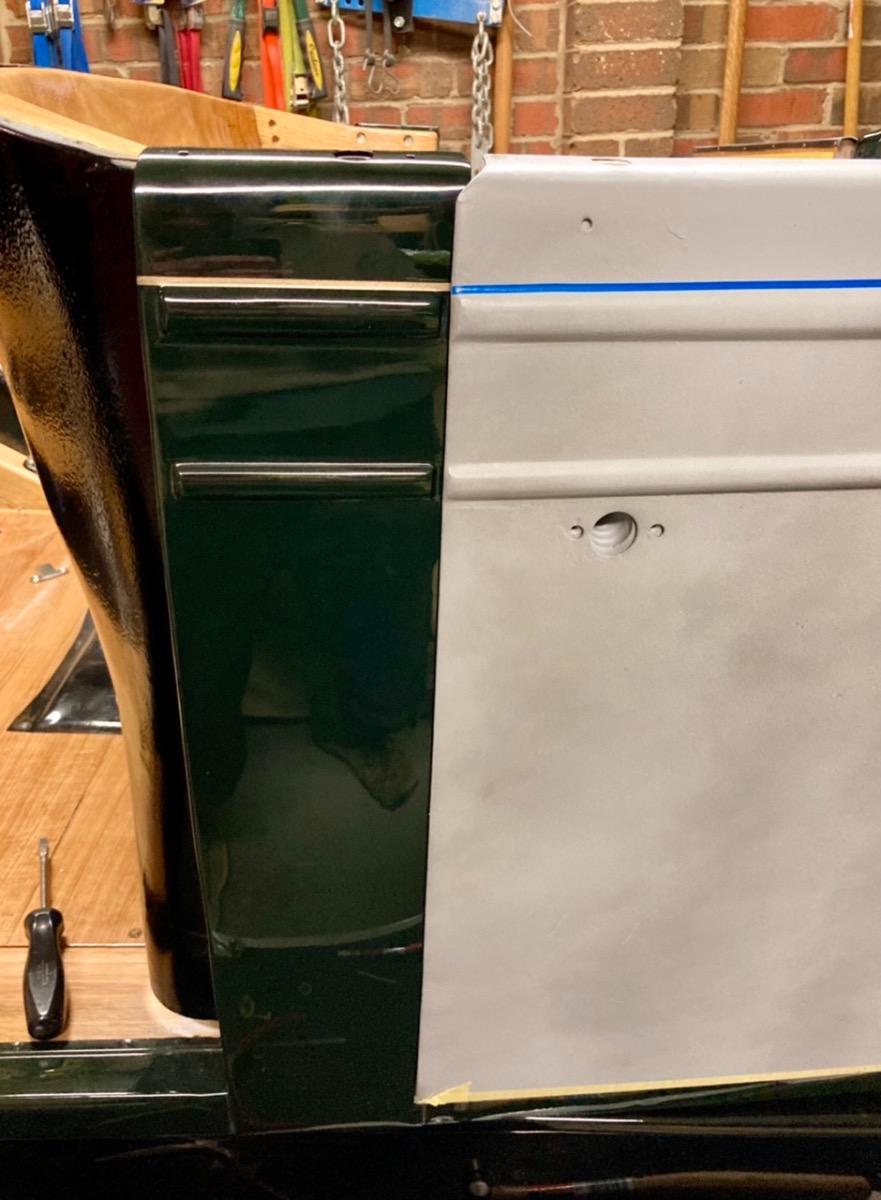
Doors are ready for final prep and paint now so started fitting more parts.
Dash going back in


Checking the steering, looks good.

Question - should there be a trim piece covering this area (over the dash fitting tabs) or is it just open?

Front floor going back in

Matt made me some panels for the rear tub (under seat) - and added a swage to give them a bit of strength.
-
4
-
-
Work continuing to progress this week. Matt finished off the paintwork on the bonnet/hood and dashboard and Trevor, John and Lindsay have been busy continuing to put her all back together.
- Front and rear floor sections final fit and screwed down.
- Fitted the dash panel and instrument cluster.
- Ran the HT coil wire from distributor through the firewall and connected to coil.
- Fitted a top radiator hose.
- Wired up starter switch, engine now turns over on the starter.
- Set up the spare tyre carrier.
- Fitted steering wheel centre controls.
- Stripped the windscreen pillars for plating and restored the windscreen and rubbers. The glass has the AS/NZS 2080 stamp which indicates it is laminated and has come up very nicely.
- Made new bumper plates, just need polishing. New bumper has been made from stainless and will be polished.


-
4
-
2 hours ago, John McEwan said:
Where can I purchase those door rubbers. Do they compress a bit?
I made mine, block of rubber from eBay. I’m pretty sure you can get them from Old Era too though.
they compress a bit but not so much that the door bangs on the paint.
-
4th door done, it’s now a four door again:). Saved the worst till last, this door was harder than the other three together!


Back doors have a rubber fitted into cutout in the bottom. Glad I’d seen another car with these as easy to miss and mine didn’t have them before - which would result in the doors bashing the body at the bottom edge.

-
5
-
-
52 minutes ago, Alan Cutler said:
Seeing that, makes all my anxiety go away...🤣
But this, oh my....😟

It was only a temporary fit up
")
-
1
-
-
3 doors done, one more to go


love this curve on the old cars

-
2
-
-
9 hours ago, nearchoclatetown said:
Ron, great minds run in the same gutter, I saw them. Car is coming along nicely.
One for the screw police - I’ve even lined them up;)

-
1
-
1
-
-
Another door done - well almost, still need to fit the “anti rattle” strikes (can’t remember the proper name).

-
1
-
-
7 hours ago, Ron Lawson said:
Hope the Philip head screws are not staying in the door catches Rich if you need any more slotted screws please let me know and I will send them over
Don’t worry Ron, only temporary - no Philips heads on this car;). I think I have enough with what you gave me already - thanks!
-
4 hours ago, stakeside said:
RichBad is the honeycomb radiator rebuilt? Did you replace the core. I am using the original radiator in my DA6 truck and have found some clogging. See my tread in this forum.
Yes, completely rebuilt with a new core. Didn’t want to take any chances given this car could be used by various club members.
-
1
-
-
Got two front doors nailed to the frame. Definitely works well doing this after putting the body on the chassis as it’s allowed the gaps to be tweaked to get them nice and even.
Also fitted one catch and the rubber stops so I can properly close one door (and it stays closed). They work really well!
blue tack worked well to get the catches positioned before drilling the holes.
Catch and stop rubbers in place


Alignment and gaps have come up pretty good.
Set the gaps when closed with some guidance from Bob (about a matchstick) don’t want to damage the lovely paint!

-
2
-
-
No worries, gotta get the doors finished so could do them all at the same time.
-
1
-
-
I use my arms, can’t forget to turn them off when turning:)
although occasionally I find my kids work well, although not always reliable;)
-
1
-
-
With Melbourne lock down 4.0 easing work's started again on Doc's Dodge. The radiator rebuild was completed and is looking fantastic. Work done this week includes
- Exhaust pipe fully connected up and carburetor re-fitted.
- Distributor refitted and ignition timing set.
- Radiator badge and lacing fitted to shell and new radiator fitted to shell
- Radiator and shell mounted to chassis.
- Rear bumper mounts being made
A brush tail possum was found having a nap in one of the parts boxes, wasn't too happy with being woken up.


-
4


1927/1928 Tourer body
in Dodge & Dodge Brothers
Posted
Had a Speedo cable made locally, gave them the length and the ends and they did a great job. I was worried it may look a bit modern with plastic covering, yellow zinc etc (as that’s what they mainly do) but it came up great, very close to original I think (although didn’t have one to copy).