


coachJC
-
Posts
480 -
Joined
-
Last visited
Content Type
Forums
Gallery
Events
Everything posted by coachJC
-

Garage Build Spring/Summer 2022-update Oct2023
coachJC replied to coachJC's topic in Garages, Trailers, and Towing
I bought a metal blade and ran it in the direction it shows. I had heard from a couple of people about running it backwards so I may try that to see the difference when I do some more soffit this weekend. -
Garage Build Spring/Summer 2022-update Oct2023
coachJC replied to coachJC's topic in Garages, Trailers, and Towing
Next came the install of the soffit. Using the bottom of the 2x6 facia board and a steel carpentry square a mark is put at either end of the front wall. then a chalk line is snapped along the length of the front of the garage. This line is used to install the trim piece parallel to the facia board which will hold the one end of the soffit while other end is nailed to the bottom of the facia board. The soffit is cut approx. 1/4 shorter then the measured distance of the wall to the front of the facia board and they just hook in together as you go along. I had about 3/8in of variation and cuts had to be adjusted as I went along.

-
Garage Build Spring/Summer 2022-update Oct2023
coachJC replied to coachJC's topic in Garages, Trailers, and Towing
The next project a wanted to get done was the soffit on the front. When I order the soffit it comes in 10ft lengths and you have to cut them to the size you require. Off to Google and YouTube for some research to see what other people do to cut the metal soffit. I came across a jig that I thought would work for me so I set about with some of my scrap lumber I have laying around to build the jig. This is the jig I built with the soffit installed checking for fit with the home made saw guide on top screwed down in a location that looked like a good spot. First part I tried finished side up, then I flipped it over and did a second part finished side down to see which worked better, the winner was finished side down. I ended up having to add a board further back and use some shim stock to hold it in place better in the upside down location, as the flange height does not locate as well upside down, but with the main face against the bottom it leaves a nicer cut edge. I realised pretty quickly I needed to wear a glove on my left hand or it was going to be full of slivers.


-
Garage Build Spring/Summer 2022-update Oct2023
coachJC replied to coachJC's topic in Garages, Trailers, and Towing
On Friday my younger son and I installed the Tyvek on the front of the garage. We used a 9ft roll for the bottom and a 3ft roll for the top.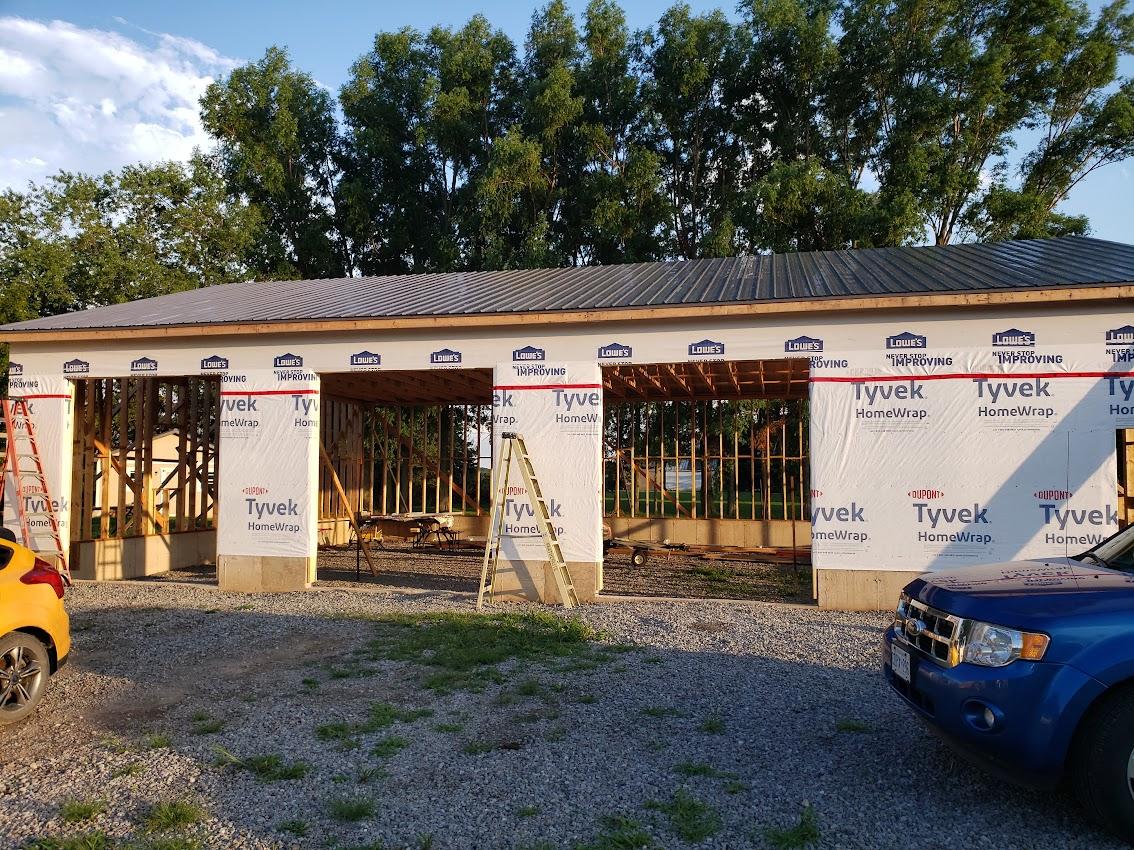
-
Garage Build Spring/Summer 2022-update Oct2023
coachJC replied to coachJC's topic in Garages, Trailers, and Towing
The last thing to do before starting to install Tyvek was to get the garage door casing finished out to there proper sizes for garage door installation. My doors are 9x10 and the installer told me the finished opening needs to be finish door size to minus .25in but not bigger. It took about 3hrs per door and that included the inside wood required for mounting the rails for the doors.


-
Garage Build Spring/Summer 2022-update Oct2023
coachJC replied to coachJC's topic in Garages, Trailers, and Towing
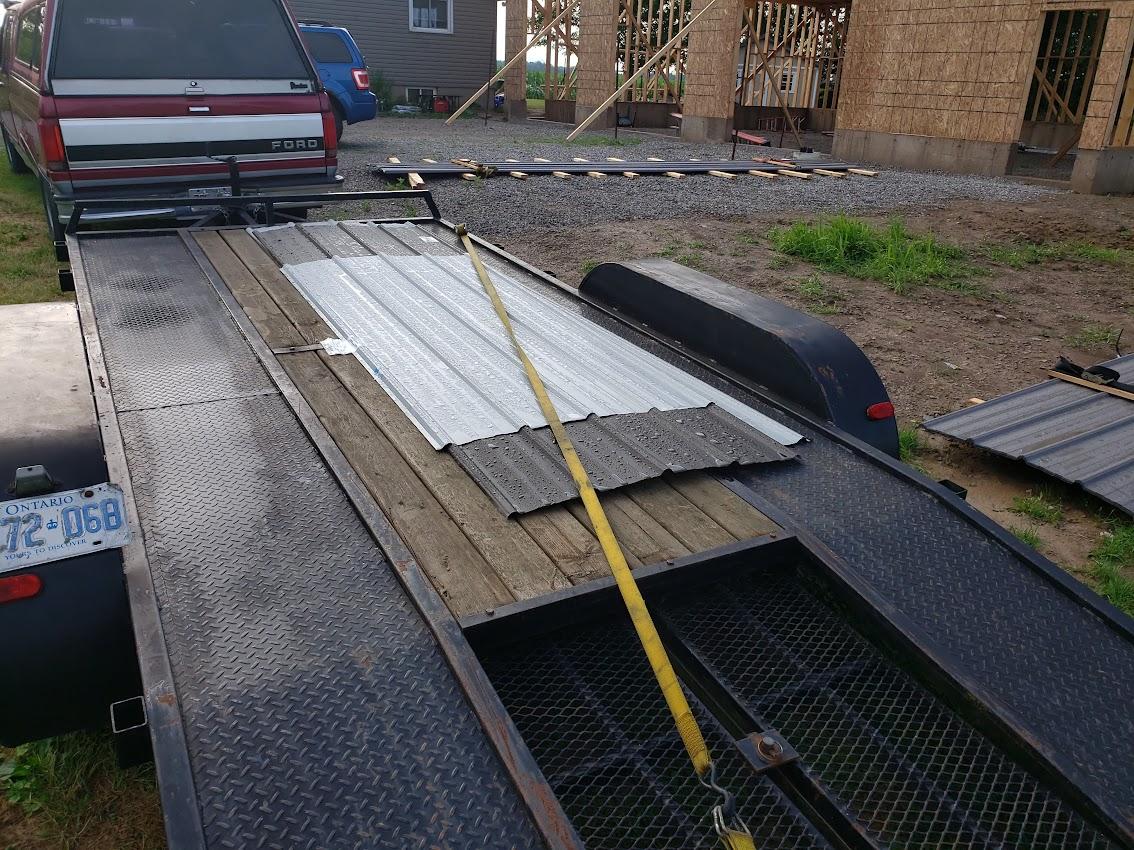
The last week of July the weather settled down for us to prep the front side metal roof for installation. My boys and I laid out our master sheet and verified it with our strapping on the front side, so with everything looking good we punched the holes in the 20 sheets to have them ready for installation on the coming Saturday. Saturday morning rolled around and with 4 guys the front half was done in 3hrs. It went much quicker than the back side, with it all pre prepped and with 2 guys on the roof and 2 guys on the ground hand bombing the panels to them made for a quick and efficient job. The first pic looks as if the middle panel is a different colour is due the the sheet being dirty as it was on top of the pile.

-
Garage Build Spring/Summer 2022-update Oct2023
coachJC replied to coachJC's topic in Garages, Trailers, and Towing
We have had a bit of a run of uncooperative weather for about 1.5 weeks. With the very hot and humid weather out came the winds and thunder storms along with some torrential rains. We even had 2 tornado warnings for our area which is quite unusual. The plan was to do the front side of the roof but that has been at a standstill due to the constant wind we have been having. One night when we got a high wind warning I went out and strapped all my metal roofing down and had all the smaller stuff moved inside my garage for protection, I also added some extra bracing to the garage to help keep it secure. I am sure happy I did, as you can see from the pics my neighbours all lost trees or sections of trees, with my neighbours right behind me having a section of a tree fall on their house. We were also without power for about 15hrs with some people in town not getting there power back for 2 days due to all the trees and power lines down. No one was hurt and just some eavestrough damage for my neighbour and my garage was still standing after the weather had passed. I have to admit I was a bit nervous when those winds were howling.


-
Garage Build Spring/Summer 2022-update Oct2023
coachJC replied to coachJC's topic in Garages, Trailers, and Towing
If I was doing this even just 10yrs ago I don't know if I would of had the patients to stop and take the time to do the repairs I just showed above. I used to think "It will be fine" it get covered in the metal siding no one will notice, and just carried on with the project leaving the bows in the walls. Then I would be mad at myself later as I am fighting with trim pieces that are wrinkling or fighting after the fact with a garage door that is not sealing at the top properly. I have had issue while working on my Model T's over the years, then pushed though things and say its fine when there are times its best to step back take a day or 2 then make things right so issues don't arise down the road. I have had to pull things apart a second time on my T more then once when I did not have the patience to stop, and deal with issues. -
Garage Build Spring/Summer 2022-update Oct2023
coachJC replied to coachJC's topic in Garages, Trailers, and Towing
After thinking about it at work the next day my best guess was that the board at the top of the garage door most likely had a really bad crown in it. When I got home and checked it with a straight edge and that confirmed my suspicion. I went out to my pile of lumber as I still have about 6 2x6s and was able to find one that was only had a crown of 3/16 of an inch over 12 feet. out came the sawzall and cut the bad one out and installed the new one and the string lined up as it should. the walls have been fixed. This took another 1 1/2 hrs so in total I spent around 7hrs over 3 nights after work to fix these issues.

-
Garage Build Spring/Summer 2022-update Oct2023
coachJC replied to coachJC's topic in Garages, Trailers, and Towing
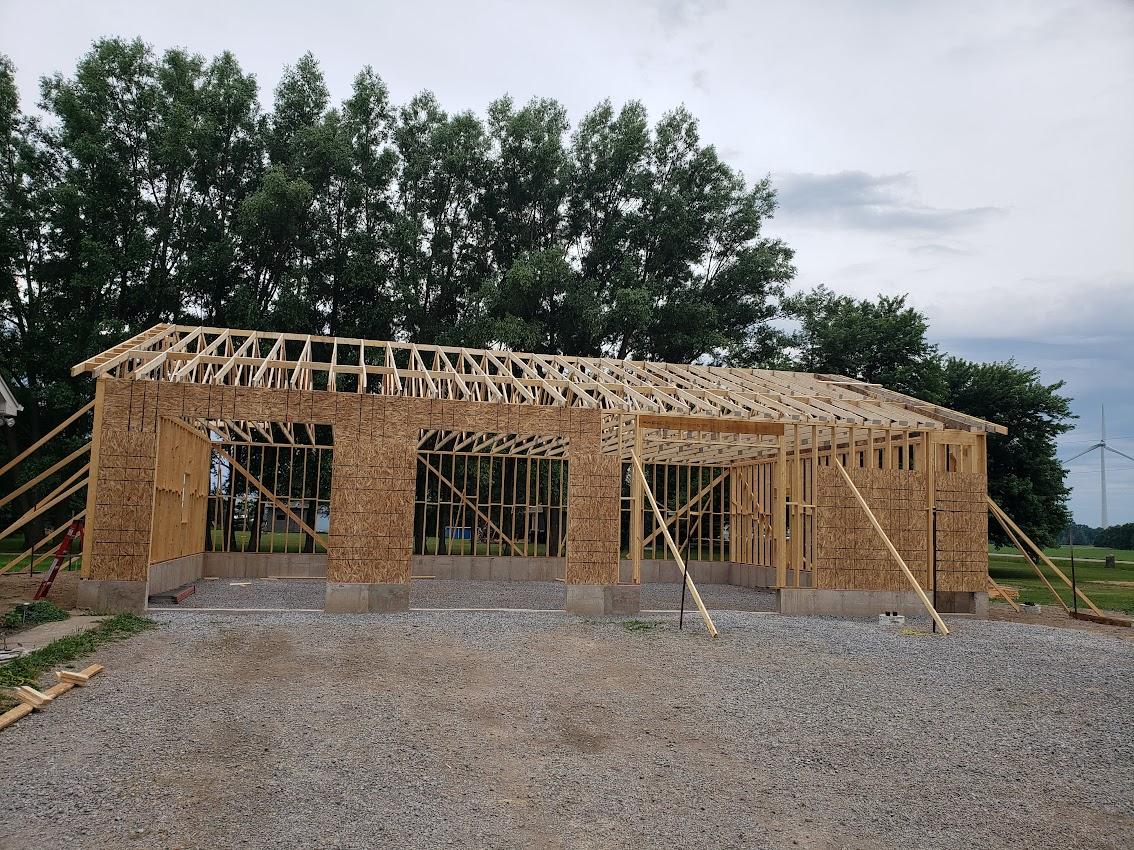
With the back having the metal roof installed we were moving forward to start the front. I ran my string line across the front, when I did that I noticed 2 issues while standing on the ladder. I had two walls that had bows in them, one end wall and the front wall. The end wall bowed out about 1 inch at a window and a joint at the top of the wall, not sure when this happened but it was a pretty easy fix. I ran a sting corner to corner along the inside of the wall to see exactly where the issue was, from there I popped 3 boards up that run thru the bottom of the trusses and using a ratchet strap I pulled the wall back in till it aligned with the string and double checked with a level. Then nailed the truss bracing boards back down and the wall was back to where it should be. this only took about 1 1/2 hr to fix so not to bad. Sorry no pics. The front wall was alittle more complicated, and I have pics for this one. I ran a string across the 2 front garage door openings to see where the bow was and how much, this string I ran up and back as at 2 heights, at the top plate and at the top of the garage door opening. I did this as it looked like I had more than 1 issue going on. Top plate was out about 1in and the door opening was about 1.5in. The bow seemed to originate in the area between the 2 doors. I think it may of moved when we were putting the trusses up and and the bracing we had there may not of been tight enough to hold it in position. To fix, I brought my truck inside the garage so I had some thing to tie my ratchet strap to, then I had to cut the nails out from under 8 trusses using a sawzall and cut the hurricane ties on those same 8 trusses. But this wall would not budge. I ended up bringing out my floor jack and using a 2x6 placing it under some truss ends and lifting them up to take some weight off the wall. After doing that I was able to slide the wall back to align with my string and double check with a level. As you can see in the pic below the top plate aligned perfectly with the string but the garage door top did not. I nailed the trusses down and added new hurricane ties and I decided to come back the next day to investigate the garage door top. To get to this point of the front wall repair was 4 hrs.


-
Garage Build Spring/Summer 2022-update Oct2023
coachJC replied to coachJC's topic in Garages, Trailers, and Towing
With the walls up you start to really understand the size of the interior, then you start go thru your mind that the the 4 post lift goes here, the utility area will go here where all the in-floor heating stuff will go, the cars here the snowmobiles there, my truck should go here and you go....momma gonna be mad because there is no room for her car....I'm gonna be in trouble. 😁 -
Garage Build Spring/Summer 2022-update Oct2023
coachJC replied to coachJC's topic in Garages, Trailers, and Towing
Friday July 15th was prep day to get ready for installing the back side of the metal roof. We chose the back side first for the obvious reasons, to get practice to make sure our plan and system work so if there is a mistake no one will see it.🙃 First thing was to add the starter stip or drip edge along the front and back. The colour I have gone with for the roof and wainscot is charcoal. Saturday morning we put the first panel up and just held it with couple of screws and made sure everything lined up. We used this piece as our template for the rest of the panels on the back. We brought it back down, punched holes in the desired locations with an awl, then put it back up just to make sure it lined up with our strapping. We brought it back down again laid it on top of a stack of 7 panel and then pre-punched all the holes in the sheets with an awl. This seems to be the quickest way and it also ensures all your screws will line up with each other visually. We did 2 stacks of 7 and 1 stack of 5. We had 19 panels across then used our template as the last pc which we cut as we only needed 8in of it to finish off the back side of the roof I should also add we ran a string line across the facia board at 1 1/4 overhang, this helped with alignment and then we didn't have to worry about any deviation that occurs with the facia board not being perfectly straight. At that point it got to freaking hot out and we quite for the day and we finished up on Sunday. It was overcast on Sunday so it was easier for the guys on the roof as the panels were getting to hot to touch on Sat. when they were trying to screw them down.


-
Garage Build Spring/Summer 2022-update Oct2023
coachJC replied to coachJC's topic in Garages, Trailers, and Towing
We have the same thing here with our permit fees. They also use it as incentive for people to actual complete there builds and not leave them half done, they are hoping they want to get a portion of there fees back when the build is complete. -
Garage Build Spring/Summer 2022-update Oct2023
coachJC replied to coachJC's topic in Garages, Trailers, and Towing
One thing I did when I did the gable ends is I did them with a 2x6. I have noticed that guys run there 2x4 strapping off the end and produce the overhang with a 2x4 facia. The front and back have a 2x6 facial as that is what the size of the board is along the top of the truss going down and they don't match. I just don't like the look when the size is not consistent all-around the building. -
Garage Build Spring/Summer 2022-update Oct2023
coachJC replied to coachJC's topic in Garages, Trailers, and Towing
Not a lot to update here, with framing done the next item to do was to get a framing inspection done before I can carry on with installing the metal roof and siding. With my building permit there were 3 inspections that I had to have done by the town throughout the building process. The first was a footing inspection, this involved the inspector from the town to come out and take a look at the soil and to make sure we were on solid undisturbed ground and to see the footing forms installed with the rebar in place. He showed up and was gone in less than 5 min. The same guy showed up for the framing inspection, as this is a plain garage with nothing fancy he only looked at a few things, bracing in the trusses, making sure the hurricane ties were installed on every truss and that every hole in the braces was filled with a nail, then he checked to make sure all the concrete anchor bolts and nuts were installed and fastened.. He also took a quick glance around at everything else to make sure that things were done properly. That lasted less than 10min and he was gone with a verbal OK to carry on. I have found it odd that when the inspection is done that there is not something that we sign to confirm that these inspections operations are complete. I would think that on a master dwg that there would be sign off location for the inspector and builder to show that the inspections are complete. I have not even received a confirmation e-mail that I have passed the inspection, just a verbal "everything looks good, you can carry on". Just something I found weird. Th last inspection for my build is just the final inspection. -
Garage Build Spring/Summer 2022-update Oct2023
coachJC replied to coachJC's topic in Garages, Trailers, and Towing
Thanks John I am glad you and hopefully others are enjoying this adventure of my garage build. -
1917-1925 Ford Model T Touring or Roadster right rear fender.

-
Garage Build Spring/Summer 2022-update Oct2023
coachJC replied to coachJC's topic in Garages, Trailers, and Towing
With the strapping on the roof we left the gable ends unnailed so we could string lines the ends to do our best to make sure everything is as straight as we could get it. Spent about 4 hrs with tie down straps and levels pulling and pushing to get the ends to line up even with the string. I have seen a couple new barns around home where when you drive by you can see the wiggle in the facia as they did not spend enough time to ensure that everything was straight. It would bother me every time I drove into the driveway if ends were out of alignment as my eyes would be attracted to it every day.


-
Garage Build Spring/Summer 2022-update Oct2023
coachJC replied to coachJC's topic in Garages, Trailers, and Towing
This is a little on topic and a little off topic but we get threads on here that bring up how kids aren't doing things with there hands any more, not interested in old cars, prefer to be on there computers and cell phone, so I just wanted to say how lucky I have been and not just with my kids but also with their friends who have helped out with this build. In this picture we have my son Ryan who is 21 in the yellow and has probably done over half the build on my shop. Of the old cars we have he loves to drive the 1929 model A the best. With him on the roof is a friend Josh who is 19, who has gone to school with my younger son since Jr Kindergarten, he has spent about 15hr helping out, and he is in the process of working on an old Willys Jeep. There is also another boy Aiden who is 21 and been friends with my oldest since high school who I don't have a good pic of but he has put in around 10hrs helping out when he can, his is working and going to school for HVAC. While the other 2 boys were up on the roof my younger son Jason (19yrs old) who can't stand heights so he will not go up on the roof or even climb the latter was changing the oil in his car in the driveway. He has been the saw guy when he has been able to help, with his 2 feet firmly planted on the ground just the way he likes it. He like to drive the 1920 Model T. I have gotten a bit of grief from him this yr as the cars are at my dads in storage and not around where he can drive them. I have posted this before but I thought I will do it again, one of my favourite pics of my kids.


-
Garage Build Spring/Summer 2022-update Oct2023
coachJC replied to coachJC's topic in Garages, Trailers, and Towing
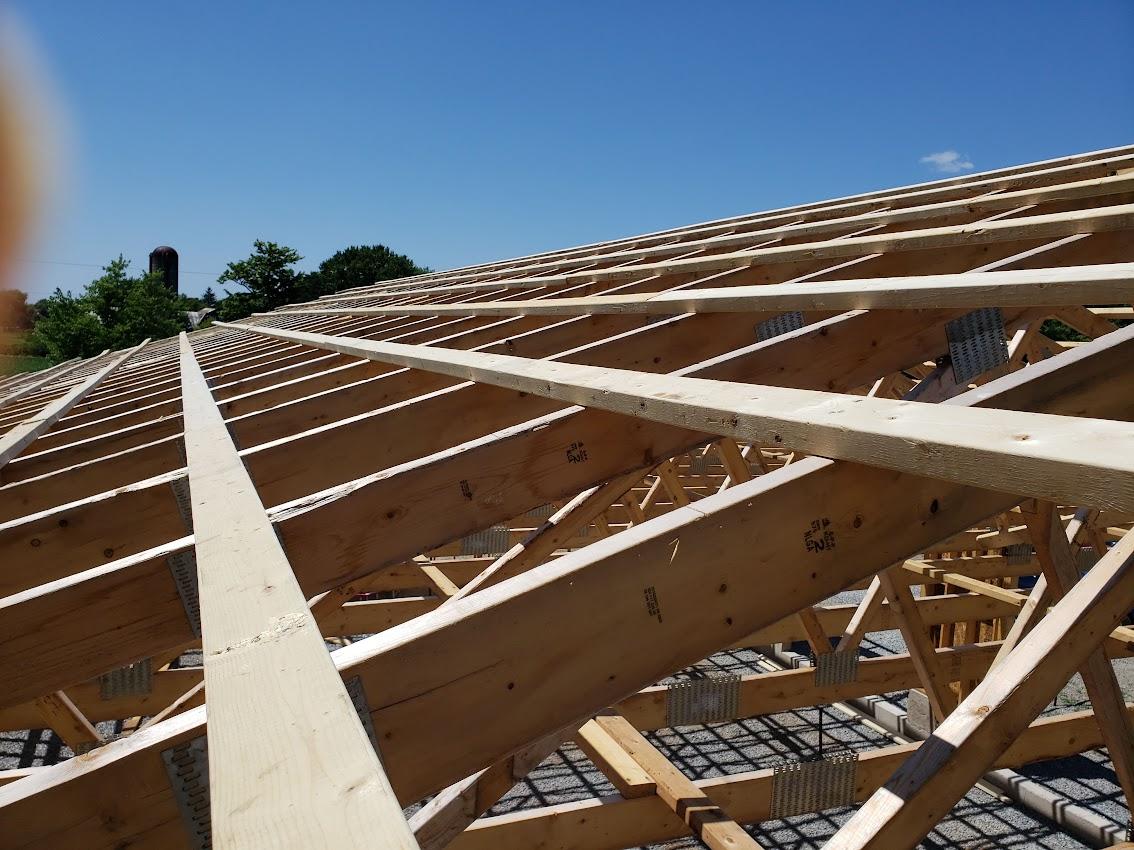
The next thing to do now that the trusses are up is to add all the truss bracing, the facia boards, and to get the strapping on the roof to add the rigidity into the trusses and for the metal roof that will be installed. We also finished adding all the OSB that was not complete. It is not very exciting work and kind of boring in the pics but it is still time consuming to try and get done every night after you have already done a 9hr day at the job that pays.


-
Garage Build Spring/Summer 2022-update Oct2023
coachJC replied to coachJC's topic in Garages, Trailers, and Towing
I should add we that there are 27 trusses plus the two gable ends for 29 in total with a 2 foot spacing. We installed 21 from the inside and the last 8 were put up over the end. The first one from the end took alittle bit of time to figure out the best was to get it detached from the lifting apparatuses then to slide it over into its place, there was a lot of head scratching going on for a bit. After we got it all figured out the last 7 went much better than the first one we put up . I do wish I had a few more pictures but its hard when there is a lot of stuff going on to step away and get pics. I had my responsibilities to complete with every truss and I did not want to slow the process down. -
Garage Build Spring/Summer 2022-update Oct2023
coachJC replied to coachJC's topic in Garages, Trailers, and Towing
July 1st Canada Day turned into truss day at the Carter household. Extremely generous of people to take the holiday to help install trusses. We had 7 of us that day including a neighbour with his tractor and attachment for picking up trusses and installing them on the walls. We started about 9am with laying out everyone's jobs so everyone knew what their responsibilities were , this helped with keeping thing moving at a decent pace and also helps with making sure everyone is working in a safe manner. With a 1/2hr lunch break we were done around 3 in the afternoon. It was another hot day and everyone was glad when we finally got the last one up and everything was braced to our satisfaction. Then everyone's favourite part.....beer time. This was something I forgot to put in the budget, 7 guys can sure go thru a 30pack in no time.


-
Are A's and T's getting too impractical?
coachJC replied to Twisted Shifter's topic in General Discussion
AzBob you beat me to it...I was going to post the same link...I just got finished reading the thread on this in the MTFCA site. I have no problem getting out and driving my model T. Where I live I have roads that are less traveled but I have no issue going into town where there are stop lights and lots of people going in and out of parking lots. I have been driving T's for 34 yrs and have probably have well over 50,000 miles in Model T's, I work on my cars and have a lot of confidence in my cars abilities and mine. That does not mean that s**t can't happen and have on more than 1 occasion skidded my rear tires by braking real hard,(yes you can do that in a T). Allot still has to do with driver being aware of what's going on around them and knowing what your car can do, and doing it safely. My dad just turned 87 and still likes to drive his Model T, for him I have my reservations on him going places where there is more traffic. I have no problem with him driving around home which is out in country and not much traffic and he enjoys taking neighbours and little kids for rides around the block, but I don't want him going into town. -
Garage Build Spring/Summer 2022-update Oct2023
coachJC replied to coachJC's topic in Garages, Trailers, and Towing
Just thought I would show a couple of pics here. Over the garage doors instead of 2x10 spruce the product that is used is LVL(Laminated Veneer Lumber), It is is suppose to be stronger, straighter and less prone to warping then your typical 2x10. There are 2 LVL beam back to back over the 9ft garage door openings. This pic shows the hurricane ties that have to be added to every truss. This is suppose to help keep roofs on building instead of coming off in the wind. The ties are made to make sure the truss is tied into both the 2x6 top plates. There is a specific type of nails to use not just regular nails. These nails I believe have a better shear rating then regular nails.

-
Garage Build Spring/Summer 2022-update Oct2023
coachJC replied to coachJC's topic in Garages, Trailers, and Towing
@EmTee-I had lots of discussion with people about what style of garage is the best to build between a pole barn, building on a pad or going full foundation. We decided to go with the full foundation wall for 1- longevity, 2- it seems to be the best for our climate here in the Niagara region,(-20'C one day and +10'C and rain the next in the winter) and 3- most people who I see that are doing in-floor heating around where I am, this is the way they all went. My dad built a pole barn 35 yrs ago and it now needs some work, posts are rotting at ground level and he did have a frost heaving issue in the back corner as he could not get down below 4ft due to him being right on the Niagara Escarpment.(hit rock) So my experience with what my dad has did not make me want to go that way. I also had a couple people swear by doing a pad and building on top of that , this was the way my old garage was, and as you can see from the earlier pics it did not last.


