


OldGerman
-
Posts
239 -
Joined
-
Last visited
Content Type
Forums
Gallery
Events
Posts posted by OldGerman
-
-
On 2/27/2022 at 2:38 AM, 63Rivee said:

 Started my prep with the interior. YES! I bagged and tagged everything. Which side of the vehicle, landmarks of placement, any difficulties, whatever. Never can be too sure of memory or how much time will pass between working on that piece.


 Got the front seats out with ease. For anyone whos had to do things the ghetto way on hoopties before with limited space or tools, the bolts were all accessible no matter the placement of the seat and simple to remove. A few in the rear of the front seats, and four holding down the front that acts as clips/hold downs. Loosened those up and pulled them out. I'm 6'5 400lbs and have gorilla strength, so I handled them really. But be mindful the seats are probably heavy for most and take care when removing them.


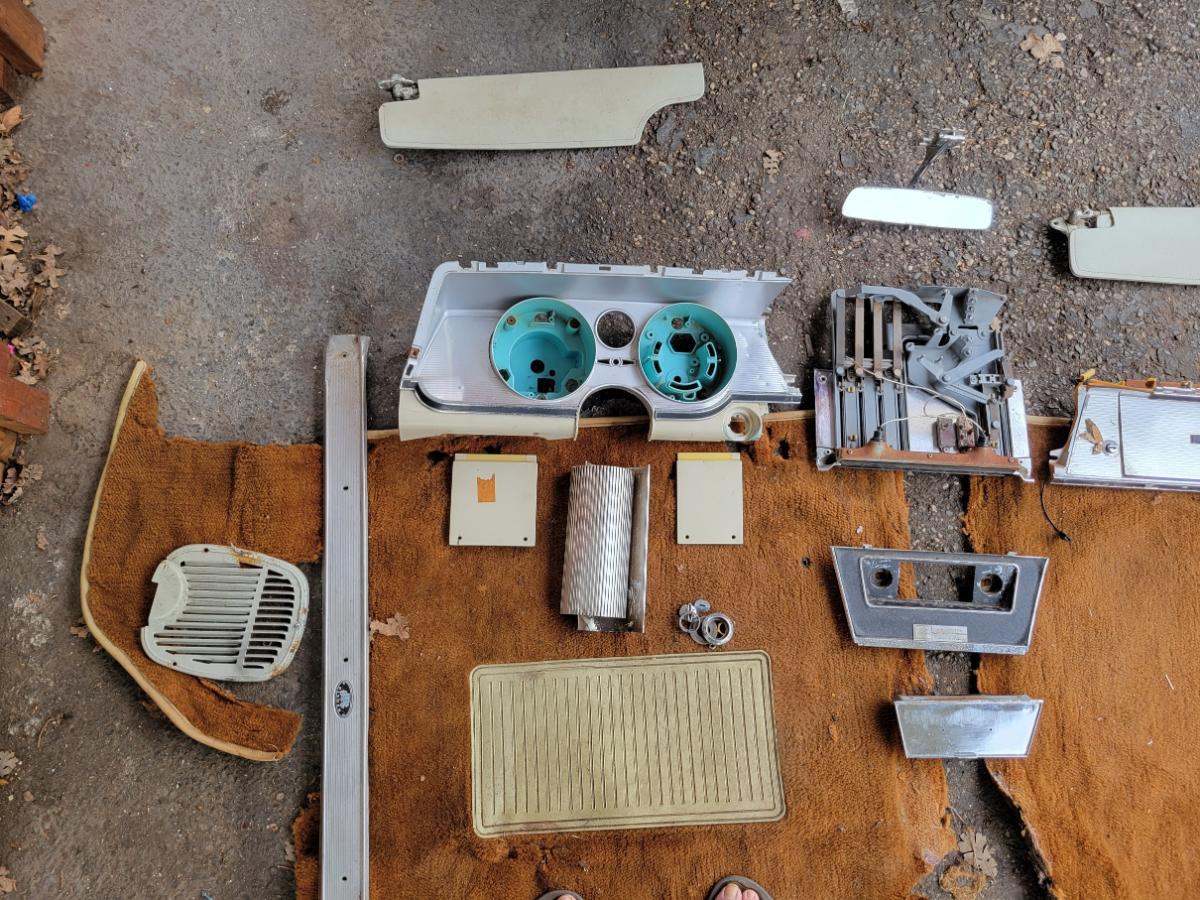

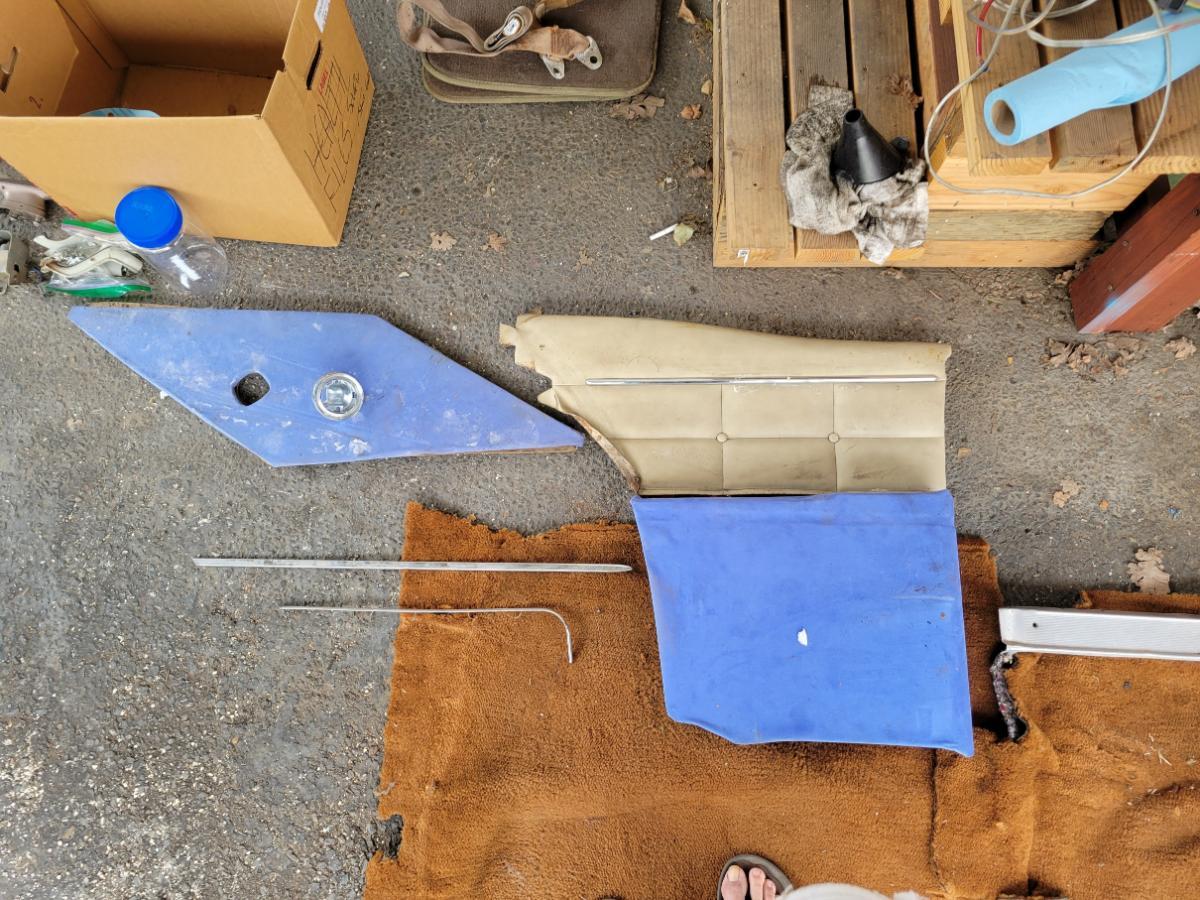


 I removed everything from the inside and placed them on the ground to familiarize myself and snap a pic to remember placement. Some of these parts were in a box in the trunk. All looks to be original to the vehicle and ready to be cleaned up and reinstalled post paint and wiring.


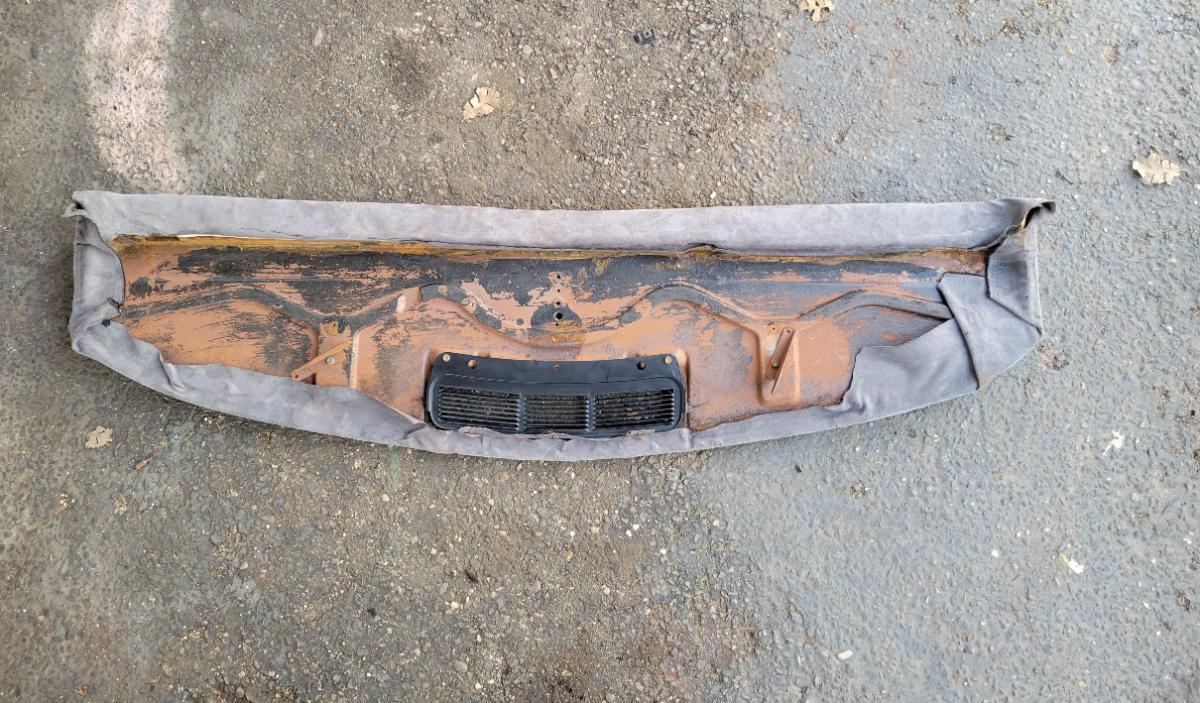
 In the trunk junk (but we all know it's treasure), was the original vinyl cover for the dash and other parts to follow, along with what I'm guessing is the twilight sentinel thing powered by this guide-matic. The dash has the old sun beaten marks of where it once sat too. Pretty cool.
Next post will be some parts I have questions about and other fun.
Thanks for looking ya'll
Just googled the name shown on the Buick Expressly built for William S. Kellogg batch. That is what pops up first. The forbes list of the richest Americans #320. he was born 1943, not to young to be first owner.

-
 1
1
-
-
The manufacturing capacity limited the Riviera to a 40.000 vehicles per year. That is possibly the reason it was outsold by other models like the T- Bird. I don‘t know anything about the marketing of both company’s back in the 60th. but wasn‘t Buick more attracting older generations ?
I personally like the Early 60-63 interior space age design and the low stance, but was never a fan of the exterior styling.
-
1
-
-
8 hours ago, Jim Cannon said:
Cool, Tom! Let me add that to my list of changes that were made during production. Do you have a sense of when that change happened? month/year or FB number?
What do I look at on the hinge with the door open to see if a '63 has the old or new design? I will start with my car, an 11A, November '62 build.
Jim, the old design has the door hinges bolt to the door from the inside. You need to remove the door skin to reach the bolts.
This makes it difficult to adjust the doors. Ed mentioned the cool idea the drill a hole trough both, the hinge and the door before disassembly. Later you can use the hole as perfect adjusting reference by inserting the drill bit.


-
My Plan is to drive out the pins and bushings without removing the hinge from the body.
If it is required to drill larger holes in the hinge to install larger bushings, I will remove the fender on passenger side as well, as I have the bumper currently off anyhow.
It will be a pain for me to get the right drill bit size here in the land of metric System....
Thank you all for your input.
Found a complete pin and bushing kit at bestofferscount and contacted them already.
-
thank you Ed.
Any recommendation for a good source of new pins and bushings kit ?
I will do a Google search, but will be thankfull about a good tip.
-
On 2/5/2022 at 3:38 AM, RivNut said:
@OldGerman Do you mean the bushings and the hinge pin or are you actually going to replace the bolts that hold the hinge to the body and the door? If it just the pin and bushings, I think you should be able to do one at a time as long as the door is properly supported.
Hello Ed,
yes I mean the upper and lower hinge bushings and the pins ( not bolt, sorry I used the wrong wording).
Is it possible to drive the pins out ( of course with the door wide Open and Supported) without disassembling the fender ? Which way they do drive out ? ( upper pin downwards, lower pin upwards ? )
I had the driver side fender off and I saw it would be easy to Hammer the Pins out that way, but just wonder if it would be possible on the passenger side without removing the fender.
picture shows driver side hinge with fender removed.
Thank you.
Frank.

-
I need to replace the door hinge bolts and bushings on the passenger side of my 63. I have no idea why only passenger side door is sagging.
Is it possible to replace both, bolts and bushings, with the fender mounted on the car, or do I have to remove fender or the door skin to get access to hammer out the upper and lower bolt.
What works the best ?
Thank you.
-
I aggree with Jim.
When I bleeded my new single master I did the mistake to just push the piston in as deep as possible.
the piston overtravel a bore and fluid dripped out the cylinder. I think I ruined the Innern rubber seal Lippe that way. The brake pedal creates a limited travel of about 1“ at the push rod.
The next time I did the bench bleed, I‘ve limited the travel by adding shims over the screw driver, to limit travel to max 1“.

-
Is it correct that the flattened side of the front coil spring comes up as shown in the photo ?

-
While the coil spring is out , I took the oportunety to press out the old lower control arm bushings.
self made tool worked out well.


-
1
-
 1
1
-
-
I found some insulator and shims sind the www.
Standard non Automotive parts, not made for the Riviera. I Hope it will fit and work.


-
2
-
-
1 hour ago, 1965rivgs said:
Frank,
How much more rotation are you measuring? My measurements for the `65 box are the same whether installed in the vehicle or on the bench.
Tom
Sorry, I did not measure the rotation on the steering Box, I did not had it out of the vehicle. I have counted on the steering wheel only. Disconnecting the tirod ends will provide same result, as on the bench. The difference is maybe not a full rotation, but The steering gear Box will allways provide more travel/ rotation than what is needed/ restricted by the Suspension. Some gear boxes do not like to be forced into the limits of Travel. They need an solid stop by the suspension to be protected. An large offset between left and right tirod adjustment can also lead to a damage of the gear box when it comes to it physical stop before the suspension travel restriction is reached. GM steering gear boxes are maybe not critical, But I don‘t now this for sure.
I do not have taken all the measurements, but what Tom T. Measured on the bench (4 1/4) and Tom M. (3 7/8) at the wheel sounds right to me.
Just want to say do not compare apple with pear when it comes to comparing steering gear ratio by counting rotations lock to lock. There are two locks in the steering gear and linkage system.
-
9 hours ago, 1965rivgs said:
For what its worth, my experience with the `65 Rivs is that the standard steering box is 3 and 7/8ths turns lock to lock and the H2 quicker steering box is exactly one turn less at 2 and 7/8ths turns.
Tom Mooney
That 3 7/8 turns is what I can confirm for a Standard 63 Riviera counted at the steering wheel. This number of turns is provided by the suspension stops. The knuckle movement is limited by the lower control arm. The steering gear box on the bench will provide some more rotation from its lock to lock. I guess both values are right, but were measurements taken at different places.
-
On 11/29/2021 at 8:19 PM, RIVNIK said:
I have the same problem, only mine is more like 1 1/2" How will a 1/2" shim raise the low side 1"? will it simultaneously cause the other side to drop 1/2"?
The suspension coil springs are pre-tensioned when assembled. If the space available for the spring is reduced by inserting a shim, it is further pre-tensioned and thus lifts the vehicle against its own weight through the spring force.
How far the vehicle rises depends on the spring rate of the coil spring used or it's age/weakness. If it is very strong, the vehicle will lift more than with a low spring rate. If all the information about the installation situation were available, it would even be easy to calculate how far it will lift with a certain shim size.Since the vehicle is sitting on a spring at every corner, they are all in balance. This means that if the spring at the front left becomes weak and the vehicle sinks at this corner, this also affects the other three corners. The vehicle rises a little at the front and back on the right. Since the front of the vehicle is heavier due to the engine, the rear section in particular is raised more on the right.
-
I have found an insulator on one side made from a tire side wall. This piece of rubber is heavily reinforced by the cord. So it was in a good shape. That could be a Self made Solution as well but it is hard to cut a tire.
What size of shim do I have to add to lift the front at the driver side by approximately one inch ?
Thank you
Best regards
Frank
-
I‘m concerned that this coilover shock carries the weight of the car instead of the coil spring resting on the lower control arm. Maybe I’m completely wrong and please correct me if so, but I think the complete front weight of the car is now sitting on the two small screws Attaching the shocks to the lower Control arm.
What I‘m missing here ?

-
1
-
-
14 hours ago, sixxer said:
While I cannot answer your question directly, I have used appropriately sized I.D. heater hose in the past with good success when the factory rubbers are missing or failing on other vehicles.
That is a good idea. The aftermarket part offered by CARS and OGPI is a simple flat rubber shimr at a cost of 25$.
From the illustration the NOS part Looks more like a molded Part made in a shape which fits the upper coil spring end.

-
My 63 Riviera front sags a little bit on the driver's side.
The front spring is probably a little tired, but the rubber insulator over the spring is also missing.
I think that will make a big difference.
Does anyone have the rough dimensions of the insulator on hand for me?
Maybe I also have to fabricate a shim to be in line with the passenger side ride hight.
I guess the shim diameter would be similar to the insulator outer diameter.
See illustration attached for reference.
Thank you all for your input.

-
They are 12“ Outsider diameter.
If the casting would fit Buick inner brake liner diameter and width, it would be easy for the manufacturer to drill additional 5 on 5“ lug holes for the Buick folks. It‘s too Bad they just make them for Ford Hotrods.
-
737 Esslingen, Germany.

-
4
-
-
The pre bend lines from inline where the correct fit on my 63, but I was not able to assemble them into the car with engine and radiator assembled and my car sitting on jack stands. This is maybe easy with the engine out or liftet, or you have to dissassembly some other parts to get access and to make final adjustments to the bendings. I ended up in cutting the lines in two pieces and added short hydraulic tubes to Get it into the car. I can’t get a flaring tool and fittings in that tube size in the metric world here in Germany.
-
Just removed the driver side door skin on my 63. the window did operate up and down easy, but it feels loose and did rattle in the channels. I found the previous owner already removed the Most likely broken window guide arm. Some nuts of The window channel assembly were loose and the felt lining in tracks is worn. Is there a source for new channel felt lining ? Does anybody has dimensions of the guiding arm, to fabricate a repro?


-
1
-
-
On 6/21/2021 at 3:10 PM, JZRIV said:
I dunno, it looks like the gear in top pic looks used. Appears to be witness marks from the timing chain laminations. As far as deburring I'd use a 150 or 220 grit stone to knock off any sharp edges but.....This should NOT be necessary on a new gear. Another reason maybe its a used gear.
Used gear ? I bought this set TS576 from CARS. I think the surface marks are left from the machining, but there was no surface treatment like grinding. It is not a high precision part, but that is maybe not required. I‘m thinking of leaving this part in the box and order the TA performance chain set. This is not the first time I buy things twice....

-
1
-
-
I also used just one of The 3 Mr. gasket 98 steel plates. I need to grind a small cutout on one side to clear the choke or carb Linkage. Plugged the intake holes in addition as I will not use the car as a dayly driver or in cold climate condition.


-
1
-


moving front seats in a 65
in Buick Riviera
Posted
Jim,
do you have taken pictures of your construction ?
Searching for ideas How to fabricate.
thank you.