


Eric W
-
Posts
1,026 -
Joined
-
Last visited
-
Days Won
4
Content Type
Forums
Gallery
Events
Posts posted by Eric W
-
-
Thanks - I'll see what happens with the tube I installed, because the thread on this replacement slave cylinder is not the same as what was on the car (and I got this cylinder from Moss). The fitting that came off the car - I'll try to clean that up for possible future use, but it was pretty corroded.
I tried to bleed the system yesterday, but the fluid couldn't make it "over the hump". Checking the AH forum, this seems to be very common, so I ordered the pressure bleeder recommended there. (Gunson Eezibleed, ships from UK) The "hump" is the fact that both lines exit the top of the master cylinder, go up the firewall a couple of inches, before routing across the firewall and back down on the right side. More widely available (and universal) vacuum bleeders seemed to not be as reliable for this system.
On one side, it seems strange to me that a master cylinder whose job is to pump fluid can't pump it upwards a little, but it may really be the weight of the fluid in the upward-routed tube that falls back down into the cylinder even with the bleed closed on the outlet end, so the fluid never makes it up and over to where an equal amount of downward-running fluid would be present to counterweight the upward-running fluid.
While I wait for that bleeder, I'll see what else can get done.
-
I'd bought a bend-your-own brake line a couple of days back. I brought in the fitting that came off the car to try to match that up in the store, but when I got it back to the new cylinder, it didn't fit. Tried the old fitting in the new cylinder - didn't fit. So I may have matched the fitting on the new tube to the old fitting, but the new cylinder is different. New strategy - bring cylinder with me to the store. So I got back to the store yesterday, returned the tube that didn't fit, but they didn't have one that did fit. They sent me to one of their other stores, which wasn't at the intersection that they said, but I found the next closest one to that intersection, and they didn't have a tube that fit either. Now that I think about it, I had "European" on my mind, so I didn't try the "U.S." thread sizes. They referred me to Merle's, which is a local chain that has had parts for some of the other cars I've worked on. (They have 6V parts and other things for older cars.) The guy at Merle's went to their tube rack, pulled a "U.S." thread tube, and it fit.
So I got the tube back and using the old tube as a reference I bent up the new tube. Then I fit it on the cylinder and got the cylinder into position on the transmission. It was very tough to get the bolt started to hold the cylinder, so I pulled it all back out and cleaned the thread in the transmission. For whatever reason, that bolt continued to be very difficult to work with, but I did get it in there. I tweaked the fit of the tube, cut it to length, and transferred the compression fitting from the old tube to the new one.
I installed the bleed extender hose onto the cylinder so it would be in place when the cylinder was installed. I didn't want to try to work swapping the bleed for bleed extender hose through that little access hole in the trans tunnel.
For the upper slave cylinder bolt, I cut about 1/4" off, because these bolts have an absurd amount of thread going into the trans (only the first 3-4 threads on any threaded joint actually take load, the rest is just dead in the hole). Hopefully this would allow the upper bolt to go back in without having to lift the trans/engine within the frame. This did work, but it was very difficult to work with a couple of fingertips through that little access hole in the trans tunnel to get the cylinder lined up and get the bolt back in. But once it was started, I was able to crank it down snug with just fingertips, then I worked an open-end wrench in there to snug it down. For the final tighten, I realized I could work from below and get the upper bolt reasonably tight. Getting the two slave cylinder bolts in was about the most difficult two bolts I've ever worked on. The lower one just wouldn't catch the threads in the trans and get started straight, and the upper one was completely blind, with just fingertip access through the little hole. I was considering how difficult it would be to pull the engine & trans to install this cylinder outside of the car...
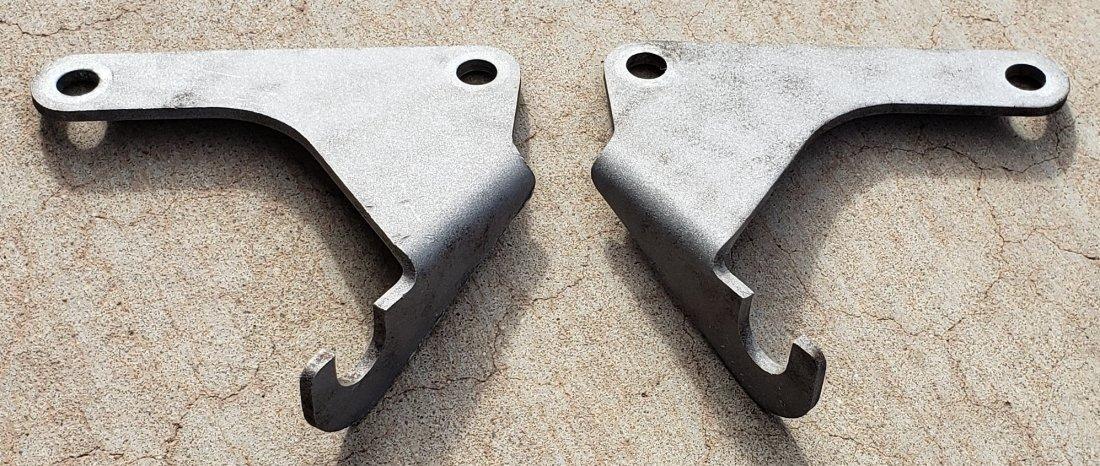
Last thing was to attach the upper mount bracket for the bleed extender hose. The L bracket for this only had one mounting hole, and it was oversize. Probably an error in how the part was made, so I drilled a second hole of correct size, and added a washer under the screw head at the oversize hole to make this work.
I see from the photo that I need to reinstall the washer and cotter pin on the slave cylinder link, but that clevis pin isn't going anywhere - I couldn't get it out.


-
Got this little rolling bench for Christmas. I'd been using a shoe box for the tools that collected around the car, since the main tool box is on the other side of the garage. This has been more convenient just by sorting wrenches in the top drawer, pliers, screwdrivers, and others in the lower drawer, and oversize tools below. The painted dust shields before going back on. Right brake reassembled. Also got the left brake put back on.
The clutch bleed extension arrived earlier than their email had forecast, so time to get that put back together.


-
 1
1
-
-
Mike - I was bending these cotter pins with my fingers, but to put the twists on that wire needed pliers, so I think it's a tougher metal (at least at these sizes). I'll keep an eye on it.
Frank - I tried the HF blast media today. Stock was very limited. Just some very fine glass and walnut shells to choose from. The glass was less aggressive than the other that I'd been using, but I got the brake dust shields done.
First photo - this MG was next to me in the HF parking lot. Sign of good work to get done on the Sprite today?
Second photo - dust shields after media blast, with some Rust Kutter working on the remaining rusty areas. I'll clean that off tomorrow and paint.


-
2
-
-
Got the right-side parking brake rod installed, and adjusted the main cable. May need to adjust again after the wheel cylinders are bled, but at least now the parking brake is functioning. Went with safety wire rather than the cotter pin on that shorter clevis pin. Also ran one of the clutch slave attach bolts through the Evap-o-rust. The other one cleaned up with just the Brakleen. Also got email that the clutch slave bleed extender shipped - wasn't expecting that after their last message, but the clutch slave hard line is about next on the list anyway. The blast media still shows "delayed" in shipping. Might see if there's some already in town somewhere.

-
Getting a few things done even with delayed parts and materials. For the long parking brake rod, went with methods other than the media blast to clean it up. Soaked both of the ends in Evap-o-Rust over the past couple of days. For the center of the rod, wire brushed the loose dirt and grease, then sandpaper, then the Tractor Supply Rust Kutter for a couple of hours, then washed with Purple Power, dried with compressed air, then Rustoleum rattle can black paint. For the clutch slave cylinder, put a jack under the trans-to-motor flange, and lifted the trans a small fraction of an inch on its mounts. This was enough to free the upper bolt on the slave cylinder. It took a lot of wiggling to get the right moves to get the slave to drop out from between the frame, trans forward flange, and the clutch actuation rod, but it finally just dropped out. See photo - no piston rebuild kit here. The guts of this thing just fell out as a pile of dust. Also pulled the clutch hydraulic line out from the side of the trans tunnel. Somewhere along the way, an inline joint was added, so I won't need to remove yet more stuff under the hood (heater system) to run a line all the way back to the master. Also cleaned 3 of the 4 sets of wheel lug nuts and wheel studs. These were very sticky with dried out grease? Anyway, used the Brakleen solvent, and these 3 wheels will go on nice and the torque will be accurate. I'll get to the 4th wheel when I pull the wheel to reinstall the long parking brake rod.


-
Started reassembling the parking brake linkage. I don't have a sizable quantity of items to order (from Moss) right now, but did need to replace the clevis pin that I had cut to remove. Found that Home Depot (the biggest one in town) has the clevis pin. When I got there, I found that the pin is between 3/4" and 1" lengths (7/8"?) which HD doesn't have. I took a chance on the shorter one. Test fit shows that I can just sneak the cotter pin through. For the main cable to pivot part, I did get nylon washers on either side of the pivot lug - I think this assembly was made for some sort of washers. Rod from the pivot out to the left brake is just sitting in place - the pins from Moss for the brake end are too large diameter. Need 1/4", not 5/16". (The central HD has these, so I may be able to get over there again tomorrow.) I had missed cleaning up the one that was on the car, so I'll put that in the Evap-o-rust overnight.
Things delayed by worldwide conditions: the remote clutch bleed hose - got an email that a couple of the parts come from other parts of the world and haven't arrived yet. The blast media is late to expected delivery date - that might just be weather / holiday package volume. It's coming from Michigan, so I can't clean up the front brake dust shields yet.


-
Feels like I didn't get much done today. Media blasted & painted the short parking brake rod. The long one will fit in the blast cabinet, but I'm not sure I can really get to it all in there. Started to blast one of the brake shields, and the media was somewhere between gone and too full of dirt. I need to get some more media (can order for pickup at Walmart). Cleaned dirt & grease off the front spindles, and cleaned up the floor under them. That's about it. Need to get some plastic washers for the parking brake rods. There were a couple of fiber washers (not sure - some kind of phenolic?) in these joints, but I've seen photos of modern nylon or hard plastic washers being used to center the rods in the clevis and maybe reduce the friction in the linkage somewhat.
Missed posting this photo yesterday of the clutch slave through the access hole.

-
Adding some photos - front brake fasteners cleaned up. Parking brake pivot - cleaned up and then painted. Pulled the front hubs - not sure what I was waiting for. Center nut used 24mm socket, not 15/16. Brake dust shields - single forward fastener hides behind the hub - will get these blasted and repainted. LH one has notch cut on the bottom. Not sure what that's for - looks like it was cut, not from the factory.


-
1
-
-
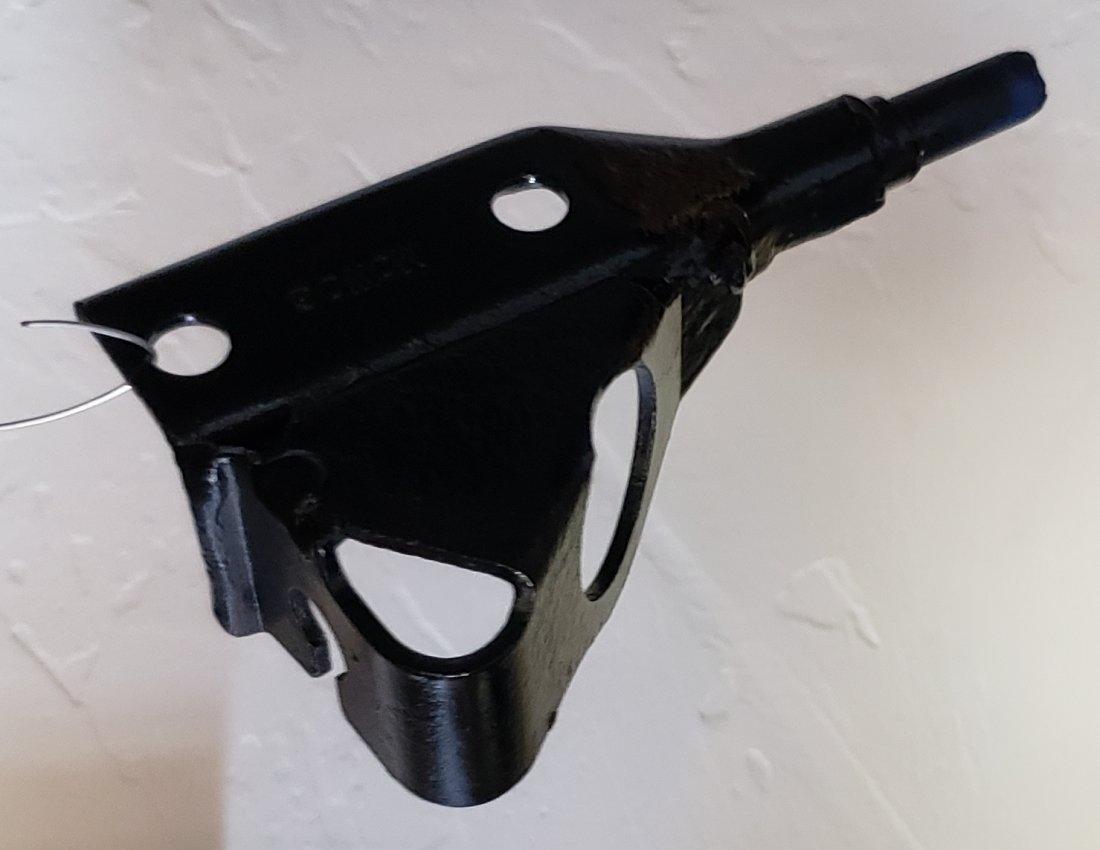
Rest of last weekend - painted the hand brake pivot fitting. Started to pull the clutch slave cylinder. Bottom bolt - easy access from below. Top bolt - tight and blind access through the small bleed access hole in the trans tunnel. Got that bolt loose, but it doesn't clear the trans housing before hitting the body structure, so clutch slave can't come out. Will look at taking trans mounts loose and slightly lifting the trans. Also broke off the hydraulic tube at the slave cylinder. Will need to get a new tube and route it. I'd been thinking about taking the hood off for a while - this may force that question.
Looking at clutch slave info online, while doing this, it seems to be worth adding a remote bleed hose (from olphartz.com), to run the bleed up to near the distributor. So instead of trying to cycle the bleed and collect the fluid through that little hole in the trans tunnel, the bleed is routed up under the hood next to the distributor. Some report that it also helps significantly with getting all of the air out of the cylinder.
-
1
-
-
Pulled the right front brake yesterday with my son. Been running fasteners, etc. through the evap-o-rust all week, to get something done without a lot of my time. Also yesterday, cut the clevis pin that was rusted into the parking brake crank arm. Cut out the center section, then hit the tail end with some heat - this allowed the tail end to be twisted out with pliers. Then added heat at the head end, and was able to use a punch through the now open hole to drive out the head. Pushed most of the grease out of the center of the part (some q-tips and paper towels) and now have it soaking in the evap-o-rust. Thought about media blasting, but don't want any grit in the central pivot thread.
Media blasted the two brake hose brackets, wiped with lacquer thinner, then painted. First 2 photos trying to show the extent of the rust - not too bad. The blasted part had not been cleaned a this point, so the light rust appearance is just dust on the surface. Next 2 photos - parts blasted & cleaned for paint.
Ordered the reman calipers a couple days back, but they may not get here for this weekend.


-
Disassembled the left front brake. First photo - where the pad springs go relative to the retaining pins. These springs are pretty sad - pads look like they have plenty of life left, but probably can't get springs alone. Second photo - the parts that will be cleaned up and reinstalled (with new copper gasket washers on the brake line banjo bolt). Bracket orients the brake line banjo fitting at the caliper. Next photo - have new brake line and will get reman calipers. Next 2 photos - brake disk without caliper. Extended hub - takes up the space where the older-style drum brake would sit.


-
Replaced the rear brake hose. Ran some of the parking brake parts through the Evap-o-rust. One of the clevis pins won't budge - will try some other methods before cutting the pin and redrilling the pin holes in the clevis.
-
Paul - yes, these definitely have many ways that they'll go together, and probably work ok, but not as well as intended.
Ground down the axle nut socket on the belt sander to remove the chamfer. Putting 140 ft-lb on a nut about 3/16" wide - the socket chamfer is a recipe for something bad happening. (Of course, I then cut my finger on the sharp edge of the socket just moving things around...) Put a bag of ice on the axle while I collected tools, cleaned up, etc. Put the hub out in the sun. Maybe 100F temperature difference between them when it was time for the big move. Custom axle setting tool - about $11 at Home Depot for a 1 1/2" pipe nipple & cap. Axle is about 1.4" diameter, so 1.5" pipe works fine for hammering the bearing back into place. Did the right side hub first, because it came off easier and I'd avoided gumming up the threads on that axle - to see how this is supposed to happen. Hammer hub into place. Insert tab washer. Torque axle nut to 140 ft-lb, then bend the flange on the tab washer.
Last photo - kind of got out of order. Want to paint the hub flange with gasket sealer, set the o-ring in the groove, paint one side of the paper gasket with the sealer, let it set up for a couple of minutes, then set the paper gasket in place - sealer to sealer. Then paint the exposed side of the paper gasket, and the inside of the axle flange. THEN install the axle (after cleaning both sides of the axle flange) correctly clocking the 3 screw holes between the wheel studs, the single screw holding the axle, then the brake drum, 2 screws securing the brake drum, then the road wheel and torque the lug nuts to 37-39 ft-lb. On the left side, the threads in the hub for 2 of the 3 small screws were gummed up, but it's the lug nuts that hold all these sealing items, so I'm not worried about it.


-
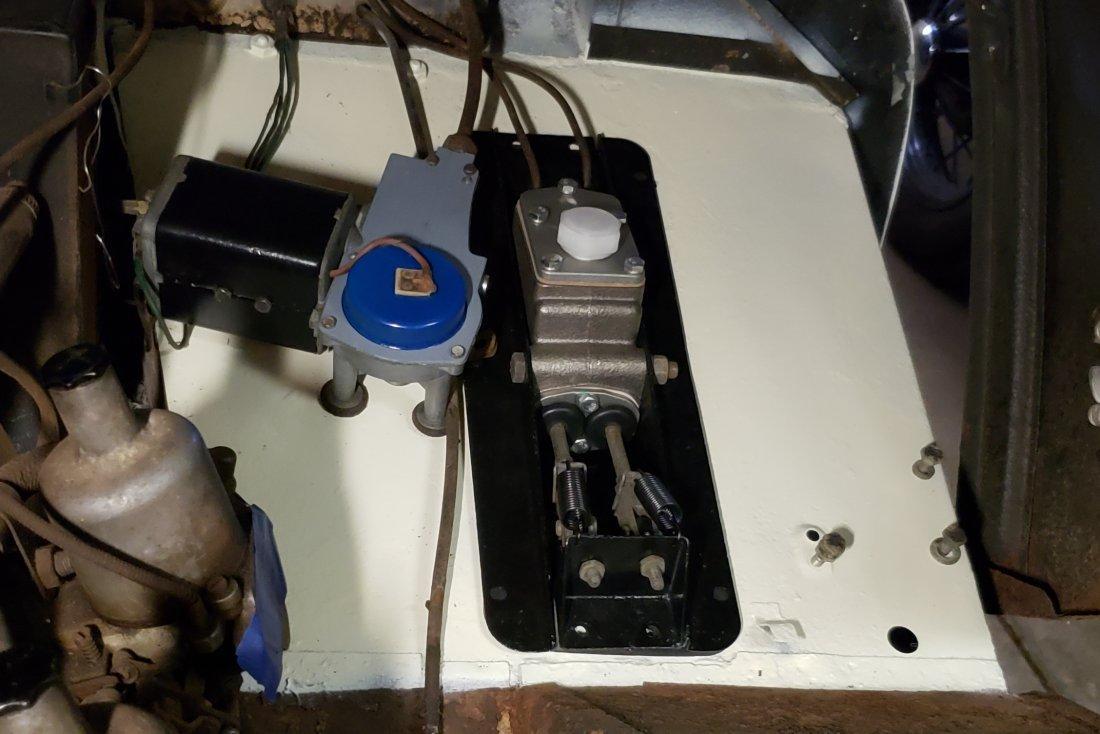
Got the master cylinder installed yesterday. Didn't fasten the pedal box because I realized I hadn't run all of the fasteners through the evap-o-rust yet. Before & after of the pedal box area. Found a diagram of the brake installation - had seen some photos with the springs on the inboard side, and this confirmed I'd put the brakes back incorrectly (though they were springs-out when I disassembled). Seems the brake is far from mistake proof - the shoes can go on either end up, springs fit in different openings, etc. I switched the park brake levers side for side because the rivet interfered with the spring. These parts do not have a RH / LH in the part marking. Assembly - hang the rear shoe from the parking brake lever and get the spring in place. Then add the forward shoe and get park lever and upper spring in place. Then add lower spring - rear adjuster block may fall out (when the parts are clean), so put the forward shoe on the adjuster, slide the rear adjuster block in place, and snap the rear shoe onto the adjuster. Next - get the hubs back on the axle.
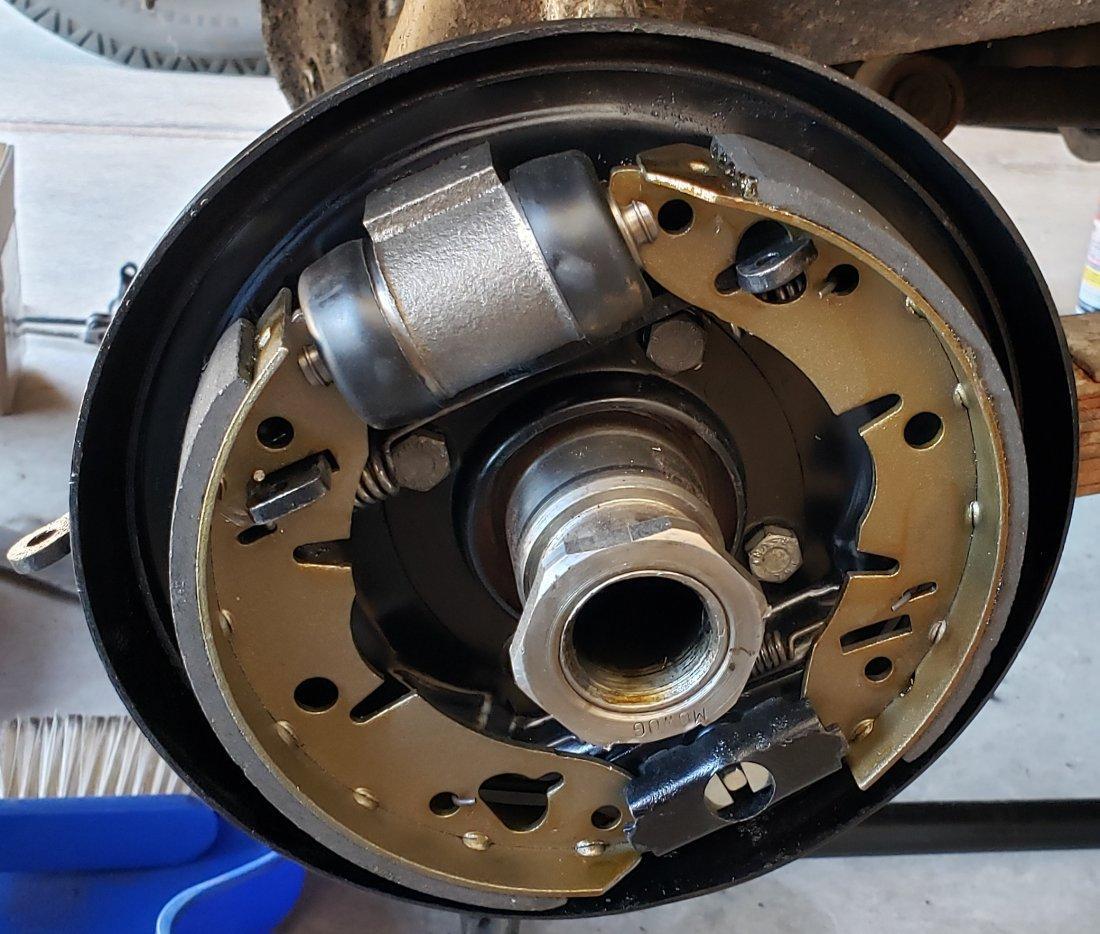
From bare backing plate - install the wheel cylinder onto the plate (using c-clip tool from Moss). Attach the backing plate loosely to the axle, so it can lean out enough to get the brake line into the wheel cylinder. Install brake line into wheel cylinder, then tighten backing plate onto axle. Then add the seal to the parking brake lever, brake lever to backing plate, then brake shoes and springs.


-
1
-
-
Yes, it was having to shear the grease over most of the gear's side surface area, so that's a lot of drag.
A no rust car would be great, but this one doesn't seem to be too bad.
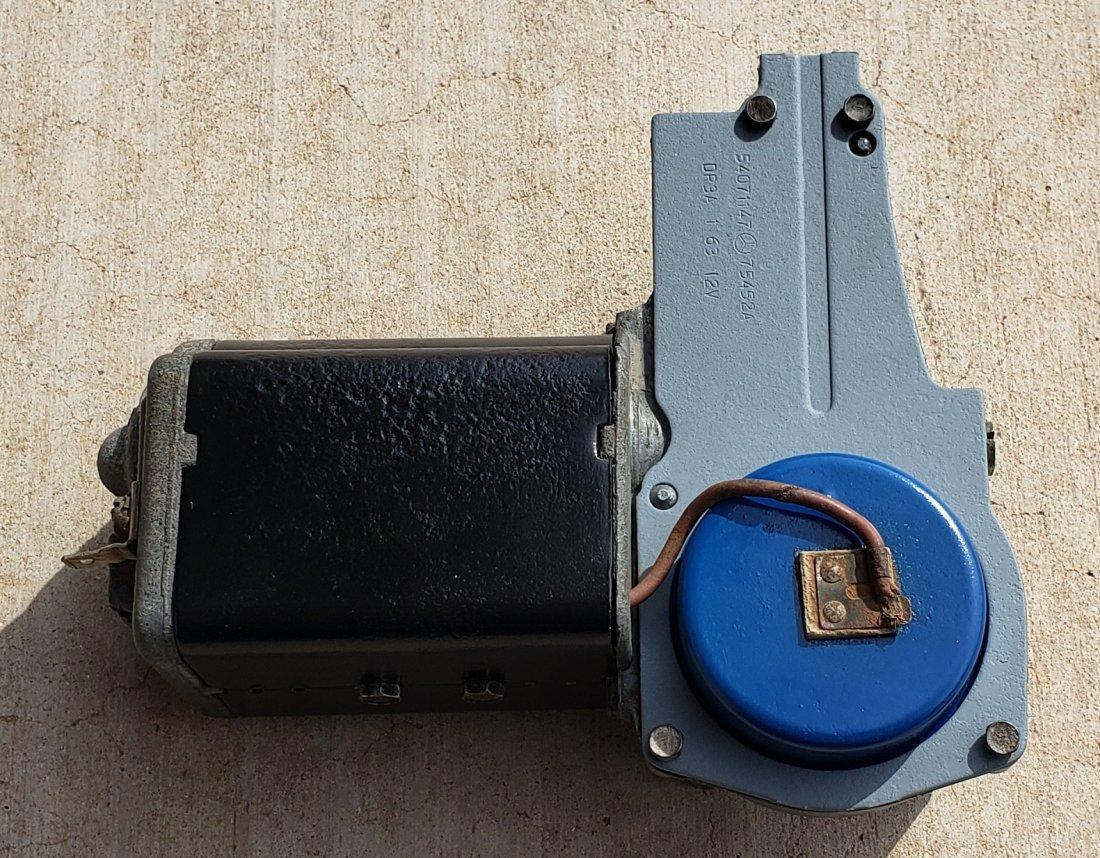
Blasted the parking brake bracket, wiper gear cover plate and parking position contact cover. Can see that the gear cover plate has a 1/63 date code & 12V. Car came to me connected as 12V negative ground.
Painted the couple of parts. Blue & gray is what I had - looked like these parts may have been unpainted originally. Reassembled wiper motor; spliced the ground wire back together.


-
4
-
-
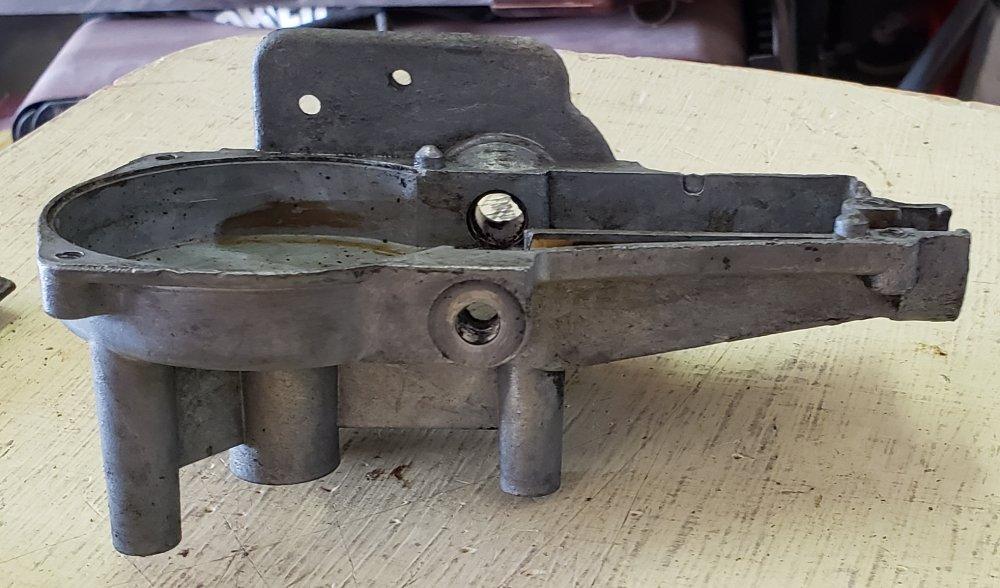
Working on wiper motor today. Wiper was working (slowly) before this, but I wanted to get this as cleaned up as I'll want it because it's much easier to install the wiper motor with the pedal box out of the way. This wiper motor seems to be a victim of "if some grease is good, more is better" and "it's moving slowly, so add more grease" - to the point that a massive jam of grease was gumming up the main drive gear. Will be interesting to see how much easier the wipers move without all that grease in there (a proper amount, at the proper point, but not all this). Had to cut the ground wire (for parking the wipers) as there is no quick disconnect. Did that where the splice will be inside of the housing when I put it back together. Cleaned the gearbox housing (aluminum casting) with some Purple Power and a wire brush. Media blasted the wiper housing (steel) and repainted.
Picked up the rear hubs from the local British car shop. They pressed out the bearings, hot tanked the parts, added the missing seals to the hubs, greased the bearings, and pressed them back in. I saw a video showing how to do this with a bench vise (rather than a press, which I don't have), but it seemed well worth the $ to have someone else work this with the correct tooling, and the hot-tanked parts look great.


-
3
-
-
Adding some photos - right rear brake parts after media blast, before paint. Pedal box just set in position - want to get the wiper motor back in before pedal box because the pedal box opening is great access for both sides of the wiper motor fasteners. Hole at lower right is for the high/low beam wire - need that back in place as well. Photo of inboard side of the left brake - not easy to get the camera on this from anywhere. Parking brake linkage.


-
1
-
-
Today, media blasted & painted the RH brake backing plate, parking brake linkage, and drum. Got the parking brake cable off of the parking brake bracket. That took a week of soak in PB Blaster, and a little heat from the torch, and a whole lot of small movement & reposition the wrench, but the bracket is off. Tried to disassemble the bracket - pretty clever that the pivot "trunnion" to the bracket, and the parking brake clevis on the trunnion are just threaded on, with no jam nut or cotter pin to keep them from coming back off. They're locked in place by the actuation rods, so no securing of the threads is needed. The clevis directly pivots on the trunnion thread.
-
1
-
-
Decided on Ford Wimbledon white as something along the lines of "Old English White" that I can get easily in a rattle can for engine bay cleanup. Eventually, the exterior of the car may end up with this same color. In the meantime, this will help the working parts stand out as opposed to flat black on everything. Also going to motivate cleanup of the wiper motor, but the grease is so dried in there it wasn't working well anyway.


-
1
-
-
Photos from last week of the bare brake backing plate. Got into a couple more things last weekend - ended up dropping the hand brake linkage off the rear axle housing - cable is out of adjustment, and the dried-on grease was preventing the center pivot from moving smoothly. So I'll clean that up. Started to clean up the panel around the pedal box, and part of that would be to remove the wiper motor to get at the panel under there. Had to do some checking - there's a couple of ways to remove the wiper motor (get it disconnected from the wipers). Made the 2nd parts order so that I might have enough to get things going back together over the couple of days off at the Thanksgiving holiday. Also noticed that every time I check their site, price of something has increased - I know, inflation is real, so may as well bring in some parts that I might not get to for a while with the parts I need right now. Got the left brake back together, but still need to clean up the bearing and get the hub back on.


-
May add some photos later, but worked on the right rear hub and brake today. Pulled the axle. Pulled the hub - this one didn't take much of anything with the puller to pop loose. Pulled the brake line, brake shoes, parking brake linkage, then dropped the backing plate off the axle. From there, disassembled the adjuster and released the wheel cylinder. Now that I know how this stuff goes together, this side took just a couple of minutes to get down to the bare axle housing.
Scraped the caked-on dirt off the backing plate, then cleaned it with Brake Kleen for brake dust residue and Simply Purple to release the dried-on grease. Will media blast & repaint the outside of the backing plate - probably next weekend. Worked on the left hub thread on the axle housing. I chewed this up some with poor support for the puller, though there may have been some existing damage to the very end of the thread. With a sharp-edged file to reshape a small portion of the thread, and a screwdriver and hammer to bend the thread a little, I got it working again. This will save time later when I'm ready to put this all back together - took maybe an hour of tweaking to get it back in shape.
-
Brought the Model A to the local Cars & Coffee this morning. Really good crowd there today. It's at a Top Golf. In the past, they'd let us play the golf at no cost (sell us food & drink) as a promotion to get us interested in maybe coming back later for their golf-based games. Didn't seem to be doing that today, but maybe they just wanted to get the event back to this location. It had been in the Lowe's parking lot for the past year or so.
I had brought the Miata to this golf location - not sure when that was - before Covid? I might have noted it in the Miata thread. When I did that, it was the only Miata there. This time, there were 4 or 5 Miatas. All pretty strongly modified.
Today, cleaned (left rear) brake parts. Cleaned the packed-on mud off the backing plate. Photo is after the media blast. Also blasted the parking brake linkage, and the outside of the brake drum. Painted the backing plate and brake linkage. Got some hi-temp paint for the brake drum and painted that as well. While I was out, also got some new locknuts for the 5/16"-24 brake mounting bolts. A couple of the nuts were chewed up from me working them off blind, and if they used self-locking there before, I don't want to put the old self-locking nuts back on.


-
This week's progress. First parts order received. This may get the hydraulics (brakes / clutch) going, water hoses, a couple other things. Got the hub off with a hub puller. Rear brake, loaded. Brake shoes off. Brake backing plate off - front / back. Pretty easy to pull the wheel cylinder from here, as well as the adjuster - slide out the adjuster blocks, then drive the adjuster screw down into the adjuster until it comes out the inside of the brake. The flats on the adjuster screw that are used to make the adjustment are nearly rounded off, so I'll probably add a pair of these to the next parts order. End of axle housing, stripped. Will clean off the backing plate, likely repaint. This is as far as I want to take down this corner. Yes, I can see the spring is missing a clamping bolt. They don't seem to sell these individually, so I'll see if I can find a bolt that fits.
Tried to get the title today. DMV didn't like what I had. Got back in touch with seller. They seem to be trying to help. I'd rather not go down the lost/no title process (added time & $, plus having to trailer the car somewhere for VIN verification), but that's a possibility. Better to get the title worked out sooner than later while the seller still has this on their mind.


-
3
-


1964 Austin Healey Sprite - Bugeye
in Our Cars & Restoration Projects
Posted
Yes, if it's the difference between 10mm and 3/8" with the exact same pitch - this seems unlikely though, because if it's a 20 thread / inch pitch, I'd expect a similar metric-pitched thread to not exactly match that and bind up at some point. When I put the original fitting into this new cylinder, it does just that - diameter is very similar, but pitch binds it up in a turn or less.
Anyway, I doubt that Moss knows exactly what they're selling. Many of their items are UK sourced, but some are not. I just looked, and I must have already thrown out the box that this slave cylinder came in, but the box for the master says "Made in China", so I don't have great confidence that all features were necessarily specified exactly the same in the reproduction part. I won't know if it leaks until I try the pressure bleeder (maybe in about a month from now, depending on how shipping goes). If it doesn't leak, then great. If it does, I'll work options from there. Fortunately there is a British specialist repair / restoration shop not far from here, so I could work with them to get this tube made up and replaced. I want to minimize their assistance, though, because their rate is just over $100/hr.
For comparison, I paid under $3 for the tube that's in there now, and I wouldn't be surprised if their help was at least $100. If this becomes the difference between car is drive-able or not, I'll pay for good help, but this also motivates me to do as much as I can on my own.
Our weather has finally turned to winter, so I'm not motivated to go out in the garage and do anything. I know, this is nothing compared with what a lot of others have to work with. It hasn't even frozen here yet, but that's forecast for over this weekend.