


herm111
-
Posts
213 -
Joined
-
Last visited
Content Type
Forums
Gallery
Events
Posts posted by herm111
-
-
On 12/28/2018 at 4:03 AM, maok said:
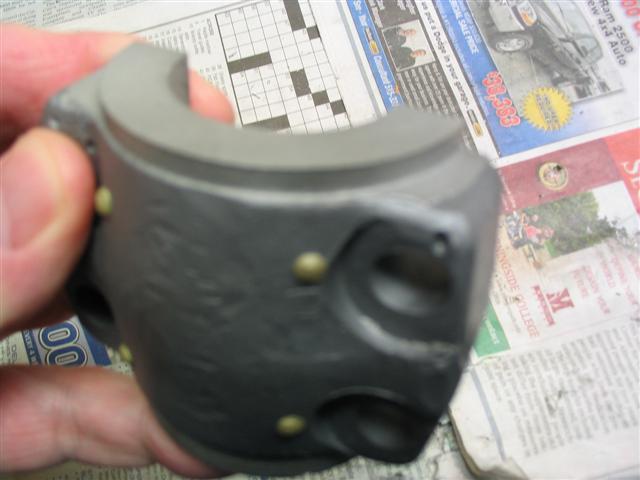
I got intimate with it today and some signs of quality issue have arisen....:(


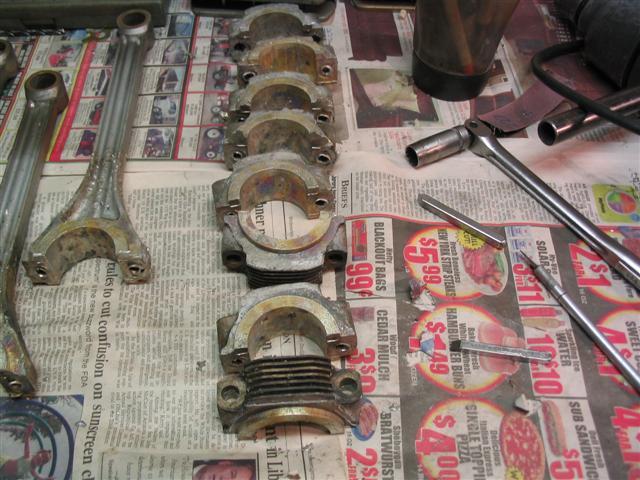
You can see a small hole in the 1st pic and some babbit material in the oil hole for the big end of #6 rod.


The biggest issue is the crank end gap/float. Bottom right hand corner is 0.0025", top left hand corner is 0.0015", and the other two are less than 0.0015". And the crank when spun seems to be binding, mostly likely because of this....:(
I am going have another look at it tomorrow, but I dont have my hopes up.
In the first picture, the middle hole with the babbitt, is that pluging off a squirt hole, or is the web of the rod drilled for oiling the wrist pin? If it is a squirt hole, I have never seen a squirt hole, connected to a circle groove, for constant oiling.
Herm.
-
On 1/4/2019 at 9:35 PM, chistech said:
One thing to note on a 26-27’ T, if it’s a coupe or roadster, there is less front seat room than 25’ and earlier. I grew up with a T and totally enjoyed driving it when I became of age. Now that I’m older and enjoying antique cars, I thought I’d might want to buy a model T because I really do like them that much. I’ve always liked the looks of the 26-27’ coupes, roadsters, and roadster pickups especially with the wire wheel option. I had a chance to purchase one from a friend who deals in T’s and it was he who told me that. Forgot what the reason is but someone of my 6’-1”, 235 frame, would not be as comfortable in the 26-27 compared to the 25 and earlier cars of the same body style. I never realized they changed the size of the cockpit in those last two years.
"AGREE"
Herm.
-
On 12/26/2018 at 7:58 PM, Rockabilly Hooligan said:
Hello Everyone,
Need some of your expert Olds 371 knowledge. My friend and I recently rebuilt my 1958 Olds 88 371. On initial startup engine sounded good but smoked a lot (Moly rings?). Too eliminate smoking I Rebuilt carb, replaced fuel pump, changed oil, changed plugs. my first fuel pump leaked fuel into oil pan but I did not drive more than 100 miles until I replaced pump and oil. Hoping it did not mess up my bearings. Engine starts, idles, and runs strong just knocking.
Oil Pressure has always been 30-40PSI. Was able to finally able to set rings for most part and does not smoke as much. Engine friend says I still need to put more "hard" miles on engine to completely set Moly rings. Compression is all good in each cylinder. My engine now has a knocking/rattling sound at idle and appears to be getting worse the more I start it up and idle her. When I rev the engine it appears to go away (or at least less noticeable).
I listened to engine block with stethoscope and did not hear any different or louder noises from cylinder to cylinder and noise appears to be coming from the lower rear engine/ front transmission area. One of my friend thinks its "thrust bearing". Another friend thinks it might be transmission related.
I pulled the starter and flywheel cover to check to see if flywheel is loose or cracked but and all bolts are tight. I also verified very little flywheel play/movement (1/4"?). Before I drop oil pan to see if bearings are loose/damaged, could the knocking/rattling sound be something in transmission? Any suggestion besides before I drop pan and check out bearings Thanks ErolDid you check all the rods for twist, bend, and offset?
Herm.
-
On 12/14/2018 at 1:18 AM, maok said:
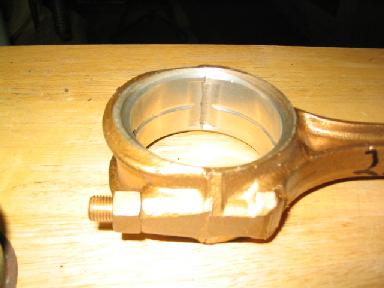
Here you go Ben, this is a big end of a conrod. They are smeared in clean oil at the moment, the oil makes them look rough.
I couldn't get any pics of the mains yet but in January reminded me to do so. The block has surface rust on it from sitting around for awhile after it was acid dripped.


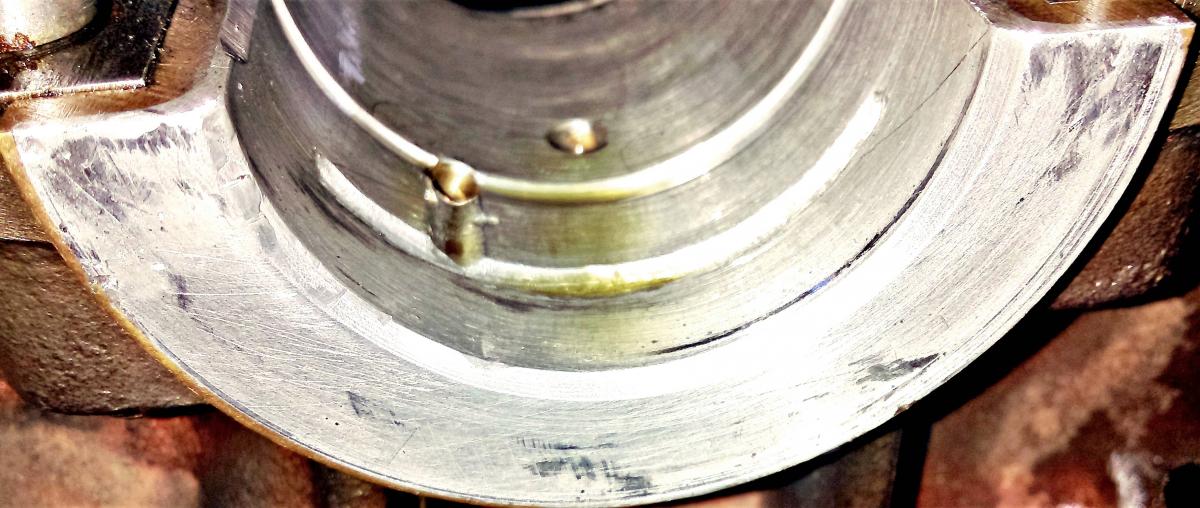
Mr. Maok, I hope those are not the rods that you are going to use, in your new engine. All those holes that are inside the Rod bearing, that I see, and in the out side thrust flanges, is dirt in your bearing babbitt. Those particular holes, are are caused from a Dirty pour, that had skimmings from the top of the babbitt pot surface, or some Guys just heat babbitt up in a ladle, and is poured into the jig, very crude. When you do it that way, the babbitt in the ladle will burn, and the burnt babbitt will go down the the bearing, and make the holes that you see.
The problem is, the holes are not just on the surface, they will go clear to the core surface on the rod. So now you have dirt, between the tinning, if there is any, and the babbitt, which means that it is not stuck, as nothing sticks to dirt.
Also, look at where the out sides of the thrust, touch the rod side, if that side is stuck, it will look like one metal, soaked in to the other. If there is a crack between the babbitt, and the rod, like water on wax, it will not be stuck.
I will post some pictures of what dirt looks like from the back of the bearing, and also what the side of a flange should, and should not look like.
It also looks like someone took Emery Cloth, to the inside of your bearings!
Thanks,
Herm.


-
 2
2
-
-
If you have a babbitt rod, and the crank pins have been ground, there is a good chance that the pin is Not damaged. If the rods were converted to inserts, there is a big chance the pins are damaged, to some extent.
So, with your accelerator being stuck, at very high, or pegged out RPM's, what has happened is the same as a high, RPM, speed shift, and you missed the shift. That will knock a rod out of anything.
I have seen it many times in the last 54 years.
The chance of getting a rod off e-Bay, and having it fit your pin, would be a crap shoot.
The boys are right, pull the rods, and check those and the pins.
I might still have some pictures of a spun poured rod, and the tools to align the oil squirt piping.
Thanks,
Herm.


-
11 hours ago, trini said:
Very interesting subject. In those days when babbit bearings where common place and engines R.P.M about 2800. These mechanics were called engine fitters. They used a die called "blue" to gauge the bearing to find high spots and scrape off excess material, and shims if needed to fit bearings.
11 hours ago, trini said:Very interesting subject. In those days when babbit bearings where common place and engines R.P.M about 2800. These mechanics were called engine fitters. They used a die called "blue" to gauge the bearing to find high spots and scrape off excess material, and shims if needed to fit bearings.
The Blue was an oil paint, called Prussian Blue, still made by Permatex. We don't uses it, as it gives to coarse of a reading.
Herm.
-
1
-
-
On 10/5/2018 at 2:30 PM, Tinindian said:
I started driving my Grandfather's 99,000 mile car in 1959. He never drove it over 45mph. On reading the operators manual I noticed that the economizer valve in the carb cut out at 55 mph. I reasoned then that it was okay to drive at least that fast. I have consistently driven it at 50-55 on highways and 55-60 on the TCH and your interstates. In 500,000 miles the engine has been overhauled twice. Both times the babbitt was cracking more than worn (never had removed shims). He had always used good oil (detergent when it became available) but 330 or 40wt. Both times when I rebuilt the engine I started out with 10wt oil and after 50,000 or so changed to 20wt. The visible results when opening the engine were the same. I don't know what conclusions one can draw from this except that Pontiac engines were stronger than we thought.
In 1962 I got to drive a brand new (26 miles on the odometer) 1930 Pontiac. It had been stored by the dealership when new). The man who bought it asked me to teach him how to drive it. That car was just as nice shifting and on the highway as a brand new 1962 was. There was a fantastic difference between it and my 100,000+ mile Pontiac. I imagine there would be the same difference or even more difference since it had never been beat up on 30's and 40's roads.
I work with bearings every day, and for a babbitt bearing, I will say 10 Wt. oil is to thin, when hot, it is as thin as water. You have to have cushion between Crank Pin, and the bearing, and 10 Wt. just doesn't have it in stressed times. Yes, as you know it will work, but like everything, it works until it don't. Summer Weight should be 30 , and winter 20 Wt.
Herm.
-
4 hours ago, broker-len said:
the debate about detergent oil in old motors has been going on,,,,,I am in south jersey,,,,shop near me did the bearings,,,,their position is --------------------NEVER------------use detergent oil with pored bearings,,,,wanted some one else to ask
We have poured bearings everyday for 54 years, all run on Detergent oil. Who every told you that is blaming oil for his bad workmanship, to cover his butt. In 54 years, we have Never had a bad bearing, or any bearing fail!
1. Aluminum Mains, and Rods out of a Franklin Auto.
2. Rods out of a 1937 Packard.
3. Chevy Four Mains.
Thanks,
Herm.


-
2
-
-
On 7/22/2018 at 10:55 AM, McCargar said:
Does anyone have the specifications for the crankshaft and rods for a 1927 standard?
Took a rod bearing out the other day, so I’m preparing to re-babbitt and want to know the starting values.
Any help will be greatly appreciated.
You don't really have to know standard, if the crank mains were all the same size, when new, grind all to the smallest ones, unless the crank is a stepped crank, like Chevys are where all mains are a different size, with the largest in the rear, and the smallest in the front.
You don't have to grind a shaft to a .010, .020, .030, ect . If a crank will clean up, at say .011, or .023 under, why waste, all the extra metal.
The mains have to be Align Bored, and the Rods still have to be cut, and the chance anyway is small to find ones that would fit, to replace them down the road, with standard under sizes.
95% of the bearings are done that way, the ones we do, unless the Owner wants the standard under sizes.
Herm.
-
On 6/26/2018 at 12:20 PM, JV Puleo said:
I think so... in fact, I have an engine in my shop that belongs to a friend that I plan to call him about. Actually, until I read one of Mr. Kohnke's posts on the subject I didn't know he made that type of bearing. The one possible drawback that I see is that, with a one-piece shell, the main bearing thrust is also taken up by the Babbitt bearing. In my own, Mitchell engine, which had thick Babbitt bearings poured directly into the crankcase, the thrust is worn paper thin. But, I suspect the Mitchell bearings were made that way because they were cheaper to do at the factory, not because they were better.
I'm confident Herm understands that and has no problem adopting to it. In the case of high end original engines, with bronze shells, the thrust was taken on the bronze. That would have been much easier for a general mechanic to work with, he would only have to have been concerned with the actual diameter of the journal so it is understandable that they would have continued to use the bronze shells even if they understood that there was a slightly better alternative.
Mr. JV, I haven't had time to play on the computer for a while. Ok, lets start with cam bearings. We do build cam bearings, as in your old ones. We spin pour them, at 1200 RPM's, and machine them about .100-00 under the cam size, for them to be align bored in your block.
Rods, the reason we don't Babbitt rod inserts, is because when done, and put in the Rods, they have to be , or should be a 100% fit to the I.D. of the rod. If not, they can move in and out, say if there was a small space between the insert, and the rod surface, of a .000-50 thousandths, and as the crank is pushing at the top, and bottom of each stroke, it can fracture the Babbitt in a short time, so the Babbitt gets a bad name. Inserts, when poured, will distort, and have to be brought back to uniformity, and some can't be trued, to a 100%. We can pour them, but we can't guarantee them. So the easy, and better fix is pouring them solid. As Mr. JV said, there is better Heat transfer, as oil that is between the insert, and rod, is not a good conductor of heat, and if with inserts, they didn't Shims, we normally put in .006 thousandths shims, on either side, and cut with the Babbitt, or if not wanted, we wouldn't.
Now, for the mains. The mains hold a crank that just turns in a merry circle, with out the rod thrust, so main inserts work very well, of course if done right, as with anything. Bearings are all the same when it comes to Babbitting, just different size, material that the shell is made of, and oil grooves.
If say your main thrust is wore, weather, a Bronze, Steel, or Babbitt shell, we leave about .050 on each side, so the Align Bore man can fit the thrust on the crank to spec's. On the part lines, we leave about .006 thousandths to fit the bearing, so as to make sure you get the bearing crush you desire.
That's all I can think of, any more questions, let me know. I am always glad to tell you More then I know !
Thanks,
Herm.
-
On 4/4/2018 at 11:47 AM, R.White said:
It all depends on what you want to spend! Your engine (and almost all stock engines) came from the works without having been balanced. If however you want your rebuild to be the best it can be then go for balancing. The most you can expect is a smoother running engine with a longer lifespan as the absence of vibration is a real benefit. Performance will still be limited.
Ray.
" AGREE "
-
On 4/3/2018 at 11:30 AM, R.White said:
I would look into cold metal stitching as a preferable alternative to welding or brazing. I have had very satisfactory results using this method.
I couldn't help noticing the crank grind tolerance of 0.010". The crank needs to be much more accurately ground in my opinion. 0.001 " max.
Ray.
If you have a +, or - of .001, the crank is already wore out. The center line MUST be kept! You can't grind a crank like that, as you would a 350 Chevy! Your +, of - should be Zero! Herm.
-
Mr., Cahartley, what are you referring to when you use the term White Metal versus Babbitt?
-
Thanks George, It is a nice one.
Herm.
-
This is an A.M.C.O. Rod Alignment Machine. Every Connecting Rod should be checked for Alignment before being installed in an engine. This Machine will go to 1.500, to 2.625, and with the other set of blades from 2.625, to 3.125. It is all complete, but the bending tool did not get in the pile, when I took the pictures, but it is there, along with the twisting tooling.
I want 300.00 for the A.M.C.O.
Thanks, 515-303-0363
Herm.


-
This is a cast Iron Wheel balancer. It is in excellent condition. I think it will do Model T wire wheels, but I don't have one here to try. But the top shaft size is 2-1/2 inches.
The largest diameter you see, is made for 1937 to 1940 large center wheels. There is no name on it, but it did have part of a name sticker when I got it about 40 years ago, but I could not make it out for the name.
I want 300.00 for it, and that is cheap for what it does. Buy'em when you find them.
Thanks, 515-303-0363
Herm.


-
On 3/1/2018 at 9:39 PM, chistech said:
Herm, are you testing us to see if we're paying attention? You say the first pictures are from a Peerless 6 cyl but I see 8 rods in the picture? LOL
On 3/1/2018 at 9:39 PM, chistech said:Herm, are you testing us to see if we're paying attention? You say the first pictures are from a Peerless 6 cyl but I see 8 rods in the picture? LOL
Well, I think it is like my typing, I look at one Key, and hit another!!!!!!!!!! LOL, Herm.
-
 1
1
-
-
6 hours ago, JFranklin said:
My model A Ford got what I was told "Diesel tin babbitt" I was happy with the results. I also was looking for a shop to re-do a rod and ran across a shop that does about any babbitt work and even showed fan jet rotors they do I was impressed. One more, I talked to a fellow at a farm machinery"steam-up" that repaired the missing chunks on the mains on his running hit&miss engine with JB Weld!
Your Babbitt is called Diesel Marine, although, it should work all right, it is made for Salt Water applications, where it is hard to lubricate.
Herm.
-
2 hours ago, chistech said:
Thanks for that knowledge Herm. Yes, the mains were bright colored and the rods more lead like coloring on my Olds. By your description it sounds like Olds used two different mixtures in their Babbitt. Possibly it has something to do with the depression and the very low production numbers for Olds that year but I could just be reaching on that. The 32’ Olds had a very long stroke so I’m sure it was more of the pounding and the weight of the old cast iron pistons taking their toll. The crank was supposedly factory balanced and during my recent rebuild my machine shop told me the crank was dead on as far as balance so I’m sure that had to have helped the mains stay in good shape.
I’m not afraid of Babbitt one bit and when I was a kid my dad had a model T engine rebuilt. The guy poured the bearings and did all his machining right in his basement. He had the engine dolly set up on tracks that were layed on his cellar bulkhead stairs. He used a boat hand winch to lower the motor into his cellar. He had quite the operation. That motor ran perfectly, never gave one issue, and that old depot hack would go like a speedster. Talking with someone recently and I mentioned the above scenario and they knew right away who I was talking about. They told me he was considered one of the best. I believe he lived in Randolph MA.
The only bearings you would have gotten from Olds, would have been Tin base, and that would have been Babbitt Grade No. 11. They had to have been replaced at one time. Federal-Mogul, built bearings using Tin Base, but when pouring used bearings they used Lead, trade name Stonewall Babbitt, by United American Metals.
I like hearing those old stories, always has been interesting, to me.
First Pictures are of Tin Base Babbitt, for a Peerles 6 Cylinder Continental, K-4. You can see the difference in the Babbitt color.
The next bearings are old Babbitt, which had been poured with lead, and a very poor job, at that, by a shop that has been pouring Babbitt for years. These are the kind of shops that give Babbitt a bad name. These bearings had less then a hundred miles on them.
The last is from a 1928 Chevy, showing Tin Base Babbitt Mains, after Align Boring.
Babbitt was used on thousands, of race cars, for 60 years, and they never had bearing trouble.
Thanks,
Herm.


-
9 minutes ago, chistech said:
I was told that the alloys varied quite a bit between babbitters years ago with some using more or less tin and metallurgy today has better quality control than 80 years ago. Today’s electronic temperature controls also help contribute to a better Babbitt by maintaining the Babbitt material at a more precise temperature don’t they? Can you help me understand why most 32’ Olds owners have found perfect main bearings in their engines but all the rod bearings crumbling and falling out. The mains also have a different color than the rods. Same material?
There are many different Babbitt formulas, the same as it always has been. But, there are essentially two different kinds ,of Babbitt, Lead, and Tin Babbitt. During the war, the government had most of the tin, so bearing builders used lead.
Now, in Lead Babbitt, there is less then 5, 10% of tin, and does nothing for the Babbitt. In Tin base Babbitt,, say Fords Grade of 86-7-7. The tin is what makes the bearing strong, Antimony that does its best to hold everything together, and Copper that gives it wearing qualities.
Lead will last a long if you keep the R.P.M's down, But Tin is better by far, and a square inch of Tin, compressed to 14,000 pounds will be pressed less then 2%.
Yes, Automatic Temperature controls, that is a good point, Mr. Chistech. A very large percent today of auto babbitters do not have temperature controlled melting pots. You can't pour good bearings with out them. Pouring good bearings is all about, Temperature, Temperature, Temperature! This carries over in heating your Jig, and what you use to heat it with, and the rate of cool.
Ok, Material in your mains, if you have a very dark color Babbitt in a bearing, it is probably lead, if shiny, or brighter, would be Tin.
Just about 90% of the time, bad bearings come from the Babbitt not sticking to the Tinning. it also could be oil, or lack of it, Flat crank, to much engine, missed shifts, ect.
Mains will last a long time, if every thing is right, as the mains just turn in a Merry circle, while the Rods start and stop, top and bottom, and then you also have the Power stroke, which is a lot of pressure, on bearing, and crank.
The last thing, don't let anybody tell you that Babbitt is no good, as we have poured thousandths of bearings in 54 years, and still have never had a bad bearing.
The bearings that come apart in a short time, is nothing but bad workmanship!
Thanks,
Herm.
-
3
-
-
13 minutes ago, bobg1951chevy said:
My white CORVAIR has swirls in the paint on the flat surface of the roof.
Buffer swirls.
What is a source ofremedy to eliminate these swirls, knowing I do not have a buffer to work with.
Thanks.
Go to a place that has Auto paint and tools. Ask for Swirl Remover. It is a liquid. It is used after some buffing.
Herm.
-
1
-
-
On 2/23/2018 at 4:37 PM, Hubert_25-25 said:
I just had new babbitts installed in the mains and connecting rods of my 1925 Buick. The connecting rods came shimmed and bored to size for the crankshaft from Egge. The machinist installed the main bearings with no shims and line bored the engine. He said no shims came with the bearings so he didn't think it needed any. When I called Egge, they said they supplied the shims for the connecting rods, but not for the mains, because they did not know what size they would need to make them. What's done is done, although I am a little frustrated, but this is old stuff and not everyone knows what to do.
Does anyone have any experience with how long an engine rebuild would last before needing shims removed, because it sounds like that is when I would need my next rebuild as I have no main shims to remove. Do the mains last any longer than the connecting rods? Modern oils should help the situation over the oils of the past. Has anyone had to remove shims after a rebuild, and at how many miles. Was it because of low oil pressure if you did remove shims?
Thank you, Hugh
I would think if the rods had shims, the mains would also. You can tell by taking the inserts out, and bolting the cap on, and measure in the inside, up and down, and side ways. What ever the difference is, if any, is what the mains had for a shim pack thickness.
From 1929, on up, and through the 1940's, Buick rods, and mains had .006 thousandths for, Rods, and Mains.
The longevity all depends on how well the work was done, and the owners care of the engine.
Herm.
-
1
-
-
On 2/23/2018 at 7:55 PM, chistech said:
Rebuilt my 32’ Olds 6 cylinder a few months back. The rods were shot but the crank and mains are still perfect. The Olds didn’t use main shims but instead recommended lapping the caps to take up any excess. My 31’ Chevy has shims on both the mains and rods. I assume Egge rebabbitted your main bearing shells. The machine shop line bored your engine to fit those new bearings to your crank. If it’s a pressurized oil system, many mains had no shims. Most dipper/splash type oilers had shims. I would think a 25’ Buick would be a splash/dipper system but don’t know for sure. Depending on what the manual says is what most engine rebuilders do. Not real confident in his answer of his knowledge but not many even know how to line bore these days so he has to know something. Most cranks “hang” on the caps so many manufacturers like Olds recommended lapping the caps as it’s the cap that wears. These days the Babbitt material is so much better than it was when these engines were originally built so I doubt most of us will ever have to adjust the shims or Lapp our mains in our lifetimes. If the clearance is correct don’t worry about it. Don’t forget to run a zinc additive in your engine oil as today’s oils don’t supply enough lubricity without it for Babbitt.
Babbitt today is the same, as it was when new. No better, no worse.
Herm.
-
1
-
-
On 2/1/2018 at 4:48 AM, Machinist_Bill said:
If the groove is not in place then the "Load" of the spinning shaft would force out the lubrication. Then there would be a heat build up. Then the brass would seize onto the shaft. Brass loves to do this!
Bill
" AGREE "


'28 Chrysler M Engine re-build
in Chrysler Products - General
Posted
Thrust should be, not under .003, and not over .004. We shoot for .003 to .003-50.
You shouldn't have had to use sand paper. Make sure you scrub the bearings when done, with warm soapy water. Your bearings should have been already done, with a smooth, reflective surface, for good oil wedge.
Herm.