


Bob Stein
-
Posts
196 -
Joined
-
Last visited
-
Days Won
1
Content Type
Forums
Gallery
Events
Everything posted by Bob Stein
-
One of the wires (8E) is for a Speedometer pointer light - probably not on my 110, so thanks for the note! The wiring diagram came from my original owner's manual. I will look for the A.E.A diagram online.
-
I spoke too soon - while trying to troubleshoot the interior lights and clock light, the wiring diagram showed me that I am missing three wires at the panel light switch! There were only three hooked up before, and there should be six. I scanned in the drawing and did a detail with the wiring key to go by, and will start hunting for the missing leads. The wiring harness was new and still looks great, so I am sure the wires are up there somewhere. Of course, it means taking the %^$#@ switch out again once I find the missing wires so I can hook everything up properly.

-
The instrument light switch on my 1941 Packard was not working right when I bought the car - you had to pull it all the way out to have any dash lights. A new switch was purchased on eBay, and I ended up spending 4 hours getting it fixed today. The first challenge was removing the dash knob. It took a mirror to figure out that the knob has a spring-loaded tab that works like the stop on a screen door closer (bottom left). When I got the original switch out and compared it to the new one, I discovered they were very different (top left). Same center dash mount, but the new control rod is much longer and uses a setscrew. Mine was mis-wired, and also had a broken resistor spring that dims the panel lights in the second position. I was able to fix the wire, then dropped the switch and broke it! After many dirty words, I opened the switch and found that a sliding plastic platform had cracked in half (bottom right). I was able to superglue the base back together, and after reassembling the switch, was very relieved that it worked perfectly! I used a grinder to reshape the new switch's control rod and remove an extra tab on the body so I can use it if I have to later (top right). For anyone who might need a 1941 switch, these are on eBay for $20 NOS. The dash mount works fine, and once you shorten the shaft and cut in a flat, the knob slides right on. I celebrated by taking the car out for a long errand run.


-
Has anyone worked out a good repair method for the sun visor arms? Mine both fall down unless they are pushed up high against the headliner. Would inserting spacers (have the idea that washers could be split and bent around the shaft) provide more tension to the spring?
-
While the mirrors on the car turned out to be aftermarket, they looked nice and were installed with screws. Also, my doors have a seal around the edge that would be torn up by clamp-on mirrors. I decided to get creative last night and attacked the passenger side mirror with a Dremel tool to cut a small slot in the mirror back that allowed the head to swivel further. A small round spacer added enough distance for the added swivel to clear the base. It took a little additional fiddling, but the mirror now shows the proper view, and the changes are mostly invisible unless you know what to look for.

-
Not yet, being a coward when it comes to working with hard-to-find parts. However, I just lucked out on eBay and picked up a NOS 1941 Packard starter pushbutton switch in the original box! I'll play with the old one once I have the new one installed.
-
I actually have one of those, plus a couple of USB battery packs. I could probably even find an adapter to get the GPS hooked up, but I like doing things the hard way. :grin. The adapter worked fine on a car club run Saturday, providing smooth power for the GPS (which does not take power straight from a USB battery pack for some reason).
-
My starter pushbutton is hanging up, requiring a little fiddling to get it to disengage. Has anyone tried electrical contact cleaner or some other cleaner? The problem has been getting worse. Is there a push starter switch that can be modified to accept the starter plastic push knob? Thanks for any assistance.
-
Bella, my recently acquired 1941 Packard, will be a great tour car, but for longer trips I still prefer to have a GPS handy. The Packard, like most US cars before 1955, has a positive ground 6-volt system that doesn't play well with modern 12-volt negative ground accessories. I put together a converter setup using three pieces available off Amazon and/or eBay for cheap and installed it last night without making any modifications or drilling any holes. The power outlet assembly (1 - bought from Amazon for $13.69) has two USB ports for phones/tablets and a standard cigarette-lighter socket. That is zip-tied securely to the front seat frame so it moves with the seat, and cants forward for easy access. It is nearly invisible unless you look for it, and no holes were drilled. The outlet block is wired to the 12-volt output side of the voltage converter (2 - 10-amp unit bought from Amazon for $28.99 - lower-power units are available for half that, but I wanted the greater power just in case.) The converter is also zip-tied to the seat frame where it has plenty of cooling and also moves with the seat. Connection to the battery is through a Battery Tender plug-in connector (3) that was extra with one of my Battery Tenders, but they are available off eBay for cheap. This works great because I can disconnect the outlet when I am not using it, and it uses the same connector to the battery that I already had in place for the Battery Tender. I tested the output with a multimeter and had exactly 12 volts. As the final test, I put the seat cushion back and hooked up a GPS - success!


-
Thanks for the replies. I actually have a ton of spare distributor parts, including caps, points, condensers, rotors, even a new vacuum advance. Just would like a spare setup.
-
Looks like dumb luck may have dropped a full set of 1941 dash plastic in my lap for $75. It all looks very straight and complete - some minor cracks in the waterfall but I can probably repair and paint to match. Even includes the metal trim! Gotta love eBay! Certainly worth the risk.
-
Packard used both Autolite and Delco generators, regulators, and distributors in 1941. My 1941 1100 has the Autolite system, however, I have found that the Delco parts are far easier to locate. Can a Delco generator be substituted for the Autolite unit if you also swap out the voltage regulator?
-
Thanks for the detailed reply! I have some new clamp-on door mirrors I bought for my 1937 Pontiac that did not work out - one of them may do for the Packard. Or perhaps a .peep. smaller mirror.
-
My 1941 Packard 110 has the factory door mirrors which look very nice, but the passenger side is not adjustable to be useful. I can get a good view of what is passing along about ten feet further out, but the mirror will not adjust in far enough to let me see rearward. Has anyone come up with a solution? I may have to add a peep mirror, but I do not want to clutter up the door.
-
I did another search - apparently I pulled up an old Merritt listing before, as they do not have the dash plastic in the current web page. Looks like LaVine is the way to go! And thanks for the information on striping - I will do further research.
-
Oh, I checked out LaVine Restoration for their plastic dash set at $1950. I take it the Max Merritt set at $1650 is not the same quality? Worth the $300 if there is a difference in longevity and/or quality.
-
Looking at the 1941 Data book, all of the pictures I can find of the 110/120 wheels show trim rings and hub caps, but no striping. Do you know what page the pictures were on showing striping? I have the book, as well as all factory literature/brochures for the 110 Deluxe, plus the 1941 Packard accessories brochure. I do have a spare wheel that came with the parts that has twin stripes just outside the hubcap area, but it is not original paint and is off a different car.
-
I checked all of the literature I have gathered so far - none of the factory sales folders for the 110 show pinstriping on the wheels. I have the 110 Deluxe brochure, the 110/120 combined brochure, and the 1941 accessories booklet. None on the car body, either.
-
Thanks! I looked at the LaVine site and the plastic set looks great - just need to take a deep breath and wait for my tax return. :grin. I don't even have the car home yet!
-
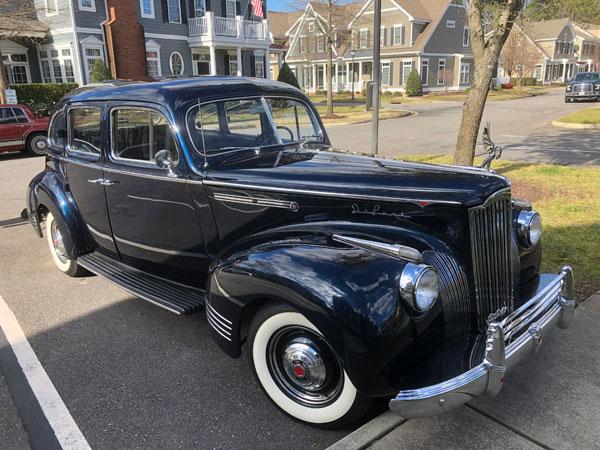
I just purchased a 1941 Packard 110 Touring Sedan and would like to add fog/driving lights. Where did the factory mounts attach to the car? I have seen different images, but none show the mounting point, and the parts book does not show or list them. Were they bulb/reflector type or sealed beam? I have a set of Guide reproductions that appear to be the correct size and style. Also, the radio blanking plate and ashtray lid are navy plastic and could use replacement. Are they available anywhere? Thanks!
-
I recently purchased a 1986 Buick Electra Park Avenue with 54K original miles. The car showed up on Marketplace and looked too good to be true. I wasn't really looking for another car, but have the addiction. It turned out to be even nicer than expected, closer to being a new car than most just a couple of years old. I am trying to collect the car's history now, and sent a letter to the folks who owned the Buick before the guy I bought it from. It is a Fire Red Metallic (1986 color) with deep red velour interior and almost loaded. It has standard air instead of climate control, the analog dash instead of digital, and power seat on only the driver's side. Other than that, the car has most every option available, as evidenced by its original window sticker! The engine bay is very clean, including the insulation mat with the silver 'Buick' lettering. Even the chassis has clean paper tags on the struts. The color is very striking - I do not recall seeing another like it. And it has the unusual rear-opening hood. The car had been converted over to heavy chrome spoke wheels with knockoffs and wide whitewall tires when I bought it, but the Electra's original heels and wire covers came with it. I sold the aftermarket wheels and tires and put on a new set of correct whitewalls. Still a few things to work on, such as the power antenna, dead coach lights, and an occasional high idle. The Buick runs and drives like new for the most part. Looking forward to bringing the car to an AACA meet - with a slight cleanup it will do very well in class judging!


- 1 reply
-
- 4
-

-
The temperature gauge on my 1937 Pontiac 6 was working perfectly and had for years. Just over a week ago, the car overheated and the gauge stuck at 220. It has the original gauge. I dug around in my parts and found another complete gauge assembly - also stuck at 220. Is there a way to fix these? Has anyone got a recommendation for a shop, or have a good gauge for sale? I do not want to have to install an aftermarket gauge. Thanks! Bob Stein Norfolk VA
-
I recently sold my 1989 Buick Reatta to a friend who used to be a mechanic at the very dealership the car was sold at. It has had an erratic Code 41 error triggering the Engine Electrical Error signal on the CRT since I bought the car two years ago. I went through the list, replacing the oil pressure sensor twice, the O2 sensor, and the crank and cam shaft sensors as well as the magnet. Sometimes it would go for a day or more with no code, and then other times I'd get the 'ding' - and the error message every five minutes. I had finally given up, since the car never had any issues other than that, and I drove it without problem on a couple of long 250+ mile trips. I saw the buyer at a club meeting last week and he informed me that the culprit had been the Throttle Position Sensor (TPS)! I do not recall that even being on the list of possible causes. The only reason he caught it was he had his separate factory test unit hooked up when it threw the code for the TPS. It did not store the code in the car's computer, but triggered the Engine Electrical Code message. So if you have been fighting an elusive Code 41 error, check out your Throttle Position Sensor!
-

1951 Studebaker External Visor mounting parts
Bob Stein replied to Bob Stein's topic in Studebaker, Erskine & Rockne
I just und the center support parts in a box - still need the 4 outer clamps, but I may be able to fabricate them. Very annoying in that I am usually much more careful about keeping small parts bagged and with the main item. The center post has an angled bracket that attached on the cowl at the center of the hood - the original was torn, and I made one that eventually broke as well. I have attached a photo of the car with the visor on, as well as the outer end and the center post assembly. I think I can create what is needed if actual parts cannot be located.


-
What did you do to your Reatta today? <ongoing thread>
Bob Stein replied to SeanR's topic in Buick Reatta
The connectors were clean for both units, and the magnet was situated 90 degrees and seated solidly - I rotated the camshaft fully through to make sure it did not hit anything. The new oil pressure switch (AC/Delco) doesn't appear to fluctuate as much, but still did an occasional leap to 64 psi at steady idle. In any case, the Electrical Control message comes up on the screen occasionally - clears after a few seconds most of the time, and sometimes stays off completely.


