


Kenneth Carr
-
Posts
309 -
Joined
-
Last visited
Content Type
Forums
Gallery
Events
Posts posted by Kenneth Carr
-
-
Regarding the suggestion to fill the float chamber: I have to do this any time the car sits for 4 days or more. I pull the little float level screw on the side of the bowl (careful ... if you drop that ..may want to put a rag under the area to catch it). I then use one of those little squeeze bulbs that are used to clean out ear wax (get this at your pharmacy). It has a slightly curved tip and works great.
A friend of mine also recommended putting a second ground strap from the battery directly to one of the mounting screws for the starter. He says you can be sure of getting maximum crank strength that way. I may do that this summer.
-
I eventually got a belt from V-Belt Global Supply as recommended above by "sixseven".
The belt arrived within a week. It was folded a few times and in a bag. It unfolded easily.
The belt is new, the correct size and style, and supple. I installed it easily and the car is working nicely with
no more belt noise. The old one is in the trunk as a spare.
The correct belt at V-Belt is the "C48 V-Belt".
The cost, with shipping to RI, was $18.46.
I agree that Bob's is a good option because you don't have to choose the belt by dimensions.
My only problem was the cost. It would have been $52.45 with shipping and residential delivery. I still
would not have qualified for the $40 minimum order so I would have to get something else also.
-
39 minutes ago, Den41Buick said:
I just installed one on my model 71C from Bob's. It fits perfectly.
Did you notice what the brand and model number were?
I will likely go with Bob's if others don't have it.
-
4 hours ago, sixseven said:
Give these guys a try: http://www.vbeltsupply.com/conventional-wrapped-belts/c
Thanks. They do have a belt that meets the dimensions. I may give them a call to see if it has a cross reference with the 625.
-
I have a 1941 Buick, Model 71 Roadmaster 4-door sedan. My fan belt is getting old and noisy and needs to be replaced.
The correct belt appears to be the Gates Vulco no. 625 (I have an old NORS that is a bit dry). The belt on the car now is
a Green Stripe 625. It also has the number 384D on it. The belt is 52" long (outside) and 7/8" wide (outside) and about 3/4" wide on the inside.
My local parts man ordered me a belt. He gave me a 48" belt, even though I told him 52". It was also slightly narrow (about 1/8" narrower).
I tried it anyway at his suggestion. I could not even get it over the crank and fan pulleys, never mind the generator.
He now wants to order me a 52" belt that will also be narrow. I did not notice if the first belt he gave me held against the walls of the
pulley or bottomed out.
So, is there a modern equivalent of the 625 that will work? Is a 3/4" belt going to work or will it slide down and
not have enough surface on the sides to drive the pulley?
If anyone has replaced this belt and has some modern numbers and brand that would be appreciated.
Thanks!
PS - The major old Buick parts houses don't seem to list the width of the belts. They also charge much more than my local guy.
-
The manual says to use "S.A.E. 90 E. P. Transmission Lubricant for temperatures not lower than 10° F. below zero. For temperatures lower than 10° F. below zero, add S.A.E. 80 E. P. Passenger Car Heavy Duty Hypoid Lubricant."
I use what is commonly available, 85W-140 gear lubricant. The transmission quiets and shifts easily. I suspect plain old 90 would be better but this one works for me.
Raise the car on a pair of ramps so you can fit under it. Be sure to use chocks on the rear wheels so it won't roll back.
Get under the car on the passenger side. Find the transmission.
You will see the drain plug on the bottom. On the side is a similar plug. That is the fill plug. Remove it and then pump the lubricant in until it starts to flow back out. Now it is filled. I use a sort of hand-operated suction pump. It comes with a nice flexible plastic hose that you can insert right into the fill hole. Suck up some oil from the oil container and then pump it out into the fill hole. I have tried using a funnel but it is really difficult to to do.
In the photo the filler plug is the upper square plug. Above it you can see the floorboards. The angle is a bit odd because of how
I was wedged under the car.

-
Thanks for all the replies! I know a local upholster and I will check to see if he has this.
I am familiar with Masonite but this stuff is not as stiff or hard as that is. I suspect the panel board will be the way to go.
-
Vehicle: 1941 Buick Roadmaster 4-door sedan
I have been busy rewiring my interior lights and installing seat belts. In the process my front seat cushion underlayment (best term I can come up with) has suffered a few more breaks.
This is a cardboard-like material that lies directly under the front seat, nestled within the lower portion of the seat frame.
I would like to make a replacement piece but I have no idea what this is made of or what might be a suitable substitute.
Does anyone know what this is and what I should use to make a replacement piece? It looks a bit like a fibrous cardboard that is solid and crumbles and
breaks easily. I have included a couple of photos.
Thanks!

 I
I
-
7 hours ago, Larry Schramm said:
Through the floor like newer cars.
I should have been more clear, Larry. I do intend to anchor them to the floor. My question is as to where on the floor they should be placed
and where they should pass through or around the seat frame.
One recommendation I saw set 15-20" as the spacing between anchors.
-
I am going to add seat belts to my 1941 Buick Roadmaster 4-door sedan. The front seat is an undivided bench seat.
Question: Where do most people place the outside belt, within the seat frame (position 'B' in photo) or outside the frame (positon 'A' in the photo)? I like 'B' because it may be neater and totally hide the belt attachment behind the rear foot rest. But, 'B' may be more comfortable and secure.
Question: What is a good position for the belt to the right of the driver? Should I just sit down and take measurements that way?
I also plan to cover most of the sheet metal back frame ('D') with thin rubber tubing to prevent wear on the belts.
Any suggestions and/or photos of your installation would be appreciated.
Thanks!
Note: The belts I ordered have extra wide reinforcement plates and are the 74" variety.

-
Lee Ratliff is a friend of mine. We met through amateur radio (his call sign is K1LR). Lee spent three years in the 1970's as the driver, mechanic, and crew chief for Evel Knievel.
I am writing here to let you know about Lee's story that I recently released on my blog.
There will be six chapters and plenty of previously unreleased photos. If you are interested, please check it out.

-
On 4/1/2016 at 4:46 PM, Matt Harwood said:
Looks to be a good original car, which are my personal favorites. Good, usable, relatively rare tour car with high-speed capabilities and the price is about right if it is as good as the description claims. If you're interested, be sure to ask about the manifolds and rust in the passenger foot well at the base of the A-pillar.
Hey, Matt! You may remember me from the old Buick Webring. You used a photo of my '41 Roadmaster as an example of the 4-dr Trunkback Touring style.
I agree with you about those rust areas. I had to replace the metal on both the driver and passenger side footwells at the base of the A-pillars. I also had to replace some metal in the bottom of the spare tire well (looks like the one on eBay may be OK there). My manifold has a crack and I am just leaving it alone. I believe that you mentioned elsewhere that nearly all of them crack due to the intake and exhaust being bolted together and heating up at different rates.
Did you ever put seat belts in the front? I am considering it and am wondering if the anchors can be hidden underneath the carpeted footrest in the back floor without disturbing the carpet.
-
Keith,
I love that coupe of yours! Ever since I was a teenager business coupes were my favorite style of car.
They are almost as good a a 1959 Chevy when you want to sneak someone into a drive-in theater.
I now like just about all styles including station wagons, sedans, and of course convertibles.
Have fun with your coupe! It has plenty of style.
-
Nice video, thanks for sharing. I have a '41 Roadmaster coupe, Canadian built, so its' officially called a McLaughlin Buick which I restored and drive. Glad to have another '41 on the forum!
Keith
Nice to meet a fellow '41 Buick owner, Keith! 1941 was the year
that Buick really took advantage of what they had when those
two carburetors were placed in most of the cars. Good move!
-
Thanks for the encouraging replies, guys.
Hopefully I will have a better video in the summer.
I will be doing a bunch of engine painting, repairing a leaky water pump,
and if I am real brave I will get to a new wiring harness and painting some
interior trim.
-
 1
1
-
-
I recently posted a video of my car on YouTube. I did this back in 2009. It's not a great production but some folks may find something interesting. Someday, when I have caught up on current projects, I hope to make a nicely scripted video.
My car came with just about no history and repeated attempts to get information from the seller go nowhere.
I suspect that a partial restoration was done back in the 1970's or so. Parts of the car, especially the interior, show the wear of time. Then again, being an owner of a '41 Buick, I like all videos of this era. So, I thought it might be interesting to some of the folks here.
The link is above or just click on the text here:
Note: the best thing I ever did regarding this car was joining my local AACA affiliate, the Westerly-Pawcatuck Region AACA (WPRAACA). They are a wonderful group of car lovers. We have great times together and the knowledge base of the club members is unlimited. And yes, I have even benefited from their program whereby members help others diagnose and repair car problems. Please feel free to visit our website and if you live in the Rhode Island or Eastern Connecticut areas. We would love to have you become part of our group!
-
1
-
-
Ray and Keith ... Thanks for the feedback. I did find that it is indeed a NPT 1/8" x 27. Unfortunately NAPA did not have the exact fitting.
So, I put it through a die and that solved the cross thread issue. It did not come out perfect but at least there was no more binding. Then I tried to put it in the new carburetor and it was still difficult so I chased the threads on the carb. All worked well!
The car started up immediately with the NOS carb (I had it in a box for about 10 years ... finally put it on at the encouragement of my friends from our local AACA club, Westerly-Pawcatuck Region). No leaks and the car runs much better!

-
I am installing a NOS carburetor in my 1941 Buick Roadmaster. This is the front carburetor of the dual setup. The front of the carburetor has what I believe is a vacuum line entering it. There is a fitting in the carburetor that receives the fitting on the vacuum line. I have to use the fitting from the old carburetor.
Unfortunately the old fitting that screws into the carburetor appears to be cross threaded and I would like to get a new one, preferably locally at NAPA.
Can anyone identify this fitting (thread size, style, etc.)? I used a 7/16" wrench to remove it. The end that enters the carburetor tapers slightly and terminates in a 1/16" diameter hole.
Photos are below . Thanks!


-
Roadmaster,
Here is what I would try. Since you have multiple dashes, I would take the worst one and attempt to re-finish it with a new wood grain pattern.
Glenn .... that was my plan B and I may just do that. All the interior trim woodgrain has to be done anyways. I have been researching techniques. It looks like a good primer followed by a brown base and final wipe with stain is the way to go. I just have to line up the best paints (will likely use spray cans) and experiment.
Thanks!
-
I have a 1941 Buick Roadmaster. It runs well but only the essential wiring is reliable. So, it is time for me to attempt to remove the dash and instrument panel. If I can do that I will likely purchase a wiring harness and go to work.
At the same time, my dash has almost no woodgrain left at all. I do have two spare dashes, one of which has about 75% of its woodgrain. I'd like to swap that one for my old one at the same time I am putting in a new wiring harness.
Question: What chemicals (wax, polish, vinyl conditioner .. ArmAll, etc.) are safe for the original woodgrain? I would like to treat the replacement dash now so as to preserve what I have.
Some photos are attached so as to give you a better idea of what I am working with.
The "OrigDash" photos show what is in the car now. The "ReplaceDash" show my spare. Although the spare is better it does have streaks in it. Any touchup suggestions would be welcome.


Thanks!
-
Just for the record (and to ask one question) I will weigh in on this.
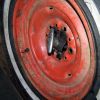
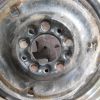
I have a 1941 Roadmaster (model 71). All four mounted wheels have 15 x 7.00 4-Ply tires on them. That would make them 15x5.0" rims as listed in section 10-7 of the Shop Manual. Each rim has 3 clips to hold the hubcap. These rims appear to be original to the car since they are black (original color per data plate; car is now two-tone green) with pinstriping.
The single spare has a 8/8.20-15 Suburbanite tire mounted on it. So this would also be a 15" rim. The rim has slots for 5 clips for mounting the hubcap and it is colored red and has no pinstriping. I suspect this is not a 1941 rim.
And my question: Were 1941 rims, regardless of size, supplied with 3 hubcap clips?
(My spare rim was missing the clips. I purchased 5 clips made for a VW and they fit fine with a little bending - only $8.00)


Are some newsletters via internet only?
in AACA - Editors & Webmasters
Posted
Our region is the Westerly-Pawcatuck Region (RI and S. East CT). The newsletter is sent out by e-mail, posted on our website, and mailed to all those who prefer it that way. The club pays postage. Some of our members do not use computers and some just prefer a mailed copy. Everyone is happy (of course our editor understandably would prefer the e-mail ony system). htttp://www.wpraaca.com