

Caballero2
-
Posts
819 -
Joined
-
Last visited
-
Days Won
1
Content Type
Forums
Gallery
Events
Everything posted by Caballero2
-
The carb location works well with grade 8 bolts. I made my own from structural angle. I was in a hurry and am a cheapskate.

- 21 replies
-
- 1
-

-
- chain placement
- engine hoist
- (and 1 more)
-
Yes, I overlooked the BFH part. Hope that I covered that and maybe otlhers by emphasizing the strict instructions. Caballero2
-
I belive all are on track about the shoes being on exact center with the drum. However, no-one is citing the fact that the anchor pin for the shoes is eccentrically mounted in the backing plate. In the service manual, at least for the '57s, a major adjustment is described when no arching machine is availible, the mounting nut on the anchor is loosened and with the brakes applied, the anchor pin is rotated to center the shoe. This adjustment should be done by strictly following instructions in the manual. If I am correct, this adjustment is also described in the '55 service manual. Caballelro2
-
I think that this might help some. https://search.yahoo.com/yhs/search?showuninstallsurvey=1&installsource=nag&schemaver=1.0.0.0&year=2015&source=nag&machinelocation=244&cmpgn=ignite&hsimp=yhs-ext_onb&ssdcat=321&vendor=none&vendorsrc=firefox&oslocale=iso:usa&osvers=6.1&ver=22.17.3.50&oslang=iso:eng&os=windows&templatecat=sbu_w_1000_5039_nsbu_retail_2&cdest=nag&chn=1007450&version=22.17.3.50&o=ds&p=brake shoe arching machine photo&prt=ngc&schemacat=sbu_w&olpchannel=retail&tpr=111&doa=2019-07-24&guid=2124f7d8-323e-4218-9c0c-3561844bc64a&hspart=symantec&installstatus=updated&doi=2019-07-24&type=ff_ds_ignite_wk30_2019¶m1=2124f7d8-323e-4218-9c0c-3561844bc64a_2019-07-24_ff¶m2=ds_nag_ignite¶m3=ngc_22.17.3.50_wk30_2019¶m4=1007450
-
Try this, I have not solved any similar problem, but it is amazing how it works. It is a polymer similar to that used for tooth fillings these days. After application, it is activated by applying UV light to the polymer. I suggest that you might, by finger pinch, hold a small piece of copper wire or other conductor between the two parts. Then, bond the two parts with the attached. This product has a built-in UV Light. Oh, a good bond requires a mechanical grip, eg; rough interface or a couple of bends or holes. https://www.amazon.com/dp/B018IBEHQU/?coliid=I36A16NO92D1I2&colid=3INVWGQKGBUA&psc=1&ref_=lv_ov_lig_dp_it
-
 Me too!
 -
WTB 1957 - 58 A/C Evaporator Housing / Compressor Bracket
Caballero2 replied to 1957buickjim's topic in Buick - Buy/Sell
Here is a '57 AC for further comparison.
-
OOPS!
-
Do you suppose that this photo was taken from that Car? This photo now decorates the East wall of the men's room of Aunt Alice' Kitchen diner in Longmont, CO.
.thumb.jpg.49a98149ae3978342d664d0673bddb7d.jpg)
-
I once read in the AACA Forum that that was part of a feature that prevents the hood from vibrating in a strong wind condition. I am going from memory from a few years ago.
-
Well, I tried.


-
Must have used seatbelt?

-
??????


-
1957 Buick Roadmaster Turn Signal Nylon Bell Crank
Caballero2 replied to 364nailhead's topic in Buick - Post War
Also, Bhigdog, my thoughts exactly except even easier from self lubing nylatron GS. -
1957 Buick Roadmaster Turn Signal Nylon Bell Crank
Caballero2 replied to 364nailhead's topic in Buick - Post War
My guy says it is feasible, but he is not able to achieve the precision necessary. -
1957 Buick Roadmaster Turn Signal Nylon Bell Crank
Caballero2 replied to 364nailhead's topic in Buick - Post War
I have a fellow reviewing the feasibility of reproducing from this sample a prototype on a 3D printer. Hope to follow up next week. Caballero2 -
1957 Buick Roadmaster Turn Signal Nylon Bell Crank
Caballero2 replied to 364nailhead's topic in Buick - Post War
Oh, I see the problem. The nylon piece in your photo should have a sphere integral to that part. The sphere is gone. That is almost impossible to find except in a salvage yard. It is integral to the base in which it is installed. That sphere fits into a pocket in the yoke and actuated the wire. The end of the wire slips over the post shown in your photo of the nylon piece.
-
1957 Buick Roadmaster Turn Signal Nylon Bell Crank
Caballero2 replied to 364nailhead's topic in Buick - Post War
364nailhead: Sharp eye, you are correct, my apologies. -
1957 Buick Roadmaster Turn Signal Nylon Bell Crank
Caballero2 replied to 364nailhead's topic in Buick - Post War
I hope this helps. Complete part for 1957. The part has recently been on Ebay.
-
Post pictures of past Buicks that you have had
Caballero2 replied to Larry Schramm's topic in Buick - Photos and Videos


-
Lets See Your 1968 Buicks!
Caballero2 replied to Ted "Wildcat65" Nagel's topic in Buick - Photos and Videos
One of our vintage family photos.
-
Here is one of the originals that was restored and shown in the 1991 National in Sacramento.


-
Convertible vs. Coupe vent window 1957 (and probably other years)
Caballero2 replied to lancemb's topic in Buick - Post War
The lock pin on convertible is absent. See photo. -
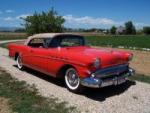
1955 Buick Roadmaster Convertible - new owners
Caballero2 replied to Bill Newland's topic in Buick - Introduce Yourself
Ah, and it is red too. Welcome to the greatest of the 50s. Dan in Colorado -
Not sure, but if I remember, there was a mid-year that required cooling features, It may have also been more output.


.jpg.6540d0afaa01c59ce6125fd7babf36f1.jpg)


