


Machinist_Bill
-
Posts
666 -
Joined
-
Last visited
Content Type
Forums
Gallery
Events
Posts posted by Machinist_Bill
-
-
I've been watching this thread, and being a machinist, I have seen all kinds of machinery. But I have to tell you that I have been to 3 whorehouses, 2 County fairs, and one Hog butcherin' and have NEVER seen anything like this!
Your creative use of an old lathe to make a vertical boring mill is very impressive! Nice work!
Bill
-
 1
1
-
 2
2
-
-
I purchased several items for my 1926 Coupe and the quality is excellent. Don't forget the currency exchange rate so don't be shocked by their prices until you figure in the rate. I put another order in for the rubber step plate mats but they were sold out. Here is the response I received from Rosemary Smith today:
Bill,
We are going to produce one more lot of Dodge mats – these will be approx. 4-6 weeks before they are ready – will hold your order until then and send both parts at that stage.
If you know any other Dodge owners who want them let them know this will be the last time we produce this mat. – Only doing a limited number.
Enjoy your weekend.
Rosemary
Yours in Vintage Motoring
Glenn and Rosemary Smith
It will be a sad day when we lose another vendor......
-
1
-
-
Your right..... I should never have complimented you on the "Nice Old Chevy" on a Dodge Brothers forum! I apologize for that and in the future i will refrain from giving you any compliments.
Have a great day!
Bill
-
2
-
-
Nice old Chevy! I wonder if we will see the chassis & running gear up for sale this fall..........
Bill
-
On 6/17/2023 at 9:23 AM, DodgeBrothersEd said:
I read an old post of yours showing that you had several distubutors. Might you or anyone have a good distributor for a 1927 DB 4 cyl 6v?

Yep. I had a real nice one that I paid premium dollars for. It sat on the shelf for 10 years and it self-destructed. Cracks all over it like a cracked egg shell!
I pulled the trigger on the complete reproduction distributor from Vintage Reproductions in Australia. Worth every dollar! I purchased the top piece set up for Bosch points.
They are going out of business in a couple of months (Retiring) so when the stock is gone it's gone for good! Don't get shocked by the price. The exchange rate changes daily. When I purchase it was $885 Australian and $525 USD.
Shipped to my driveway in 10 days.
Good luck!
Bill

-
1
-
-
21 hours ago, Klec269 said:
Here is one you can buy thats repo https://www.myersearlydodge.com/image.php?ws_page=fuel.php&ws_image=FSCN2770.JPG
No! It will not fit!!!
I attached a photo of the tank neck he has.

-
1
-
 1
1
-
-
This is what it looks like......


-
1
-
-
Keep using the heat & Kroil. It will work loose eventually. Get out of bed, heat & spray, and then back in bed. Repeat as necessary! Be patient.....
-
1
-
-
Congratulations!
-
1
-
-
No RPM's, or slow to get RPM's, might be a mouse nest or a collapsed muffler in the exhaust system. Just a thought......
-
1
-
-
-
No clue. Just a photo I found surfing at 3 this morning to be sarcastic. Sometimes I think the worst inventions are two post lifts, Bumper jacks, and disk brakes......
-
23 hours ago, Minibago said:
It’s okay, I can do it from underneath.
Good thing we have safe lifts today.....

-
3
-
2
-
-
19 hours ago, Mpgp1999 said:
Any tips on straightening a bent valve.
Scrap steel is $180/Ton..... Call Meyers for a used one.....
-
1
-
-
1 hour ago, Mpgp1999 said:
I plan on replacing the bad ones(3 total) with nos/ good used. I plan to lap the other valves in place.
Now is the time to open your "Mechanics Instruction Manual" to page 97 thru 136. Very explicit instructions on valves, guides, seats, spring tension, etc.
The book will answer all your questions.......
-
1
-
-
Somebody put a lot of time and creativity in this build. Looks like something I would have done as a youngster. Doesn't look too bad from my house! The asking price reflects the originality......
-
2
-
-
On 3/17/2023 at 11:16 PM, Willy said:
My drums are pitted - can they be resurfaced, or do I have to get others? Are there new ones?
Many years ago as a young man as an apprentice I sleeved a bunch of old drums because of lack of $$$. 0.0005" fit per inch diameter and my Mother's oven (When she wasn't home) 500 degrees and drop in the sleeves. Slow cool.... Large diameter cast iron pipe was everywhere for scrap price! PVC pipe came along and there went my supply.....
You can try: https://www.jgrelining.com/
Just an option in case a replacement is unavailable.
Bill
-
1
-
-
I agree with Joe. You're over the hill now! The only thing I would add is be very aware of the two studs sticking out as you turn the vise grips. Serious pinch point on the fingers!
Looks like some valve seat repair in the near future too.
Good job!
Bill
-
1
-
-
19 hours ago, Mpgp1999 said:
I can bring it to work. At work we have milling machines and a lathe. But I’m not sure what I can do at a shop that I can’t do at home.
I know you have tried everything but if you can borrow a pin puller (If it fits your stem diameter) it just might work. I use them to pull the alignment pins on an engine block.....

-
If I was only 20 years younger.........😟
Nice start for someone! Good luck with your sale!
Bill
-
2
-
-
Your shop is entirely too clean & organized! AND you work too fast!
You're making me feel bad....... LOL
Keep up the good work!
Bill
-
Not being an expert on steering boxes I have to rely on outside sources. I also don't have a 1934 Dodge parts book. The Hollander book I have had a very small section on "Worms & Sector" interchange. Nothing in your year of course! Earlier models (29-31) seem to be the same as Desoto.
Here are some steering box adjustment instructions for a 1934 Plymouth that MIGHT work for you:
Excessive play in the steering
Excessive play in the steering may be caused by several different components:
- Loose or defective front wheel bearings.
- Worn king pins
- Worn tie rod ends
- Worn or mis-adjusted drag link
- Worn or mis-adjusted steering gear box
Replacing bearings, tie rod ends and king pins are standard operations whose descriptions can be found in other manuals. In this section we will deal with the steering gear box.
Adjusting the steering gear box
When adjusting the steering gear box the front axle must be jacked up so that the front wheels are free of the ground. In a couple of steps you will be looking for a
slight drag
in the gear box which you cannot feel when the wheels are on the ground.For 1933, the steering gear box is a worm and sector gear unit designed to be
semi-irreversible
. This is to prevent road shocks from being transmitted to the steering wheel. In practice this means that the wheels will not return to the straight ahead position when the steering wheel is released. Your front end alignment shop may tell you the gear box has a problem: They are used to pushing and pulling on the tires to get their equipment setup. This will not work on the car. Don't worry about it, it is not broken.There are three general steps in adjusting the steering gear box. They should be performed in the following order:
- Adjust the worm gear end play.
- Adjust the sector gear end play.
- Adjust the worm and sector gear mesh.
Adjusting the worm gear end play
 The worm gear end play is adjusted by turning the steering column tube. The screw threads at the bottom of the column adjust the end thrust of the worm gear bearing against the front of the gear box.
- Jack the front tires up off the ground.
- Loosen the U-bolt that clamps the steering column to the dash board.
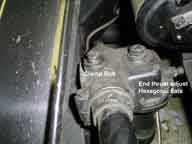
- Loosen the clamp bolt on the gear box at the bottom of the steering column. This bolt is on the frame side of the gear box.
- Tighten the steering column using the large hexagonal flats at the end of the steering column. Tighten until there is just a slight drag on the steering wheel then back off 1/4 turn.
- Tighten the steering column clamp bolt on the gear box and the steering column U-bolt on the dash.
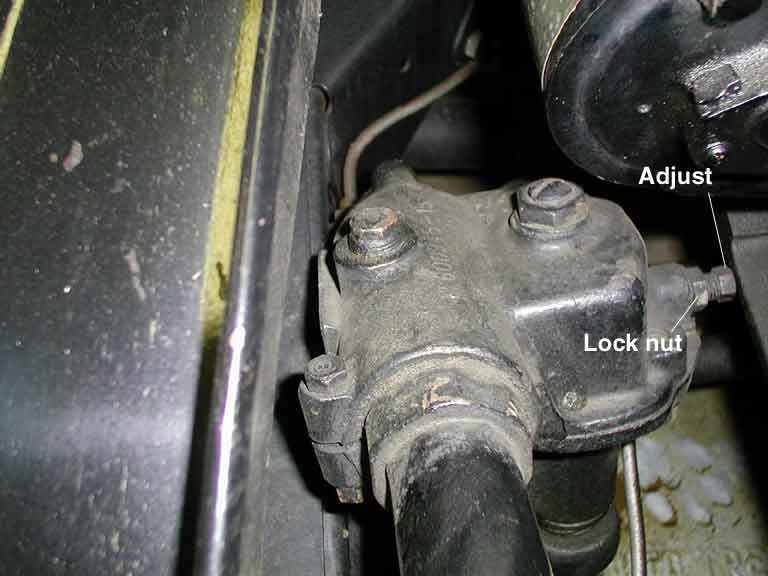
Adjusting the sector gear end play
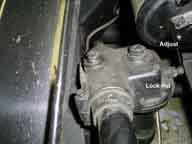
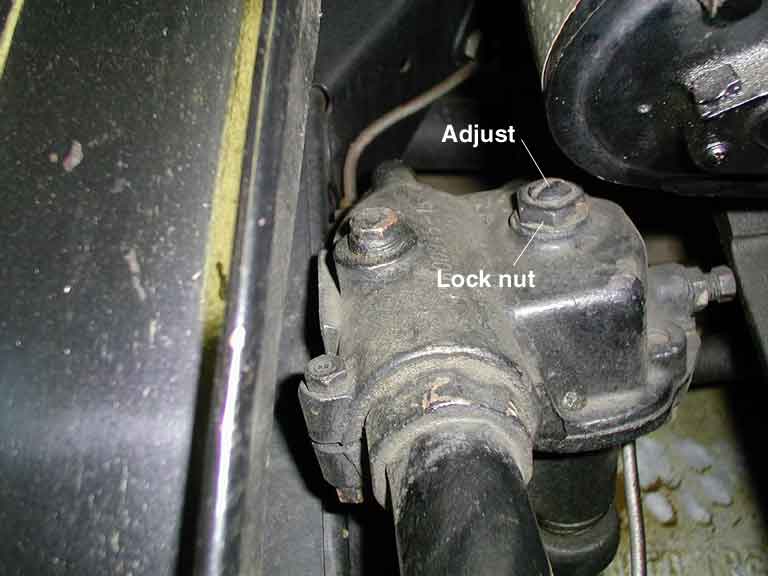
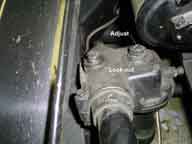 The sector gear adjusting screw and lock nut are located on the top of the steering gear box.
- Loosen the sector gear adjusting screw lock nut.
- Tighten the sector gear adjusting screw until it just touches the sector gear.
- Maintaining the adjusting screw at its adjustment, tighten the adjusting screw lock nut.
Adjusting the worm/sector gear mesh
 The steering gearbox is built in two castings. These castings move in respect with one another to adjust the worm and sector gear mesh.
- If not already jacked up, jack the front tires up off the ground.
- Loosen the four nuts that hold the sector gear housing to the worm gear housing. These bolts are accessible from below the car.
- Loosen the worm/sector mesh adjusting screw lock washer. The worm/sector mesh adjusting screw is located on the engine side of the steering gear box.
- Adjust the worm/sector mesh adjusting screw until there is just a slight drag on the steering wheel in the straight ahead position. The gear box is designed to have more play when at either end of its travel. If it is adjusted to have slight drag at some other point than straight ahead, it will be too tight in the straight ahead position.
- Tighten the four nuts that hold the sector gear housing to the worm gear housing. Tighten the worm/sector mesh adjusting screw lock nut.
- Lower the front tires to the ground.
Good Luck!
-
3
-
Well Mike, if you ever have problems keeping a job as an Engineer, I can get you started on being a Machinist! 😁
Very nice work!
Bill
-
Matthew,
I have a 1926 that's rough but rust free condition. No interior, half an engine, but everything else is solid and is a roller with disk wheels. Photos available upon request. Get yourself healed up and if Indiana is not too far then we can talk later.
Bill
-
4
-
1
-


RODGER HARTLEY has a new address!
in Dodge & Dodge Brothers
Posted
He always helped me when I thought I was right.... A wealth of knowledge! My condolences to the family.