


fatbuick
-
Posts
265 -
Joined
-
Last visited
Content Type
Forums
Gallery
Events
Everything posted by fatbuick
-
Ah, I thought so. Here you are: http://www.mako.com.au/buick/USA2006/pages/CIMG0093.htm
-
I don't know who JohnRex is but you were obviously in Flagstaff because I have a similar picture of that day. It was so nice of everyone to help me replace hoses and master cylinder that day. That green is a factory color called Lime Mist. It really suits the car. The story about my boattail acquisition in 2006 is here: http://www.mako.com.au/buick/html/boattail.htm You will also see a link to the restoration we did in 2007. At our ROA Meet, Best of Show was the dark green 68 Riv owned by Greg and Geraldine Massey who are attending your meet in Reno. If you're going please make yourself known to them.
-
Hi all, It was a pleasure organizing the 2017 ROA Nationals Downunder with my wife Barbara and seeing everyone enjoying themselves in their Rivieras last weekend ENJOY the pictures. You may recognize a few faces.


-

New Disc Brake Kit fits 15" factory rims (61-70 full size Buicks)
fatbuick replied to fatbuick's topic in Buick Riviera
For 63 Rivs, one thing I forgot to mention is that you will need 5 RH wheel nuts for the left side. Factory studs have LH threaded nuts. -
New Disc Brake Kit fits 15" factory rims (61-70 full size Buicks)
fatbuick replied to fatbuick's topic in Buick Riviera
Hi Rod, Yes, later standard 15" factory rallye wheels or standard rims will accommodate this kit without any modifications to a 63-65 Riv or the rims. In reply to Mass9192 question, the feedback we have confirms this. Testimonials These are all the Buick Products I make: click here USA customers: We do not recommend Duralast parts. Calipers and bearings we purchased from Autozone were faulty. -
Hi Dan, Yes it is the same Boattail which we still love. I'll never forget you and others helping change the master cylinder and all rubber hoses in the car park in Flagstaff. Great people.

-
Hi Guys, I got whitewalls put on my tires yesterday. They're mounted to 17x8 Torque Thrust. I noticed while the back wheels were jacked up there is end play in the shafts. The whole brake drum and wheel move in and out maybe 1/16" on both sides. I can't see any way to adjust this out in the workshop manual. Does it mean the bearings have not been installed correctly?

-
One of my kids is there and tells me there is a big carshow on McCormick's Car Show & Auction at the Palm Springs Convention Cenre.
-
Measuring the Rockers to the ground I like the rear to be 1/2" to 3/4" higher. Since having new rear springs made locally (Australia) the rear doesn't sag when you add fuel and luggage so much. They are made with less coils from a thicker dia material. The ride is still good and not harsh. My wheels are 16" dia
-
I've had time to look through your restoration. What a great job. Look forward to seeing more progress and realise now you already have disc brakes.
-
I enjoyed your explanation. Very easy to understand
-
Absolutely gorgeous 66 Riv. Fantastic job Jason. Don't know how I missed this post
-
I've got to do my grille too. Is it easy to remove without scratching the car? Here's my engine

-
Thanks for starting this topic because mine recently stopped working. Don't know if there's a fuse of if the rubber diaphram is split. Have had time to check everything yet. Any tips would be appreciated. The smaller lower bracket is the correct one going by mine.
-
I pulled my switch apart and cleaned, lubricated and reassembled it to keep it going
-
Haha you're a funny guy Ed. They were going to have a trial of switching to RH side. The suggestion was to first start the trial with trucks and then cars 1 month later. Never got of the ground!
-
Just back from the Aussie Buick Nationals which was great and in the beautiful NSW south coast. Check out this cool video shot by our friend Alistair on one of the runs. Plus a few shots of the Show N Shine at Black Beach Kiama.
-
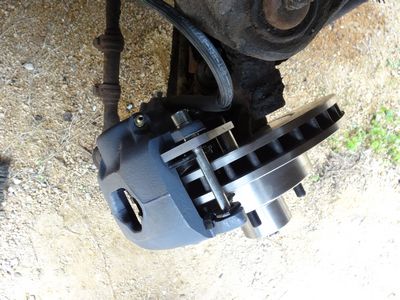
Hi Guys, We fitted our kit to a 66 LeSabre on the weekend. Our bracket is designed to fit the front of the spindle so there is no change to the toe-in or wheel alignment. The 63-65 brackets work the same way as this one shown. Guaranteed to fit all types of rally wheel and standard factory rims. This customer had two types of rallys normal and disc brake type shown. Booster worked well and it pulled up straight and easy even though the pads aren't bedded in, so it will only get better. Standard single master cylinder will be changed to a dual master cylinder soon.


-
New Disc Brake Kit fits 15" factory rims (61-70 full size Buicks)
fatbuick replied to fatbuick's topic in Buick Riviera
Good comment, thanks for emphasizing this fact. Your purchase includes the following items only for your specific Buick model: Left & Right main adaptor brackets Left & Right caliper mounting brackets All mounting hardware: high tensile bolts/nuts and crush tubes specifically for your model. You will purchase the following items in the USA yourself: *we will provide all the part numbers and suggested suppliers in the USA New Vented Rotors 11.86" (301.244mm) dia 1.28" (32.5mm) thick - Full size Buick 5 on 5" stud pattern Left & Right powerful Calipers and Pads Inner and outer wheel bearings and seals Correct Rubber hoses and Banjo Bolts -
Latest update posted here in case you missed it
-
These latest kits have been designed to fit standard 15" factory rims and parts are readily available in the USA to make your own kit. In Australia and NZ we're selling the complete kit as shown but we're offering US customers a Bracket and Hardware Kit. Exclusive to USA Customers approx US$279 +shipping click here to details We will supply US customers all the correct part numbers. Australian & NZ Customers click here for pricing & details I look forward to any comments or questions.
-
Hi guys, I thought you would have seen my previous post with a link to the Rear Kit we make which is far superior to the Addco version and does not hang down below the diff or require any drilling of control arms. Read all about them here with a link to an installation gallery. Hardly any mods needed. http://www.mako.com.au/?content_destination=/ibm_bin/common/product_list_display.cfm&product_groupID=10
-
Hi Jan, Glad it worked out. We're enjoying Hong Kong for a couple of days and then Italy until June 4th. What I do is thoroughly clean any old grease from the tracks and then use Nulon Engine Rebuilding grease I think it's called. It's used when you rebuild an engine so it has a good coating before you start it up for the first time. It doesn't go hard like the original grease. Alternatively you could use a White Lithium Grease spray can. The motors I pull apart, get all the carbon dust out safely with a mask on. Clean the copper contacts on the shaft by putting the armature in a lathe or a drill press. 600 wet & dry works and then scribe all the separation lines out. Bit of grease in the bushes and they usually run faster and stronger.. You could check the motors are getting plenty of juice (close to 12V) because old wiring can deteriorate. In my son's 69 Riv years ago we had to put relays in the doors using the original wire as the trip wire and running a new 12V wire from the battery. I'm sure there will be plenty of ways other have done these tasks but that's my 2 bobs worth.. Have fun.
-
Thanks again Jim. A great reference document. Read the Troubleshooting Section and my symptom was there: "Does not disengage - Fan clutch won’t slow down when engine is cold." I'm looking forward to putting the new one on for quieter motoring. BTW, Barbara and I have put our hands up to organise the 2017 Australian ROA Meet and we hope you and other ROA guys can make a special trip downunder. I will start a new topic when we have some firm details but it will probably be early May and close to Sydney NSW


