


1953mack
-
Posts
1,160 -
Joined
-
Last visited
-
Days Won
2
Content Type
Forums
Gallery
Events
Everything posted by 1953mack
-
A 1953 Buick Shop Manual is not correct for 1953 Buicks built starting in June-1953 when the resistor was relocated from near the coil to the firewall. A Service Bulletin came out describing this change along with the change in the new wiring harness whereby the original two leads direct to the coil's positive terminal, one from the starter and one from the ignition/resistor, were spliced together before the single connection to the coil's positive terminal. Does your setup look original or does it look like it was changed after it rolled off the assembly line? This might be your problem . . . if not, my vote would be that the rolling ball in the vacuum switch is gummed up. You don't need to remove the carburetor to service this vacuum switch.
-
I'm thinking that the baler belting will be at least as durable as the OEM mounting pads. I cleaned up all the hardware and gave everything a light coat of flat black primer and don't foresee any problems for the next 60+ years. Depending on what thickness your newly purchased U-shaped shims are, you might want to consider buying a variety pack of 1/16", 1/8" and 3/16" thicknesses locally. Good luck.
-
Thanks for confirming that your original mounting pads were 1/4" thick. FWIW. The 1952 Buick Shop Manual (applies to 1953 Buicks also) says that the convertible coupe models used a solid composition shim compared to a rubber shim for the closed-top Buick models. My understanding after removing two 1953 convertible bodies from their frames is that when Buick said solid composition, they meant a combination of rubber + a fabric reinforcement rather than a steel washer-like sandwiched inside some rubber. The manual goes on to say that a separate steel shim is used to compensate for variations in the body or frame to eliminate any distortion. Your picture shows several of these loose steel shims. The manual does not give an overall thickness for these solid composition shims but measuring 52 of mine after 60+ years, they are all thicker than 1/4" . . . closer to 3/8" to 7/16". I wound up making my own body-to-frame mounting pads from baler belting material that I found at a big-box farm supply store (Fleet Farm here in the Twin Cities). The store stocked the APACHE brand, 3-ply 3/16"-thick belting in 4" and 7" widths in what Apache, Inc. calls a "light impression" top surface. I wound up buying 7' of the 7"-wide belting @ <$6.00/foot for the 26 body-to-frame mounts, the 2 inner front fender-to-frame mounts, the 4 coil spring insulators and the 5 exhaust/muffler/tail pipe hanger straps that were in need of replacing. The store clerk was willing to cut the 7' length into manageable size pieces to cut on my mini hobby table saw (a band saw would work too). After super gluing the squares together for the 3/8" and 3/4" thick pads, a 3/4"-diameter hole saw attachment to a power drill worked for me (a drill press would be better). Total cost was around $55 for the belting, glue and hole saw. https://www.apache-inc.com/cms/apache.nsf/ProdGrouping_Public.xsp?action=openDocument&documentId=9CE# Al Malachowski BCA #8965 "500 Miles West of Flint"

-003.jpg.7ac1844974c645ea426bd8363f403297.jpg)
-
Bob's online catalog lists: - a 2" x 2" x 1/4" rubber pad for 1940-1958 Buicks at $7.00 each - a 2" x 2" x 7/16" rubber pad for 1940-1949 Buicks at $10.00 each, and - a 2" x 2" x no thickness given rubber pad with a metal washer (vulcanized between the rubber?) and with a locating circular nub for the bolt holes for 1940-1958 Buicks at $9.50 each. The mounting pads that you removed and are pictured in your first post don't have the locating nub. Would you be willing to share which of the first two you wound up buying and what thickness your originals pads measured? Thanks.
-
Suspension Lubrication Points - 1950 Super
1953mack replied to Kartman01's topic in Buick - Post War
B.S. More B.S. and more confusion for the OP and everyone else: - What you are calling radius rods that attach to the rear axle and the front of the torque tube, Buick calls them rear axle strut rods. Since there are no bushings to deteriorate causing squeaks, I did not include this item in my original post of 4 items. - What you are calling a sway or panhard bar, Buick calls it a rear axle radius rod as I stated as item #4 in my previous posts above. If you are replacing the bushings and only order out two from a supply house, you will be two short.

-
Suspension Lubrication Points - 1950 Super
1953mack replied to Kartman01's topic in Buick - Post War
Not to confuse the OP and everyone else, please explain the difference between a sway bar as you call it (with one bushing?) and a radius rod with four bushings as Buick calls it and as I noted in my post above as item #4. Thanks. -
Suspension Lubrication Points - 1950 Super
1953mack replied to Kartman01's topic in Buick - Post War
A lubrication chart for an early-1950's Buick that can be found in the front of your Buick Shop Manual doesn't show any locations that require a chassis lubricant for the rear-half of the car. A couple of areas to look at that might be causing squeaks coming from the rear-half include: (1) a worn/missing tire cord fabric-like insulator between the top of the coil springs and the frame's coil spring pockets; (2) too-tight, worn or incorrect body-to-frame mounts; (3) too-tight of the muffler/exhaust pipe installation or lack of the flexible tire cord-like hanger straps; (4) worn radius rod bushings or the radius rod was not installed in the neutral position; or (5) worn rivets used for attaching frame components . . . the frame does flex. -
WTB: Any late 40s early 50s six inch wide steel wheels
1953mack replied to capgage's topic in Buick - Buy/Sell
The diameter for the center hole varies thru the years. Hope you lucked out. -
1950 Buick Gas Pedal Bellows and Brake Pedal Grommet Installation
1953mack replied to Kartman01's topic in Buick - Post War
https://www.buickheritagealliance.org/archives/details/80#.YTDh8bBKiUk -
1950 Buick Gas Pedal Bellows and Brake Pedal Grommet Installation
1953mack replied to Kartman01's topic in Buick - Post War
The Buick Master Body Parts Books don't have illustrations on the wooden Estate Wagons thru 1953 since they were built by Ionia from four-door sedans. There was a separate book for the Buick woodies that a Buick woodie owner should have. Did you ever think that your "noisy muffler" might be a result of inadequate floor insulation? Al Malachowski BCA #8965 "500 Miles West of Flint"
-
1950 Buick Gas Pedal Bellows and Brake Pedal Grommet Installation
1953mack replied to Kartman01's topic in Buick - Post War
Is your front floor completely carpeted? A Buick Master Body Parts Book lists insulation, insulating mat, retainers and screws (Group 15.289) for the Models 59-79 Estate Wagon's front floor covering. -
A 1953 FACTS FOR SALESMEN'S booklet doesn't show a SPECIAL MODEL 46C 6-passenger convertible as being built. The low production number was due to the fact that they were not available when the new-for-1953 Buicks started rolling off the assembly lines. If you can only count up to 23, you're in luck. The convertible in question is the narrower SPECIAL Model 46C with the narrower grille . . . 23 vertical teeth . . . in lieu of 25 teeth as seen on the wider SUPER & ROADMASTER Models. There was a total of 13 (not 12) different 1953 Buick Models offered later-on. Al Malachowski BCA #8965 "500 Miles West of Flint"

-
- Buick published a 6-page pamphlet that came out for 1951 thru 1953 Buicks. Towing with a 1949 Buick should be similar. - I am sending you a PM with my e-mail address if you are interested in receiving a copy of this with Buick's suggestions addressing hitch design, overload springs, tires, trailer brakes, etc. Thanks. Al Malachowski BCA #8965 "500 Miles West of Flint"

-
No, it's TURQUOISE. If you're interested in looking at 1955-1957 Nomads, station wagons and sedan deliveries, check out this one hour video on this year's Minnesota Street Rod Association's BACK TO THE FIFTIES WEEKEND car show. How high can you count? https://www.youtube.com/watch?v=qRXp2wDCmKg I spent a few hours walking the show and you will not find a larger show (10,630 announced registrations this year) for 1964 and older cars with one exception: NOOOOOOOOOOOOOOOOOOOO Mustangs allowed. Al Malachowski BCA #8965 "500 Miles West of Flint"
-
1954 Buick Skylark - how many have survived?
1953mack replied to HOMETOWN BUICK's topic in Buick - Post War
- It sounds like you haven't received your 2020/2021 BCA Membership Directory & Handbook in the mail yet. - The 1954 Skylark list under MEMBER CARS BY YEAR/MODEL in that Directory is not inclusive of known 1954 Skylarks still out there plus a same Skylark might be listed as being owned by two different-named current, non-current or deceased members. - Not all 1953-1954 Buick Skylark owners belong to the Buick Club of America or the '53-'54 BUICK SKYLARK CLUB. Al Malachowski BCA #8965 "500 Miles West of Flint" -
- Correcto mundo on "1" = a White convertible top according to Sean's similar post: https://forums.aaca.org/topic/317062-1962-buick-special-convertible-acc-codes-and-v8-questions/ - Your best bet would be to send Sean a Private Message for an explanation on your Accessory code A6. It might be related to the type of transmission you have since code A7 = a four-speed manual transmission. What do you have for a transmission? Thanks. Al Malachowski BCA #8965 "500 Miles West of Flint"
-
A few more tips to check out a car that is complicated to restore: 1. If you’re fussy about originality and authenticity, bring a 1953 Skylark owner with you that has worked on his own car and knows 1953 Skylarks. If not, it might be okay to bring a Chevy, Ford or Mopar guy with you since a few of the tips below would not apply. 2. Spend at least a couple hours checking out the car, talking to the current owner while checking out the topside (doors-hood-fender fit and gaps and workmanship), taking it for a test drive and reviewing restoration receipts plus additional time with the ’Lark in the air and hood up at a knowledgeable auto repair shop checking out the underside to get a look-see understanding of what the current owner’s definition of a “restoration” is. Are there receipts for engine and transmission rebuilds? If not, get the shop to check engine compression and transmission read-outs at the least. 3. History: how long ago, who did the restoration work and why has it been sitting in a museum for seven years? 4. If an old Buick starts, you're on your way — but will it stop? Troublesome system #1: first-year power brake system. OEM or replaced hydraulic soft and hard brake lines, OEM or replaced power brake cylinder, working check valve or added backup electric vacuum pump, wheel cylinders, etc.? 5. Troublesome system #2: the Hydro-Lectric power system that operates the 4 side windows, the two-way tilt-away front seat and the convertible top. Lot of items to go haywire including 7 window switches, 7 hydraulic cylinders, convertible top control switch, convertible top/rear quarter-windows’ control solenoid valves, rubber hoses and hard hydraulic lines. 6. Hard to find parts: non-pitted, not cracked front upper grille bar (mustache), one-year Skylark-only fender-mounted electric radio antenna with toggle switch. 7. Fussy substitutions #1: were the OEM trim, convertible top and paint color codes now on the car available as standard color choices back in 1953? 8. More substitutions: do the engine and transmission numbers and codes indicate 1953 vintage or have they been replaced with late units? 9. Wheels and tires: OEM 6 1/2" wide wire wheels with bias-ply tires running inner tubes? 10. Non-matching numbers: different states used either the Car Serial Number or the Engine Serial Number for titling a car — two different numbers. If it's titled using the C.S.N., can the owner prove that what's on the title card matches what’s stamped on the frame and the driver’s door metal tag, or if the Skylark was titled using the E.S.N. that is stamped on the engine in two different places, can he prove that those match? Do both numbers fall within the known production month ranges? Good restoration documentation/records should have pictures of these numbers. Good luck. Al Malachowski BCA #8965 "500 Miles West of Flint"
-
When I used my Dremel tool with a cutoff wheel to splice the filter in half is when I destroyed the INLET and OUTLET covers, not the paper gasket. You should be good to go with dipping it in Evapo-Rust and pressure washing the assembly from the OUTLET side. I've added more pictures for comparison — the top-right one before the filter element was scraped-clean and dipped in Evapo-Rust. Thanks. Al Malachowski BCA #8965 "500 Miles West of Flint"


-
I agree it's the only way to go — both the original or an over-the-counter one requires maintenance. Two flared nut wrenches are all you need to remove it after the air cleaner is taken off. I wouldn't worry about using the more-convenient style later filter either. That porous bronze micro-beaded filter element was first used on 1942 Buicks and WWII military amphibious, air and ground-transportation vehicles. You're talking millions of applications and miles; more durable than paper filters. Here's a pic of the front half of my destroyed 1953 filter after I sliced the crimped assembly apart; it was then dipped in Evapo-Rust. Worthy to note is that this early disc-style filter used a paper gasket (remnants show around the edges) whereas the later take-it-apart style used a rubber gasket. Good luck. Al Malachowski BCA #8965 "500 Miles West of Flint"

-
1950 Buick Estate Wagon - Ventilation Hose Question
1953mack replied to Kartman01's topic in Buick - Post War
Buick published a Master Chassis Parts Book (Groups 1-9) and a separate Master Body Parts Book (Groups 10-15) on loose leaf 3-hole paper for their dealerships. Each book typically covered a range of several years and each book contains 600-700 pages. I have never seen a book published for one specific year. Original books in loose-leaf form and bounded repops show up on eBay covering various eras. For straight eight owners I would suggest getting a set that covers through 1953 — for early V-8 engine owners I would suggest getting a set that covers through 1956. Thanks. -
I disagree with what you're saying unless you can post some Buick documentation here. The OP's lower number plate and surrounding areas show the OEM Shell Grey paint with splashes from the undercoating job. There was a good reason why the factory painted Body by Fisher Number Plates and their fasteners in 1953.
-
1950 Buick Estate Wagon - Ventilation Hose Question
1953mack replied to Kartman01's topic in Buick - Post War
That air intake hose setup is bogus for a 1950 Buick for numerous reasons. In addition to you saying it has large gaps and the pic doesn't show a clamp, the length is about twice as long as it should be and both ends should not overlap both circumferences. Joseph P. Indusi says it correctly: one end of the hose fits over and the other is tucked inside. Look in a Buick Master Parts Book under Group 9.787 that shows only two hose clamps are used on a 1950 Buick installation: one hose clamp for the air intake hose to the RIGHT air tube and one hose clamp for the air intake hose to the LEFT air tube. Anyone care to disagree with the Master Parts Book? Al Malachowski BCA #8965 "500 Miles West of Flint" -
In addition to all the decoding info that can be found on Hometown Buick's website, consider these: - Your Car Serial Number that consists of the assembly plant prefix "1" for Flint-Michigan + the sequential number of 7I28564 is an August-1953 production build-date number. - The last digit (4) in this sequential number does not designate that this number was assigned to a Buick 40-series Model. Has the OEM Shell Grey bottom color been sprayed over with a cream-colored paint or did the OEM oil-based lacquer yellow-out that much in 68+ years? The two-tone Body by Fisher Number Plate, the lack of paint on the door-jamb's C.S.N. metal tag plus the shiny screws makes me question it. Thanks. Al Malachowski BCA #8965 "500 Miles West of Flint"

-
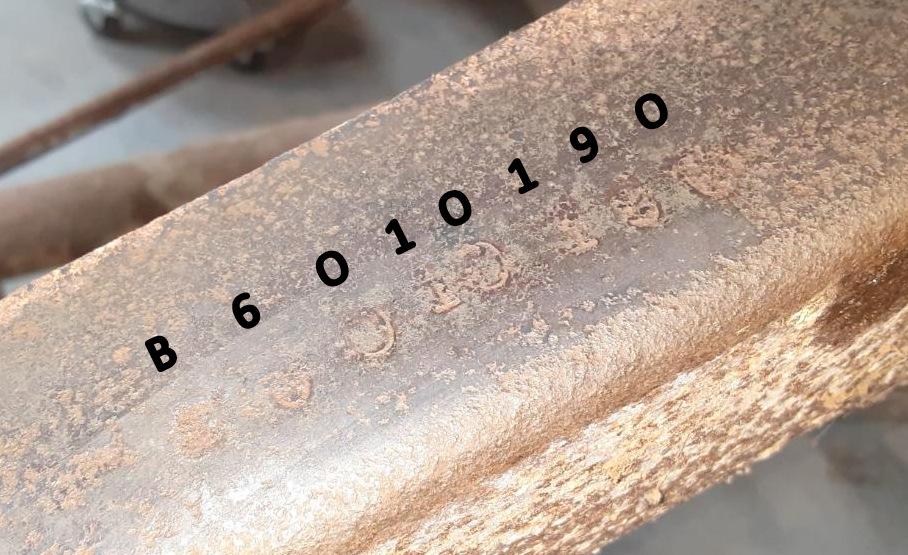
Thanks again for taking the time finding and taking pictures of the stamped Car Serial Number located on the topside of the frame rail near the rear of the passenger's side of the frame. There might be a second "hidden" location somewhere else on this frame to keep honest people honest. Not stamping the first digit "6" (designating a Buick 60-series) on the frame rails makes sense since 1955 Buick 40-60 Series Models used the same basic frame. Here's my best guess of the eight characters. Al Malachowski BCA #8965 "500 Miles West of Flint"
-
All the information on a 1953 Buick OEM Moraine fuel filter is pictured and described on PAGE 84 in a 1952 Buick Shop Manual. The 1953 filter is the early style (you can't take it apart) that had a drain plug at the bottom and required disconnecting the filter from the carburetor and fuel supply line and backflushing the debris for a thorough cleaning. You might want to soak it in a container of Evapo-Rust or similar overnight. The preferred later "take-it-apart" style came out in 1956 that had a center bolt that held the front/bronze micro-beaded filter screen/rubber gasket/back together. Moraine supplied several marques with this filter and both styles pop up on eBay often with different part numbers. GOOGLE "Moraine fuel filter" or do a "SEARCH' on this forum for more pictures and info. Al Malachowski BCA #8965 "500 Miles West of Flint"


-003.jpg.7ac1844974c645ea426bd8363f403297.jpg)


