


bradsan
-
Posts
258 -
Joined
-
Last visited
Content Type
Forums
Gallery
Events
Everything posted by bradsan
-
Got it, at first I was confused and so I started typing. Pretty much had it figured out that was what you did but didn't want to waste my typing efforts!
-
Carmover I'm curious how you can do a leakdown test on the two cylinders with the burned out valves? Did you pull the manifold and seal of the the ports? Or are you just extrapolating the testing of the 4 cylinders with good valves to the two bad ones? Is that a 2525A? Brad
-
Larry I got my springs , guides and valves from Egge. After I did, I was talking to one of the club guys who was working on a 29 Cadillac.who advises me that he sourced his new valves from the Cat service facility who had a scrap bin full of old valves . Seems the stem diameter for Cat diesel engines is the same .375". With a longer stem and larger head ,what isn't a usable valve for Cat is still usable for our old cars. All you have to do is shorten the stem , cut a new keeper groove and make the head a lot smaller. That was the theory anyway. It helped that another club member's son worked at Cat so access to the scrap bin was easy. They are stainless and hard so the lathe work isn't easy but your talents should come in handy. Brad
-
Tom I've already done the conversion but can offer some tips. I think!!! 1925 is the oddball part of course. Hugh's part listing is for the hub only which I think is actually for the innards part you are replacing . The parts book also lists the fan shaft ( 1925 Std has its own single listing due to a different fan bracket) separately and there are only 8 shaft listings covering 1925 to 1932 so your spreadsheet won't be that big! The fan driven pulley which is what we are calling the hub or outer casing has many more options but shouldn't be relevant to what you are making as long as the owner has the original pulley. In other words, I think you just need to collect relevant fan shaft measurements. I think the more important measurement is from the front of the shaft ( gear end) to the centre of the groove and opposed to the measurement you are seeking. Your circlip or retainer at the front of the shaft where the gear is will be the same for all shafts. Assuming all hubs ( guts) are the same, what locates the outer pulley is distance from the front circlip retainer to the groove in the shaft. Anything hanging past the groove towards the engine just sticks through the bracket and really isn't relevant. Warning when drilling the 8 holes in the hub that they are not evenly spaced. It is designed to fit one way only ! Ask me how I know! Photos attached showing some difference between 1925 and 1926 Std. I would send you some measurements but, as you can see, after I was done , the shaft came in handy as punch for getting something else apart! Brad


-
Hugh I think Bob's sells 'choke stove pipe insulation' for this. Page 33 of their Nov 2014 catalogue. That is what I bought anyway. As you know , I haven't had a chance to install it yet! Brad
-
I defer to Hugh! He is collecting (and sharing) an amazing pile of information. On any differences we have , I plead McLaughlin. Brad
-
J.H. Nice car! The originals were three boards with tongue and groove joints between them. Covered by a ribbed rubber mat with aluminum 'L' trim on four sides. Bob's Automobilia has the trim and the mat although some have not been impressed with the mat supplied. There is a healthy, and helpful, group of 25 Standard owners in the Pre-War Buick group. Feel free to jump right in! Brad
-
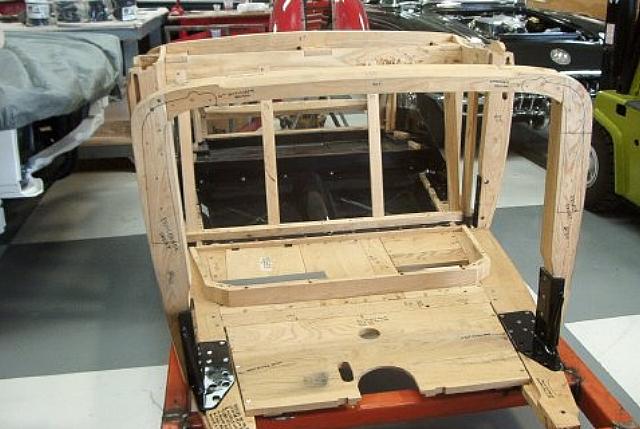
Cesar I have two such projects waiting for attention and have being collecting photos. None of these are mine! Some pictures of a 31 Auburn cabriolet under construction and a 1925 Buick touring with the skin off which would be closer to yours.( neither are mine) . As you can see , it gets complicated! I think that the touring is less complicated than the cabriolet but have done neither so my opinion is uninformed. There is a 28 Auburn open car for sale on Hemmings. https://www.hemmings.com/classifieds/?0=0&adtypeFacet=Vehicles for Sale&sort=sort_time_desc&page_size=15&makeFacet=Auburn. Maybe give the owner a call and see if he will help you. He is in my car club but a different chapter so I'm not acquainted with him. We are generally a friendly, helpful bunch! What you really need are the diagonals and widths ( top, middle and bottom) at each opening across the car ( front and back of each door opening so 4 openings) to get the lines of the car set up right. Brad


-
1920’s Buick 4 cylinder & Standard gas gauge cap
bradsan replied to Hubert_25-25's topic in Buick - Pre War
Hugh Great news and thanks for your efforts! Did you manage to source a lens for the gauge? I think it is supposed to be curved! Brad -
Post a picture of your father or grandfathers car..
bradsan replied to nick8086's topic in Photo and Videos
My Mom's dad ,who passed away before I was born, with his Model TT work truck in Vancouver,BC . I think that is a dump box on the back I'm not sure whose goat that was. He arrived in Canada in 1910 and eventually ended up in Alberta where he and his brother tried to make a go of pig farming. When that didn't pan out, they decided to pack up and drive their Model T to Vancouver, BC in around 1924. I do not know if this is the same vehicle but his age in the photo and the age of the Model T sure come close . If I can find the negative, I want to see if the license plate on the back of the cab is BC or Alberta. In 1960 , my Dad bought a 1924 Model TT wooden C-cab to restore. We finished that restoration in 2004. The above picture came to light sometime after that which is pretty serendipitous. I have driven said truck, For the life of me, I do not know how anyone spent 8 hours a day driving one for a living. The noise, heat , lack of visibility and cramped quarters would drive me insane. How one would drive such a vehicle 600 miles over the Rockies on 1924 roads is beyond my comprehension. The trip made such a lasting impression on him that when the the family embarked on a camping trip 30 years later in 1956 he went to great lengths to properly provision the car in the event that they became stranded in the wilderness, especially in anticipation of tackling the dreaded Stevens Pass in Washington State. The story goes that they stopped in a cafe in Washington where he went in to ask how much further to the Pass and . after ascertaining which direction they were going , was advised that he had already gone over it. Amazing how much the highway infrastructure had changed in a short 30 years.
-
I'm not sure about antithesis I think there is a substantial difference between building a car and assembling it. If I'm not mistaken Tesla makes more of its own parts for the car in house as opposed to outsourcing parts from external suppliers and then simply assembling it. Might be a fairer comparison ( not sure to whom since I don't have the numbers) to look at the total of all employees producing all components of the car and the final assembly. They are also ramping up for new production so I'm not sure what point in time the people number refers to. Either way, the robots have it in for us. To quote a popular musician , 'those jobs are going boys and they ain't coming back' If you want a job, best learn how to fix the machine that builds the machine ....at least until they make a machine that does that as well! What still amazes me watching the old videos was just how much automation they achieved with simple mechanical processes. I've seen the GM assembly line video before and watched it several times through. Always fascinating . Was hoping there was something similar for AO Smith. Brad
-
Ricosan Another thing you might want to consider, if you are in the market is that 31-32 and even 33 are the same style car with 33 having the most cosmetic changes. All 31's came with single speed axles and most of those axles are low speed gears ( there were 3 gear ratios available) so that everyone could drive around town without shifting. Finding the higher geared cars is difficult. 32 A's came standard with a two speed rear axle which might suit modern touring more. Some 31 owners have put the 2 speed axle in their cars, not original but more practical and still looks correct unless judging is your thing. Brad
-
Nick Thanks for posting, very interesting. Is there a video of this assembly line in operation? I did some quick searching of Google/You Tube including King Rose, but nothing came up. Would love to see some footage of it in operation. Always have thoughts of 'how did they do that?' when it takes me an hour to replace one rivet.Not to mention I could sure use one of those step machines to straighten out a small kink in a side rail. You would think there has to be something out there! Brad
-
Rico First question: is it assembled? This is very important! Some of us think assembled cars are just no fun and disassembled cars are so much less expensive! Second question: any sign of coolant issues ie water in oil? Known issues are head corrosion and water jacket corrosion in valve guide area but those could be the same issues for any straight eight from the period. You already have a nice Marmon so this likely won't be news to you. The A or Custom was largely a matter of extra chrome plated trim, a dash insert and your choice of paint colour . Mechanicals and sheet metal are identical. If you haven't already done so , post over on the ACD forum as well. Neither of my 'parts ' cars runs as yet so I'm hardly an expert! Brad
-
Larry Looks like we posted simultaneously. I was misunderstanding the issue. I thought the ball was 'ovalled'. What you have is downright scary!. I also forgot your machining talents. Sleeving the hole likely not an option given the wall thickness the sleeve would have to be...right? Probably better to ream the hole the next size up and make a stud with a custom shaft. As mentioned, Rare Parts could make a ball with a custom shaft size but they won't let you play with it for all of the good corporate liability reasonss. Can you machine something like that ? I think the ball should be hardened and I think Rare Parts does that. Brad
-
Larry There is always Rare Parts. http://rareparts.com/ They can put a new ball stud on for you. I'm not sure if they will sell you one to put on yourself. They rebuilt the tie rods and pitman arm for my Auburn. Looks like quality work but the only way you know for sure that it isn't quality is when it falls apart. Which, understandably, is why they likely won't sell you the part to do yourself. It will definitely be more than $3, Probably a couple of today's days wages so maybe things haven't changed that much! Brad
-
Casting Early Buick Open car floor board thimble
bradsan replied to Hubert_25-25's topic in Buick - Pre War
Hugh Of course I want one and thanks for asking! Don't know if it came on our McL as its not in the parts book but the McL parts book is incomplete in my mind. I'm going to put it on and anyone who doesn't like it can provide the exemplar car to show I'm wrong! I agree aluminum would be the best choice, closest to pot metal and easy to polish up if you wanted it that way. Brad -
Arrggghhhh. Why did I read this!!!! Any suggestions on how I nickel plate the radiator neck now that I have painted the radiator and am finally, repeat finally, within an hours work of getting the @@#$% (possibly incorrect ) radiator back in the shell after 10 years of parts sitting on the shelf. Anyone? Larry? You started this BTW, I epoxy primed and gloss black top coated everything but the core faces . The core I hit with some light coats of Rustoleum flat black BBQ paint. Just enough to even out the appearance. Looks good on the shelf and I'm a long ways form worrying about whether it will hold up on the car! Brad
-
Apologies to all, I had about 6 links come up on YouTube and my sound was muted when I picked one. it has been posted a few times on this site and I still find it fascinating to watch. If I had my druthers, I'd rather hear the sound of the assembly line since both are likely to cause the same hearing loss! Big Flats has some good instructions on hot riveting. I don't know how much more superior cold is to hot for this purpose as they used hot riveting to build bridges and ships but I could see from a tight production line perspective why you wouldn't want to be throwing hot rivets around! Not to mention the faster production speed. I suspect the the actual choice might have been a production line issue combined with an added marketing benefit to GM. I'll guess that if hot riveting was significantly cheaper, they would have stuck with it! Agree that ring gears would be a different animal given the different loading that takes place. I think the hot rivet method will outlast the current owner of the car unless they are doing Beijing to Paris. Brad
-
What was your favorite car related Christmas / holiday memory?
bradsan replied to Brass is Best's topic in General Discussion
Dad's commuter car in the early 70's was a '51 Chev business man's coupe. He was convinced it was the best car for the snow and regaled us was details of the commute to and from work where he passed other poor souls stuck in the snow. Not very practical for a family of five of course and if you had to ride in the back in the cold , the heater in the front didn't do much for your rear end on the floor so Dad had a piece of styrofoam back there for us to sit on. Classic snowy Christmas in 71 or 72 ( which is unusual for us our here on the Wet Coast). Myself and my two sisters and my mom all bundled up in the back under blankets. Mom in the back because we were driving my cousins' grandmother home after Christmas dinner. Something magical about the adventure that still resonates today. I can still hear the sounds of the 216 chugging along and the particular GM whine of the 3 speed going through the gears all muffled by the surrounding snow. That and the indescribable musty (but not in a bad way if you ask me) sort of smell of those cars built before 1960 never leaves you. BTW It snowing here today on the Wet Coast ( has been unusually cold and snowy for two weeks) but the rain is coming and we'll have our usual soggy green Xmas , Brad -
http://www.bigflatsrivet.com/ I formed them hot but I think you could do it cold if you had one of the machines shown at about 1:10 of this video! Unfortunately, I couldn't find one of those at Harbor Freight. https://www.youtube.com/watch?v=HPpTK2ezxL0 It's a lot easier with two people if you are doing them hot. Brad
-
Curt Just from some poking around on the internet, not qualified beyond that ! Looks like either Permatex 64000 https://www.permatex.com/products/thread-compounds/permatex-high-temperature-sleeve-retainer/or Loctite 640 will do. http://speedtalk.com/forum/viewtopic.php?f=1&t=6120. http://www.fordbarn.com/forum/showthread.php?t=50177&showall=1 Joe makes a good point too! Brad
-
I'm not sure about Hagerty specifically but almost all auto insurers have the following damage exclusions in their policy : - wear and tear - rust and corrosion - Consisting of or caused by mechanical fracture or failure. - freezing - damage to tires Then they usually have an exception to the damage exclusions that provides coverage when it is coincidental with a covered loss. As pointed out above, the no insurer is going to cover you for losses that are care and maintenance issues. If they did one of two things would happen 1) you would not be able to afford the premium or 2) the insurer would run out of money paying claims and cease to exist. Insurance is an interesting purchase. Most consumers reluctantly give up their cash for piece of paper but have no idea what the piece of paper actually says. Meaning they never find out what they bought until they actually have to use it. Now, how about we all go and spent as much time reading our insurance policy as we all just did reading this post .
-
Larry That looks like one nice ride ! I'm interested in the name as well. Not happy is an understatement. That is one positively malevolent expression from Christine, I mean Belulah. I hope you are not parking them in the same building or things might just start 'happening'. Brad
-
DodgeKCL This post was linked to a recent post in the AACA technical section. I'm interested in how you did the two conversions. Can you post photos of the parts used and then installed? Especially the generator cutout conversion? Should the voltage rating of both parts match the system voltage? Am I limited to selecting for 6V components or is it okay to use a higher rated part IE a 12V part for a 6V system. ( such as this 250V rated .22uf cap http://www.rpelectronics.com/my-0-022-250-5-0-22uf-250v-mylar-film-capacitor-pkg-4.html ) Thanks Brad


