


rustranch
-
Posts
38 -
Joined
-
Last visited
Content Type
Forums
Gallery
Events
Everything posted by rustranch
-
1909 Brush Model BC followed me home last week.
rustranch replied to rustranch's topic in Brush Automobiles
Here it is, I’ve run out of things to add. I had to have a top, so I made one, as the last major item.. I’m ready for some summer car shows and parades because this baby is FINISHED.


-
1909 Brush Model BC followed me home last week.
rustranch replied to rustranch's topic in Brush Automobiles
I felt compelled to finish off this story of my 1909 Brush Runabout revival project. Here’s what I started with. Insides of the transmission gone. Motor missing piston, valves lifters and the crank was frozen in the crankcase. Little else remaining was good except it had all four screw on hub caps. Here’s what I start the story with when someone ask about it. “It was an amalgamation of mismatched years, models, broken and completely worn out pieces parts!”
-
1909 Brush Model BC followed me home last week.
rustranch replied to rustranch's topic in Brush Automobiles
I added braces to the steering column attaching them to the firewall to try and control the vibration. -
1909 Brush Model BC followed me home last week.
rustranch replied to rustranch's topic in Brush Automobiles

-
1909 Brush Model BC followed me home last week.
rustranch replied to rustranch's topic in Brush Automobiles
Here’s the end of this car project. On to the next one. In a recent car show I took 1st place in the pre 1930 class.

-
1909 Brush Model BC followed me home last week.
rustranch replied to rustranch's topic in Brush Automobiles

-
1909 Brush Model BC followed me home last week.
rustranch replied to rustranch's topic in Brush Automobiles
Well here is my retake on a dash engine oiler which I will call Ver. 2.0. When I put together my first one I had no idea of how it worked. And only a vague idea of how it should look. I now consider that one a big failure and it’s parts have been reused in Ver 2.0. I considered reproducing via lost wax casting the correct style brass body. That idea fell through due to a house/shop move and just not have time. Thanks to eBay I sourced a smaller size sight / level gauge. I proceeded to slice and dice them into many smaller pieces using a hack saw. This included the brass bases, both end caps and various other fittings. Thus ending up with a rather daunting pile of smaller pieces parts. I silver soldered, also called hard solder, the pieces together according to my vision. Then using a piece of .375 (3/16”) bright steel rod I fabricated an extension to the needle valve I already had. Having previously removed the damaged and smaller brass hood handles while straightening and saving most of the original bent and mangled hood. I installed a set of larger brass hood handles that fit my hands better. I reused the small originals handles by cutting them into many small pieces and brass welded them back together in a new configuration. They became two anti shimmy shake clamps for the unsupported ends of the oiler. It’s also protection from a passenger accidentally bending it with their foot. Now I’m sure it will be the source of many a commit on this forum as well as at car shows in the coming years. I know it’s doesn’t look anything like an original but luckily there’s not many people who know what it should look like. It does look a wee bit steampunk though, yet this one functions correctly, which is more important. I like it, it’s my toy, nuff said.


-
No I do not have any of the original gearbox.
-
Here’s a better view of the levers and I got a squeeze horn installed.

-
Well because I installed a different three speed transmission and clutch. Working a clutch and shifting was going to be a problem. No room for an additional pedal. I dug through my collection of old parts and found what might have been a parking brake lever from some late 20’s car, or it might have been from a early farm tractor, or plowing implement. The lever in question works the clutch, so now by using the ratchet pawl function I can lock the clutch in the disengaged mode while I shift, and the original Brush lever is still the gear selector. Can’t be any more difficult than driving a three pedal Model T Ford. It was a compromise of function which I believe turned out pretty good.
-
A few just about done pictures of my 1909 Brush BC Runabout.


-
1909 Brush Model BC followed me home last week.
rustranch replied to rustranch's topic in Brush Automobiles
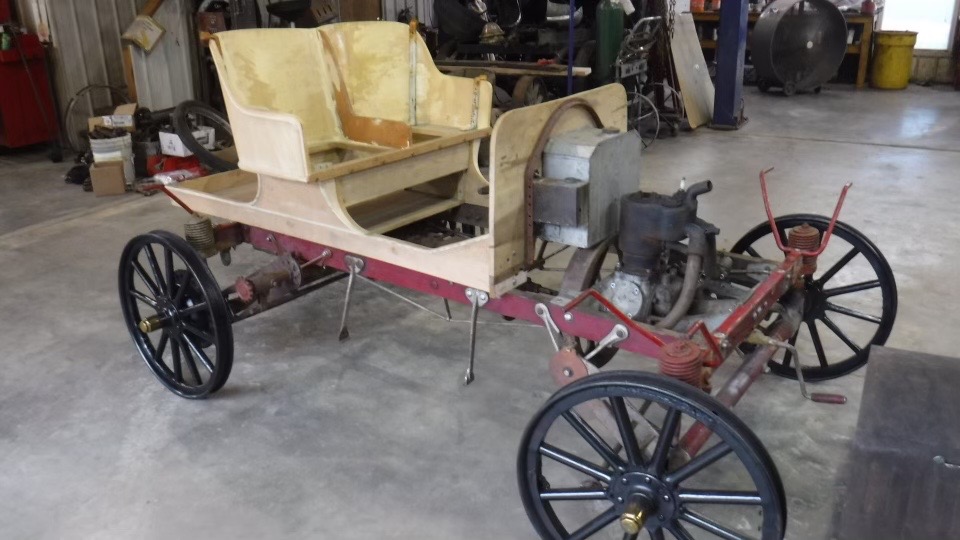
So it’s time for a update on this project. I hope this story is informative and mildly entertaining. After I got into this project, I liked to reference it as “An amalgamation of mismatched years, models and completely worn out parts”. A few times I thought why did I even purchased it in the first place. There never was enough of the car to restore in a reasonable length of time, if ever. The truth be told it was a parts car when I purchased it. But once I decided what I was going to do, and I had a plan I was fully committed. That’s when I sold what there was of the transmission to help a fellow Brush owner to hopefully get his car going. I then adapted a different clutch and transmission combo into the car. This was my biggest deviation from originality in working on the car. I’m just going to refer to it as a aftermarket unit. You can see in the picture, what it was like when I picked it up. It previously had been converted to Model T spokes and rims, not a problem. It was a common change. Here’s a incomplete running list of missing pieces parts. It was missing the steering wheel, steering column, throttle and timing levers, radiator, all the fenders, both running boards, engine piston, connecting rod, both valves, valve springs, one valve lifter, spark plug, carburetor, all connecting linkage, any resemblance of a battery ignition coil, all most everything inside the transmission, most of the shifting linkage, the linkage that was left was broken, bent or from a different brand of car or tractor. I never figured it out. One motor mounting arm was broken off the aluminum crankcase, the crankshaft was solidly seized in the crankcase main bearings, there were no usable ends in the steering linkage, the cross tierod link was way to long, it must have been from a southern widetrack, one outer and one inner front wheel bearing raceways were beyond use, a good number of the wheel ball bearings both big and small ones were missing, anything that remotely resembled a brake part was missing, every half moon, woodruff and square key was missing, But I did get both ends of the muffler. All six frame to fenders support brackets were way to short and I had to reworked them. The taper connection where the wheel assembly clamps to the wooden rear axle were wallowed down and wouldn’t clamp, the replacement wooden Runabout body wasn’t built square, most of the 1/2” oak floorboards were missing, and the firewall was a hodgepodge of glued up planks with lots of hole plug patches, as none of them lined up with anything, I scrapped it and started over, both the gas and oil tanks were rusted through, all the holes were a step above pin hole but just short of “stick your finger into” size, I gave up trying to find any kind of gas and oil caps that would fit and made up something that will work, every brass bushings and felt grease seal through out the running gear was worn out or missing. None of this was a problem I couldn’t resolve and I did. Here’s more story on my pertnear restored, rebuilt or recreated 1909 Brush BC Runabout. My approach to this toy will make a few car purists shake their head in discuss, anger or I can’t believe he did it. Nough said, I had the will power but just couldn’t resist the challenge of making it my oldest resto-rod. My feeling was as long as it had the proper “look, feel and function” of it’s original self I’m OK with it. I collected every online picture I thought would be helpful. As part of my research I reviewed three Brush Runabouts in museums, two in Texas and one in Nebraska. Much to the embarrassment of my wife when I crawled under two of them without permission from the staff. As I pointed out there’s no one around to ask, and I’ll have my pictures before I could even find anyone to ask anyway. The signs everywhere said “Do not touch the cars” and I didn’t touch them. As everyone who owns a Brush knows there’s plenty of room to just wiggle slide under it. And it was just so I could get some important pictures of the mechanics of the running gear, brakes and other stuff. Now I did have to explain myself to one Museum curator, but after I explained I owned one, they had more question about the car in their collection than I did, it was great. I’m now listed as a subject matter resource with them on their Brush. And my wife got a great story to tell to fellow car enthusiasts every chance she gets, which she does with great enthusiasm. Covid business shutdowns, two house and a shop move made this project took much longer than planned. I’ve spent the last six weeks repairing what I had left of some kind of hood that kinda fit, then making a set of fenders and running boards. As everyone knows there are no originals or usable sheet metal fenders available and I was unsuccessful in buying reproductions from anyone, I really tied. So I just built fenders myself, I did add a different swoopy profile to them as I like some of the vintage cars with the smooth flowing lines. Being an old car enthusiast, you can substitute nut if you please, and hearing the one cylinder chug, wheeze, chug, wheeze, chug, wheeze is kinda intoxicating. I think it made the project worthwhile, I love it. So here’s a set of pictures of what I started with and how it is today in all its new glory. I’ll admit to anyone at a car show or parade the parts that are “not correct” IF challenged or asked. Otherwise I’ll just enjoy folks reaction to the old car and getting a chance to tell a wee bit of automotive history. I’ll show it setting next to my 1915 Ford model T touring car as the example of what forced the Brush auto company into bankruptcy. Next is to get the squeeze horn finished, make or adapt some hood latches, rebuild a dash oiler and acid etch some information ID plate before year end. Them I’m putting this puppy to bed for the duration of the coldest part of winter which is the next two months, I do not have heat in my shop. I will start on another car in the spring. Maybe this summer I’ll build a top for the Brush. Well there you go, take what shots you must about what I did but after all it’s my toy and it now looks good and runs.
-
Tomorrow I’m at the point where I’m installing the #60 roller link chains and driving it back and forth on the driveway which is very flat. If I only had brakes, fenders and maybe a new hood. The project is still young so I’ll figure out something, it’s a 1909 Model BC.

-
1909 Brush Model BC followed me home last week.
rustranch replied to rustranch's topic in Brush Automobiles
Well after working through a number of personal issues and items, plus holiday trips, two house moves and two workshop moves in six months. I’m finally back working on my 1909 Brush model BC Runabout. So after all that plus one computer failure I don’t seem to be able to find detailed information on the brakes. You know what’s inside the brake drums. Somewhere in the shop is a three ring binder of all the standard files you can find doing a wee bit of internet searching. But I don’t think I’ve ever had that type of info. Does anyone have a photo, tech sheet, diagram or even a drawing on a cafe paper napkin of the brake bands, pads, shoes or whatever folks are calling them, on the 1909 model BC Runabout. Anything would be helpful. The one technical drawing in a very early Cycle and Automotive Trade Magazine, review of the car is way different. I’ve about gotten the car to the point of moving under its own power, but I would like to be able to stop. Thanking everyone in advance.


-
This was a reply to an email as well as a phone call.
-
As of spring this year 2021 when I checked Rootleib no longer makes Brush fenders.
-
1909 Brush Model BC followed me home last week.
rustranch replied to rustranch's topic in Brush Automobiles
Well I am impressed with your work of building a copy of the oiler. My efforts are humbled after viewing yours. I had a vague idea of what it looked like. So after seeing what a oiler should look like and how it works. Mine is up for a redo version 2.0 . I see the oiler also gives you an idea of the oil level in the oil tank. I’m going to do some thinking on this. -
1909 Brush Model BC followed me home last week.
rustranch replied to rustranch's topic in Brush Automobiles

-
1909 Brush Model BC followed me home last week.
rustranch replied to rustranch's topic in Brush Automobiles


-
1909 Brush Model BC followed me home last week.
rustranch replied to rustranch's topic in Brush Automobiles
Well it’s about time to post an update to this car project. The 1909 Brush had a 4” oil sight glass on the dash to monitor oil going to the motor. Any originals are nonexistent. It’s my car so it’s time to be creative. So I started with a 4” brass sight glass I scored off of eBay. BUT it’s set up to work in a totally different fashion. But it has the right look and I can easily reconfigure it. So here’s what i had to do. Built a new long steel valve stem and transferred the brass knob. Removed the valve seat in the front of the body, then build a new brass valve seat and install it in the back of the valve body assembly. Now I can control oil coming into the sight glass and on to the motor. Then I sealed the original dropper outlet with a machine screw. It kinda looks like a bleeder screw now, next I turned the whole thing upside down and installed a new 90 degree outlet on what’s now the bottom. This is where I will connect the oil line to the motor. The first picture is what I started with. I’ll send a picture of it mounted in or on the dash soon -
1909 Brush Model BC followed me home last week.
rustranch replied to rustranch's topic in Brush Automobiles
Thank you Paul, very helpful info. I can’t believe in studying the few 1909 Brush Runabout pictures I’ve found in trying to identify features that made it that model. I totally missed that the 1909 was the only year that the top of the firewall is flat. So this morning I corrected that issue. As far as the other measurements it’s a wee bit bigger. It’s real close now on height but is wider. I’m just going to shrug it off to how our waistline get bigger as we get older, and everyone would agree this car is older
-
1909 Brush Model BC followed me home last week.
rustranch replied to rustranch's topic in Brush Automobiles
Well I’m going to have to ponder the idea of trimming the top of the replacement firewall flat. -
1909 Brush Model BC followed me home last week.
rustranch replied to rustranch's topic in Brush Automobiles
Anyone want to venture an answer to the following. We’re squared ends on the fenders and long running board a hallmark of the 1909 B and BC’s? Was the 1910 model D when the 10hp improved counter balanced motor first used? -
1909 Brush Model BC followed me home last week.
rustranch replied to rustranch's topic in Brush Automobiles
Here it is setting in just about the same spot when I unloaded it from the trailer back in Nov 5th, 2020. I’m making progress.
-
1909 Brush Model BC followed me home last week.
rustranch replied to rustranch's topic in Brush Automobiles
Well I rolled the Brush out of the garage to clean and organize. What I’m starting next is all the hidden parts that make it move. With fall fast approaching and figuring my new timeline with all I need to build and repair. Moving under its own power is a Christmas target present to my car and myself.


