


jim1941
-
Posts
51 -
Joined
-
Last visited
Content Type
Forums
Gallery
Events
Everything posted by jim1941
-
Smiling face a mistake. A C
-
A 😄 R44XLS. The other 5: RN14YC
-
Plugs replaced and what an improvement! Photo showing the set of 6 with that hard to change one at #1. Question: the #1 plug wire inside cap connection looks different from all the others (see photo) and the wires are all matching as a set. Is this ok? Rocketraider advice taken regarding choke test. First photo cold engine. Second is with engine running and a few moments after starting. I think all is well. Should mention, before starting cold engine the choke was open a bit. I touched some side linkage and it quickly snapped shut as seen in first photo. Jim


-
Plugs are fine on cap. Everything should be so easy. Jim
-
Thanks to you both! Guidance very needed and appreciated. I launched this project because the car runs rough; better after warmed up. When I first got the car it was really running rough and a mechanic discovered a very bad harmonic balancer which got replaced. Re; tune up: I took out all the spark plugs one at a time and cleaned them with a brass brush. The one near the A/C compressor was horrible to get out and when I did, noticed the base just below the porcelain was very rusty unlike all the others. Did someone skip that one? Anyway, I'll be changing all 6 checking proper gap. I'd like to figure out how to check and compare firing order with where plugs go on distributer cap, just in case it's wrong. Jim
-
Began my tune up project by watching a youtube video for the same engine, but a Jeep and probably a few years earlier than '76. Grateful you guys told me I have electronic ignition not points as in the video. Adding to my confusion, went to Autozone with my year and model of car and they ordered points, condenser, etc. for me. Glad I didn't get the parts yet because can still cancel; no return on electrical parts I think. Anyway, took off my distributer cap and took a photo. Tip of rotor (is it?) is blurred in photo, but looks good. Rotor does not lift off like I'm used to, so left it alone. Notice underside of cap, the one point toward top has residue on it. What would cause this? I cleaned it, reattached. Car seems to idle smoother now but didn't run it for long. Jim


-
Thanks to everyone for all the advice! My meter is not for this job. I've checked timing and tuned up my other car a Model A Ford but never any car newer. It's getting harder and harder to find auto service shops with experienced people I can trust. That's what led me to doing it myself but I will proceed very carefully. Thanks again. Jim
-
After watching youtube instructional videos, I'm going to try and do my own tune up on a 258 c.i. AMC 6 cylinder engine. I found this meter in storage (see photo's) Is it a dwell AND if yes, what setting should I put it on after attaching to the coil? I'll also be shopping for a used timing light. fyi, parts on order: plugs, wires, distributer cap, rotor, points, condenser. Jim


-
Jim again, charcoal canister is right there, easy to find. Never thought about it before this. Still learning about the car. Thanks again.

-
Jim again. Think I found the right place for my hose! Your guidance helped a lot and especially that I had it in the wrong place. See photos. Hose comes out of top of rocker cover and you'll see where it fit. Remember, it's a Pacer and the engine goes under the cowl and front windshield, you'll see how far back that hose originates from. THANKS!! to all of you. Now, wondering where the hose is that goes on the white colored roll over valve; charcoal canister? Still looking and trying to figure that one out.


-
'76 AMC Pacer: noticed the disconnected hose in photo laying on top of engine. It comes out of the top of rocker cover. Looked all around and only place I can see is to plug into canister outlet at top of carburetor. Has to snake around and go under the air filter but it's a comfortable length. The shop manual calls that part with the fitting a "roll over valve and canister outlet". It fits, but wanted to be sure where that hose goes. Jim


-
Thanks Frank. I'll have to wait until the motor arrives, but am now thinking it won't work like original with different speeds. I do have a continuity tester and that will be an easy test to start with.
-
Will be changing the non-working blower motor for my a/c and heater. Replacement is coming from a Mopar parts supplier. New motor shows only two wires; one red and one black. Existing original motor has three; the green and brown (plug) and a separate ground wire. Question is, I don't understand how to wire the new motor to the plug. And what about ground? The motor has three speeds on the dash. I've included a photo of the shop manual wiring diagram if that helps. Jim


-
Thanks Mark. I like the design and will go for it. Looks identical to the Delphi CFE0553 and in the same price range. Wonder if it's really the same manufacturer? Had to be towed home the other day only a few miles from home and I suspected vapor lock. About two hours later in my cool garage the car started and ran like a charm. Jim
-
I have a 1976 AMC Pacer and would like to add an electric fuel pump with an "on - off" switch near the dash to use in case of vapor lock. I'm told to use a solenoid type pump, but in looking at the ones offered by Napa, for instance, information does not say anything about being solenoid type. Does anyone have a specific brand of 12V electric fuel pump to recommend? Thanks, Jim
-
Did my experiment and it worked fine; both backup lights "on" running the jumper wire. Proves wiring, ground and sockets are fine. Thanks all. Jim
-
I'll have to wait until tomorrow to try this. More information; I've broken two neutral safety switches by installing new ones then testing with car running and shifting to reverse. Doesn't work, then I take out switch and see it's broken; push button switch has been pushed all the way in and won't return out. Messy each time with trans fluid coming out and having to replenish. There's certainly a transmission adjustment to be made that I'll have to figure out. The little arm that I can see in the switch opening has to be backed off somehow. Jim
-
Have a '76 AMC car and I'm dealing with a bad Neutral Safety Switch, backup lights that weren't working and out of adjustment transmission linkage. Would it be ok if I run a wire from the NSS plug at the proper connection holes directly to the positive side of the battery to see the backup lights come on? Just a quick touch. I want to be sure they are working ok from that plug going back to them. I already changed the bulbs. The car is negative ground and I'm sure about which connections in the plug are for the backup lights. Thanks. Jim
-
Thanks for the information and guidance. Glad I asked!! Car has been running fine for over a year of nice weather usage, but I won't wait on this. Jim
-
I have two 1976 AMC cars and discovered today that one of them has brown trans oil when I did some draining while changing the neutral safety switch. The other exact same car has the standard red color. Book says use Dexron oil, but the new quart I purchased is red. Is color important? Thanks, Jim
-
That's good advice. Will make a point to check under the cap every so often. I'm getting a whole new core and he's beefing it up for more capacity than new. Amazing, I found a recent youtube video of a radiator restoration on a '77 Pacer, I think it's called "on the road again". Certainly perfect viewing for me at this moment. Jim
-
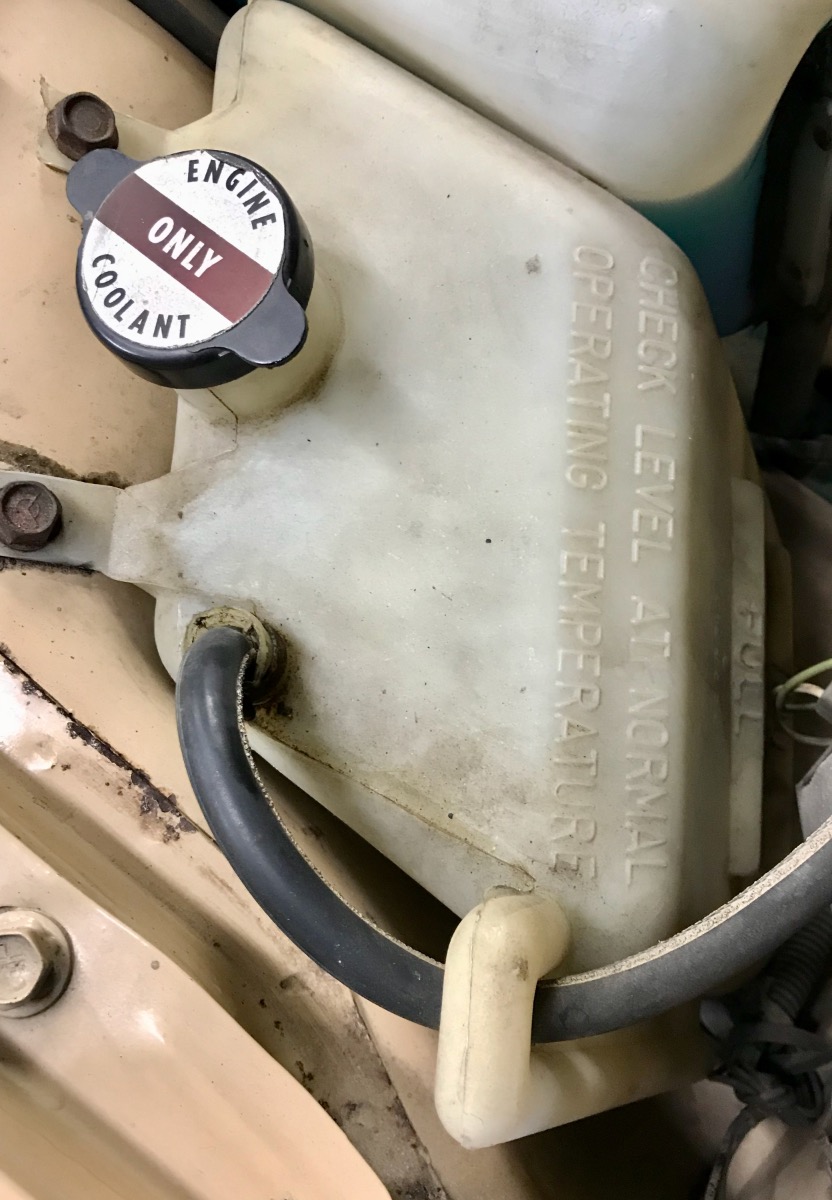
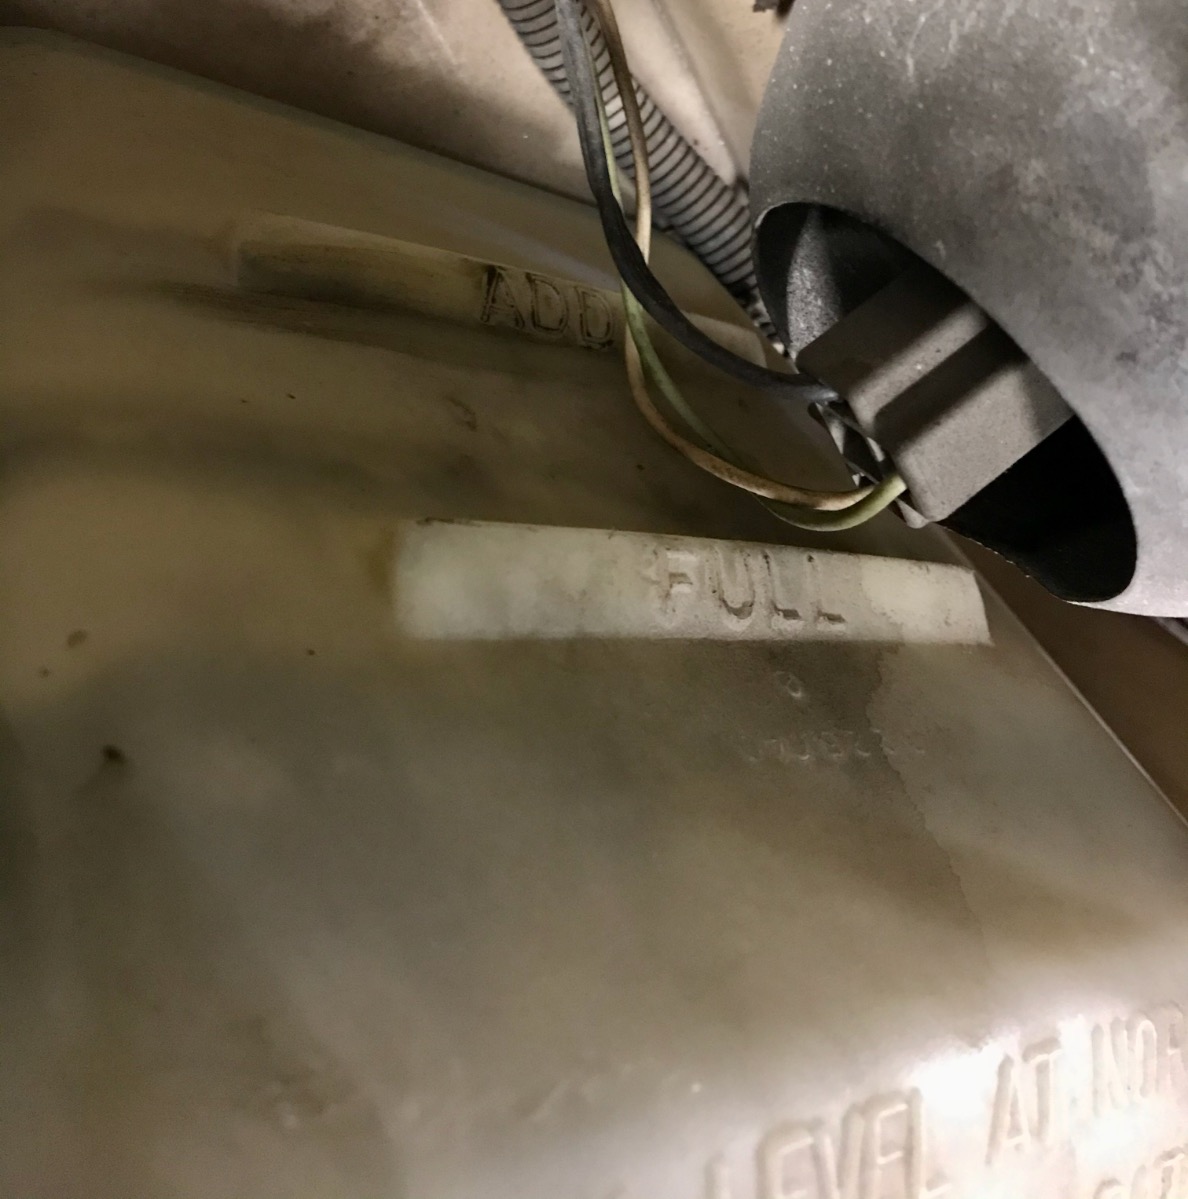
Thanks to you both. NOW I get it, I didn't see the hose going all the way down to the bottom of the overflow tank. That same hose flows both ways; overflow and suction back to the radiator. The overflow tank IS where I add coolant. The question came about because I pulled out the radiator today due to a small leak and am going to bring it to my favorite rad repairman. As requested, a few photo's. It's a bare bones model, but nicely preserved. I'm going to see if someone somewhere can put in A/C.


-
I feel like this is a dumb question, but here goes... Have a '76 AMC Pacer, my first antique car new enough to have a plastic radiator overflow tank. What I don't understand is why it has "add" and "full" lines marked on the side. I see no return line to the radiator, so why does that range matter? Can't see how the level would ever rise and fall and why the cap on top as if to add coolant? Jim
-
1941 Buick Replace Radio Antenna Outside Gasket??
jim1941 replied to jim1941's topic in Buick - Pre War
Jim again, I stumbled on an eBay full antenna assembly "for sale" with photo's. Now I can see how it all goes together and comes apart. Regards, Jim -
Does anyone have experience with replacing the outside gasket for the roof top radio antenna base? How does it come apart? The inside turn knob has a little hole that looks like a set screw access, but closer inspection looks like some kind of gray colored composition in there. Before I get too aggressive, thought I'd ask for guidance if anyone can help. I have the replacement gasket. Thanks, Jim


