


BulldogDriver
-
Posts
443 -
Joined
-
Last visited
Content Type
Forums
Gallery
Events
Posts posted by BulldogDriver
-
-
1 hour ago, XframeFX said:
I hope Corvair.com will still do those fiberglass package shelves. I'm not happy with the cheezy flat cardboard deal I reluctantly installed.
For those door panels, best to not disturb. It deteriorates every time hey are removed/handled.
They were still doing the trays when I got everything “interior” from them in November. Get extra vinyl if you are going to match the side pieces going between the rear seats and side panels. I’m going to do the panel between both rear seats also.
Shipping was pretty steep, enough that I made a 3 day trip, stopping at BestOfferCounts in PA for parts, Clarks in MA, and then up to Maine for a bunch of lobsters. Still cheaper than having all the parts shipped, other than the lobsters!
Ray
-
 2
2
-
-
From my recent observations the only wood panel kits available are for 65 cars now. The other sources have gone away. If anyone knows of a current source for 63 and 64, please let us know.
Ray
-
I had Clarks do “everything” interior for my 63 back in November. They no longer have a source for wood panels, but I was able to get everything else from them. The one thing that I had to send to them was my sun visors, they were the longer ones that they don't have a replacement for and the originals had to be recovered. Another observation was that my carpet and rear window tray colors weren’t available either so they had to be substituted.
Ray
-
3/4” both ends
https://www.summitracing.com/parts/dac-80418
they also make one that steps down from 3/4” on short 90* end to 5/8” on the long end
Ray
-
1
-
-
http://www.oldbuickparts.com/product_info.php?cPath=27_405_407&products_id=7194
As the original ones. Count the number of holes. You will need more than one set.
-
https://www.inlinetube.com/products/inl15253
1955-81 GM Transmission Cooler Line Rubber Clamp Insulators 2pc
SKU:INL15253 -
I bought these recently. Will get you their source shortly.
Ray
-
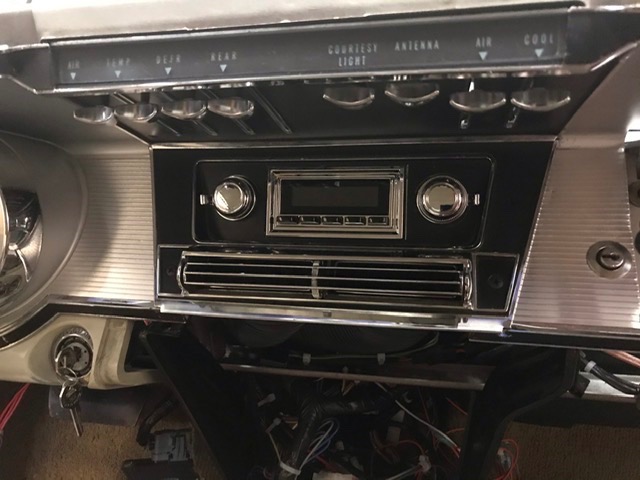
Oops your right! You said December and I was thinking December 1963. Mine has Cruise, Cornering lights, Wonderbar AM, Tilt wheel, wire hubcaps on 6” wide rims. Also is a factory undercoated car from California. Console is sitting on the side as I’m finishing up on upgrades being done. Radio was changed out because the Vintage Air AC took up too much space to fit back in. Its the only thing that keeps the interior from looking original.
Ray
-
Sorry 63
-
Winston are you sure about the resistance wire stopping at the firewall? The wire coming from the ignition switch was the same color code and cover material looked to be the same. Just saying as in my case it doesn't matter now. My ignition system is aftermarket electronic now and doesn’t use resistance wire.
What I need to do is make sure that the power is not interrupted when you start the engine. What I’m trying to verify is that Voltage is still applied to the gauge cluster when in the ‘Start’ position is what I’m looking for. I’ve added a multipurpose gauge and want to make sure it and the other electronics have constant voltage between ‘On’ and ‘Start’ so I can finish wiring.
Ray
-
18 hours ago, RivNut said:
All of the first built '63 Rivieras came with a 120 mph speedometer and a plain dash as would be found in the Electra / LeSabre. Around December, the 140 mph speedometer was introduced along with the ribbed aluminum veneer on the dash. Early Rivs had a different placement for the four note horns as well as a smaller indentation in the vacuum reservoir. My '63, bulit 02E, still has the spare tire on the trunk floor. Early 63's had the firewalls painted body color instead of black. I can't tell on my car because the exterior is black as well. 😎
Jim Cannon has a 63 registry and as part of it, he keeps track of build dates along with all of the changes made over the years.
Mine must be another irregular first year. Speedo 140 MPH, ribbed dash panel, spare up in the hump area, and build date second week of April. Firewall is black and booster has the indent too.
Could it being a ‘Deluxe’ interior have anything to do with this?
Ray


-
I purchased a tank and sender from James at BestOfferCounts. Both are very good quality and great service from him. There was no rubber on the straps from the factory but I put them on mine. You should also add a ground wire if you use the rubber. If you can’t source the sender and have an AC car I can sell you mine. It is new, I went a different direction on my car.
Ray
-
I’m looking for clarification for ignition switch and coil wires. If I’m not having a senior moment when you turn the ignition switch to ‘Start’ the black wire puts 12 volts to the coil and when it is in ‘On’ it is at 8-9 volts or whatever through the resistance wire.
Being the ‘Start’ wire and the resistance wire are connected at the same terminal when the ignition switch is in ‘Start’ there is still voltage going back through the resistance wire and going to the gauge cluster but at the lower voltage.
I believe I’m over thinking how I need to wire for modern technology, EFI and transmission control need constant voltage. When you go from ‘On’ to ‘Start’ voltage is dropped until you make contact to ‘Start’ and back to ‘On’. This causes them to ‘Reset’ both ways.
Ray
-
Someone on eBay sells them. Can’t remember who but they sell them for different makes.
Ray
-
Haven’t driven it yet, still working on drive shaft setup. Hoping to run it sometime next week. I don’t see anything major being a problem with my setup. Engine has been run in, others have done 700R4/4L60E trans conversions, AC and Cruise Control are pretty much a plug and play thing these days. Biggest concern is EMI issues with the Sniper EFI. I’ve done some shielding of the wire harness as a precaution but my placement of the coil and closeness of the wiring harness to the distributor might dictate more shielding.
I believe that Rostra is Dakota Digital’s cruise control. With everything that I’ve done to this car, new cruise control was a given. I hid the control panel in the ashtray and left the original cruise switch in place so the interior still looks original.
Ray


-
Price of parts for Sniper EFI is the same for everyone unless you have friends in high places. All work has been done at home myself with common tools and a lot of elbow grease. Only things I’ve farmed out are the transmission, rebuild of steering box, booster, master cylinder resleeved, and welding. Would have done the engine myself but didn’t feel comfortable with machine shops in my area so it went to a trusted builder I’ve know for 40 years. All of their work is done in house.
I hadn’t addressed the throttle rod height when the photo was taken. Here is my solution for short throw on the Sniper. This bracket will give an additional 3/4” distance on the linkage which is the most I could get using a lowered air cleaner base. Can be made with a file, drill, and hacksaw. If you want a pattern email me your address and and I’ll get a template to you. It also gives you a way to attach the cruise control cable if you go aftermarket. Everything is close but nothing touches.
Ray


-
 1
1
-
-
Doing the veneer from scratch is my last resort. Doing that isn’t a problem for me but after everyday of working on this since February, I’m ready to look for shortcuts and get it done. I still have this to restore.
Ray

-
On 10/8/2020 at 1:28 PM, Seafoam65 said:
CARS sells the wood kits.
CARS only shows for 64-65 Rivieras. I’ve waited 2 months for parts from them and would hate to go through that again. But will ask them when I’ve run out over options.
Ray
-
My Sniper install is as clean as could be done with a 4L60E transmission that needs a TPS remotely mounted, and a cable for the Rostra cruise control. The bracket for the cables had to be widen by 1/2” due to our Nailheads using the inner mount holes.
Ray

-
Yes, Bob Scanlan‘S last advert was in the Jan/Feb 2020 issue. I’m going to reach out to him but still if someone knows of another source for wood veneers please let me know.
Ray
-
Started the process of ordering new interior parts for my car with Clarks. While discussing what they needed from me they informed me that they are not able to supply the wood inserts. They sourced these from someone and that has now gone away. They also said that they don't have a source at this time.
I looked at the Owner’s club website and if my memory hasn't completely failed me there use to be sources for the inserts, there are none now.
Does anyone know who still makes inserts?
Ray
-
Vintage Air part number is 63016-VUL. I did a bit more than what’s needed to fit these into the vent. A little trial and error sanding should allow them to fit just fine.
Ray


-
4
-
-
This should give you the ability to look at differential/rpm/transmission ratios
-
I have just finished doing a Vintage Air Gen 4 install in my 63. Here are the caveats I had.
1. If you have the means to pull the engine, it is a lot easier to do the job. I can send you a pattern for the firewall blank.
2. Placement of the evaporator unit can be a challenge. By flipping the front bracket upside down and rebending the bracket to sit flush on the unit, it gives yuo the ability to bend the bottom up to the valance for securing to the dash. This doesn’t effect functionality. To gain clearance for the ac and heater hoses I had to center the floor vents over the center of the floor hump. This caused the radio depth to be decreased by 1 1/2” so I am going to go with an aftermarket radio that is retro in appearance. The rear bracket is mounted to the firewall with 1/2” standoffs from the factory. There is only 10 1/2” clearance to fit the evaporator between the firewall and valance. Too tight to get the unit in and mounted for my installation. I did not use them and went with the braket mounted directly to the firewall after installing sound deadening mat and insulation mat. I made brackets to do this but you can do it with bolts through the firewall blank. Once the evaporator is Installed and plumbed it should not be a problem in removing it if needed.3. The original Control panel can be used and I also moved the fresh air vent cables to the panel. Using the original cables from the ac is possible but I had a set of Old Air cables and modified the ends that attach to the levelers using the ends from the original cables. Only one lever is not used and I wire tied it off. Heater hoses can be gotten to have it look very clean on the engine and I wired everything up inside to keep it out of the way for the other installed stuff.
4. I made up a bracket to hold the condenser in front of the radiator. It also holds a transmission cooler for the 4L65E transmission no in the car. You should be able to do it with the brackets that come with the condenser. I did have to cut a notch over by the drier to get #8 line to fit properly. I used hoses everywhere as hard lines could not be bent close enough for my install. The heater hose adapters going through the firewall are reversed to have them lineup with the evaporator as I didn’t use the standoffs.
Ask questions if needed.
Ray


-
3
-
1
-


63-65 Custom Center Console Kits
in Buick Riviera
Posted
Thanks James for filling a supply void that truly needed filling! My order is in for a full veneer set.
Ray