


o2zoom
-
Posts
69 -
Joined
-
Last visited
Content Type
Forums
Gallery
Events
Posts posted by o2zoom
-
-
As always Bob is on target with expert help. I would add that in the general area where the wiring harness is located by the lighting switch at the end of the steering column are leads for the gas gauge sending unit that runs to the gas tank and also wires that run to the lever switch for the brake lights. As noted no fuses and the old cloth covered wiring can be quite delicate. On my column the leads going to the lighting combination switch where all exposed wire. I didn't want to replace the entire harness so I carefully took each lead and removed the covering back to a good area and then used heat activated shrink wrap tubing to re-insulate each lead so they would not short or make contact with the neighboring wires as it's a tight area under the protective cover. After assembly all worked as it should and the cover hides my after the fact insulation job.
-
 1
1
-
-
You might find something in a write up I did when converting my 32 57S.
My neighbor created an adapter for me. After further testing I increased the jet size just a little.
-
I did a conversion on my 32 Series 57. I wrote up some of the process I followed. Perhaps you might find something useful. In the end I ended up using #45 or #46 jets. Can't remember now. So far no issues and love the quick startups. A couple of pumps, pull choke hit the starter and instant starting.
-
My 1932 Series 50 has a weak hood center strip. I've done some looking around and found this source.
https://www.steelerubber.com/hood-hinge-top-strap-pivot-70-0045-42
I'm not 100% sure this will work on mine or yours. What I do know is it's very pricey.
I'd like to find something a little less expensive. Also my top strap is bright chrome like finish not painted steel. Anyone have any ideas?


-
For what's worth here is a link to the thread on problems I had and eventually cured on the "death wobble" on my 32 50 series. Perhaps there might be something you can find that will help you solve your issue. In my case it was a corroded worn out steering box.
-
Bob,
Check will post tomorrow going your way.
Thanks,
-
Jim,
Thanks for the lead and tips. So far so good on vapor lock potential issue. I've driven in 80 degree weather, the hottest it's been and so far no issues with vapor lock. I plan on insulating the fuel line. I do a little cheating on fuel. Since I live pretty near a private air field I use a mixture of aviation low lead with regular pump gas. Boiling point is a little higher. Used this formula in my 38 flathead Caddy with good results. If I encounter a problem then relocating the fuel line a little more distant from the exhaust header may be necessary. Time will surely tell.
-
Thanks Bob. That’s a deal. I sure I still have your address will send check.
-
Thanks Bob and Mark.
-
I need a distributor cap hold down spring clip. I have one that is broken. These distributor hold down clips where common on a multitude of Delco Remy distributors used in all kinds of car makes and model applications. I am hoping some forum member has a box of scrap distributor leftovers that might have one of these clips hiding out. Appreciate any leads. Thanks


-
Mike,
Glad you're pleased. Nice to have an original. I have an original Reference Book, you're right about the page thickness.
-
I'll just have to visit some of my local area auto wrecking yards to see what might be a candidate for my application. Thanks for the suggestion.
-
I had a forum member ask me about my what I used for a gas pedal. I thought I would share my response.
This might be a little hard to follow but I will try and describe what I did with the pedal setup. The pedal is a spoon type on a pivot with an arm. The pivot shaft is splined so the arm and pedal relationship can be adjusted. The pedal was too long so I just cut it down to the length that worked best. There is a clevis pin to witch the cable is attached to the upper arm of the pedal assembly. I used ¼ inch tubing to fashion the housing that the cable runs through. I know the kits you can buy have a woven mesh housing that is pretty flexible but I was afraid it would deflect some when the cable exerts internal pressure. My concern was this setup housing runs very close to the positive battery cable that goes to the starter lug. With the rigid copper tubing no chance of deflection so that issue goes away. I used the end assembles from a flexible cable kit. One end has a threaded member that the ¼ tubing fits perfectly in. This allows one to adjust the slack out of cable. The other end has an attached flat washer on the threaded housing. I was able to use the slot in the floor board to stick the house through where the threaded extended past the floorboard enough to allow me to put the nut on and sandwich the housing on to the floorboard. Then it was just a matter of setting the modified pedal assembly to where the cable fed through the house at a good angle and allowed for full throttle and an easy return with the carburetor return spring. I looked on eBay and there is a kit that looks exactly like the basis for my setup. I have been test driving the car and the cable throttle works great.
Here is the eBay link:
I tried to take some pictures and have attached them. Please feel free to reach out if none of this makes any sense. It was a trial and error method but I am very happy with the results. The last thing I need is a good looking period air cleaner that has a low profile with not too big in diameter, maybe 8" or less. I'll have to post a request for help on the forum for suggestions.


-
Cost to send Priority Mail flat rate is: Priority Mail 2-Day™ Flat Rate Envelope $7.75 so $29.75 to your door. If this is good just PM me with your address and a way to pay.
-
Yes it's still available. Jorn in Norway discovered the previous owner of his newly acquired 32 had a spec book. Will check on cost to mail to Mobile and get back to you.
-
Jorn,
I can personally attest to Bob’s willingness to assist with both knowledge and parts. The only reason my 32 Series 50 is up and running is because of Bob’s generosity with guidance as well as some critical spare parts. I’m in the final stages of fine tuning various repairs but can drive the car while finishing things up. Without his help I’d be no where close to where I am now. Pictures during recent road test. Mine is just a driver quality with some non original modifications. I have kept any parts that I removed so that any substituent owner can keep the car as is or go back to what ever level of originality they desire. To me it's all about enjoyment and dependability.


-
1
-
-
Jorn,
As I had mentioned I don't know or do much about motorcycles. When not driving or working on the Buick I take a break in this.


-
1
-
-
Nice looking bike. I usually just stick with four wheels. Besides my 1932 Buick I have a 1963 Corvette Roadster. I'll forward a picture tomorrow, can't seem to find one in my picture files. I checked with UPS and Fedex, absolutely ridiculous price to send the manual , they wanted over $100. The United States Postal Service looks to be $24.50, that's still pretty pricey. I got that price from their web site. They are closed until Monday so won't be able to talk to a live person to confirm the $24.50 price. Hard to believe it costs that much to ship. You may be more familiar with shipping costs living in Norway. Just let me know what you think.
-
JomI will have to see if i can find out how much it will cost to send the manual to Norway. Here in the US the postal service has a special rate for books. It cost less that regular postage rates. I'll see what I can find out about sending something like this to Norway.
-
1
-
-
Excuse my late reply. I do still have it.
-
Jon,
Thanks for clearing up my mystery 1-117 Aerotype Stromberg.
-
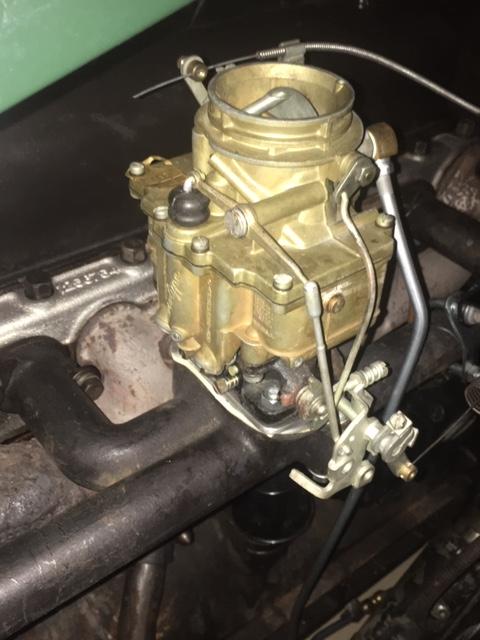
I acquired this 1932 50 Series early last year. The interior and body were in good shape. The mechanics on the car were in not so good of shape. The steering box was bad shape and I found the cylinder head was cracked. A long time member and 32 Series expert Bob Engle assisted with knowledge and parts to cure the steering issue and cracked head. There is a previous post on the steering box cure. In addition it needed new rings and a host of other smaller problems corrected to make it in to a reliable driver. An item of main concern became the carburetion. The original Marvel carb was in bad shape. Someone had JB Welded it together I suppose in an effort to cure leaks. In addition the riser was cracked and the diverter valve was shot and also cracked. An attempt had been made to weld a block off but it was poorly done. I was not going for originality but reliable function. So I made the decision to convert to a downdraft setup. From what I was able to find several others have also gone this route. I wanted to share the approach I took and hope some may find it useful as well as getting feedback to improve where I am.
I made the decision to try and use an older period carburetor. I am somewhat familiar with the ones I chose to test. I also had several parts, jets, gaskets, etc. from years gone by as leftovers. I settled on testing a Stromberg 97, a Holley 94 and a Stromberg Aerotype. All have the same 3 bolt flange pattern. I am no carburetion expert; this was just a trial and error attempt to get something that would work. The Aerotype could be an AAV-16 but I’m not sure, but I understand these where used on Buicks in the 30s and 40s. This unit has a manual choke and the base only has AAV imprinted on it. There is a tag on the top (1-117) but I never found a reference for it. Maybe some knowledgeable forum member can identify it. Pictures of carbs follow. My intuition told me the Aerotype would be the best choice but wanted to see if the others could also be alternatives.
A neighbor machined me a beautiful adapter. A nice thing is the adapter can be mounted either way, so the carburetor can be faced however the linkage or fuel inlet works best.
It is well know that the intake manifold can just be flipped over to accommodate a downdraft carb. The only thing I found necessary was to make some half moon spacers to compensate for the offset differences on the each end where there are different heights on the flanges. These spacers allow the special Bellville washers to align flat on the mounting surfaces at these locations.
I decided that trying to work out linkage with traditional rods was beyond me. So I decided to use some left over cable throttle parts. I used the end setups and fashioned ¼ inch copper tubing into a housing for the cable to run in. This made for a nice stable routing for the cable. I used an after market pedal in place of the OEM one, also a leftover. I attached the carburetor end setup with a U-bolt and mounting bracket to the intake manifold. It was relatively easy to adjust the cable so I got full travel with no binding. I also attached a similar bracket for the return spring witch allowed me to perfectly align it to a return swivel on the carb.
My first trial carb was the Stromberg 97. These were/are used on just about anything with an old school internal combustion engine. The 32 50 Series is 230 CI, Fords using these carbs were 239 CI, close enough for me. I bolted the unit on in stock configuration with #48 main jets. All seem good at idle but no mid range power and backfiring under load. Seemed like a too lean issue. I kept increasing the jet size until I got to #62. With these jets the car performed pretty well but still just a little mid range fluttering. No more back firing and good power under full throttle. Next up was the Holley 94. Pretty much the same situation, had to steadily increase jets to get good performance. Also had poor midrange transition. These carbs have a vacuum economizer/power valve. The stock economizers give full power fuel flow at 6.5 inches of vacuum. What I was seeing is the Buick engine pulling more vacuum not allowing the full fuel flow under upper midrange throttle. They make several economizers to compensate for vacuum variations. I suspect a 10.5 would have helped this condition. I just bypassed the valve and played with jetting. I also think both of these units with under 1 inch venturi accentuate the increase in vacuum. The Aerotype is closer to 1 1/16 inch and vacuum dropped earlier as throttle opened. I think I could have used either the 97 or the 94 but would have had a harder time smoothing out the transitions from idle to midrange and then full load. I also notice that they didn’t seem to atomize the fuel as well in midranges.
What I hoped to be the most promising candidate, the Aerotype AAV-? did prove to be the one. Mounting configuration worked well. Cable throttle was attached to a throttle arm on the right side of the carburetor. I could adjust it to give a nice smooth range of motion. The fuel inlet located in the center of the carb made it relatively easy for me to fabricate a steel supply line to attach to the existing metal one that runs from the passage side of the engine to where the fuel pump is located on the 50 Series. I had my doubts as to whether the stock fuel pump would handle the extra lift given the downdraft carb sits a lot higher than the updraft unit. So far it seems to be working with no modification.
I kept stepping the jetting down from #48s to #42s and performance remained good through out all ranges down to 42s. I used a #60 power valve. So far the plug color indicates a good fuel mixture. I plan to keep an eye on things as I begin to put some more miles on the car with extended run times. I could be just a tad too lean. I’ll see if I need to increase the jets or the power valve but so far so good. I have taken quite a few pictures and will attempt to post them with this write up. If they all won’t post I put them in a subsequent post. Any and all feedback appreciated. I have found this forum to be a wealth of information and without it I seriously doubt I would have a running 1932 Buick. I hope the above will be of some help to someone in a similar situation.


-
2
-
-
Thanks, I guess correctly.
-
Do Belleville washers mount to the exhaust manifold with the bell in or bell out?


1932 Buick 50 Series steering gear help
in Buick - Pre War
Posted
I think the amount of leakage you described is excessive. I now can’t remember exactly how that shaft is sealed. For want of a better explanation my shot in the dark fix would be carefully remove the combo light switch. The retaining plate on mine was secured with two bolts to the gear box. I’d see what’s behind the plate. Might give you the answer on what’s supposed to be there. If after looking at the area around the shaft nothing is evident or comes to light I’d suggest this. Find an o-ring with sufficient width to be compressed when the end plate is attached that has the same inside diameter of the lighting shaft. The idea is the plate will compress the o-ring and provide a nice tight seal around the lighting shaft. Maybe a parts book would show what’s really supposed to seal the shaft. Perhaps someone else really knows what the correct sealing method is.