diablorick
-
Posts
26 -
Joined
-
Last visited
Content Type
Forums
Gallery
Events
Everything posted by diablorick
-
1956 Buick Century Restomod
diablorick replied to diablorick's topic in Buick - Performance and Modified
Sorry, for the delay. My best friend and the owner of this car Passed away from COVID. His family did not want to finish the project. -
1956 Buick Century Restomod
diablorick replied to diablorick's topic in Buick - Performance and Modified
Hey guys, didn't want you to think I bailed on this. The holidays put me behind and now we had to side track the Buick for a few weeks to get some small shop jobs wrapped up. Should be back on it in a couple weeks. -
1956 Buick Century Restomod
diablorick replied to diablorick's topic in Buick - Performance and Modified
Well, I tried stainless on the center console but I didn't like it so I switched to carbon fiber, much better.
-
1956 Buick Century Restomod
diablorick replied to diablorick's topic in Buick - Performance and Modified
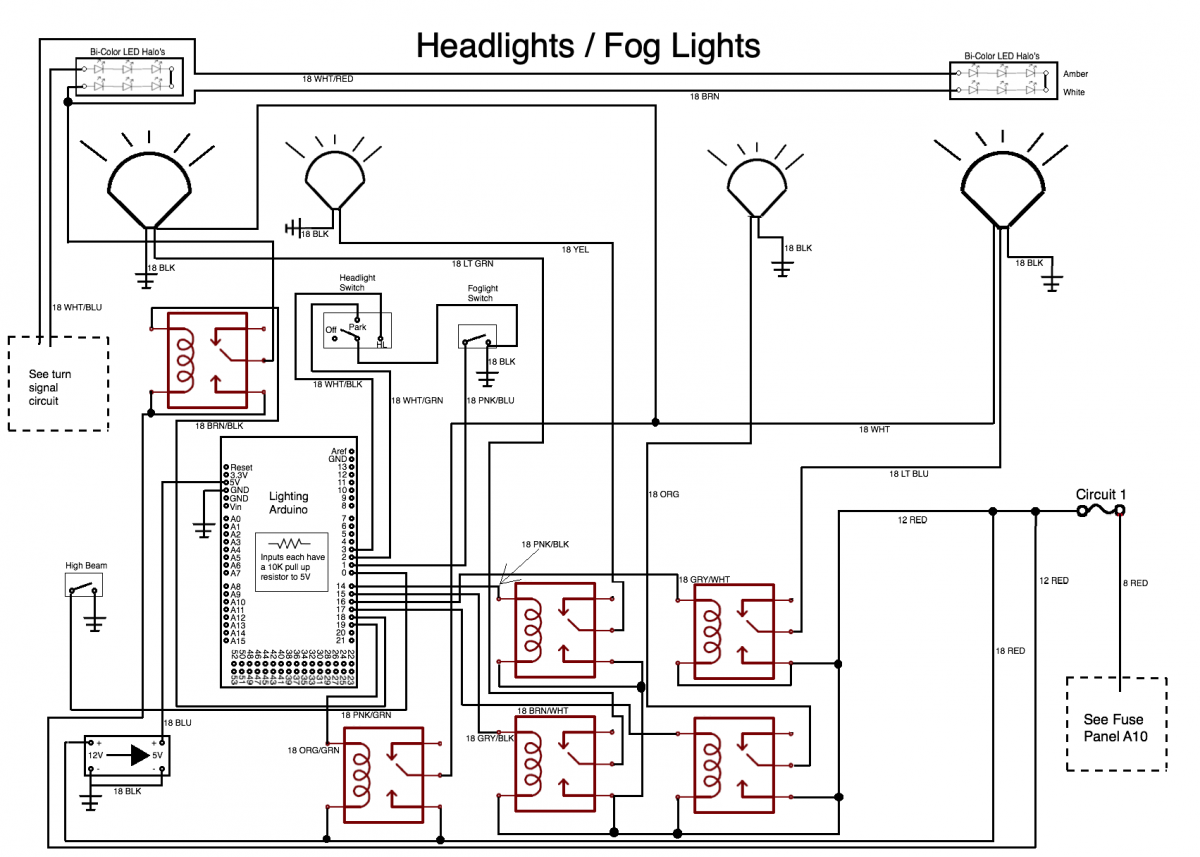
I was waiting on steel for the tops of the console, and it was Sunday, so I decided to work on some of the electronics going into the center console. I used 1/4" mirrored plexi to mount the Arduino's and the relay boards. If you're interested in the actual Arduino code and blocks, I will post that part on one of the Arduino forums and put a link in here, when I get it done. I am doing that for 2 reasons. One, I don't think that many people, in this forum, will care about it, and two, It is much easier to post code on those forums because they are setup for it. Here is the Arduino board. It has 8 UNO's on there that will run pretty much everything in the car except fuel injection and spark, which is run by the the Summit PCM (no point in reinventing the wheel). Keep in mind, if you do this, and you want to keep your wiring neat and well soldered, that you will need to cut tunnels in the plexi to allow the wires to be soldered to the bottom side of the boards. Next I made the relay board. It holds 32, 5V/10A relays that will run pretty much everything in the car, and 4, 5V/30A relays that will run the headlights and fog lights. ********If you do this, MAKE SURE you are using LED headlights and fog lights, AND that they do not draw more than 30A.******** Mine draw 23A at full bright, so I will be fusing these circuits at 25A to protect the relays.

-
1956 Buick Century Restomod
diablorick replied to diablorick's topic in Buick - Performance and Modified
Next we started building the center console. Originally we thought about getting one from the junk yard but all of the newer vehicles have narrow trans tunnels so it just wouldn't have looked right. We started by cutting out what we wanted from cardboard and taping it together to get the shape we wanted. Once we had a layout that we were happy with, we took it back apart and laid it out on 18 gauge steel. We cut it out with the plasma cutter. I just want to throw in a quick shout out here. My buddy works at Matco Tools so I am a pretty loyal Matco guy, however, we picked up this plasma cutter at Harbor Freight, hoping it would allow us to do a hand full of cuts 2 summers ago, and I've got to say, this thing has been amazing. I normally don't buy tools from there because they don't last, but this one has been a trooper. Anyways, after we cut out the sides, we took some 3/4" bar stock and measured out the pieces we needed to hold the top panels in. Then we drilled and tapped them for 10-32 screws. After those were done, we welded them to the sides. The plan is to have it match up to the stock speaker grill / ashtray mount so I measured the distance between the ash trays and then figured out how far apart the sides need to be. I welded in a piece of stock and put it back in the car so I could drill the mounting holes to mount the console to the dash. Then I drilled and tapped the stock. After that I welded in 3 pieces of stock across the bottoms to mount the console to the tunnel. Sorry, I forgot to take pics of that.


-
1956 Buick Century Restomod
diablorick replied to diablorick's topic in Buick - Performance and Modified
Sorry I haven't updated in a few days. I've been pretty busy. Had to fabricate a lot of stuff. We got the dash mounted back in the car and got the steering column mounted. Installed the Vintage Air evaporator box. Had to loose some glove box but that's OK because we're building a center console so we should have plenty of storage.


-
1956 Buick Century Restomod
diablorick replied to diablorick's topic in Buick - Performance and Modified
I was originally going to weld in sheet metal where the old heater core was but I decided to make a little show spot there. I made a custom plate from 3/16 steel and mounted the HVAC bulkhead in it. I'll send it off to powdercoating next week.
-
1956 Buick Century Restomod
diablorick replied to diablorick's topic in Buick - Performance and Modified
Got the dash painted today. The pic doesn't show off the pearl. It looks awesome!
-
1956 Buick Century Restomod
diablorick replied to diablorick's topic in Buick - Performance and Modified
We want to use the original steering wheel, but it was in pretty bad shape so I decided to see if I could restore it. I started by cleaning it with lacquer thinner. I decided to use epoxy to fill all the cracks but I wanted to do a small area first to see how hard it was to sand. Looks like it will work so I will be doing it in my spare time.

-
1956 Buick Century Restomod
diablorick replied to diablorick's topic in Buick - Performance and Modified
Got the Dynamat in the trunk finished We finished the drains on the front and installed Dynamat there.


-
1956 Buick Century Restomod
diablorick replied to diablorick's topic in Buick - Performance and Modified
I laid out all of the circuits and did the first wiring diagram.
-
1956 Buick Century Restomod
diablorick replied to diablorick's topic in Buick - Performance and Modified
The wiring will be here next week so I started working on the schematics. I drew up a diagram of where everything is, on the car, and tomorrow I will brake everything up into circuits, and then I will make individual schematics for each circuit.
-
1956 Buick Century Restomod
diablorick replied to diablorick's topic in Buick - Performance and Modified
The manifold set for the air ride came in so I got that installed. all the bags are plumed with 3/8" nickel copper lines. The air ride will be controlled with an Arduino and a 4" touchscreen.
-
1956 Buick Century Restomod
diablorick replied to diablorick's topic in Buick - Performance and Modified
OK, we got a few more things done. We finished filling the spots on the dash, but I wasn't happy with the match on the left side (where the chrome piece butts up to it) so I ground it down a little and rebuilt it. Got the last primer coat on it and it's ready for paint. Got the drains installed on the firewall and fiberglassed over the openings. I fabbed up some mounts for the radiator, condenser, and fans. The fan mounts will be attached to the radiator after they're powder coated. And I got the air horns mounted and plumbed


-
1956 Buick Century Restomod
diablorick replied to diablorick's topic in Buick - Performance and Modified
We did a little more work the last couple days. The dash bodywork is just about finished. It's in primer now and everything was test fitted. Just have to do a few minor fills and one more primer coat and it will be ready for paint. When we set the body on the frame, we weren't really happy with the drop in the rear, so we made some shock extensions and welded those on to give us 3 more inches of drop in the rear. We also got the 16 Ga sheet metal for the new firewall. The plan is to seal off the old openings and insert drains at the lowest points (to drain water from the cowl) and then seal everything and install Dynamat, then weld the new firewall on top of it. Should get a lot done this weekend. I'll update as we go!


-
1956 Buick Century Restomod
diablorick replied to diablorick's topic in Buick - Performance and Modified
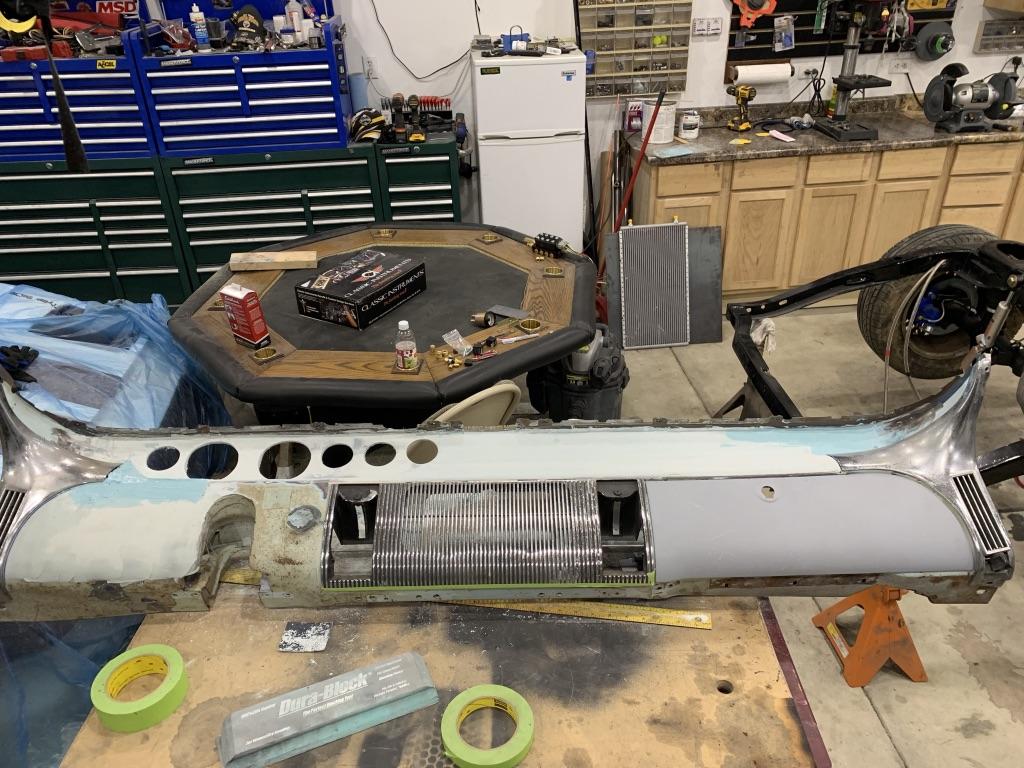
Moving to the interior now. Started installing the Dynamat this weekend and working on the dash. Sorry I don't have more pics of the dash process but when you do body work all the time you forget to take pics sometimes. I'll explain what I did though. I started by removing all the chrome and trim. Then I used the plasma cutter to cut out all the areas that I would be installing gauges and accessories. I re-shaped the angled part, at the bottom of the old gauge cluster, so that it would be flat and allow room for the new gauges. I taped off all of the front areas and then fiberglassed the back. Once I had several layers of fiberglass on the back, I turned it over and put a layer of resin on the front. After that, I used 3M fiber filler to create a solid base layer and recreate the center "hump" to match up to the edge chrome vents. After this I used lightweight body filler (USC) to flatten everything out. Then I drilled the holes for the gauges. I will get it finished up today and post some update pics later.


-
1956 Buick Century Restomod
diablorick replied to diablorick's topic in Buick - Performance and Modified
So today we finished the rear shock mounts, tied up the fuel and brake lines and got the body back on, for a test fit.


-
1956 Buick Century Restomod
diablorick replied to diablorick's topic in Buick - Performance and Modified
Ya, we insisted on keeping it Buick. I wanted to put a Buick rear end in it but it just didn't happen. Thanks guys! -
1956 Buick Century Restomod
diablorick replied to diablorick's topic in Buick - Performance and Modified
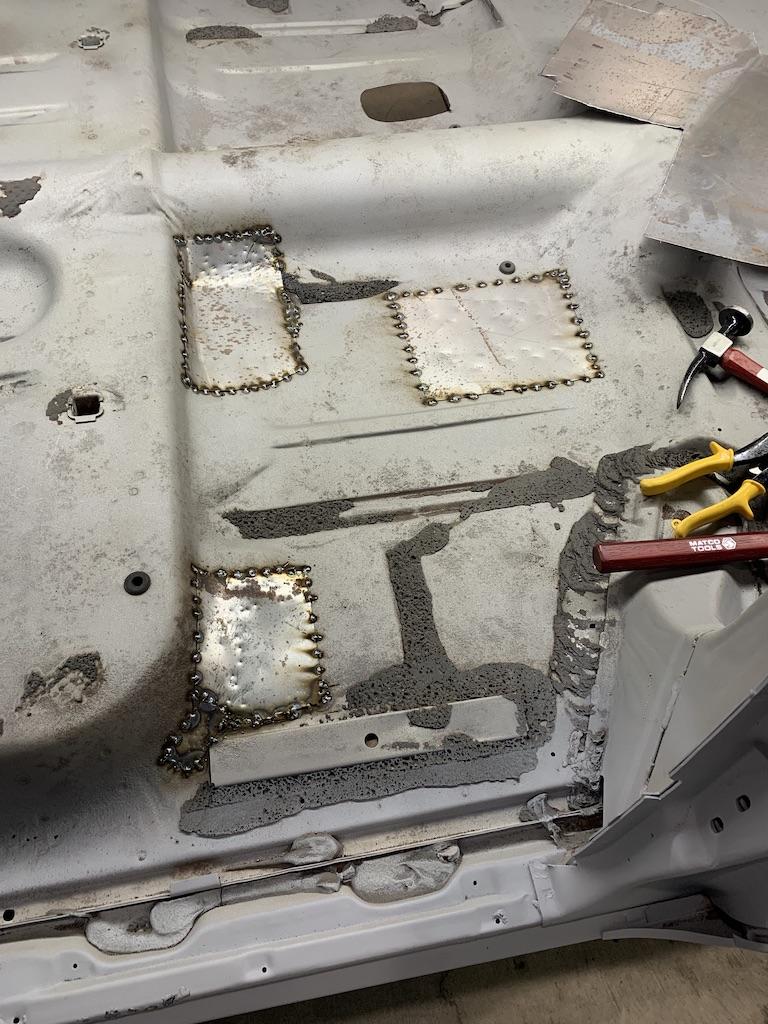
We are currently working on getting the body ready to go back on the frame (first mount of many). There was some very minor rust holes in the floors so we cut it out and welded in patches. Then we cut out the old vents in the firewall and welded in patches. Next we applied Lizard skin to the inside and underneath. That's where we're at right now. We will be applying Dynomat over the Lizard Skin on the inside next, and then we will be ready to put the body back on the car for some fitting and wiring. Stay tuned!


-
1956 Buick Century Restomod
diablorick replied to diablorick's topic in Buick - Performance and Modified
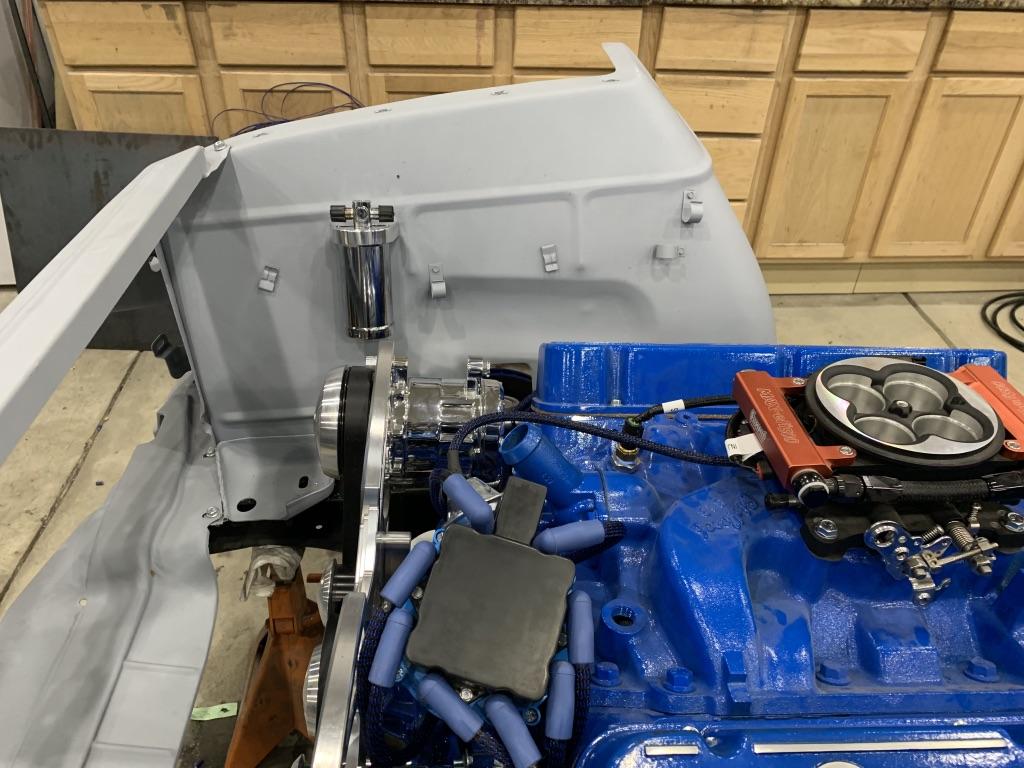
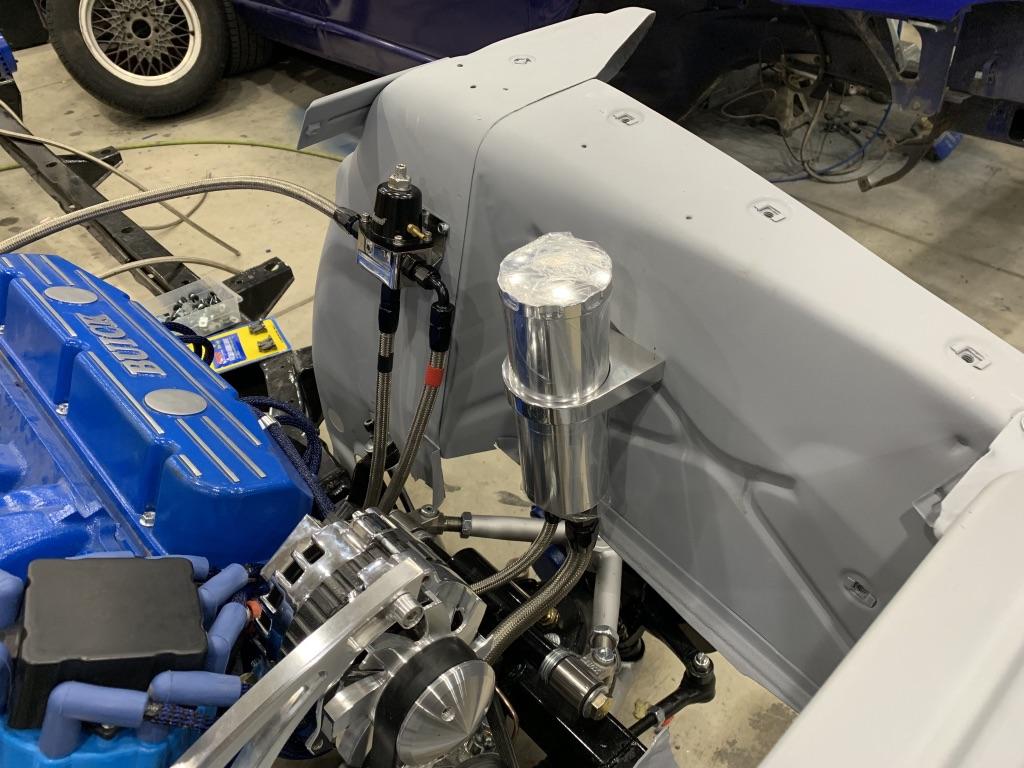
Next we installed our power steering reservoir, AC dryer/accumulator, fuel pressure regulator, and throttle body fuel injection system. We also added all of the wiring for our engine and our Classic Industries gauges sending units. We also installed custom made Taylor plug wires.


-
1956 Buick Century Restomod
diablorick replied to diablorick's topic in Buick - Performance and Modified
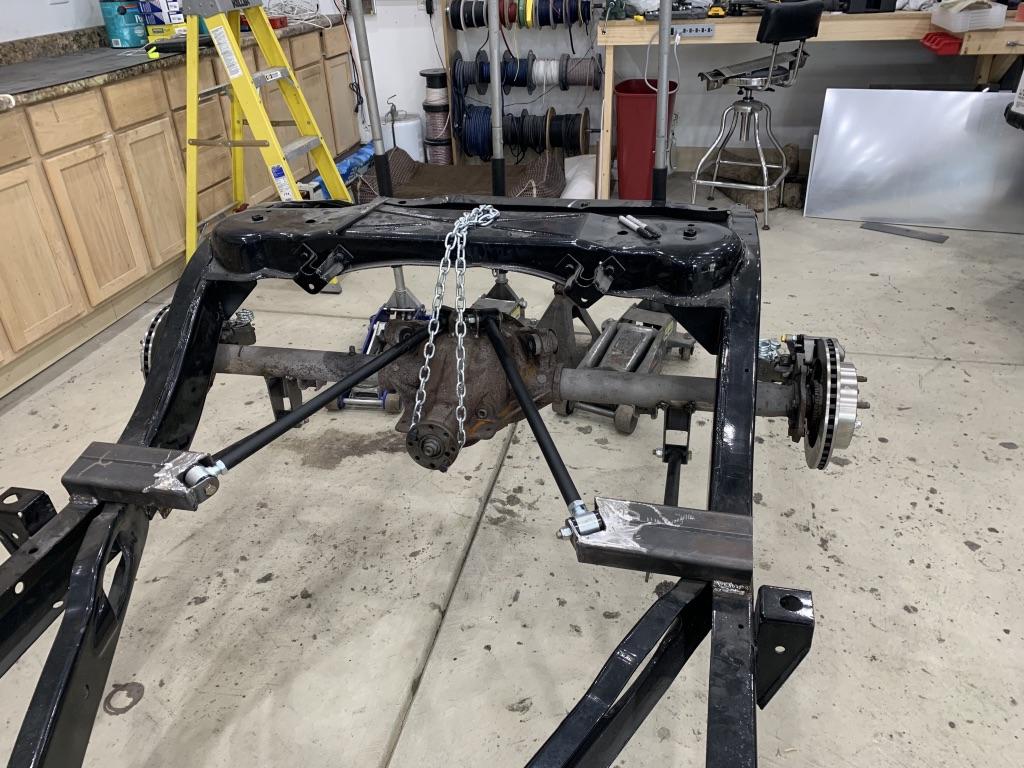
For the back, we decided to go with a Ford 9" rear end out of a 91 Lincoln Mark VII. It was the perfect length and came with disc brakes already on it. After stripping everything off of it, we started making the mounts for our custom triangulated 4-link suspension. Once all of that was welded in place, we blew it apart and painted everything. Then made the custom mounts for the air bags and shocks. We used the stock spring location to mount the air bags. We fabricated a lower mount for our Firestone bags, that they screw onto. Then made a flat 1/4" mount for the tops. At full drop, she is 3" of the ground!


-
1956 Buick Century Restomod
diablorick replied to diablorick's topic in Buick - Performance and Modified
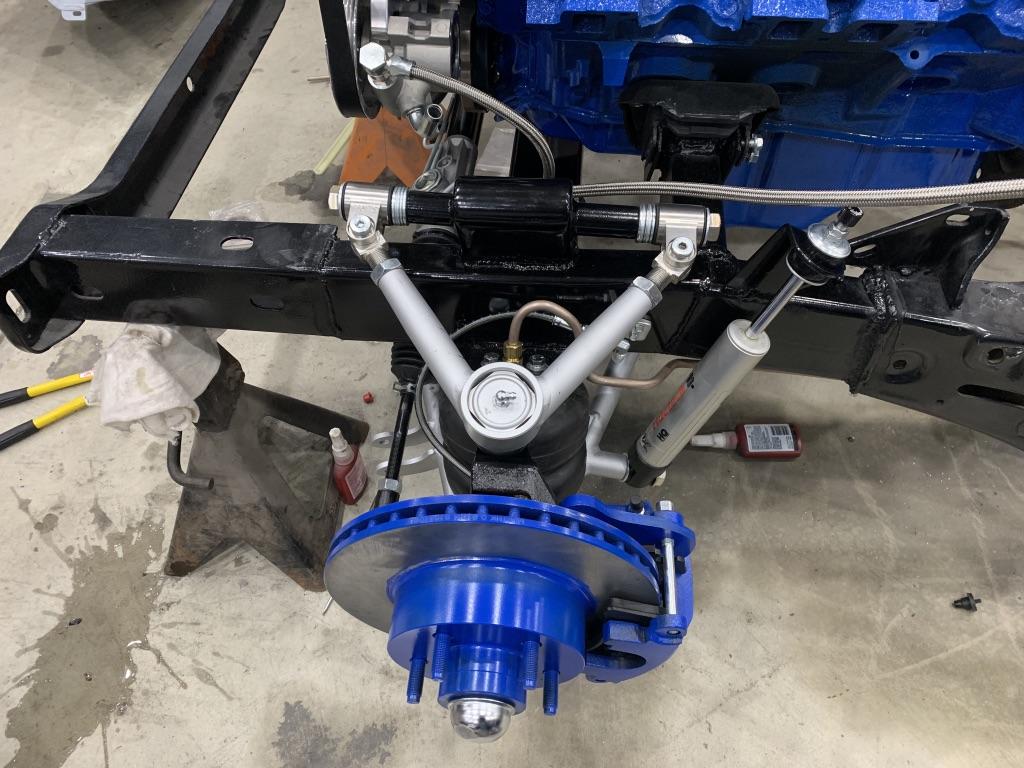
Next, we chopped off about 3' of the frame, including the front cross member. We welded in 2x4 box steel to accommodate the custom front end from Scott's Hot Rods. We gave them our inside frame measurements and they built a custom IFS for our Buick, complete with air bags. It was a pretty straight forward installation. Weld in the new cross member, weld on the upper air bag mounts, and weld on the upper shock mounts. After that it was just installing all the hardware. Once it was all mocked up, it was just a matter of tearing it back apart, painting it, and putting it back together. Then running the air and brake lines.

-
1956 Buick Century Restomod
diablorick replied to diablorick's topic in Buick - Performance and Modified
Next, we found a 455 out of a 75 Buick Electra and tore that down and sent it off to the machine shop. We also got the matching 350TH trans and sent that to AJ's for a rebuild. After rebuilding the engine, we added a March front end kit, which included the alternator and AC compressor.
-
1956 Buick Century Restomod
diablorick replied to diablorick's topic in Buick - Performance and Modified
We started with the bottom end by sending it to Shirley's Powdercoating.
-
1956 Buick Century Restomod
diablorick replied to diablorick's topic in Buick - Performance and Modified
We stripped the car off the frame and then removed everything from it.