


ADade
-
Posts
52 -
Joined
-
Last visited
Content Type
Forums
Gallery
Events
Everything posted by ADade
-
Here's a photo of the car (on the right) in 1959 before restoration was complete (no top, no interior), but you can see the cowl lights aren't brass. Funny sidelight -- although the two kids (my wife and her brother) appear to have their hands on the two cars' fenders, they're actually holding their hands about an inch above the paint -- not touching it. Their father would have killed them had they actually touched the paint!

-
Not a dumb question at all, by the way, Marty
-
Everything on the car is nickel and everything is lacquered. I just finished stripping the top half of the windshield and I'm working on the headlamp brackets. It all looks the same. Did you see my post about the thought of submerging the lights in lacquer thinner? I'm a little hesitant because of the electrical connections and the reflector silvering.
-
The lights are both kerosene and electric, so there's wiring involved. Looking for opinions here. If I were to fill a small bucket with lacquer thinner and submerge the whole light, would it damage the wiring or the reflector silver? Just trying to brainstorm here.
-
Morgan - no picture? Not yet
-
It's entirely possible these aren't like the original lamps, but the car (with these lamps on it) took a national first place Junior and three national first place senior trophies in the 1960's, so it's apparently not a big deal. In any case, I don't intend to show the car -- it's a driver. I'm looking for recommendations on who could strip these lamps for me.
-
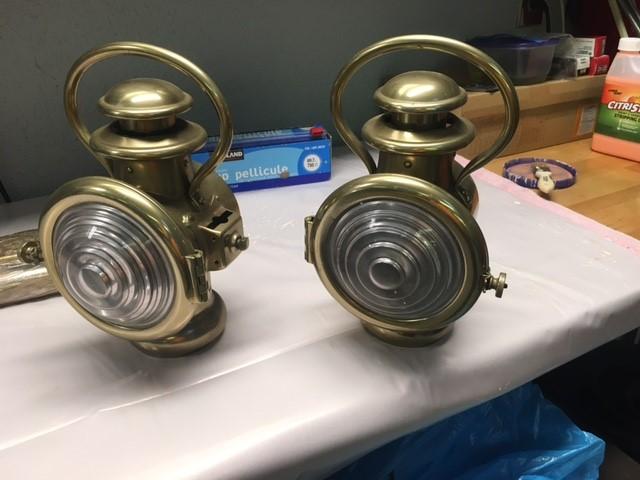
I have a recently acquired 1914 B37 restored in about 1959 or 1960. It's a beautiful car, but the restorer lacquered all the nickel to keep from having to polish it. Might have been a good idea at the time, but now after 62 years the lacquer is very yellow and unsightly. I'm doing most of the refinishing, but I'm stumped when it comes to the cowl lamps. Anybody know someone who (either as a business or a hobby) knows how to refinish these? See Photo.
-
Thanks for the inputs. I have indeed ordered a set of Champion 589 plugs -- Larry, I posted this question then thought "DUH! Larry Schramm has this exact engine -- ask him!" Sometimes I'm a little slow on the uptake.
-
I'm bringing back a 1914 B-37 touring car after long term storage and need spark plugs. The plugs that were in the engine were marked "AC C-78L Commercial". Does anybody know of a modern equivalent, or where I might look? This is a nice car - 1960's AACA first place national junior and 2x national first place senior, plus first place national senior VMCCA winner, so I want to do it right.
-
Sorry, maybe I wasn't clear -- I haven't found tanks with inset flanges. My latest plan is to cut the ends off the original tank and, without cutting the new tank, solder the old ends on, covering the domed ends of the new tank. Probably difficult to envision, but I'll send pictures. I ordered the new tank yesterday and it should be here next week.
-
I was planning to use a stainless dune buggy tank as a starting point (https://www.speedwaymotors.com/EMPI-00-3887-0-Stainless-Steel-Gas-Tank-10-x-33-Inch-10-7-Gallon,294345.html?OriginalQuery=141-3887) As you mention, the ends are the problem. My original tank is 30" long by 10" wide, so by using the 33" tank I have 1.5" of extra length on each end after removing the domed end caps. I haven't seen tanks with inset flanges on the end -- can you send a link?
-
My neck is welded, not riveted, so that's not a problem here.
-
We're thinking about modifying this tank https://www.speedwaymotors.com/EMPI-00-3887-0-Stainless-Steel-Gas-Tank-10-x-33-Inch-10-7-Gallon,294345.html?OriginalQuery=141-3887 We'd have to cut off the ends and weld on new ends that aren't domed, then cut the old threaded necks off the old tank and weld them onto the new one. Then we'd have to paint it. Much cheaper than having a new take created from flat stock. I'll check out your links above as well.
-
That does look great -- What I'd like to do is to get a new tank built (and I was planning to reuse the filler neck, fuel gauge neck and supply like fitting from the old tank as has been suggested). Then I'd think it would be a good idea to line the new tank, and use the aircraft paint suggested above, provided I can find an acceptable color as the tank is very visible at the rear of the car. Still looking for someone I can trust to cut out the old fittings and produce the new tank. As usual, you guys are being very helpful -- much appreciated!
-
There's been no sloshing, Terry. I haven't even driven the car. No, there's been no fuel outside the tank.
-
Terry, those are the exact people who re-lined my tank!
-
Looking for a vendor here. A year ago I started working on getting my 1918 Buick E-4-34 back on the road. It had been sitting unused since about 1960 and although in reasonable cosmetic shape, all those years of disuse had taken their toll. For instance, the fuel tank was leaking the most disgusting old fuel you've ever seen. I removed the cylindrical tank and had it stripped and lined inside and out, then had it painted and remounted it. "That's one issue behind me" I thought. WRONG! We got the car started (after major engine work), but couldn't keep reliable fuel flow, so I crawled under the car to remove the fuel line and found that the underside of the fuel tank is bubbling with fuel seepage across the entire bottom that's kept in check only by the paint! Isn't it great to have to revisit an issue you thought was behind you? So I've decided the only good course of action is to get a new tank built, but I've been unable to find a fuel tank builder who can (or will) create a cylindrical tank. Anybody have a suggestion for someone who can do this work?


-
I love this little car, Terry -- and huge thanks to you and Larry Schramm for all your help getting it back on the road!
-
Well to give you the "rest of the story" as Paul Harvey used to say, I also want to replace the oil pan gasket, so I do need to take off the pan It makes sense to inspect the wrist pin when the pan is off. As to the float, I have a new one made of plastic, so I'll use that rather than a cork one. It was designed for a Model A Ford, but should work just fine. I used the same thing for the float in the fuel tank.
-
I've been working for some time on my father-in-law's 1918 four cylinder two seater, and we've finally got it running reliably (at least it seems so). Long hours have gone into getting the car mechanically back in shape that I just couldn't resist sharing our success. We still have a few items to sort out before I can tour with the car: - Adjust brakes - Install new float in oil sump - Finalize a couple of electrical improvements But before the leaves fall, I should be driving the car! WHOO HOO! Pictures below. I tried to upload a video of the engine running (quite fun to watch with its exposed valve train), but it was too large.


-
On a slightly different topic -- does anybody have an OEM valve from a 1918 Buick 4-cyl they'd be willing to loan me (I'll return)? We're contemplating using Chevy small block valves in this rebuild, and they appear to match the valves that came out of my engine, but I'm 99% sure the valves we took out are not OEM, and we're just trying to identify the difference between the OEM and Chevy valves.
-
Larry -- I don't know why the parts appear to be brass in the photo -- they're not, and they don't look like that in person.
-
Sorry - 1918 Buick E4-34 One other thing that has us scratching our heads - the diameter of my shafts on the rocker arm supports are 437 thousands. We broke one of the supports and I got one replacement from Dean Tryon and another from Larry Schramm -- both have shafts of 420 diameter, so the rockers don't fit. Larry helped me get mine welded, so I can easily use that, but I'm mystified at the differences. Could this have been a mid-production run change?
-
Need some (additional) advice on the valves on my 1918 4-Cyl: 1. On the rocker arms there are two oil holes. The one on the rod end (red arrows) the oil holes have felt inserts that we should be able to remove and replace with new, clean felt, right? 2. On the axle portion of the rocker there appears to be a cap (blue arrow) that retains what we suspect is another felt oil pad. Should we attempt to remove the cap to replace that pad as well? Suggested procedure for such a move without damaging the cap? 3. Valves. This car was restored in the 1950's and the valves we removed from it appear to match Chevrolet small block valves. Does anybody have the exact specs for the OEM valve? Exhaust and intake seem to be identical. I'm willing to have valves made if there's a reason we can't use the Chevy valves, but I don't have specs for the OEM valves. I discussed this with Terry Wiegand -- he has a drawing of the 6-cyl valve, but they're not the same. Would appreciate opinions or assistance.

-
Thanks everybody for the thoughts and suggestions. I found one, thanks to Larry Schramm in Detroit.


