
.jpg.a4a32e4d25651b5a4a8c160bab990dc6.jpg)

Str8-8-Dave
-
Posts
1,001 -
Joined
-
Last visited
Content Type
Forums
Gallery
Events
Everything posted by Str8-8-Dave
-
My 1931 Buick project- the saga begins...
Str8-8-Dave replied to Str8-8-Dave's topic in Me and My Buick
So today was the day. I got the car down from jackstands after 4.5yrs, got it started after a fashion, drove it in the subdivision briefly just to make sure the basics worked, then out on the road at about 40mph. Now I have some things to work on. It's a little vibratey The car backfires unless I run partial choke The clutch friction point is too high in the pedal travel The brakes require some learning and probably some break-in, pedal travel a bit long, they won't throw me thru the windshield... Not sure about the generator output, seems quite high, at 40mph ammeter is pretty well maxed on the + side The KS Telegage gas gauge doesn't work Gotta do something with the inside and right side rear view mirrors. I will start tinkering tomorrow. It got me 3 miles to the Sunoco station that sells 90 octane ethanol free unleaded and back home.


- 181 replies
-
- 12
-

-

-
I'm actually planning to crawl under my 31 Buick to give the brake light switch a shot of contact cleaner. It is a very simple switch but the other day during a lights check the brake light would not illuminate.
-
They probably have a ridge of sludge or varnish around the perimeter of the lifter below the guide bores. When lifter is all the way up there is probably some of the machined perimeter of the lifter that does not travel into the guide bore. Use of wood dowel from the underside of the lifters with pan removed is safer than brass drift. Don't chip the guide bores in the block.
-
May I humbly suggest some stuff I found while restoring old hi-fi equipment? This stuff works wonders on dirty potentiometers and switches, both on hi-fi AND automotive switchgear.

-
May I humbly suggest some stuff I found while restoring old hi-fi equipment? This stuff works wonders on dirty potentiometers and switches, both on hi-fi AND automotive switchgear.

-
I suspect Erndog is right. To remove the lifters you must remove the rectangular side covers on the right side of the block. You will then see the lifters are housed in iron carriers suspended above the camshaft. It looks like the lifter bores are cast on the block in the picture attached but there is a retainer plate above the lift (see arrow) that has to come off to remove lifters.
.png.054af3c0f1bd2ef3b013f6ea21b8023f.png)
-
Hi Peter, I have had several pictures that are oriented correctly show up rotated when I use the "Drag files here to attach, or choose files... Rotating them in Windows does not reorient the pictures correctly and I have yet to figure out how to rotate a picture attached to an AACA forum post. Example below, this picture is upside down. Please tell me how to correct. Thanks! Dave

-
My 1931 Buick project- the saga begins...
Str8-8-Dave replied to Str8-8-Dave's topic in Me and My Buick
Hello to all, hope you are enjoying your summer. One day last November I was summoned to Shelby Auto Trim in Utica, MI to pick up the newly upholstered interior seat for my 1931 Buick 8-66S. The seat frame I dropped off was a faithful replica of the original frame. The original frame had so deteriorated it simply was not useable. The front seat I got back was spectacular, I was very happy with the workmanship of Steve Baker, the seat tech at Shelby Trim, that did my seat. When I picked that seat up, I dropped off the rumble seat springs for upholstery. The rumble seat cushions were the last major project to make the very incomplete E-bay car I bought into a complete car. When I got the car there were no rumble seat springs. The only original seat spring assembly I got with the car was the interior seat base springs which were still wearing their 90year old upholstery. I got no interior seat back springs or seat base or seat back springs for the rumble compartment. More importantly I did not get the wood subframe that attaches the rumble seat back springs to the woodwork on the rumble lid. I had no idea at the time this crucial part was even missing. I came across a deal on Snyders replica 1931 Chevy rumble seat coupe springs and bought a complete set, including the interior seat base spring. I spent some time on the rumble base springs revising the overall length. The base springs appeared to be too long to me, the ends of the spring assembly rubbed on the compartment side trims scratching the finish on the vinyl upholstery material on the trims. I figured by the time the base cushion had padding added and a seat cover installed wouldn't even fit in the available space. As a result, I cut the spring assembly perimeter frames a to shorten the assembly 2 inches or 1 inch per side. This job was pretty straight forward requiring some minor rearrangement of spring coils and spacer wires. The hardest part was trying to figure out how to re-join the bottom frame, which was extruded steel, where I had cut the frame. It turned out steel window run channel I had on hand was just the right size and shape to bridge the cuts in the frame and I riveted the channel over the saw cuts in the frame to hold it all together. Fore and aft the spring assembly was perfect. There were metal locating tabs in the right locations along the bottom rear frame to engage the locating slots on the rumble compartment woodwork. I added some leather straps to the bottom front frame rail of the spring to pass thru other slots in a header on the floor of the rumble compartment and hook over some retaining pins Buick installed for that purpose. Then I started trying to mount the rumble seat back springs directly to the rumble lid woodwork, not yet realizing I was missing a wood subframe intended to attach the seat back assembly to the rumble lid. The more I screwed around with this project the more I thought I was missing something. Finally, I consulted Dave Dunton in Georgia, to see how the seat back attached to the rumble lid of his unrestored original car. First, I asked him to use his fingers to explore how the cover on the seat back attached. Dave reported he felt some kind of frame that the base of the seat cover was attached to. Eventually I asked Dave if he ever took the seat back out of the car, could he send me some pictures of the back of the cushion assembly. Next thing I knew Dave removed the rumble seat back cushion assembly and I got a picture of the back of it laying on the hood of an old Corvette Dave had for years. And there was the wood subframe. Dave has been a great resource, helping me confirm all kinds of details in an effort to do a faithful restoration of my car. He took a ton of measurements I requested and eventually I crafted a replica rumble seat back sub-frame, fitted the subframe to the rumble lid of my car and correctly attached the back springs to the sub-frame. Long before I got heavily involved in the rumble seat cushions, I got Dave Dunton's input on rumble compartment upholstery material. Was it leather, typical of rumble compartments or open car seats? No, it was a grained Naugahyde. I discovered Haartz Landau Tuxedo Black vinyl top material, which is grained, was similar enough to use on flat rumble compartment trim panels. I showed a sample to Steve Baker, and he said he material, which is vinyl over cloth, should work just fine for the rumble cushion upholstery. I did not want to surrender my car to Shelby Trim to facilitate the upholstery work. I made a gentleman's agreement with Steve Baker that I would be responsible provide enough information to allow Steve to upholster the seats in the car without having to tow the car to his shop and having it tied up there. The interior front seat wasn't too much of a problem because the seat frame, along with the original base cushion assembly, pretty much defined the build of the interior seat. I provided Fisher Body upholstery pictures and the faux mohair seat fabric. The biggest challenge with that seat was coming up with trim welt and Steve wound up making that. When the seat came back to me it predictably went in the car without much hassle. But the rumble cushions are a little more challenging. Not only do assembly dimensions have to agree so the seat doesn't have a big gap where the bottom of the back cushion meets the back of the base cushion when the rumble lid is opened for use, he assembled cushion heights must allow the rumble lid to close correctly. The profile of the top of the back cushion assembly must also fill the space on the top of the rumble lid woodwork but it must not interfere with the latch and drain gutter on the body of the car when you close it. I used zip-ties to compress seat base and seat back springs to get a combined profile that would allow for about 1-1/2" of padding to be installed over the spring assemblies before the seat covers were installed. All I can say is it all worked out. I picked up the rumble cushions, Monday, August 8, right after I took our Subaru Outback wagon for routine service, 45 miles from my house but just 10 miles from Shelby Auto Trim. Shelby Trim had a really busy early summer, cushions originally promised for April weren't ready until August. But the job came in $800 under the low estimated price and they looked great. We were heading for vacation Wednesday, August 10, and I thought at first, I would just wait until we came back from vacation to try to install the rumble cushions. I stood the back cushion up in the rumble compartment because it seemed like the safest place to store it until we got home. But, like a young kid trying to sneak a peek at the presents under the Christmas tree I was out in the hot garage about 10 o-clock to see if I could install the back cushion. The only thing I had to do to get the back cushion to fit correctly on the rumble lid was I had to bend the hooks at the top of the subframe out away from the subframe woodwork about 1/4" to get them to engage he receivers on the rumble lid. 15 minutes later it was installed. It really looked nice. The next afternoon I dropped the base cushion into the rumble compartment and spent about another hour getting the rear locating pins into their notches in the back of the compartment, a little harder to do because they are not visually accessible with upholstery installed on the springs, and fishing the leather hold down straps thru the slots at the front of the base cushion. I finally got it done. But did I get it right? Did Steve Baker get his part right? I nudged the rumble lid forward for the acid test... Kerplunk- it closed perfectly; you wouldn't know the cushions were in the car by the way the lid closed. Enjoy the pictures below, updates will probably be few and far between now. The car is ready for a shakedown drive. There will be some paint detailing and I may swap out the fully functional Marvel heat control system on the car currently for an even nicer system that is currently an interesting paper weight on my bench top. Thanks to all who have followed this project and the kind comments and advice you have sent. Dave What you see here is all I got with the car from the previous owner, a dilapidated old seat frame with base cushion. Using the original seat frame as a pattern I fabricated a complete new seat assembly only reusing metal side pans and reinforcements, the seat adjuster mechanism, seat track slides and track retainers. The rest of the original hardware, 104pcs, were replaced in same style stainless. I gave the pictured parts, new seat frame, original base cushion and Snyders seat back spring assembly to Shelby Auto Trim, spring of 2021... I got back the upholstered front seat you see here in November of 2021. Loading it into the car by myself was a challenge but I got it in. Fits nice and the adjuster works great. This is a Snyders reproduction rumble seat base cushion spring for 31 Chevy rumble seat coupe. It was too long and rubbed against the side trim panels in the rumble compartment. I took 1 inch out of each side of the springs. I then moved the springs around and re-joined the bottom frame with pieces of steel glass run channel riveted over the original frame in 4 places. The u-shaped hooks sticking out of the back of the base spring frame insert into slots in a wood header on the floor of the rumble compartment behind the seat base. The leather strap shown here feeds thru a slot in a wood header in front of the base seat cushion, then hooks over a retention pin on the front face of the rumble compartment floor riser. Before I understood the seat back spring attaches to a missing wood subframe I didn't get with the car I tried to mount the springs directly to the rumble lid woodwork. It didn't look right. How would you hide the mounting tabs after the spring was upholstered? Why were there no mounting screw holes in the top rumble lid header? I finally shared my concern with Dave Dunton who has one of these cars that is unrestored. I asked if he ever happened to take the seat back out of his car if he could send me a picture of the back of it. About a day later he happened to take the rumble seat and sent me this picture of the back of the cushion assembly revealing the fact it was all built up on a wood subframe I never knew existed. The metal hooks shown on the left side of Daves seat frame slide into receivers on the rumble lid to attach the top of the subframe to the lid while hiding the attaching hardware. Making a replica of the subframe had quite a few challenges. The two side rails on the frame were made in two, 4" wide, steam bent pieces of ash lumber joined by a finger joint, something I could never do at home. On the right side of the picture you can also see there are some deep pockets in the subframe that have to fit over the rumble lid hinges on both sides of the cushion assembly. My solution required I buy a good bandsaw. I decided the only solution to getting the two curved side rails was to make a curved template, then cut 4 sections from 1" thick ash lumber and glue them together. The outer 1" section of each curve rail would be contoured to fit over the rumble lid hinges. The 2 inner sections of curve rail would have relief slots cut into them to recess the 3 cross braces into. Eventually I wound up with a wood subframe that looked like this. The final step before handing the rumble cushion springs off the Shelby Trim was adjusting the spring heights to get the desired cushion shape and assure the installed upholstered cushions would allow the rumble lid to close. This was accomplished by tying the springs down with 12" zip-ties. The rumble cushion springs and lots of pictures and pages of instruction were handed off to Shelby Auto Trim in November of 2021. The following pictures show the finished cushions successfully installed in the car..jpg.6ca1b5435f8e5b92be2b1462c7e4ce70.jpg)


-
I received an E-mail from a Charles Duncan that looked pretty official, it had a hyperlink to an old post I had done looking for 31 Buick heat riser parts. The general drift was Mr. Duncan wanted to know if I was still interested in the parts prompting me to respond with an E-mail stating I was still looking for one part, attaching a marked JPEG picture of the part I was looking for, inquiring if he had the part and how he wanted to be paid for it if he had one to sell. I told him if he wanted a check to tell me who to make the check to and to send the address to mail it to. Today I got a second E-mail with a picture of a hot-rodded, highly altered but nice looking complete 1932 Buick model 67 sedan. Mr. Duncan stated he was going to completely part the car due to upcoming surgery and asked me to send a list of the parts I wanted and my address, supposedly just so he knew how far he would have to ship parts. At this point I became suspicious the only pending surgery was going to be on my wallet. I didn't answer the second E-mail. A query of his name on the AACA message page produced no Charles Duncan. I'm pretty sure I caught on to a scammer but found the approach somewhat novel. Has anyone else been approached this way- E-mail with an AACA hyperlink? Cheers Dave
-
Typically, the purpose of offsetting wrist pins is noise abatement. If piston pins are not offset the piston may wobble in the bore causing clatter. Most contemporary car engines, especially those with V configured engines, use offset wrist pins. In a Buick straight 8 I doubt you could tell if pins were offset or not, the engine block castings are thick by today's standards, and the engine makes enough mechanical noise otherwise to mask piston wobble. I only had trouble with this one time, and it was with a motorcycle. I had a 1973 Moto-Guzzi 850cc Eldorado which featured a 90-degree V-twin engine and it rattled like hell every time you opened the throttle. It was air cooled and had alloy cylinders with chrome bores. I spent a lot of money replacing the cylinders and pistons to get rid of the noise and after the new pistons and cylinders were run just a few miles they cackled every time you opened the throttle. I finally figured out the reason was the crank centerline and bore centerlines intersected right on center and the wrist pins were in the exact center of the piston.

-
wtb 1931 buick series 50 heat riser or exhaust heat valve
Str8-8-Dave replied to stilwell's topic in General Discussion
Pete Phillips in TX might have one of these,,, Send him a PM if you haven't already talked to him. -
IMHO: They couldn't afford to do this, way outside their business model.
-
I owned a number of contemporary motorcyles and rode them all over for 50+ years, finally quitting after a self-inflicted stomach tear while trying to ride my Ducati 996 after I gained weight and had no business being on it. Some 7 years later that injury took me to the OR for emergency surgery after my intestine got trapped in the hernia. That said I don't and won't ever regret the motorcycle experiences I had. After building my first motorcycle from a Schwinn Stingray bicycle my dad became concerned for my safety. The Schwinn was assembler titled and licensed for legal use on the road and I was riding it all over the place. He knew the bicycle tires and rims were not safe after the bike was powered with a 5hp Lauson motor which with me on it was clocked at 50+ mph. So, my mom and dad bought my first real motorcycle, a 1966 Yamaha Trail 80. Many years and many motorcycles later I worked at Ford in a HVAC development lab. One of my good friends ran the machine shop for the Chassis Lab across the hall, a Brit named Dave Matson, owned the largest collection of The Vincent HRD motorcycles in the Midwest. Dave rode various models to work and pared them in the motorcycle lot behind the Chassis Lab, including Black Shadow, Rapide, Comet single and a Black Prince fully faired touring bike. Dave also travelled to the Bonneville Salt Flats to campaign a modified 1300cc Vincent twin powered bike he fabricated the chassis for and ran in gas classes, fuel classes and open and faired classes eventually getting into the 200 Mile Per Hour Club. He quit racing after a nasty accident in which a welded header developed a pinhole right next to his left footpeg burning a hole in his boot and severing his great left toe. Another bunch of guys, the LaFollettes road-raced, first on Moto-Guzzis for Blackies Cycle in Detroit and eventually racing stock class Honda 750 super sports. Ahh- those were the days... A 1966 Yamaha Trail 80 like the one my mom and dad gave me for Christmas in 1966. I replaced the first Yamaha with a 1967 Yamaha Trail 100 which had bigger wheels and tires, but never ran as well as the 80 did. I had 2 of these. My older brother was the original owner of the first one when he co-oped at Ford. He left the keys sitting out where a mischievous teenager who got home from school when no one was around took the liberty of "borrowing" them and learned to ride a real motorcycle before I ever had my first. The neighbors were horrified to see me riding my brothers 1966 Yamaha Catalina 250 without a helmet. That thing was pretty fast with a 15yr old 95lb rider... My first BMW- a 1973 R75/5 long wheelbase, a really good motorcycle... Grass is always greener so I traded the R75 to a guy in the Ford Chassis Lab for his 1970 Moto-Guzzi Eldorado. It had piston slap noise that drove me nuts. I didn't keep it long. Not mine but I spotted one of these, an RCMP surplus Triumph flathead sitting by the side of the road on my way to work. I wound up buying and restoring that bike. I bought one of the first Honda GL1000 Goldwings in 1975 from Anderson's Cycle World in Bloomfield Hills, MI. Again, not mine, but I bought a brand new 1975 XLH 1000 Sportster just like this one except it was burgundy. The Sportster was a cantankerous vibrating, oil leaking lump so of course, in the Ford way, I bought another Harley, a 1976 1200 Super-glide Liberty Edition. I put a Harley handlebar fairing on it, replaced the 3.6-gal tank with Harley dual 5-gal tanks with speedo and ignition switch mounted on the tank. I also added Harley white fiberglass saddle bags and installed a Harley leather tractor seat and spring post which made it, well, semi comfortable. The bike below is not mine but similar to the stock bike I bought before I modified it. Then a miracle happened, I bought a new 1977 BMW R100S from Howell Cycle. Howell Cycle was owned by a very interesting German chap named Oren Glassel and his motorcycle shop was always an adventure to visit. He was an Ithaca gun dealer, a BMW/Kawasaki motorcycle dealer and in a separate building across the parking lot from the motorcycle showroom he sold Scwhinn bicycles, had hundreds of them hanging upside down on the roof rafter cross-ties. He also flew 2 Shoestring Midget bi-planes and a sail plane, all on display in the bicycle shop. That 1977 BMW R100S gave me the most fun and enjoyment of any motorcycle I ever owned. Many years later I bought another from the president of Bell Helmets and restored it. This is a 1986 Honda VFR 750 like one I bought used and restored. It turned out to be a really good motorcycle. It featured a water-cooled V-4 that was silky smooth and fast. I was always fascinated by V-twin motorcycles so when the 1000cc Honda Super Hawk came out I traded the VFR in. For many years I rode a Honda RC51 like this one back and forth to my job at Ford. The RC51 was a V-twin successor to the Honda RC45 which Honda raced in World Superbike with great success. Honda sold RC51s right out of their race shop to homologate them for superbike racing. Carl Fogarty had a field day with the Hondas riding his V-twin Ducati's which had Desmodromic valve train that could out-rev and out-horsepower the Honda. I bought this Husqvarna 250 Mikkola wide ratio replica out of a barn in New Lothrop, MI wherever the hell that is, it was out in the sticks. It only had a few miles on it, was covered with mud and the 2 original Trelleborg knobby tires were flat as pancakes. I brought it home and tired unsuccessfully to get it started and running. I finally got frustrated with it and took it all apart to clean it up, re-paint it and restore it. One day I took the flywheel off to replace the points and condenser and discovered the reason it wouldn't start was because the previous owner removed the condenser... This late model Harley Sportster was scheduled to be given away at a local Police fund raiser. The lucky ticket holder didn't want it so the shop bought the bike back and I bought it. With its 1200cc Evolution engine and belt drive It was a little better than the 1975 iron head sportster I owned but still featured bad lighting, wandered around on it's twitchy front fork geometry and had barely 100 miles of range with the little gas tank. That's my 1997 Porsche 928 S4 hiding in the garage... My next bike was a 2001 BMW R1100S which I bought from a Grand Rapids doctor. It was a mess when I brought it home but the price was right so I restored it and rode it for a couple of years. I often rode it from Port Huron, 410 miles to our cottage in Garden MI in the UP. I almost lost my marriage when I bought this 2000 Ducati 996 on E-bay from a seller who bought it new from BMW Detroit, rode it a less than 700 miles, then was transferred to Florida by his employer. He had the bike prepped for storage and shipped it to Florida and never rode it again. I bought it in 2011 and had it shipped to Port Huron where I completely restored it. Originally it was a "Bi-posto" (dual seat) model an using all OEM Ducati parts I converted it to a Mono-posto (single seat) model. I tore my stomach muscle trying to ride it after having gained some weight, the ergonomics of this motorcycle with its high back tank and low clip-on bars, well, it was designed for young skinny riders, which I was not anymore. I had it up to about 145MPH at 8,000 rpm that day, still breaking in the engine. The last bastions of my motorcycle career ended in this stall of my garage in 2013. I converted one stall to a motorcycle display room.


-
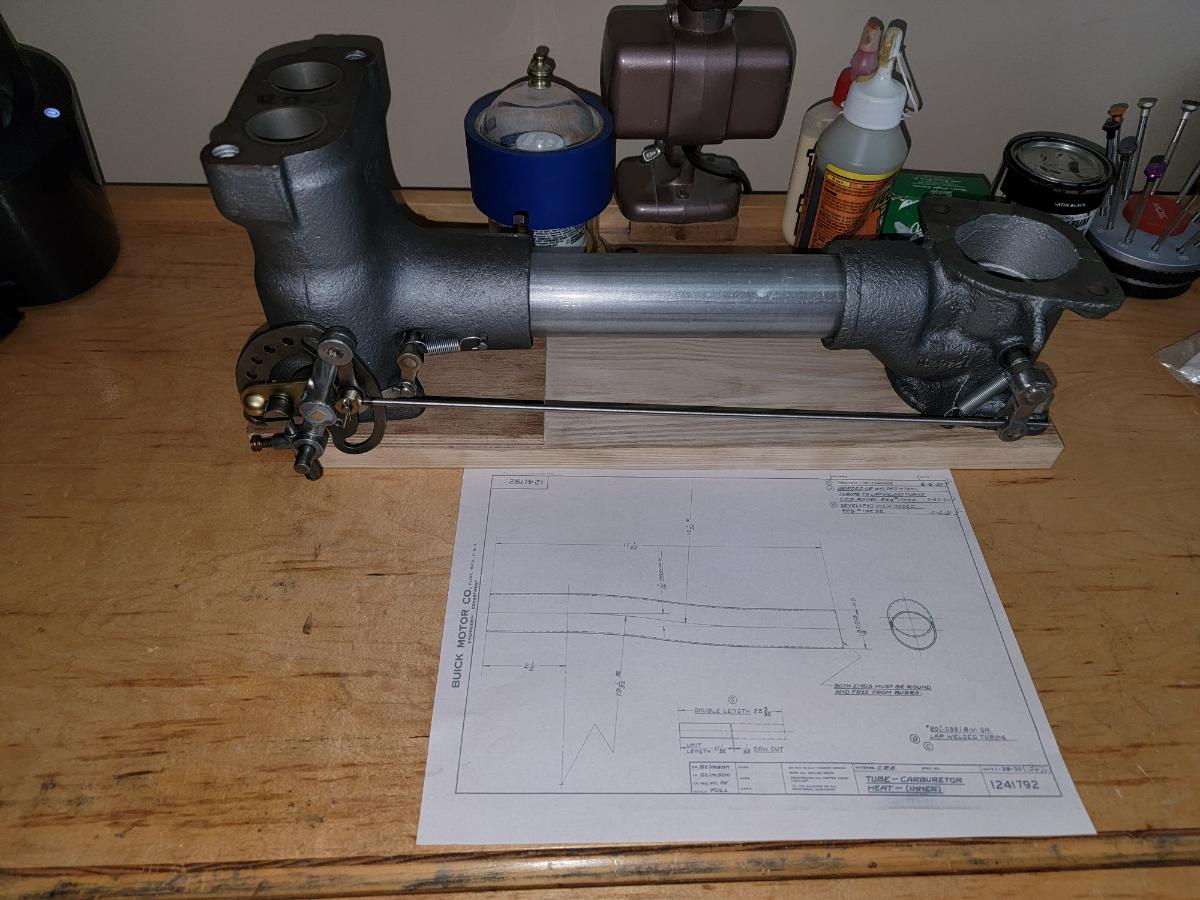
Hi Tony- You and I think alike on spares, I keep a spread sheet for mine. I recently built a complete heat riser setup including transfer tubes and exhaust diverter. That's just in case my failure to follow advice of many to block off the carburetor heat system comes round to bite me LOL. The system on my car is complete and functional without problem and the one on my bench is even better. Dave
-
You understand, do you, that the generator drives everything except the oil pump? A helical gear on the front of the generator engages the fiber cam gear in the front timing case, that drives the generator, the distributor gears that Tom Van Meteren has, drive the distributor. An Oldham coupling drives the water pump off the rear of the generator. The oil pump is driven off a helical gear machined in assembly with the cam inside the crankcase behind the oil temp regulator.
-
Who makes new carburetor floats to replace old brass cracked floats?
Str8-8-Dave replied to mikewest's topic in Technical
For sure, if you are going to coat a float with fuel proof coating, don't use shellac, use what cudaman suggested, Pactra hot fuel proof dope which is fuel proof in nitromethane, a much harder test than fossil fuels dispensed at the gas pump even if it's 85% ethanol (don't use that either). I use SIG hot fuel proof butyrate dope, also commonly available at hobby stores. As for coating a brass float- they were lead alloy soldered. If you have a float with metal fatigue cracks, I'm not sure hot fuel proof dope is adequate. Firs you would have to make sure there is no fuel trapped inside the float adding weight, second, a coating of dope may or may not adhere well on brass, it's intended for use on wood products, jap tissue and silk. If you are going to fabricate a float from cork, you have to make sure it is virgin natural cork which is difficult to find. Most cork you find today is recycled and is ground up powder that is glued, it has nowhere near the buoyancy of virgin cork used in the old days when it was commonly available. Today, a better choice if you are going to fabricate your own is block balsa which has a slightly better buoyancy that even pure cork, can absolutely be effectively sealed with Pactra or SIG hot fuel proof dope and is easy to work with. I'm leery of modern nitrophyl plastic floats because I had a couple of those saturate with gasoline and sink, in one case causing a very expensive fire. I made a float to replace the original cork item for my 1931 Buick's Marvel, model 10-795. It went in 3 years ago and still floats like a champ. An original Marvel cork float with its brass arm and float valve. I had flooding issues with this float which probably absorbed some fuel over its 90-year lifespan. I also found under the magnification of jeweler's goggles that there was some fine chalky residue coating on the float valve which I polished off with 2000 grit wet/dry sandpaper, then polished with Happich Simichrome paste chrome polish. The new float was copied exactly from the original, cut from 1-inch-thick balsa block. The float was coated with SIG butyrate hot fuel proof dope before and after assembly to the float arm. Finally- here it is on the job in the Marvel 10-795 carburetor.


-
1931 Buick Sedan Series 60 throttle hookup and locating parts.
Str8-8-Dave replied to rnbuck01's topic in Buick - Pre War
The long rod that connects the accelerator pedal (thru the firewall bell crank) to the throttle butterfly shaft in the heat riser DOES go on the side closest to the cylinder block or the right side of the heat riser. That rod that connects to the carb (that's actually the heat riser) to the steering gear is the warmup throttle rod. You control it from the top lever on the steering wheel. The bottom lever is the headlight switch control lever. Inside the steering column are a tubular housing shown on the right with the diamond shaped bracket, another tubular shaft that operates the warmup throttle shown in the center below and a solid shaft shown on the left that operates the headlight switch thru the bottom steering wheel lever in the picture above. In the picture below on the left is the rod that connects to a lever between the headlight switch and the steering gear. There are 2 levers shown in this picture, an original broken pot metal lever shown in the center and a Cadillac V16 lever cast in bronze that I modified to replace the broken piece. The Classic & Exotic Service invoice in the picture is the source for the lever I modified and the part number and price are shown on the receipt. Pictured below is the lever I made up installed on it's shaft between the steering gear and the headlight switch. The picture below shows the warmup throttle rod installed on a running car. It is connected to that lever I made up on the bottom and to a free rotating lever on the end of the throttle butterfly shaft on the left side of the heat riser. When the free rotating lever comes in contact with the pin above it, it starts to open the throttle butterflies to speed up the engine.


-
My 1931 Buick project- the saga begins...
Str8-8-Dave replied to Str8-8-Dave's topic in Me and My Buick
Hi to all- hope you all had an enjoyable 4th of July. We sold the cottage in the UP, so we wound up taking a 3-day short trip to northern Michigan's Lake Huron shoreline, ate at favorite bar/restaurant, fireworks at Harrisville, MI and took in a parade at Tawas City, MI. Very enjoyable. Today was a beautiful weather day in Port Huron so I pulled the cover off the front of the Buick and ran it. It's been probably a month since last run and I weaned it off the portable boat tank and it is now being run off the 18- gallon car tank. It runs just fine, takes a bit of cranking to fill the carburetor bowl, but after that we're off to the races. A particular reason to run the car today is I had a lot of trouble with oil leakage at the tappet covers. I ordered a set of new cork gaskets from Olsons and just to make sure I bought a tube of 3M yellow gasket and trim cement. When I actually got around to doing the job and after pulling the tappet covers, I wound up reusing the nice cork gaskets I made for the covers. They had been contact-cemented to the tappet cover. I simply cleaned the cylinder block side of the gaskets up with lacquer thinner and coated gaskets and the block with a bead of the 3M stuff and reinstalled them. I ran the car for a good 30 minutes today and happily, a couple hours later, there's nary a drop of oil on the garage floor. It's almost time to let the car down off the jack stands where it has been perched since April 2018. Then- I'm waiting for Shelby Trim to upholster my rumble seat cushions to finish all but the last details. Dave... The car is running in this picture. You can see it is still on jack stands and the stains on the garage floor bear witness to the fact it had an oil leak problem at the tappet covers. I also campaigned the pan bolts for leakage. The one remaining minor leak is it drips a little from the rear main, not enough to make me pull the pan. A view of the wide-open radiator shutters which correctly operate from the Sylphon-style bellows thermostat in the top tank of the radiator. Good oil pressure (30psi), good water temp (185f) and good rate of charge at idle. The car idles nicely... A shot of the right side showing the tappet covers trying to hide behind the right side accessories. Kinda like an elephant trying to sneak across the top of a pool table. The view thru the passenger door...


-
1931 Buick Sedan Series 60 throttle hookup and locating parts.
Str8-8-Dave replied to rnbuck01's topic in Buick - Pre War
Yes- 60 series, model 8-66S Special Coupe. Your 60 series sedan would use the exact same setup shown here. -
1931 Buick Sedan Series 60 throttle hookup and locating parts.
Str8-8-Dave replied to rnbuck01's topic in Buick - Pre War
I don't know who produced either the front fitted mat or the Fisher Body non-fitted mat I installed in the rumble compartment. I bought both from Bob's Automobilia in Atascadero, CA along with the repro gas pedal and a ton of other re-pop parts. I did the cutting and trimming on the rumble compartment mat.

-
1931 Buick Sedan Series 60 throttle hookup and locating parts.
Str8-8-Dave replied to rnbuck01's topic in Buick - Pre War
Here are pictures of my 1931 Buick 8-66S throttle linkage under the hood and inside the car. I believe my linkage setup is totally correct except I had to adapt a 1939 (I think) Buick throttle return spring. Basically the link shown sticking up thru the floorboard is connected to the input of a firewall mounted bell crank. A long link connects to the output of that bell crank, then stretches forward horizontally to a pin on the throttle cam of the heat riser. The spring attaches to a hole in the firewall bell crank bracket, then attaches to a welded tab on the horizontal throttle rod that connects the output of the bell crank to the heat riser throttle cam. Hope this helps. These are high-res pictures and you can expand them quite a bit and they will remain clear. Dave... Download and expand this picture to get a clear view of the firewall mounted bell crank. A good shot of the accelerator return spring. Here you can see the heat riser throttle pin and how the linkage attaches. That's the view from in front of the heat riser, the cotter pin and washer adjacent to the reddish idle adjustment screw. This may be a better shot of the firewall mounted bell crank. Download and expand for a clear picture. The accelerator pedal link rod is a short piece the attaches to the bell crank on the firewall and sticks up thru the floorboard shown here between the starter pedal and the hand brake lever. Just to the left of the shifter dust bell you can see where the accelerator pedal attaches with a clevis pin. Accelerator pedal viewed from right side of car. Accelerator pedal from left door opening.


-
Dot 3 is alcohol/castor oil based and the alcohol DOES absorb moisture. Dot 5 is silicone which WILL NOT absorb moisture. The Dot 3 stuff can and does absorb quite a bit of moisture but since water and alcohol bind perfectly the moisture content is spread over the entire volume of the brake fluid and is much less likely to boil causing brake failure during a panic stop. With silicone, any moisture that does collect in the system forms droplets which are not absorbed and migrates to the lowest point in the system, I.E. the wheel cylinders. This can result in boiling causing a compressible gas known as steam to form from the heat transmitted to the fluid in the wheel cylinder, particularly with disk brakes. This can be an awkward occurrence during a panic stop. This, combined with owner reluctance to replace brake fluid every 1-2yrs as recommended by the OEMs is why the OEMs do not use silicone. They are not fond of lawsuits. My late model Porsche has extremely sophisticated brakes and anti-lock systems that can be severely damaged by moisture absorbed by the Dot 3 brake fluid installed at the factory. The Dot 3 brake fluid is replaced in annual factory authorized service encounters to avoid this. Porsche specifically DOES NOT recommend Dot 5 and won't warrant the brakes on a car using it. Also, if you want to participate in Porsche Club of America club racing, you will be asked to produce a receipt showing your brake fluid is no older than 1yr in service. Failing that you have 2 options, don't participate or let club mechanics change the brake fluid on-site. All that said I have used Dot 5 in the past without incident. I have also purchased Dot 5 in Harley Davidson TM cans. I have no idea if they still carry it.
-
For one thing, fenders, gas tank shield, running board aprons, front gravel pan and hood sills were originally black. If the paint is metallic, that's not right either.
-
I still use California Car Covers on my cars, for the 1931 Buick I found a returned cover being sold by CCC on E-bay that was actually designed for a 1937 Olds sedan. It's an indoor cover made with their Dust Stop fabric and it keeps the dust, quite prevalent in my garage, off the paint. It would have been better to order a custom-made cover, this one is long enough but sides are not tall enough to reach the running boards, so some dust makes its way to the fender aprons and running board aprons. For $150 it was a prudent buy. For my 2015 Porsche 911-4S I bought a custom fitted CCC cover for about $300. The car is worth 3 times what the Buick would sell for. That cover reaches down past the rocker panels by a good bit and the elastic makes it pretty form fitting. This cover is also indoor-only. As far as the dust abrasion comments, if the car finish is clean when the cover goes on there will be minimal abrasion and the car will still be clean when the cover comes off. This 1937 Olds cover was returned to California Car Cover and I bought it on E-Bay. Not a perfect fit but acceptable and it keeps the dust off my 1931 Buick 8-66S The cover on my Porsche 911 S4 was a custom fit cover and cost twice as much as the Buick cover. It fits the car well and keeps the dust off the paint.


-
want to buy 1931 Buick Speedometer Cable
Str8-8-Dave replied to Str8-8-Dave's topic in Buick - Pre War
Hi Tom; I bought Dave Dunton's spare cable probably 3 years ago. These are very hard to find. Best of luck. Dave


.png.054af3c0f1bd2ef3b013f6ea21b8023f.png)

.jpg.6ca1b5435f8e5b92be2b1462c7e4ce70.jpg)


