


DShoes
-
Posts
128 -
Joined
-
Last visited
Content Type
Forums
Gallery
Events
Everything posted by DShoes
-
@atencioee, @gungeey answered with more detail than I ever could but I'll tag on that I did not upgrade my alternator. Also, I'm not sure how you're going to keep an original radio face (mechanical) to use with digital components like Bluetooth. Maybe I misunderstood what you wanted to do. I've been very happy with my RetroSound Hermosa and you can customize it to your liking: https://www.retromanufacturing.com/collections/vehicle-search/1965+Buick+Riviera?rq=yr_1965~mk_Buick~md_Riviera Also, don't forget your sound dampening. I put the adhesive sound deadening material on most of the bare metal in the trunk before recovering. It improves the bass response 10X and it knocks out any metal rattle that might occur between the panels. Good luck!
-
Ed / Rodney, I think you're on to something! Currently investigating these bike cable ferrules from Amazon and will report back.

-
Clever! Can’t get cleaner than that!
-
Good thread, gungeey. I’m also about stealth + quality sound. I’m running Morel speakers powered by a Kenwood amp. I’ve pulled the spare tire and the amp is fastened to the backside of the back seats. 10” sub in the trunk awaiting matching interior vinyl re-wrap. Two 6x9s have been placed in a redone shelf above the back seats. Two 6” speakers also sit in custom enclosures on the door kick panels. OEM dash speaker was pulled and upgraded. Radio is a Retrosound Hermosa, which I bought for the Bluetooth and decent look (still not as cool as OEM). Also converted the cigarette lighter to USB ports which connects to the sound system and charges your phone.


-

1965 Riviera trunk lid acoustic insulation options?
DShoes replied to DShoes's topic in Buick Riviera
Rivnik, those are the originals clips (as far as I know - I am 2nd owner). -
1965 Riviera trunk lid acoustic insulation options?
DShoes replied to DShoes's topic in Buick Riviera
Curmudgeon: with a quality stereo system and quality insulation, you won’t hear anything. Perfect for yelling at those kids to get off your lawn. 😉 -
Good thought Rod, especially on using the Dremmel to not lose length. Tricky part is that I think I need to reduce the length of the cables a fraction so that they are pulling evenly and at the right tension. At least your method gives me more cable to work down. Now where to find those end caps….?
-
1965 Riviera trunk lid acoustic insulation options?
DShoes replied to DShoes's topic in Buick Riviera
Spare doesn’t go. It stays at home. I figured I didn’t need the extra weight and would call AAA if need be. Sounds good on the new thread. Maybe I can even get photos right side up! So frustrating… -
1965 Riviera trunk lid acoustic insulation options?
DShoes replied to DShoes's topic in Buick Riviera
Gungeey, I’m all for that thread! Amp is right behind the back seat where the spare tire used to be. I re-did the back shelf and put 2 x 9” oval mids from Morel there. Both doors got custom enclosures for some 6” Morels. Tweeter (also Morel) replaced the OEM speaker under the dash. Retrosound face allows for Bluetooth, etc. Incredibly happy with the outcome acoustically and visually.


-
BINGO. Phoemsen, I don't know why I didn't think of something so simple, but that did the trick. Thank you!
-
Thanks Seafoam. Will give that a try.
-
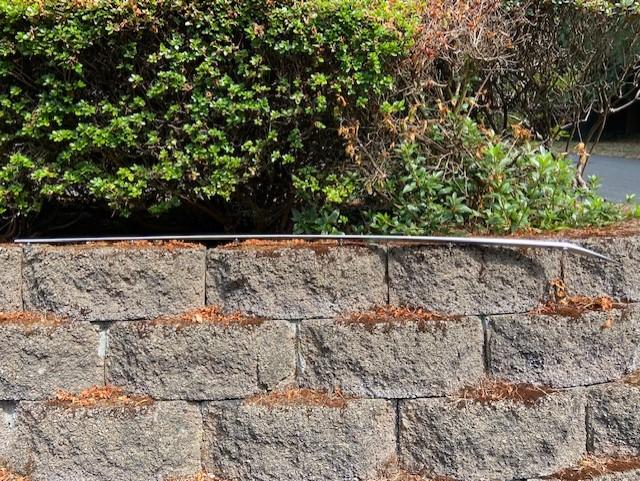
I’ve lost the correct tension from the three cables that allow adjustment of the side view mirror. As such, my mirror won’t stay in place while driving. My sense is that the cables have gotten stretched a bit too long. You can see one strand has even broken. I’m a little nervous about cutting and recapping as this may make them too short. Also not sure what to cap them with that will still fit / anchor appropriately in the joystick housing. Thoughts / suggestions?


-
This is part of the problem. I’m going to look for more of a flathead screw perhaps with a shorter body to make sure clearance is not an issue. My first preference is no rubber washers at all. I trust you guys don’t have a lid that wiggles and squeaks?
-
What should have been a simple fix has continued to elude me... The center console lid on my '65 is loose and rattles. When I try adding some rubber washers, it won't close flush. I must be missing something incredibly obvious here... Wrong length fasteners? Something else? Can someone show me the light please? Note it does have the small rubber lid "bumpers" where the lid lands near the shifter.


-
Hi all. I have an extra 64-65 hood spear that is in very nice condition and ready for a new home. Note it's silver argent color has been replaced with a black satin (no idea why my paint guy did that) but its an easy fix and the spear is in great shape. $50 + shipping from Seattle. Posting here first before going to Craigslist, etc.


-
Picked up this '64 driver's door mistakenly for my '65 project. I'm not able to ship it but happy to pass it on free of charge if another enthusiast will pick it up in Seattle.


-
1965 Riviera trunk lid acoustic insulation options?
DShoes replied to DShoes's topic in Buick Riviera
Progress pics. Trying to wrap the cardboard inserts with leftover vinyl from the interior and finding it harder than imagined. Will probably shift to doing the sub enclosure so I can feel better about myself.


-
1965 Riviera trunk lid acoustic insulation options?
DShoes replied to DShoes's topic in Buick Riviera
I appreciate all the good thoughts gentlemen. I went with the double-whammy of sticking down 0.8mm dense acoustic dampening material (similar to Dynamat) and wrapped as far into the crevices where the inner and outer panels meet as possible. Then I cut-to-fit a large carpet remnant roll that matches the interior fawn color. I'm about 85% complete but the sound improvement is already +300%. Rattle is gone and the bass is tighter and more acoustically pleasing overall. I also love the look. Next up is to order some extra vinyl from Clark's Corvair to wrap the subwoofer enclosure. I'll try to update with some photos here soon. -
1965 Riviera trunk lid acoustic insulation options?
DShoes replied to DShoes's topic in Buick Riviera
No old glue on this end. Trunk lid was removed, stripped, sanded and painted last Fall. I’m dealing with acoustic vibration. -
Hi All, I'm looking to add some form of acoustic insulation to my '65 trunk lid, which rattles more than I'd like due to the subwoofer placement. Its got brand new weather stripping, so I know that's not the culprit. I'm curious what folks recommend that is both functional and pleasing to the eye? What I'm finding online seems functional - but not much to look at. I'm also curious if anyone has ever added insulation similar to what's available for the engine bay hood to the space between the interior and exterior trunk lid panels? I'd love to keep the underside of the trunk lid clean, if that's a option. Thanks.
-
Len, I used the old pieces as a template for the new. Traced them and started cutting. As usual, Ed is spot on. The screw holes were the worst. I ended buying very small cosmetic scissors to get those holes done.
-
I just did this in my '65 a few weeks back. Tenugent and Ed are right with the heat gun and adhesive remover. I personally used the heat gun, Goof Off and a plastic scraper. Took a little while but I got there in the end. For sticking the new pieces on, I went with a flexible E6000 clear adhesive that would allow me a little time to move the piece into place and clean up easier than spray adhesive. I also custom cut new pieces from burled maple veneer. Pretty pleased with how things came out. Good luck with yours.

-
Quick update to this thread. A few weeks back, I ended up removing the rusted out resonators all together and piping things straight back to a transverse Flowmaster (I think I mistakenly stated Magnaflow previously). My wife can't tell the difference but I can tell things are just a bit louder. No real gain or loss in the low grumble. I had been warned about possible drone with the Flowmaster at highway speed, but fortunately I'm not experiencing it. As always, thanks for all the suggestions / opinions. David
-
So if I'm understanding you right, you just have the single muffler with 2 1/2" pipe and no resonators? Would love to see more of those pics when you have a chance. Thanks. You've got me thinking that maybe I should ditch the resonators, step up my pipe diameter from 2" to 2 1/2" and go straight into the back muffler...
-
Turbinator, I just came across your video. What a beautiful Riv...and what a beautiful sound! What's your set up? I need to replace the R and L stock resonators on my '65 (rusted out). Already replaced the large back muffler with something from Magnaflow a couple years back. Sounds nice but almost too quiet. I'm looking for that nice Chris Craft boat rumble that you've got.


