RichBad
-
Posts
740 -
Joined
-
Last visited
-
Days Won
1
Content Type
Forums
Gallery
Events
Everything posted by RichBad
-
1927/28 Dodge Brothers series 128/129 Tourer
RichBad replied to RichBad's topic in Our Cars & Restoration Projects
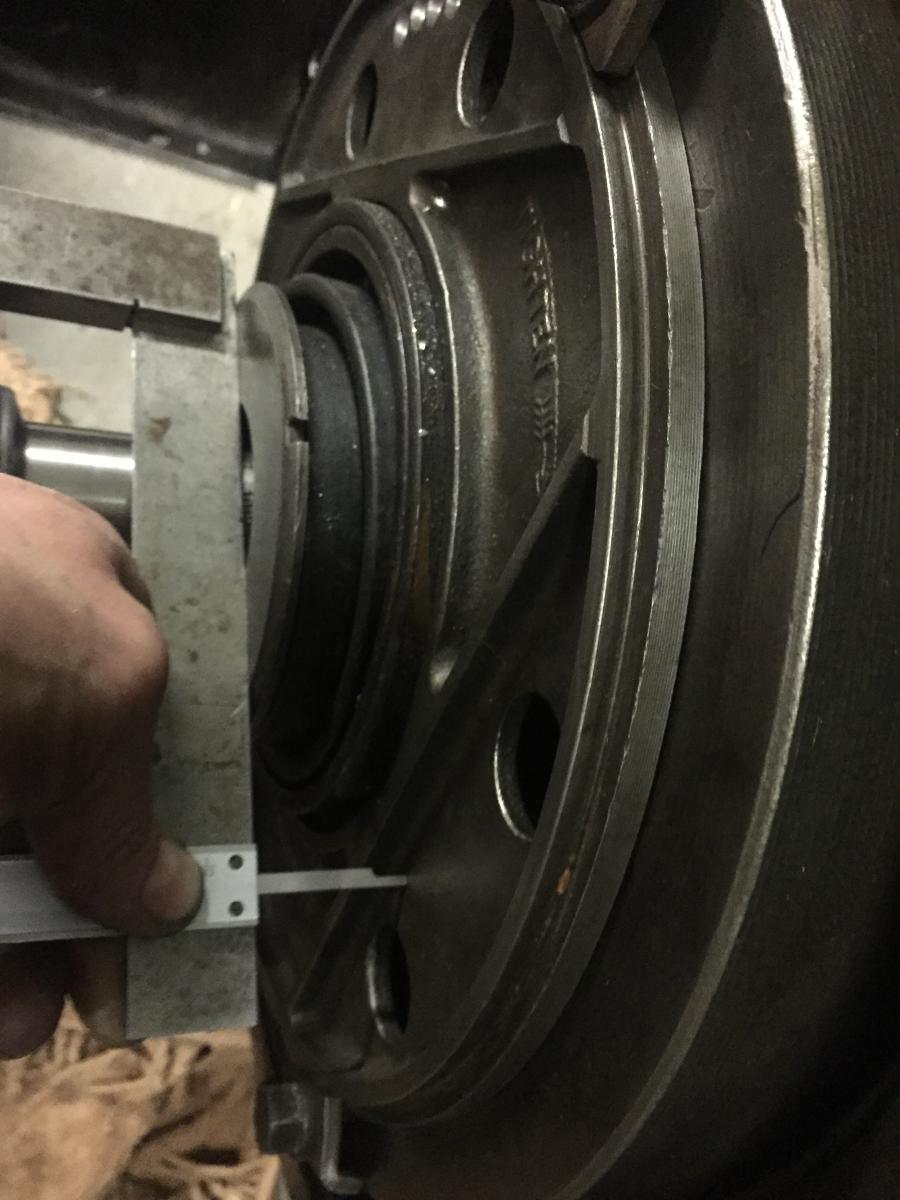
Engine back in the car and new plug leads made and plugs fitted. Fan fitted Exhaust and inlet manifold painted (baked in the BBQ much to my wife's pleasure) and bolted together also made a new manifold nut to suit. Manifold and carburettor fitted and timing and throttle controls attached and adjusted. Flywheel fitted - don't forget to fit the spigot bearing into the crankshaft and add some grease to keep it lubricated. Clutch pressure plate cleaned and joints greased. Clutch assembly fitted to flywheel - used gearbox output shaft to set clutch alignment before tightening. Adjusting pressure plate pre-load - set dimension to 1 5/16" Vacuum and fuel feed tubes made and fitted. Adjusted points gap to 0.030"and set timing to 12degrees (mark on flywheel) with timing in fully advanced position. Fitted radiator, temporary coil and exhaust. Filled with oil and primed oil using the oil pressure gauge outlet port (to pre-fill all the reservoirs). All ready for initial start up


-
1926 Carburetor Issues and Also a Wanted Ad for Bell Crank
RichBad replied to DB26's topic in Dodge & Dodge Brothers
Not sure if yours is the same as mine (pic below) but I didn't have any leaking problems after replacing the packing. I fitted the shaft then wound the packing around the shaft in a clockwise direction (so it wouldn't unwind when fitting the nut). Then fitted the nut and gradually tightened checking that the shaft would still be able to move easily - I found that I went past the point of easy movement but then after moving back and forth a few times it freed up a little. I repeated this a few times and then tightened the locknut - haven't had a drop leak since. Perhaps your shaft has some damage which is stopping it sealing correctly? Cheers
-
Thanks for the parts Bob, they arrived today. Gear box finished off and fitted:) the lay shaft was way better than mine! Here’s the ring if anyone was wondering Ring fitted to output shaft. Gearbox back on the car and filling with oil


-
1927/28 Dodge Brothers series 128/129 Tourer
RichBad replied to RichBad's topic in Our Cars & Restoration Projects
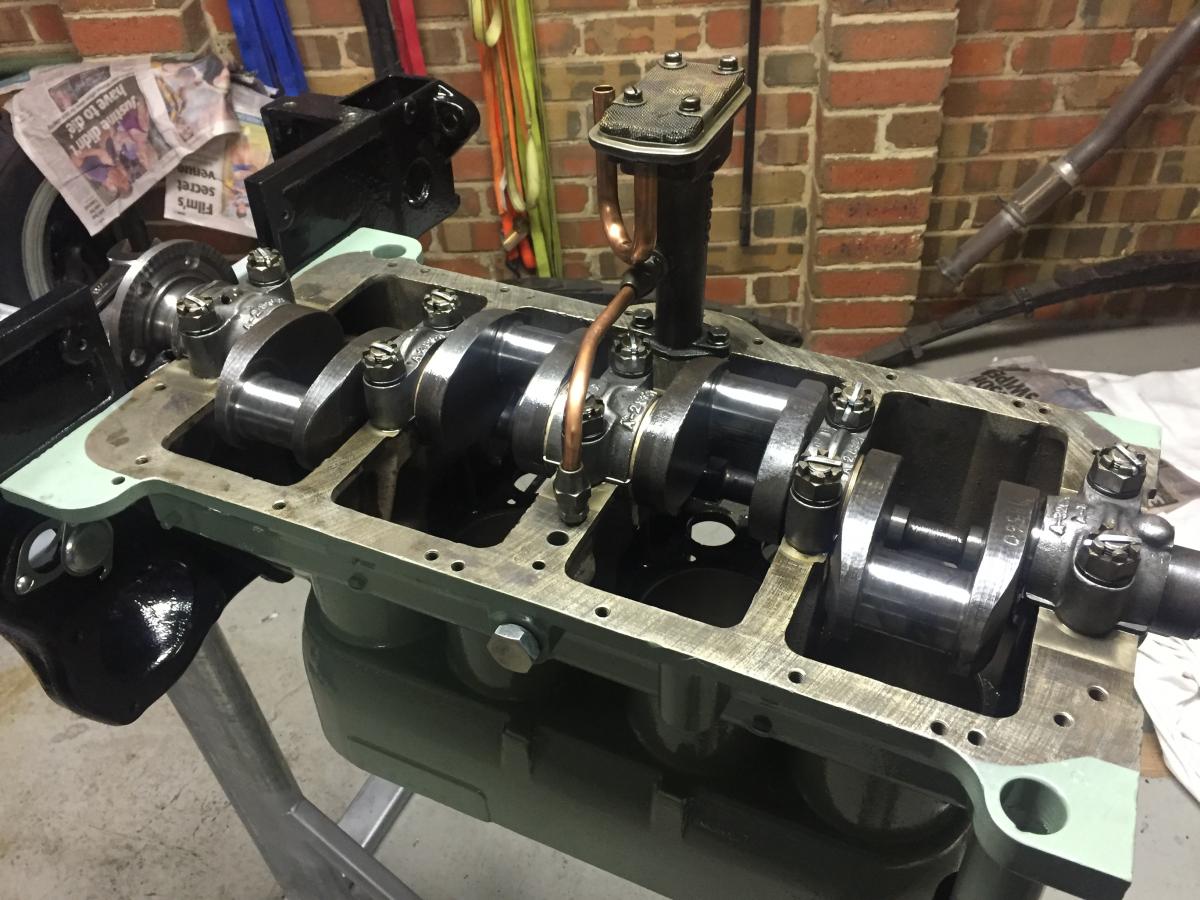
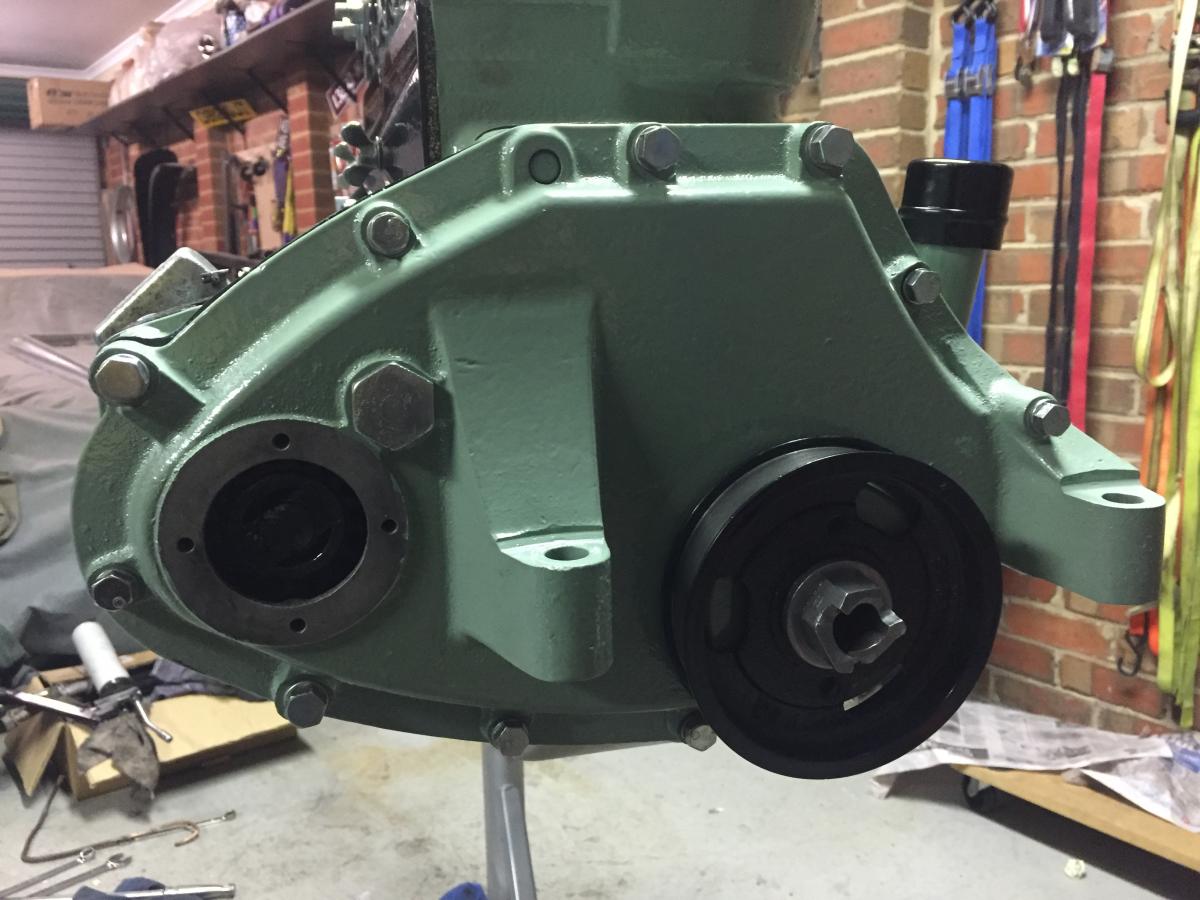
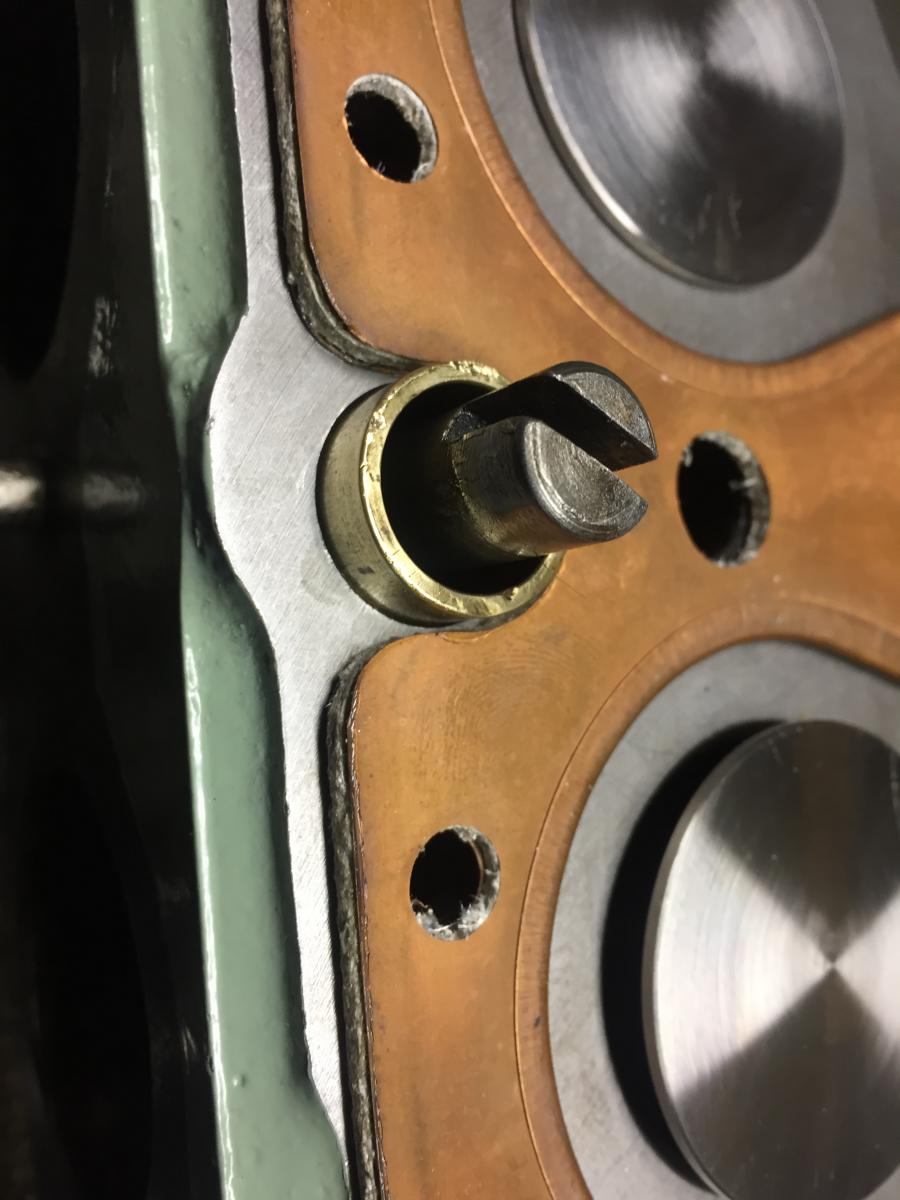
First step - engine bolted to the rear mount then fitted to stand. Used thread sealer on the two bolts that go through to the crankcase to reduce likelihood of oil leaks. Fitted rear oil gallery blanking plug (square head) and crankshaft rear bearing upper oil retainer with thin gasket. Ensure face of retainer is level with block face to help get a good seal with the sump gasket. Use thread sealer on all threads. Fit camshaft and crankshaft bearings and shims Fit crankshaft and caps. Check bearing shims are aligned (even clearance to crank journals) and tighten nuts. Tighten progressively to 60 ftlbs (that's what mine were line bored at). Keep checking it's free as you go - mine could be turned by hand. Fit split pins to the main bearing nuts. Fitted oil pump and oil pressure relief valve Fit cam followers - I chose to do these before fitting the pistons as it's easier to turn the engine over before the pistons are fitted. Fitted valves and springs. Valves adjusted to 0.007" Inlet and 0.008" Exhaust. Tappet covers fitted Fitting Pistons. Gaps for the 4 rings evenly spaced and away from thrust face. Big end nuts tightened gradually to 45 ftlbs. Split pins fitted to all the big end nuts. Fitted rear bearing oil seal felt and sump gaskets. Seal and gaskets 'glued' to block with sealer. Pay attention to the gasket around the rear bearing oil retainer as this needs to be trimmed to ensure no overhang into the cavity otherwise this will result in oil leaks. Fit flywheel bolts to crankshaft - this needs to be done before the sump is fitted - can't be done after (guess how I know). Note gasket shape around oil flinger. Fitted sump - note to ensure the front flange is level with the front face of the block. Use sealer on the front bolts as they protrude into the crankcase. Made new felt seal for flywheel lower cover and fitted. Fit intermediate front cover, camshaft gear (note thrust washer goes on first) and crankshaft gear. Ensure sufficient amount of sealer between the cover and the joint between sump and crankcase as it's not a great fit here. Fit timing chain - note generator needs to be fitted to be fitted to hold the gear and tension the chain. Fit oil throw out cup to crankshaft and spring loaded plunger to cam shaft. Check that generator gear oil feed tube is clear and aligned correctly with the reservoir in the gear support housing. Fit front cover and crankshaft pulley. Use thread sealer on all bolts that pass through to the internal crankcase cavity to reduce chance of leaks. Fit generator gear cover ensuring spring and plunger are fitted to the cover first. Fitted head studs - use stud lock to stop studs turning and seal into the water jackets. Check head gasket fits correctly Fitted water pump and connected to generator and installed manifold studs - use thread lock on all studs to prevent unintended removal and stop leaks as they all go through the water jacket. Fitted starter motor, oil pressure union, timing cover, filler cap and dipstick Ensure brass ring (distributor shaft bush) is fitted to block and fit distributor drive shaft - note that this only fits in one direction so check it is correctly engaged in oil pump drive. Fitting head Fit horn, vacuum tank and vacuum pipe clip (rear stud) and tighten head nuts. Tighten progressively, starting with centre nut and use a circular pattern. Leave time between each tightening step for gasket to settle - final tightening to be completed after first run. Distributor can be fitted - checking the drive engages correctly with the shaft (only goes one way) and fit the retaining stud and lock nut (tighten lightly then back off to ensure distributor can still advance/retard correctly). Next step - put it in the car.


-
Small Disaster on the way to the Colac rally today.
RichBad replied to Mattml430's topic in Dodge & Dodge Brothers
Cricket, that’s a pain- was that the box you just did? At least the woods a little easier to repair than your other running boards. Has that cracked part of the chassis or is it just a mount for the running board brackets? -
1927/28 Dodge Brothers series 128/129 Tourer
RichBad replied to RichBad's topic in Our Cars & Restoration Projects
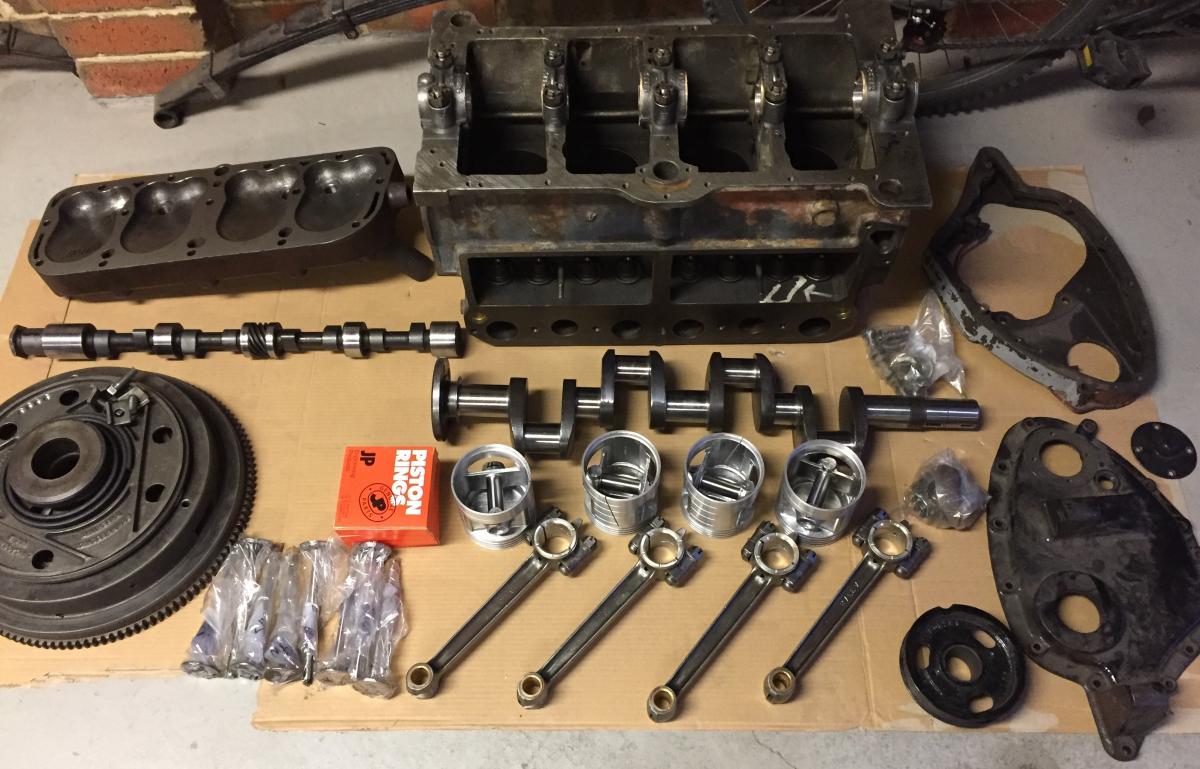
Details of the engine rebuild. Finally got all the parts back from the machine shop - after well over a year!! Parts from the machine shop: Head skimmed and cc'd. Block cleaned, re-sleeved back to standard, skimmed, valve seats re-cut, guides lined, crack tested and pressure tested. Crankshaft reground and balanced with flywheel. All bearings re-white metaled. Valves re-profiled. New Exhaust valves and pistons. Head, Block and front covers cleaned and painted - thanks to Matt. Block took some serious cleaning - was de-greased and power washed prior going to the engine builder, engine builder 'hot tanked' it, then I de-greased and power washed again. Still had crud in the oil galleries/reservoirs so made up a 'U' shaped tube to fit to the air line to get into the reservoirs - combined with lots of carb cleaner this seemed to shift all the dirt. Some long Moroso bottle brushes were perfect for cleaning the main oil gallery. Machined the valve spring holders to get rid of the retaining pin wear grooves Opened up the rod oil holes with a countersink to provide a slightly larger area for collecting the oil. Added a chamfer to all the bearing shells - provides an additional oil reservoir as well as allowing any debri to collect away from the bearing surface, also stops the 'sharp' edge acting as an oil 'wiper' All the parts cleaned and ready for the rebuild.


-
1927/28 Dodge Brothers series 128/129 Tourer
RichBad replied to RichBad's topic in Our Cars & Restoration Projects
Made up some new cables for the battery/starter. The outer cover came up good when re-plated but a couple of the end fittings were missing. Not sure what they are for - I guess they are just insulators - the original ones looked a bit like bakelite - I made a couple of new ones out of wood which should be OK.
-
Small Disaster on the way to the Colac rally today.
RichBad replied to Mattml430's topic in Dodge & Dodge Brothers
Man that just sucks so much! I went up to the rally for a few hours and I think you’re would have been one of the best! Hope it’s not too hard to repair - oh man I can just see all that time on polished stainless and the paint:(. Shout if there’s anything I can do to help! -
1928 Series 128/129 Fast Four engine rebuild
RichBad replied to RichBad's topic in Dodge & Dodge Brothers
Bob has sent me a bit for the gearbox which is on the way. Otherwise I probably could:). I was thinking of driving over in other car just to see some of the other Dodges. Is there somewhere everyone is meeting? -
1928 Series 128/129 Fast Four engine rebuild
RichBad replied to RichBad's topic in Dodge & Dodge Brothers
Well it started first time - almost - just had to pull the mixture lever and she fired straight up. Got to check/adjust the timing and mixture but she’s running pretty smooth. And doesn’t doom to be any leaks so far... will load a video when i can figure out how to shrink so I can upload.
-
1928 Series 128/129 Fast Four engine rebuild
RichBad replied to RichBad's topic in Dodge & Dodge Brothers
Engine back in the car. Hoping to start it up this weekend.
-
1927/28 Dodge Brothers series 128/129 Tourer
RichBad replied to RichBad's topic in Our Cars & Restoration Projects
Got rear springs back today, reset, cleaned up and new bushes. Fitted to the car and for the first time in a while have the car on all four wheels again:) Sits up quite high at the rear now, hoping it will drop down a bit when the body goes back on.


-
Fantastic, thanks Bob
-
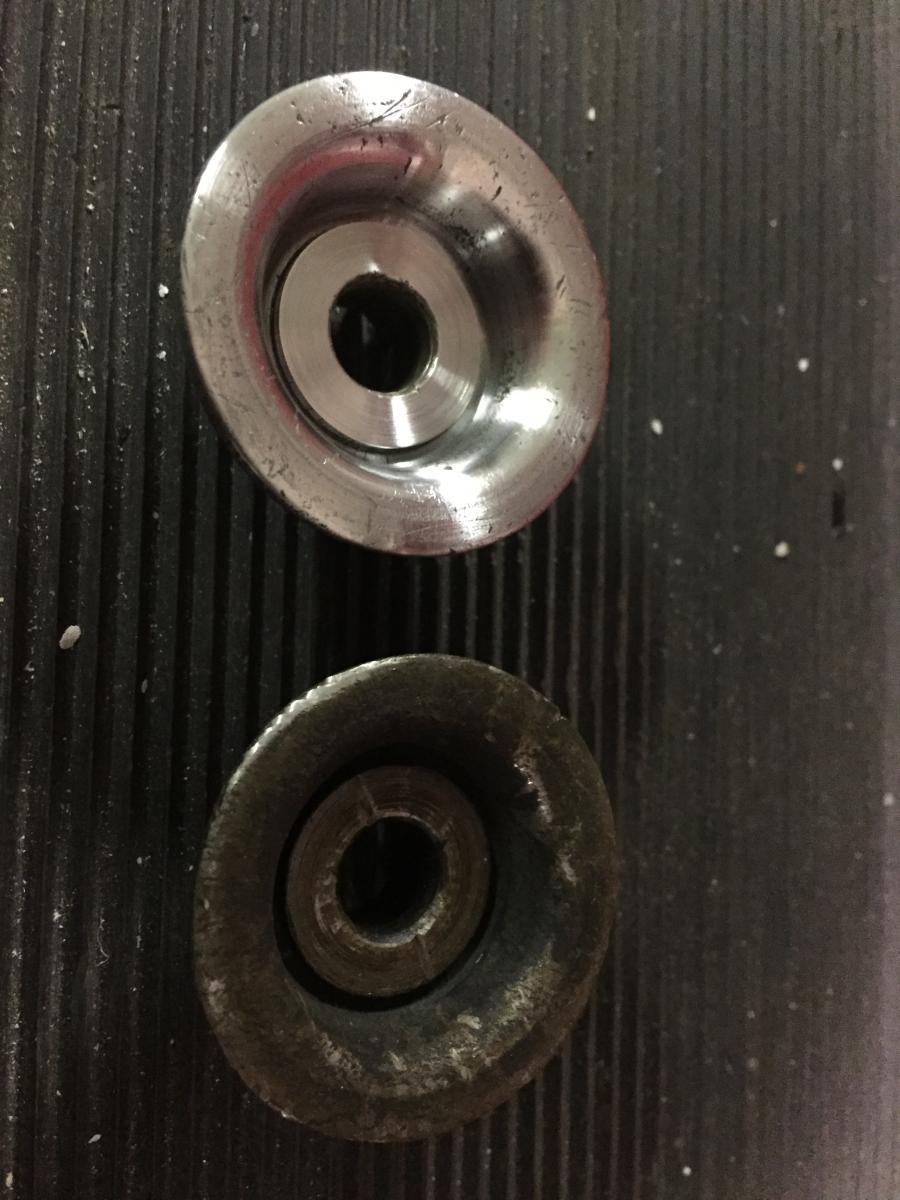
Thanks Bob! For others for info, it’s a hardened ring that locates the bearing removing play. If it’s missing it can result in the sliding gear hitting the bearing and damage - seems like I was luck mine worked - although it’s possible mine pinged out when I disassembled it (that said my Hyatt was in pieces).
-
Thanks Matt, don’t worry pulling it appart as that’s a bit of a pain to pull the front bearing out. I think there’s enough from your description and the picture that I should be able to make a small spacer to suit. Cheers!
-
Spiney, the car was driving with no problem, surprisingly as all the Hyatt bearings had collapsed. Thanks Matt, that makes sense, was it gripping on the shaft or loose?
-
Hi, Almost finished my gearbox rebuild and when fitting the input shaft to the output shaft I noticed that there didn’t seem to be much axial location of the Hyatt bearing - which could allow it to rub on the sliding gear. There wasn’t anything there when I pulled it apart but I noticed that the parts book shows there should be a retainer (27240) see pic below. Does anyone know if this is critical - if so, what does it look like - is it just a steel washer/ring or something more complex? thanks!

-
1928 Series 128/129 Fast Four engine rebuild
RichBad replied to RichBad's topic in Dodge & Dodge Brothers
Right, back to where I was a couple of weeks ago! Have torqued up to 20lbs and will leave to settle overnight and next step tomorrow. So far all good ?
-
1928 Series 128/129 Fast Four engine rebuild
RichBad replied to RichBad's topic in Dodge & Dodge Brothers
No, it’s just a stain - I think from where they pressure tested it - definitely not a crack. -
1928 Series 128/129 Fast Four engine rebuild
RichBad replied to RichBad's topic in Dodge & Dodge Brothers
Picked up the repaired block today and they said it will be all good. They just repaired the large two cracks but not a couple of small ones on the front - they said because it was quite thin walled it would weaken it further and because the small cracks go into the stud hole which is sealed with the studs it would not leak. They torqued it up and pressure tested it to 45psi to test the repairs so I guess it’s good. I also spoke with the guy who did the repair and he seemed to know what he was talking about. He was also surprised that it had cracked as he did the initial crack and pressure test - I asked him if the old studs were in when he did his checks and he said they were. Really makes me think that removing the old studs caused the damage (or at least weakened it) as the marks on the studs look like they took a huge force to remove. Time me will tell - they did quite a neat job with the repair and luckily Matt gave me some extra paint so I could patch it up.


-
Wow, they’re looking great!
-
1927/28 Dodge Brothers series 128/129 Tourer
RichBad replied to RichBad's topic in Our Cars & Restoration Projects
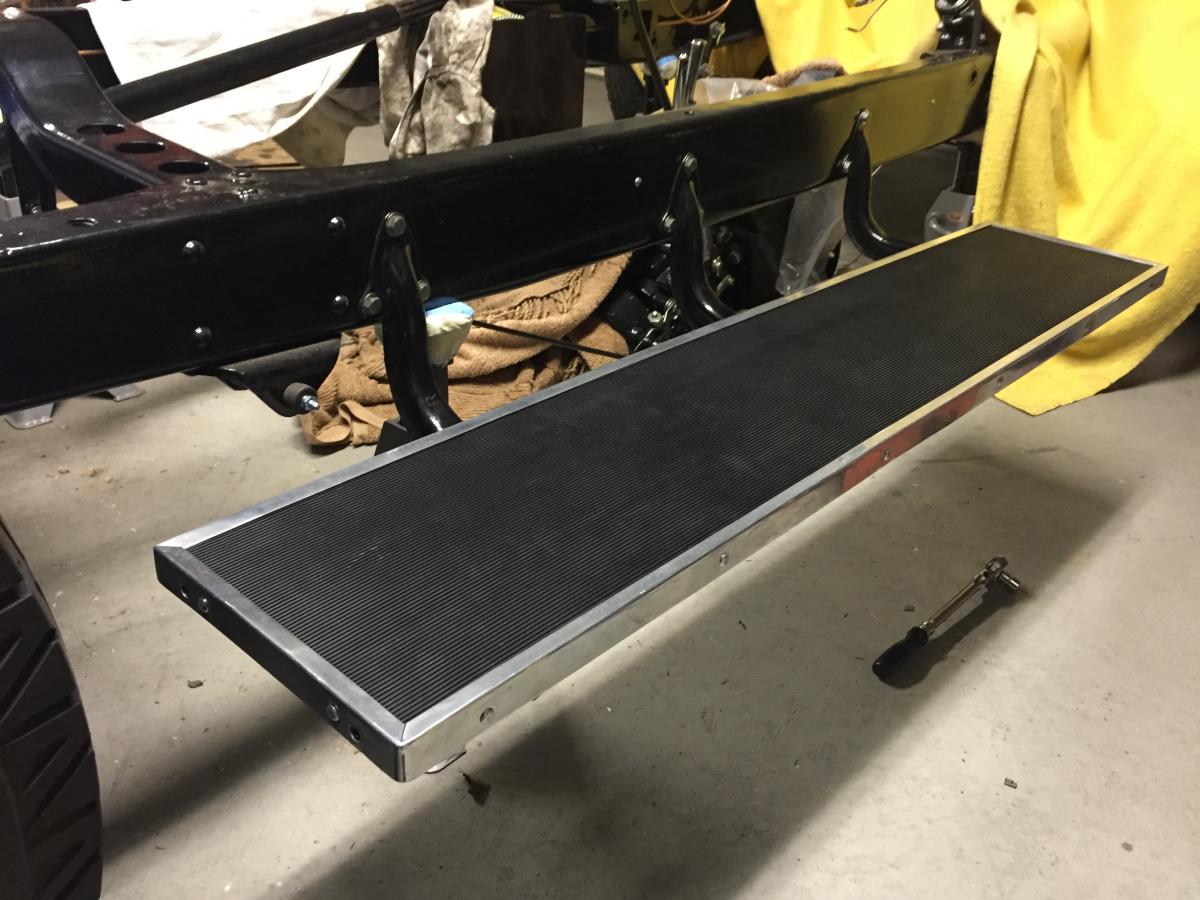
Well, thought I was making progress with the engine but took a step backwards, all the gory details here - http://forums.aaca.org/topic/314814-1928-series-128129-fast-four-engine-rebuild/?page=2&tab=comments#comment-1787538 so started finishing off some of the other items. Running boards with new rubber and polished the aluminium trim strips ready to fit. Also got some nice aluminium rivets. One finished and back on the car. And the other


-
1928 Series 128/129 Fast Four engine rebuild
RichBad replied to RichBad's topic in Dodge & Dodge Brothers
Good point - I haven’t. The 45lbs I was told seemed reasonable any less seems quite low for a head - anyone have experience with lower torque on these heads? -
1928 Series 128/129 Fast Four engine rebuild
RichBad replied to RichBad's topic in Dodge & Dodge Brothers
Called today and they are mid way through repairing it, they said it’s no problem. Still have my doubts but they said they will pressure test when done. I asked if they will torque it down any they said only lightly. I asked them to fully torque it for the pressure test as I don’t want to rebuild it all only to find that it goes when I torque it up. I’m nervous but I also don’t much like the other option of starting almost from scratch on another block. -
Route of the 2249 Dodge Senior fuel pipe
RichBad replied to gundog99's topic in Dodge & Dodge Brothers
Could be worth double checking valve clearances. I’m told that if these are too tight it can give similar symptoms - when the engine gets very hot under load the clearances can disappear.