Wheelmang
-
Posts
415 -
Joined
-
Last visited
Content Type
Forums
Gallery
Events
Everything posted by Wheelmang
-
I replied to a post this morning and my reply is no longer a part of the thread. The thread had to do with left hand thread wheel bolts for a Chrysler. I responded with you may want to try a NWRA distributor. Any idea what may have happened? Did I do something wrong? Thanks Paul
-
Thanks David. No need for that. It sounds like a really great shop. I was just surprised that there was a non - OEM process for this kind of testing.
-
Thinking this thread should have been named engine and drivetrain rebuild. I am now into the transmission as long as it is out. It is looking like a few months before the "outside" my shop engine work will be done. Now looking to sometime in late October or November before the engine will be ready for re-assembly. So the first piece removed from the transmission was the idler gear? (Probably the wrong terminology.) The one removed (on the left) does not look to be in the best of shape. I had a spare and don't think that looks much better. Would you use either one? I am considering re-installing the original. it was working fine before removed. Anyone have a replacement that is in much better shape? Thanks for looking Paul

-
Curious as to the process your machinist is using for testing. The equipment that I was involved in probably cost more than the GDP of a small country. ?
-
Thanks all for the great feedback. After reading a couple of the post I decided to take a closer look at some of the bolts. After some degreasing and wire wheel every one I looked at had a DB head marking. Sorry about the fuzzy picture. Guess I was too close for my cell phone. The concern is have they been torqued up too many times to maintain torque anymore. I also assume that bolts with the DB marking are not readily available or affordable. My past work history with an OEM manufacturer says "never" reuse a bolt. However, contrary to that, I was involved in engineering testing that provided empirical data that bolts that are not over torqued should be good for at least 2 - 3 uses. That begs the question, how many times would things like transmission, oil pan, engine mounting etc. be removed and reinstalled in the last 90+ years? All head studs, main bearing studs will be replaced no question.

-
Thanks David. That looks exactly like what I am looking for. Thanks JFranklin. I have tried a couple of the local parts stores but not NAPA. I will give them a try to see if they are any different from what I have seen so far. The McMaster Carr site looks like I can get boxes for only slightly more $ than what I have seen for 6 - 8 bolts so far at auto parts places and the quality at the local parts houses is extremely suspect.
-
I am going to use a lot of new studs nuts and bolts on my 26 DB. The intent is replace everything removed, with new, at reassembly. The problem I am running into is the big box house hold stores have product of very suspect quality and auto parts stores have little to no inventory and that is suspect. I really do not require grade eight, with the possible exception of head studs, but I would like to find stock that doesn't need a die run over the threads, (from shipping and banging around in the bins,) before being used. Does anyone have a source with quality products? Or am I being too picky? Thanks Paul
-
Matt: Sorry if my comment caused you an extra measurement. My curiosity got to me and I measured the shaft on my DB. It was .625 which is just slightly over your measurement of 15 MM.
-
15 MM sounds small for a shaft diameter.
-

6 volt starter turn over slow or fast?
Wheelmang replied to Sactownog's topic in Dodge & Dodge Brothers
I cannot speak to the vroom part after a couple of row row but rebuilding mine did not speed up the cranking speed. -
I hope my 26 looks as good as yours when I am done with it. And you are just starting yours?? Curious - What does it need that we cannot see in the pictures.?
-
Bhigdog has a valid point. I have a lot of tools that I justified the purchase by "maybe" will use them again later. However most of what I am speaking to are things in the under a couple hundred range. If it is in the $1,000 range plus that is money I can put into needed parts that I cannot make in my home shop. Plus you get to meet some neat guys taking work to local craftsmen.
-
Hi Ray: Yeah the cold chisel sounded pretty radical to me as well. You say you pulled them. Could you please describe the process you used? All my retainers are refurbished and new pins made. I had just completed an interim valve job to get me to the point when I could do the whole engine up proper. Just didn't expect it to be so soon afterwards. Machine shop will be cutting new seats and all new valves and springs will be coming from Myers. Thanks for the heads up on the oversize and sticking. Paul
-
Got to cleaning and painting the U-Joint housing and have a question about the shims that go between the housing and the back of the transmission. There are five of them. Two are .032, two are .023 and one is .013. That leads me to think that there is some kind of shim spec for that union. If that is the case how is the correct spacing determined. It is a looong way before I get to reassemble but will be good to know at the time. Thanks for looking Paul

-
I am going to replace the valve guides on this mostly because it seems like the right thing to do at this stage. Do they press out and back in or is it something more complicated that needs to be left to the engine rebuilder? Thanks Paul
-
Hi Rich: This response is 2nd hand from a reply to one of my queries. The reason there are no ridges at the top of the cylinder walls is because the top piston ring goes all the way to the top of the cylinder. That would mean that the top of the piston does extend into the area above the top of the block. I am sure others with more empirical data will chime in. Paul
-
Just to echo Tom - You should be able to take them to just about any auto parts store and any good counter man can look them up by size. You may have to settle for something slightly longer if they do not have an exact match. Do not recommend going any shorter though.
-
With everything forward of the driveshaft out and on benches, in bags and plastic bins there is no shortage of projects. Today was a quick one on the throw out bearing. It probably did not need to be totally torn apart but it was sitting there staring back at me all greasy and dirty and rusty. So here is what the inside of a 26 DB throw out bearing looks like all disassembled. It was actually pretty badly caked up with hard grease so it was a good thing to tackle. It came apart quite easily by grinding off the back side of the four rivets and punching through. There were also some small ridges that had raised up on the left side of a few of the ball bearings. They came off quite easily by letting the balls drop to the lower part of the retainer. This allowed the ball to drop just enough out of the way. It then took just a lite stroke or two with a fine tooth file to remove the burr. It is not completely reassembled yet as I need to find some rivets or more likely will get some machine screws with nuts, tighten up and a quick spot weld to hold all in place. It is working way smoother now.


-
I am not a member of the Desoto club so cannot post. If someone reading here is a member please fell free to post something on the Desoto site referring to this AACA thread. Thanks.
-
BTT one last time. I REALLY hate to do it but if no one can use these they will be headed to the scrap metal recycle the next time I need to use my trailer.
-
Free 1928 or possibly 1929 Desoto K series parts Free
Wheelmang replied to Wheelmang's topic in Parts For Sale
BTT one last time. I REALLY hate to do it but in no one can use these they will be headed to the scrap metal recycle the next time I need to use my trailer. -
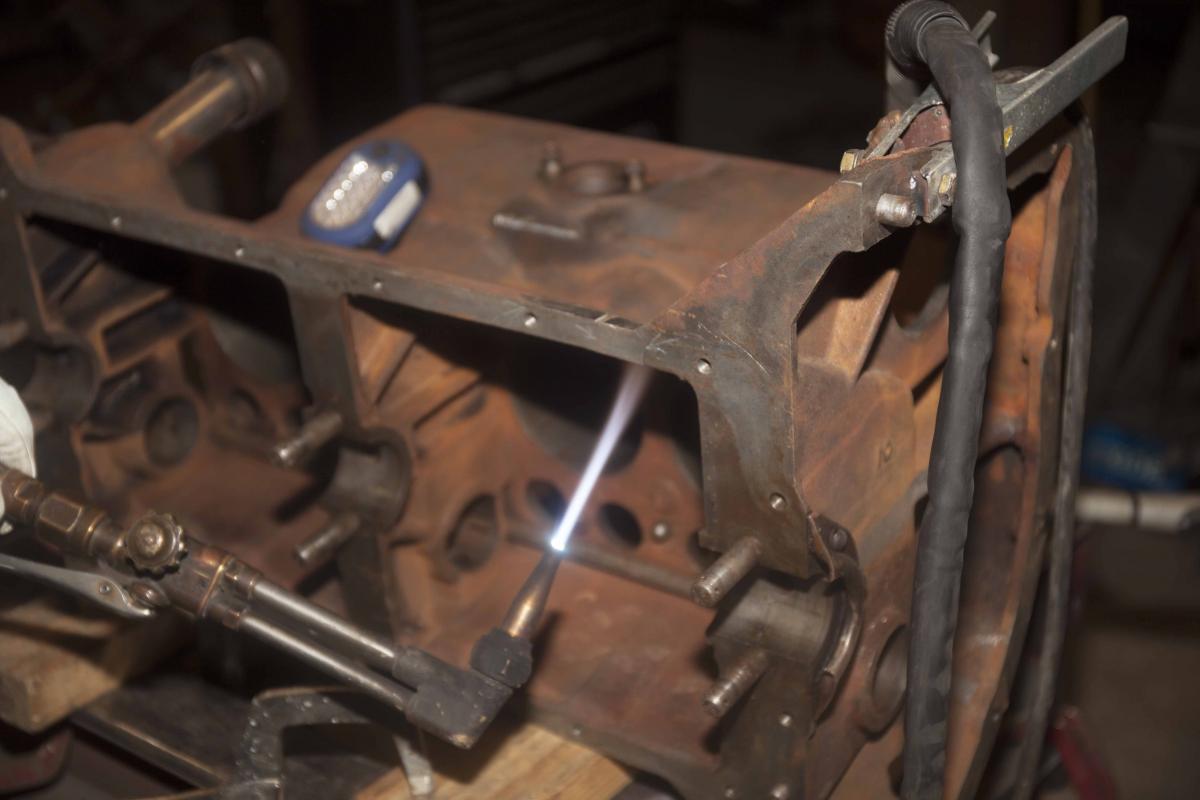
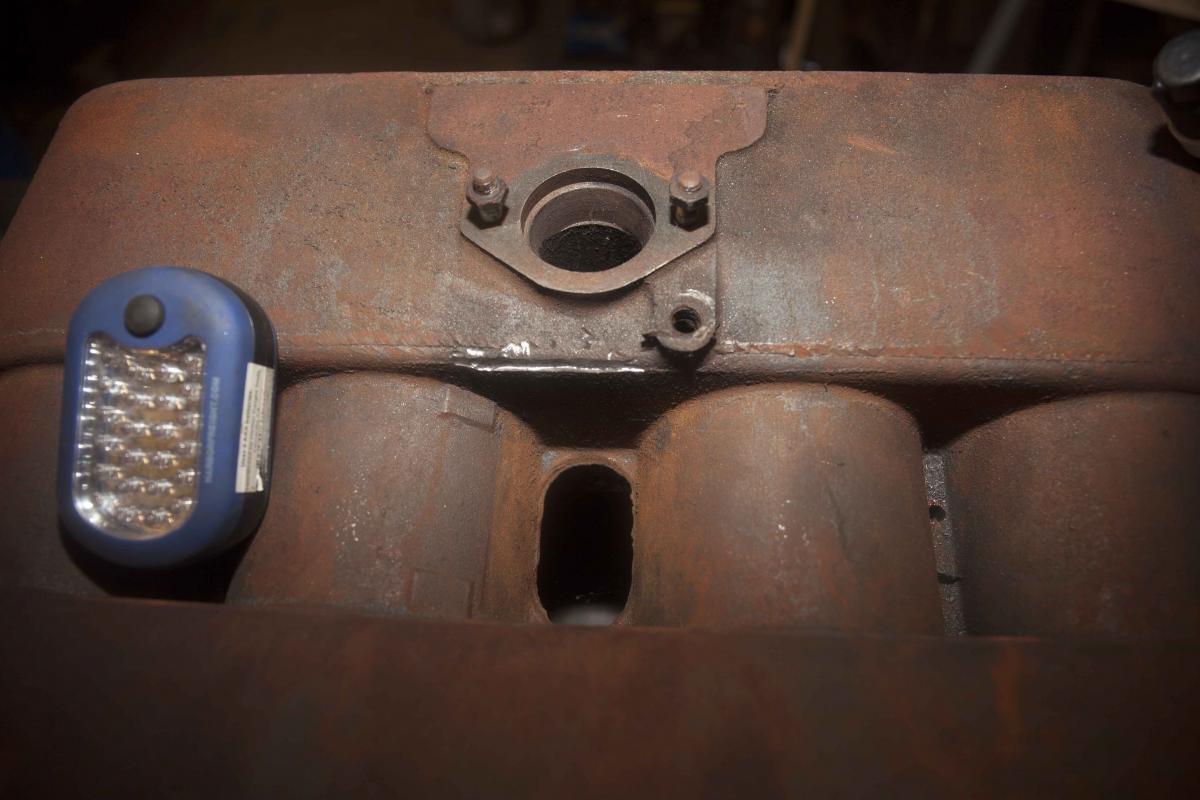
My welder friend Dave has advised that the cracks are repairable so on with the block repair. There was a second crack found at the base of the carb intake when the block was dip tanked and cleaned. Interesting that this was not leaking but we decided to go ahead and weld it anyway. Both cracks were cleaned up and channeled. There are holes drilled at each end of the crack to stop further running. In order to weld on the cast iron it needed a temp of approximately. 400°. Cast composition was tested and determined that the best welding process was TIG with 95% nickle rod. Then a slow cool down with sand to absorb the heat. I should be picking up the finished job tomorrow. Then back to my shop for grinding the welds smooth. The speed shop has been advised to go ahead with the crank and as soon (likely a few weeks) as they provide me with the journal specs, the rods and mains are off to Herm for Babbitt. Stay tuned!


-
Thanks Ray - Myers had them, I just missed them.
-
Both springs were missing and I do not see them listed at Myers. There were some partial pieces in the crud at the bottom of the bell housing but not enough to figure out a way to make new ones. Would you or someone have a picture to go from or possibly a source to purchase. Paul
-
That looks a whole lot easier and safer than what I did. A press is working it's way into the budget. Your throw out bearing surface looks like it also has some wear. There are major grooves in mine. Fortunately the spare had no wear. Way less movement in the throw out bearing now.