SCOTT's 90's
-
Posts
108 -
Joined
-
Last visited
Content Type
Forums
Gallery
Events
Everything posted by SCOTT's 90's
-
It's interesting all the different little options that one could get for these cars ... Anyone else have something? Thanks for the replies
-

What interesting object have you found in your car?
SCOTT's 90's replied to AZVET's topic in Buick Reatta
I too spent a couple weeks pulling out the interiors of both my Reatta's cleaning them from top to bottom. My second one though before I cleaned it and just after I pulled into the driveway, by habit I reached up to the passenger visor to open the garage door and there was a garage door remote clipped on there....Just then I realized that wasn't my remote! I called up the guy I bought it from (he was quite surprised to hear from me already) and I told him no worries, but I had his remote. Well I told him I would mail it since he was over 100 miles away, we did go through the whole car and trunk to make sure that he had got everything out of it but somehow missed the garage door remote. I did also find the common things you guys already mentioned, other than panties - hahaha. -
The other day I was doing some research in my 90' FSM and went to the back to look in the index and that is when I noticed the page preceding the index. How to Install an optional Child Safety Seat "Reatta Coupe Only" (Of course you had to have purchased the hardware kit Part No. 20688115 probably no longer available) That's right you could've put a modern day child safety seat in the Passenger Seat using the Tether Anchor attached in the rear below the third brake light; still can if you can find the part. I don't know if any of you knew this (Probably many of you did) but I found it very interesting. Yet another point of the Car ahead of its time the Reatta - Got to love it!!!

-
You might want to check for something first. I was having similar problems with mine a while ago and I found that the plastic housing around the headlight lens was hanging up on the splash guard. It is on top of the blinker/park light housing and below the headlight. It is black plastic like a mud flap, mine was bent up and catching when the door would close causing it to slam shut. Just a thought and only takes a few seconds. If this is only on the 90/91's sorry, I am not sure what year your Reatta is.
-
1990 Headlight Switch Repair Tutorial --
SCOTT's 90's replied to SCOTT's 90's's topic in Buick Reatta
Thanks Kevin, that is why I didn't use any of those cleaners since I have had bad results with them in years past. -
1990 Headlight Switch Repair Tutorial --
SCOTT's 90's replied to SCOTT's 90's's topic in Buick Reatta
Thank You very much for those pointers it will help a lot! -
What did you do to your Reatta today? <ongoing thread>
SCOTT's 90's replied to SeanR's topic in Buick Reatta
Today it was about 55* here in Utah so I decided to tear into my Headlamp Switch since it was not working correctly. I thought it was either one of the contact rocker bars had fallen out of place or there was corrosion on the contacts. Turned out that it was both and since I had done this before (being my 4th time) over the years I decided to make a tutorial on it "1990 Headlight Repair Tutorial". Everything went smooth and in the end I now have a great working switch that should last at least another 5 years or more. -
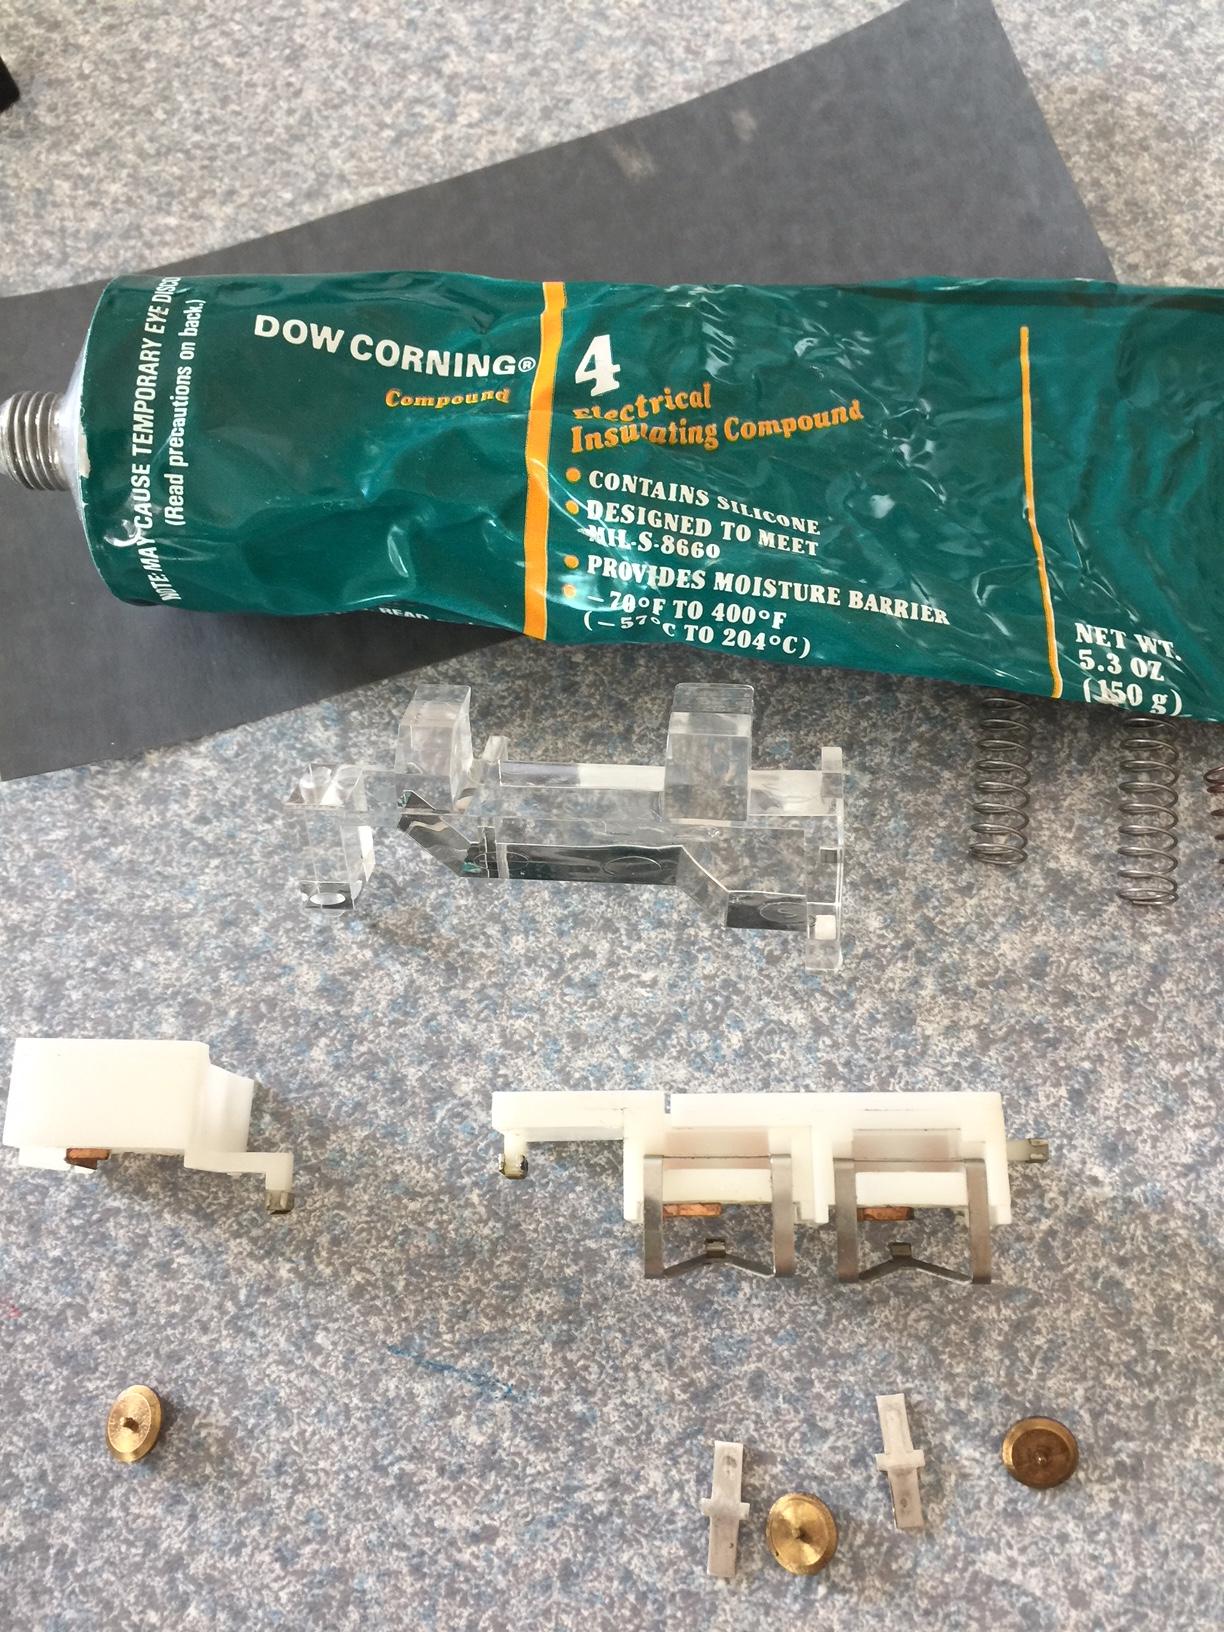
A few weeks ago I started having issues with my headlights; sometimes when I pushed the button they would not come on (the buckets wouldn't raise either). When I pushed the button again they would come on briefly and turn off, and when I pushed the button in slowly and with some slight force they would come on. So this went on for a while and eventually got worse until nothing worked ... I knew that it was the dreaded Headlamp switch possibly one of the contact bars had fell out of place or corrosion on the contacts. Turned out being one of the bars had come loose and the other one was not making good contact. Well today I finally decided to tear into the switch (this will be the fourth time over the years) and I thought that a tutorial or instructions on how to repair the switch might come in handy for someone wanting to repair their spare or broken one. First off this is a very tedious job and requires a lot of patience but I will try to make it as simple as possible Step 1. Make sure that all three switches are turned ON ie: the ON push will have more resistance than the OFF and the ON will travel farther than the OFF. (I hope that makes sense) The reason being that each switch has its own lock position "ON" so that when you separate the housing parts won't fly everywhere. Step 2. 1. Remove the Dimmer slider switch button. 2. Separate the two halves of the Switch housing by carefully prying up the sides to clear the tab locks and turn it on its side buttons facing out and SLOWLY remove the top with the buttons being careful not to depress the white buttons inside the housing and set the top aside. The top part has the buttons and they are just floating, and if you didn't have the switches pushed ON then this is where you will experience your first lesson in patience because literally everything will just fall out and look like a jigsaw puzzle, but no worries you can just skip the next step... Step 3. Inspect the internal parts looking for damage or loose parts and slowly start to remove everything. 1. First to get a feel for it start with the FOG light button (it's all by itself in the upper corner shown in above picture) by pressing down on it and slowly letting up and it will come out with a spring under it set it aside and repeat for the other two switches (they are combined so just remove both at the same time). Take note at this time there are two contact bars one for the Parking switch and the other for the main Lights switch careful not to lose them; Also there are three small brass wheels for each switch keep an eye on them too. Step 4. Once you have everything out and organized it is time to clean and re-lube the contacts. "CAUTION" Be very careful cleaning the contacts on the CB (Circuit Board) if they get bent or misaligned in any way then you will have electrical problems with your switches. Each switch is activated by the height of the contacts 'Up & Down' for example on the main switch there are two contacts on the CB one of which is for the little indicator light which also shows "LIGHTS ON" on the IPC. I know this from past repairs and I had to tear apart the whole thing to carefully adjust that contact because it was sitting up too high making contact when the switch was OFF. I accidentally caught it with my towel and bent it. 1. Clean the Aluminum Bars and the contact points inside the housing, I used some 5000 grit paper to clean the corrosion (Arcing/Burnt) from mine. 2. Gently wipe off each contact of the switches and remove any corrosion if necessary being careful not to bend anything. 3. Re-lube everything. I used some Electrical Compound and put it on all the contacts including the brass wheels and rocking points of the bars to help keep them in place for re-assembly. Step 5. Re-Assembly - The FUN part (It helps if you have a small bench vise or something to hold the housing in an upright position because you will need both hands to do this). 1. Place the CB into the housing (Make sure to remove the clear plastic illumination piece it will make things a lot easier). 2. Start with the FOG light switch; Apply some Silicon or grease to one of the brass wheels and put it in place (The 3rd picture above is showing it in place) 3. Place the spring in the hole and put the white plastic switch on top of the spring and slowly push it down. Align the brass wheel to fit into the groove and once you push it all the way down let up on it and it will lock into place. You will hear a slight 'Click' I hope this video works if not sorry IMG_2610.MOV 4. Repeat for the other switches (They are combined so you have to do both at the same time - this also requires patience just keep trying you will get it) Place the two brass wheels into their spots as described above and then place the two rocker bars into their positions (This is where the silicon grease serves its purpose holding everything into place while you put the switches back in) While you are pushing the two switches down you will also have to gently pull out on the sliding contacts over the two rocker bars 5. Replace the Clear Plastic illumination piece CAREFUL not to bump or depress the switches. 6. Place the Three spring bars into their positions making sure they are fully seated and in the correct direction. Step 6. Re-Assemble the top part by laying both pieces on their sides with the buttons slightly tilted down and slowly put it back together - Make sure you do not press on the buttons until it is fully assembled or you will have a mess and will need to start over. You are all finished and all you have to do now is test it out to make sure all is working properly. If everything is working great then you can put the black knob on the slider dimmer switch. I hope this helps someone if it does at least you won't have to buy a used one for $150 or more.


-
I've seen that happen at many workplaces. In fact one place I worked at moved their whole business back east and the stuff that they didn't want to take with them went in the trash...And I mean GOOD stuff like electrical cords, tools, one-day used gloves, push brooms, etc.
-
So how does this dye work exactly, do you paint it on or spray, Because that looks really nice. Did you do the dying process or your upholstery guy? Thanks!
-
What did you do to your Reatta today? <ongoing thread>
SCOTT's 90's replied to SeanR's topic in Buick Reatta
That is funny since I did the same thing to mine a couple weeks ago when it got up to 55 and just as soon as I washed it that darn wind and rain started coming so I also pulled in the garage and finished drying if off. Unfortunately there was some dust that had been whipped up and was now clinging to the wet areas. I had to fetch a bucket and lightly wash/remove the dust and then dried it off the rest of the way...Too much work, all in good fun I guess! -
Best thing about that is you don't have to spend any money to do a test to see if that is the cause of your issues.
-
Thanks for the Update! Happy it all worked out for you - If you go to a pick yard to get an ICM your chance of getting a good one is 50/50.
-
Yeah I know what you mean, hopefully that is not the case. I guess we will see.
-
I would keep the accumulator and pump if they are in good working order, but the screen not sure. There was someone here that would repair them but I don't think he does anymore, Ronnie would know.
-
89RDG - here is the link from his original post about his resources http://forums.aaca.org/topic/294177-led-set-up/?tab=comments#comment-1613863 Just scroll to the very bottom
-
I guess White is in style ... ha ha ha
-
Is there an update to this post and what was the solution if any? Thanks
-
Would you happen to have a picture of your new setup Thanks
-
It does have all blue trim instead of black which I think is a plus
-
So do we have any Chemical Engineers on our forum? I actually wanted to Major in Chemical Engineering with a Minor in Environmental Science, but life happened and it didn't. Anyway there is also Acetone which I know that it has been discussed before, but what effects if any does it have on E-fuels?
-
So a thought came to me, could you add a gas dryer like "HEET" to remove the moisture from E-85; if by chance there were damaging issues? Not that I would want to put E-gas in to save money and then BUY and additive to counteract such things....I know stupid question.
-
What size YouTube videos do you like best on the forum?
SCOTT's 90's replied to Ronnie's topic in Buick Reatta
Sorry been busy, but for me it depends on the quality of the video. If it was meant for an iPad and I am on my bigger screened laptop and the video looks like s@#t then I would probably choose not to watch the whole thing being frustrated with the graininess and clarity. As for the forum video size I also think the medium size would work well. -
Ahhh I see, Thank You for that info.
-
Interesting thought...But one would have to be careful not to CURB it if that was painted. I don't know if anywhere else has high parking blocks like we do here but it really frustrates me every time I accidentally hit one.