


theastronaut
-
Posts
333 -
Joined
-
Last visited
Content Type
Forums
Gallery
Events
Posts posted by theastronaut
-
-
The B-pillar bracing is pretty much finished up. Had to extend the rocker panel 9" rearward so the outer B-pillar piece had something to weld to along it's outer and upper edges. This was rusted away on the original pieces so I didn't know it should have been longer than I originally made it. Didn't know exactly how it should look so I just made it functional, it won't be seen once the outer piece is welded on. Also pulled the rear floor pan back out to recess the area under the inner B-pillar brace. The rocker extension also had to be recessed.I should have everything for the left side finished this week so I can pull it all out for cleaning/priming. Then it'll be ready to be welded in. All I'm missing now is one rear body mount brace at the rear inner fender; I started on it yesterday. Also need to blast the original rear floor pan braces, hopefully they'll be nice enough that I won't need to make new ones.Top half extended.
 Floor pan and rocker recessed so the B-pillar brace sits flat.
 Fitting the outer B-pillar piece.
-
 1
1
-
-
Been working on finishing the driver side B-pillar inner brace. I layered three pieces of 1/8" x 3/4" steel to make the 90* turn (didn't have a piece of 3/8" x 5/8" laying around). I thought that a solid piece would be stronger than sheet metal, and that area needs all the help it can get to help keep the quarters in alignment. Just need to do some final trimming to fit it to the car. Making it solid also make it possible to "sculpt" the shape of the "bead" so I could blend from the round lower bead on the floor section to the square upper bead on the B-pillar, matching the appearance of the factory piece.
 Both sides had be previously "repaired" so I only had pictures to go by.
 Picture is from the car we were able to document in GA/NC. His shop is on the state line, not sure what side the car was on.
 Also have been working on the driver side rocker. I made the front edge too round where it meets the A-pillar, so when I tried to test fit the door the front/bottom edge wouldn't clear. I had to make a couple relief cuts to drop the edge down. No pics but you can see the difference between the original shape and what I originally made. I should have made a template of the corners before I cut everything out. I'll know better on the passenger side...

-
I have the right inner fender bottom welded in, and the rear seat pan welded in on the areas that I can get to. I'll have to flip it on the rotisserie to finish welding the middle section, there is about 16" in the middle that I can't reach from the top side.


 With the seat pan in I mocked up the inner/outer rockers and floor pans so I could start on the inner B-pillar brace and finish the outer B-pillar section.
 Bottom half of brace made.
-
Holy Swiss cheese, Batman! That sure is looking better by the panel.
Swiss cheese manages to hold it self together though!
Thanks! Really nice work. As I restored a '56 Biarritz with a lot of rust, I'm appreciating what you are doing.
Thanks Roger! I found your model project topic when I joined here and have been reading through it as I have time... I'm simply amazed by your skill and paitience!!
-
With the floor pans mostly roughed in I turned back to the section under the back seat. I had the center section made but needed to make the side pieces. The left side is fabbed and welded in, just started on the right side last week.I bent the back edges of the floor pans to fit against the rear seat floor section. Also trimmed the rear seat pan to fit up nicely once it's ready to weld in, and drilled holes for the plug welds.
 You can see how the back edge of the floor pan will weld to the inner fenderwell and bottom of the seat pan.
 This is looking into the right quarter panel from the inner fenderwell. The fenderwell should be covering this, so you can't see in... I decided to go ahead and cut this area out since it was in such bad shape and the rear seat pan edges needed to weld to the fenderwell.
 After cutting out the lower front fenderwell and edge of the seat pan. It's amazing that the car didn't collapse in on itself; this was a body mount area that is completely rotted away.
 Made a new seat pan edge.
 Blasted and painted the floor braces with Por15.
 Made a template for the inner fenderwell skin.
-
I cut the jump-seat base out and made a new panel. This was an easy piece to make... the rest of the rear seat area kicked my butt... :dohh:

Like the middle pans, the only thing I had to go by for the rear pans were the pictures and measurments taken earlier from another car. I made a (really) rough draft of a template to start mapping out the bead lines and body mount areas. The pictures I had were barely adequate to get the measurements correct, so there were a couple areas that all I could do was make the proportions look right. I doubt there will be any show judges crawling on their backs under the car with tape measures.
Once I had the rough template in the car I made some corrections and transferred that to translucent paper. That template still needed some fine tuning before I could transfer the pattern to sheetmetal. 

The rear pans are mirrored so I can flip the pattern and use it for both sides.

Checking the fit of the right rear pan. It's not in there straight since the outer rear edge needs to be turned down into a flange to fit against the fenderwell. Once that's done it'll slide all the way back into place. I'm 90% finished with the left pan so I can start welding the inner/outer rockers, quarter, and front lower cowl panels in place. The inner/outer rockers sandwich the floor pans so I needed to have all of the pans done before anything else could be welded in for good.


-
Way too soon to think about it now but when your customer gets to working on the convertible top assembly we can supply you with that gull wing shaped header bow for above the windshield. There is no ready source for these as far as we know. We are making a batch shortly, likely a one time thing. Very time consuming to shape. Expensive but correct.
Appreciate the offer. The owner has many new or good original parts already so I'm not sure if that's a piece we'll need. Will keep it in mind though!
Although I already commented on the skills/talent shown here on this project I am still wide eye looking at your update. To me this is the best kind of restoration documentation be done. Great job. On a side note though it sure looks like your building a car from a bunch of small shaped metal pieces, who'd a known that it could be done that way.
 Scott...
Thanks Scott!
-
Got most of the lead work done, ran out of lead sticks before I was able to finish the last rear quarter/trunk panel seam.I melted out the last two spots I had left on for reference and blasted the areas to clean out the rust that was underneath. The top pic shows just how far the edge was pounded in from the factory.

 Filled in the driver side quarter seam. I'll have to remove the bracing before I can file it smooth.
 Door jambs filled and smoothed.
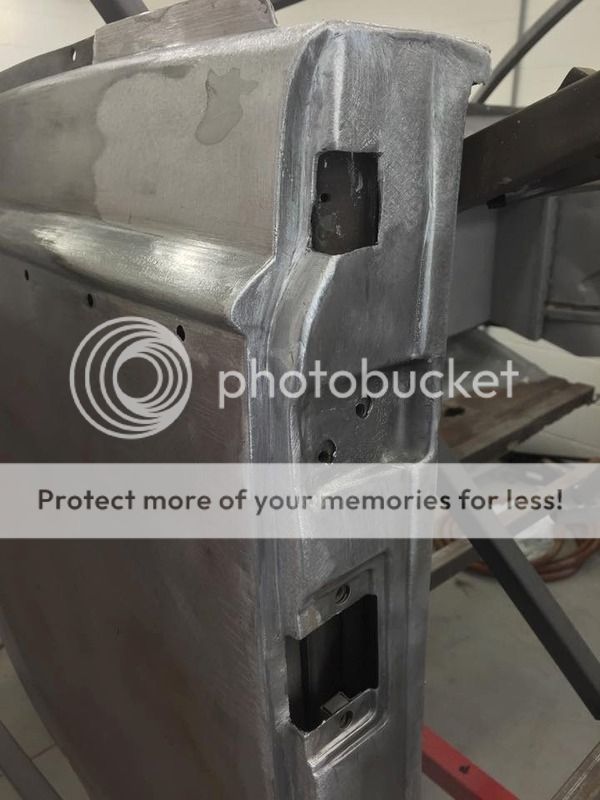 Shot the body with a couple coats of PPG DP74LF epoxy. I'll get it back on the frame next and start welding in the new panels.
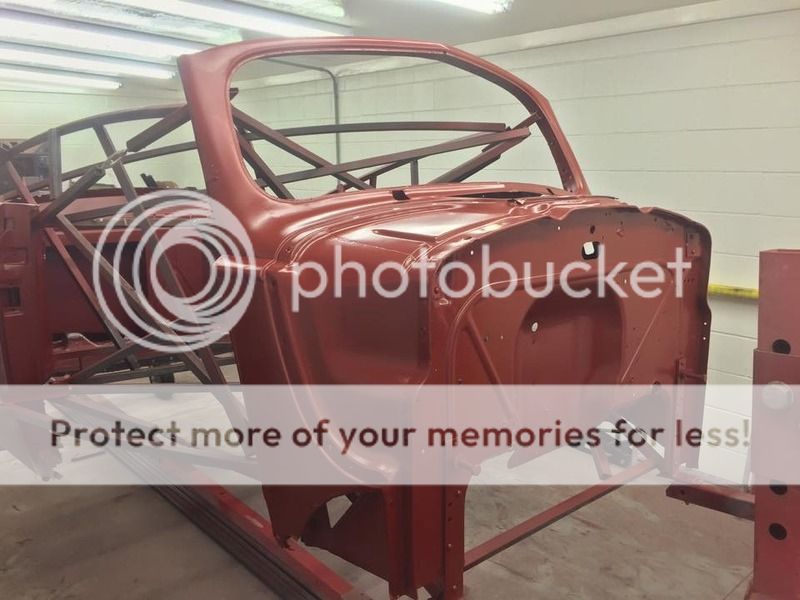


-
I went over the area to be leaded with a wire brush to make sure it was smooth/clean before applying the solder paste.
 After filing the lead flat. This is an odd area to shape, the upper half is slightly concave in both directions so the flat file could only do so much shaping.
 So I sanded it with 36 grit to finish shaping it. I know you're not supposed to sand lead, but the 36 grit is so rough that it doesn't make fine dust particles. I was wearing a mask of course.
 The 36 grit lead "dust", almost big enough to be called shavings. This isn't small/light enough to float around in the air so I felt ok about sanding with 36 grit.
-
Made a video of the lead work but had to break it up into smaller clips to get it to upload. I'm still trying to get the hang of getting the lead soft but not melted so it's shapeable. The middle section isn't as much of a problem; it heats up pretty evenly. The edges are much more difficult to get the lead heated evenly. The outside "skin" melts and runs off but the inside of the chunks are still hard. I did turn the torch down a bit and that seemed to help.
-
After melting the lead out. I went back and blasted these areas to get them 100% clean.


 After blasting.


-
It finally quit raining after three weeks of almost non-stop wet weather. Body is now all stripped and I have most of the lead melted out of the seams. I left the lead in the left top windshield frame corner, and the top of the door jamb/quarter panel for reference. Those two areas aren't just leaded to hide seams, they're built up fairly thick to actually shape the area. I've never used lead as filler before so it will be interesting to learn the process.There is a good bit of lead in the car from the factory. All of the overlapping panel seams in the door jambs were built up and shaped into an outside "corner" to mimic a one-piece stamping. The lower rocker seams were also leaded to hide those panel overlaps.Cracks in the lead, these looked worse before blasting.


 The whole top corner of the windshield frame is shaped with lead.
 As is the top of the quarter panels.
-
With the bottom of the trunk separation panel cut out I was ready to start blasting the body, but the rear half was way too weak to be mounted on the rotisserie like it was. I bought more 1" square tubing and used our tubing roller to make more bracing to keep the body in shape while it's off the frame for blasting.The '68 Chevelle in the background is another shop project. We're just about finished with it.

 I'm about halfway through blasting the body now. Once the weather dries up I'll be able to finish stripping it and shoot epoxy primer.


-
I started cutting out the bad metal in the back seat area against the inner fender wells. This section isn't all that bad overall, just a few pinholes here and there. I also cut out the bottom of the dividing panel between the cab area and the trunk so I could get in there to blast better. There was rust between the layers that had to be cut out anyway.


 More inner fenderwell rust at the bottom edge.
 Trunk divider bottom cut out.
 Beginning to make a new panel.
-
With the last of the old floors cut out I could test fit the toe board and front floors. Fits pretty good, needs a little tweaking in a couple areas still.

 Also cut out and made a new section for the convertible top mount.
 And cut the last section of fenderwell rust out of the driver side.
-
The next section down had the mount for the convertible top welded and bolted in place. I'm not sure if the 1/8" thick outer plate is original or not; it was brazed on and bolted. The bolt pattern wasn't square and the brazing looks the same as the other areas that were poorly reworked so it looks like it was added later. It did have tan paint and red oxide primer though, so maybe it was original. I'll have to check with someone who knows the cars better.

 A little bit of rust in the outer rolled edge. Just a small spot though, glad it wasn't the whole lip.
 Top mount cut off and blasted clean.
-
Cut more of the left rear fenderwell out. This is the better side...


 Inside of the outer panel stripped clean.
 Initial fitting of the new panel.
 Bump added.
 Welded in and shot with weld thru primer, ready for the outer layer to be welded on.
 Outer layer welded on. Still need to add the holes and slots for the fender bolt clips.
-
Thank you for the reply. I will send you a PM. Your work is fantastic. Also thank you for your photos and updating the progress.
WOW!
Amazing skills!
Thanks!!
-
Got the right front corner cut out. I cut it out in one piece instead of separating the layers like I did on the other side. This way it's all still assembled and I can see how it goes together better.

 Front floors all laid in place.

-
1
-
-
Rear passenger floor pan. Same process, pre-stretch and bead roll. Had to do a little shrinking around the corners of the beads to get it back flat.


-
Both pans finished, ready for final trimming and fitting.

 Compared with the C2C pans.


-
Front passenger side pan. This side had an extra cut out for a small transmission inspection cover.


 I didn't show the body mount area on the drivers side pan earlier. Made it the same way, pre-stretched then used the bead roller. I used a 5/8" round bead to make the straight lines and the 1/4" offset dies. I spaced one of the offset dies out to match the rounder 5/8 bead.
 Distortion from pre-stretching.
-
Finished up most of the work on the front 2/3 floor pans. Still need to make the rear floors and pans under the rear seat.Made patterns for the other floor sections. I only had the pictures we took of the car in Dillard GA to go by.
 Battery door cut out.
 Been slack at taking progress pics, so I only have the finished pan.
 The original battery cover door was missing it's retaining tab so I made a new one and welded it on.

-
I cut down a piece of 1" ID tubing and smoothed the edge to use as a finishing tool at the ends of the beads. The bead roller only shapes the sides of the beads; there's nothing to shape the ends. This "closes" the ends of the beads and makes them look finished, and also flattens the metal around the ends so the panel is flat.


After finishing the ends of the beads with the pipe tool. The panel is much flatter now, even across multiple beads.


1940 Packard 120 Convertible Restoration
in Our Cars & Restoration Projects
Posted