


2Buicks
-
Posts
58 -
Joined
-
Last visited
Content Type
Forums
Gallery
Events
Posts posted by 2Buicks
-
-
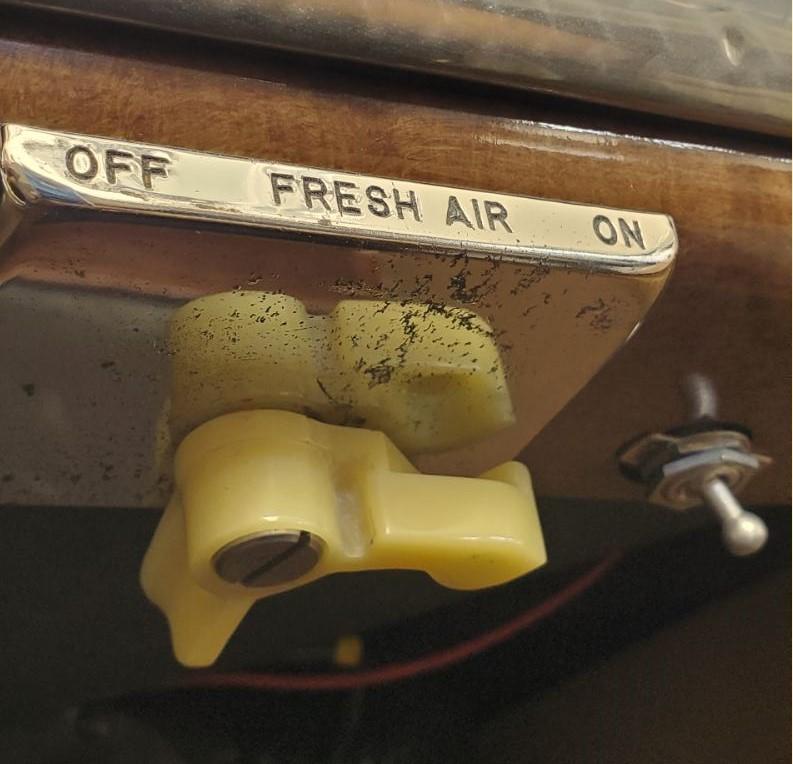
It may not be factory exact, but it clears the defroster hose and the ivory knob travel aligns with the on-off markings.
-
 2
2
-
-
Based on all the inputs from fellow Buick owners, I have my 1940 Buick Convertible fresh air vent working. On Saturday, I used a coat hanger to mock up a control linkage from the dash knob to the fresh air vent butterfly valve (on the firewall). It took several tries of modifying the coat hanger until I got the desired movement over the defroster/heater hoses under the dash. After I achieved the desired shape, I took an old door lock rod and repurposed it for my new control linkage. The installation turned out great and the vent control knob works like a charm. Included below are the pictures of the mock-up linkage and what the final installation looks like under the dash and on the firewall.


-
3
-
 1
1
-
-
Tinindan,
I thank you for your comment, but I'm trying to determine if the wiring is correct for the accessory switches. The electrical wiring diagram I have for the 1940 Buick, does not show or list those three switches on any drawing in the 1940 Buick Shop Manual. If I use Neil's wiring for the 1941 Buick, it might tell me the wiring for my 1940 Buick is wired correctly. My next job is to check the wiring per Neil's drawings. I will let you know what I find.
Don
-

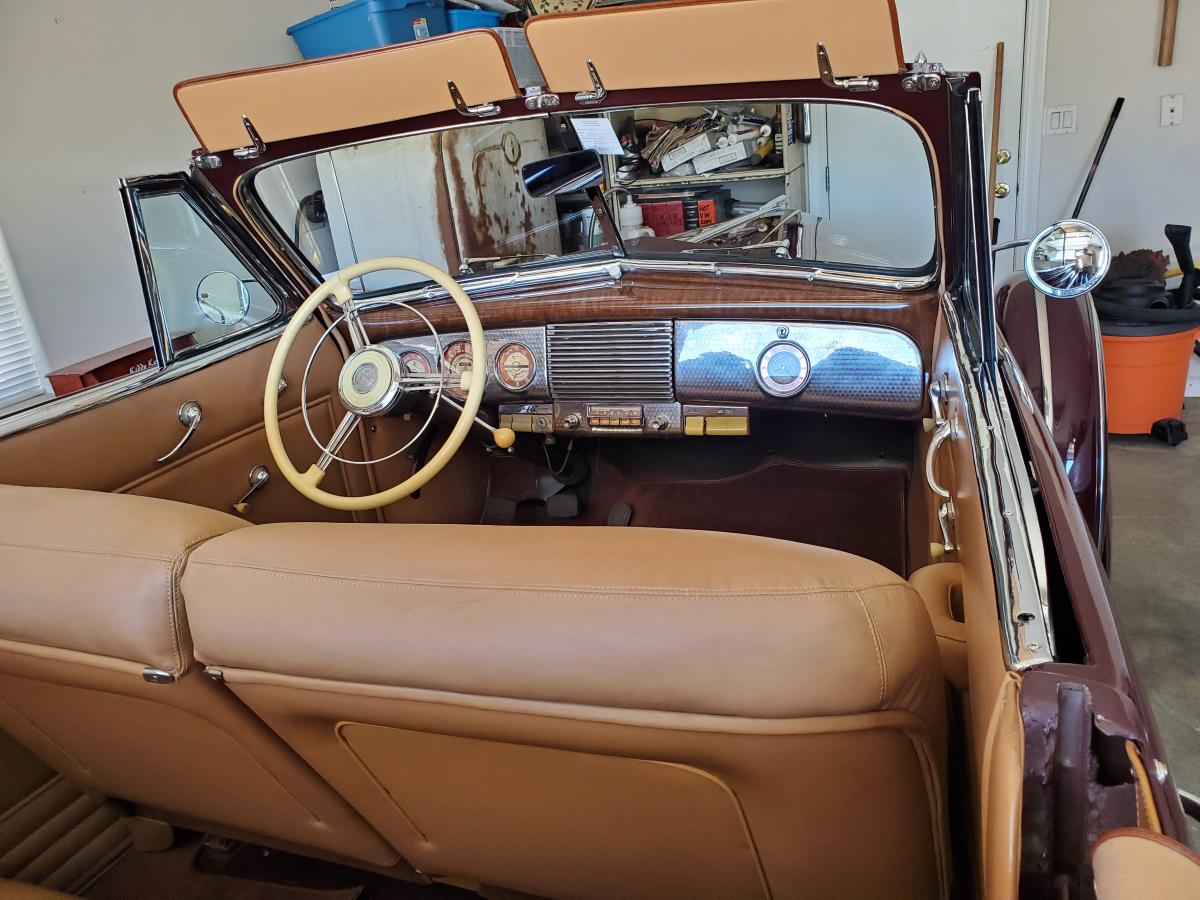
As I have stated in my other 1940 Buick threads, I recently purchased a 1940 Buick 46C convertible and I'm trying to better understand and appreciate this new Buick. My latest question pertains to the heater shutoff valve, mounted below the thermostat housing, that connects to a heater hose that feeds the heater/defroster lines at the firewall and then the under front seat heater. As shown in the picture above, my '40 Buick does not have a shutoff valve installed and I believe this is why it gets so freakin hot in the front seat when I take the car for a long drive. I agree with Walt G's comments (from the June 19th thread on the 1940 Buick Special Convertible sedan on NY Craigslist), that the 1940 Buick heaters are very efficient and if you don't control the hot water flow to them, they are like a furnace in the passenger compartment.
Checking other '40 Buick threads, I found the following two pictures that show a flow control/shutoff valve at an outlet, below the thermostat housing, that feeds the two heaters cores. The question I have is do you close off all hot water to the heater cores, when you don't want any heat, or do you leave them open slightly? I believe it is closed completely but need clarification since I have not found any info on this subject.


Brass replacement shutoff valve for $23.99 on eBay (https://www.ebay.com/itm/NORS-Brass-Manual-Heater-Control-Shut-Off-Valve-Possible-Use-1930s-1940s-Cars/283803158708?hash=item4213fc88b4:g:K2UAAOSwxkpdzeXK)

I wish there was a control valve, that shuts off the hot water to the heaters, like I have on my 1952 Buick Super. Has anyone added a flow control valve similar to what Buick added in 1946, after the war?
Don (2Buicks+1more)
1969 Buick Riviera
1952 Buick Super 4dr
1940 Buick Special Convertible
Based on checking
-
2carb40,
Thank you for the great pictures you provided. This will help me in making the brackets for my 40 Buick.
Don (2Buicks+1more)
1969 Buick Riviera
1952 Buick Super 4dr
1940 Buick Special Convertible
-
2carr40,
Do you have another picture of the linkage rod and how long it is? From the picture, it looks like there is some kind of tape raped around it below the U shaped clamp and the end, at the top of the picture, is in a bag. I believe from the picture the right angled piece of the rod, in the left hand corner of the picture, is what connects to the butterfly valve and the end inside the bag (can't determine what its shape is) connects to ivory knob under the dash. Is this correct?
Neil,
Thank you for your information of how the vent air duct attaches up front. When I added the missing air vent duct to my 40 Buick, that is what I did was to shove it into the opening next to the radiator. The part I do not have is the U shaped clamp to hold the vent duct in place along with the two heater hoses. I will make that missing piece unless I can't find it on eBay.
Ben,
Thank you for clarifying what the two defroster ducts are. Based on your comment, I will leave on ebay for someone else to purchase.
Matt,
Thank you for your reply. Also, based on your 1940 Buick Super 56C Convertible link, I went and viewed all the pictures to see if I could gain any information on how the linkage was installed. That 1940 Buick Super you have listed is a beautiful car.
Don (2Buicks+1more)
1969 Buick Riviera
1952 Buick Super 4dr
1940 Buick Special Convertible
-
Neil,
Thank you for that information. That will help me in making possible changes to the wiring to correct the power drain to the battery.
Don
-
I recently purchased a 1940 Buick 46C convertible (see attached pictures). As part of some trouble shooting and to better understand and appreciate my new Buick, I'm trying to determine how the accessories should be electrically hooked up. The three accessories I want to know more about are the heater, defroster, instrument light switches under the driver's side of the dash (see picture below). I have checked the 1940 Buick Shop manual electrical diagram and it does not show these three switches on the drawing. What I am trying to determine is should the power to these three switches be on full time or should they receive power when the ignition switch is on? Currently, the switches have power when the ignition switch is off. I have drained my battery a couple of times when the switches were not in the off position. I prefer to connect the power to these three switches through the ignition switch, but need guidance on what other 1940 Buick owners know on this subject.
Don (2Buicks+1more)
1969 Buick Riviera
1952 Buick Super 4dr
1940 Buick Special Convertible


-
All, Another question I have is what does the vent duct connect to in the front, next to the radiator? I found pictures of vent ducts on eBay and was wondering if this is what the flex hose connects in the front of the engine compartment..
Don (2Buicks+1more)
1969 Buick Riviera
1952 Buick Super 4dr
1940 Buick Special Convertible

-
Neil, Matt or other 1940 Buick owners,
I recently purchased a 1940 Buick 46C convertible(see attached picture) and I'm trying to locate and replace missing parts. The part(s) I'm looking for now is the linkage from the control (under the dash) to the fresh air vent butterfly valve (on the firewall) shown in the 1st link. I have all the parts to control the valve except the linkage. Can Neil or Matt take pictures of what the linkage looks like under their dash and at the butterfly valve so I know how make a replacement linkage? I have searched for the linkage on the internet and have not found one to show me what it looks like and how long. I included the first picture on this thread plus pictures from my own 1940 Buick.
Don (2Buicks+1more)
1969 Buick Riviera
1952 Buick Super 4dr
1940 Buick Special Convertible

_LI.thumb.jpg.41deda32bcdec3302c83b40f3fcb60ee.jpg.b5536e60f5cb2ba9f0e8b41aee3a1d22.jpg)


-
Thank you Mike for the input and based on what you provided, the '37 Buick eBay part won't work on our 1940 Buick Convertible. With that resolved and the information you provided, my son (dual owner in the '40 Buick) built the following steel part that looks similar to your floor pan. See the three pictures below.
I also want to thank Bloo for providing the part #.
Don (2Buicks+1more)1969 Buick Riviera
1952 Buick Super 4dr
1940 Buick Special Convertible


-
5
-
-
Mike,
Do you have any pictures of your floor pan, near the brake and clutch pedals? My '40 Buick Special is missing the piece (see 1st picture below). Found a 1937 Buick floor panel on eBay that looks to match the cutout in my Buick's floor. Need to know if they are the same part number. Checking out "Cars" catalog shows the floor pans are the same part# for 1937-1940 Buick Specials. I have already reviewed "Daves1940Buick56s" thread on instruments and found several floor pan pictures from his 22 Jun 2014 thread to be helpful. Your or any other Buick owner's help is appreciated.
Don (2Buicks+1more)
1969 Buick Riviera
1952 Buick Super 4dr
1940 Buick Special Convertible

.thumb.jpg.9508f4980895c8adc604ff210b1ea954.jpg)

-
Mike,
What is that white tube, in the engine compartment, slopping downward from the firewall to the carburetor? Since my 1940 Buick does not have that, I was trying to determine what it was and its purpose.
Don (2Buicks+1more)
-
Mike,
Thank you for the information. I need to do some research and checking to see if my carb has that linkage on it or the carb has been changed out.
Don (2Buicks+1more)
1969 Buick Riviera
1952 Buick Super 4dr
1940 Buick Special Convertible
-
Mike,
Thank you for the information. I need to do some research and checking to see if my carb has that linkage on it or the carb has been changed out.
Don (2Buicks+1more)
1969 Buick Riviera
1952 Buick Super 4dr
1940 Buick Special Convertible
-
1
-
-
Mike,
Great looking car. I was looking at buying a 1940 coupe before I found this 1940 Buick 46S convertible.
My question to you is I'm trying to figure out some of the dash knobs and electrical switches. I have included pictures of my dash and engine compartment to show you what might be same/different in your Buick.
The question I have is the throttle knob next to the steering column is not connected to anything when you pull it out. Do you know what your 1940 Buick SC throttle is connected to? I would appreciate any information/pictures on the throttle knob and what it is connected to. I have gone through my Buick shop manuals and other books, but found nothing on the dash switches and knobs.
Don (2Buicks+1more)


-
2
-
-
Does anyone have pictures of where you placed the hole on the torque tube to add a screw tap, so that you can drain or monitor for transmission fluid leaking past the torque ball? I have a 1952 Buick Super that is all original except for a prior respray. I have been going through the vehicle and correcting all mechanical and electrical issues. Since my dynaflow transmission does leak a little (after driving) on the garage floor, I would be like to check for leaks past the torque ball.
-
Eric,
I purchased my seatbelts last July and finally installed them in my '52 Buick Super. After researching several sites, I finally did it my way. I just posted all the pictures and instructions used to install six pair of seatbelts. The front two seatbelts are retractable.
http://forums.aaca.org/f163/1952-buick-super-344289-3.html
2Buicks
-
Continuation of the seatbelt installation into my '52 Buick Super.
The second part of the rear seatbelt installation involved locating the center seatbelts. The distance between the outer two holes drilled earlier was 69”. I placed two marks at 23” inboard on the backseat structural frame, either side of the armrest. Using two L brackets bolted together, I marked the location of holes to be drilled. After the first hole was drilled, I placed a bolt through the bracket to maintain alignment before drilling the second hole. As you can see from the pictures, I was able to drill slightly into the cross channel structure under the floor pan. By bolting together the L brackets and then bolting to the floor pan, I improved the structural installation. The pictures show the installation process.

After replacing the rear seat, my '52 Buick Super had six lap seatbelts. I was very pleased with the total installation and wanted to share my pictures with other car owners. I think this is a structurally supported installation and safer for both driver and passengers, especially for my grand kids. Enjoy
2Buicks


-
In February, I finally tackled the installation of seatbelts in my ’52 Buick. I had searched the internet for several installations and found nothing that worked for my ’52 Buick. I am posting the steps I went through that provided a good structural installation and great look for after market seatbelts.
Since I wanted the GM logo on the buckle, I purchased seatbelts from Wesco Performance. This included two 8” long housing retrackable lap seatbelts with 20” floppy ends and four 60” lap seatbelts. I also purchased the “optional hardware for $4.95 each” for installing the belts.

Installation of the retractable seatbelts was completed first. I first determined how much room I had between the door panel and the front seat side panel to place the retractable hardware. I used the front door sill hole (last hole) as a reference point. By locating a hole 1 1/4” forward and 4 1/4” in, I was able to tie into a crossbeam channel structure side flange in the floor pan that attaches to the frame. (See pictures.)

The next step was to install the center seatbelt and the two 20” floppy ends for the retractable belts. I removed the front seat and folded back the rear carpet to expose the floor pan. The distance between the retractable holes was 66”. I then used a string stretched between the holes to place a 22” mark on the centerline from each side. With the two L brackets bolted together, I centered the l brackets over the 22” mark to drill the two holes through the floor pan. Since I did not have any cross beam structure to support the installation, I added a 3’’ by 5” plate under the floor pan to better support the installation that was 4" aft of the floor crossbeam channel structure. (See pictures.)

The back seat was a little more of a challenge - how to hide the seat belt brackets and provide a good structural installation. Before removing the back seat, I determined if I placed an L bracket in the corner and drill two holes…one through the floor pan and the other through the inside fender well would provide a sound structural installation. I was again able to tie into the cross member structure to improve the installation. (See pictures.)


-
Update - April 2015.
In late November and early December, my son and I went through a five step hand rub process to buff the paint out to give the 52 Buick a shinny wet look. We first used 3M (0594) Super Duty Compound (liquid sandpaper) to cut the oxidation, applying the compound on a microfiber towel and hand rubbing a small area. After wiping the surface clean, we then followed up with Meguiar’s Swirl X and Meguiar’s Scratch X 2.0 to remove any swirl marks left on the surface from using the 3M compound. The 3rd and 4th steps were to go over the car’s surface again with Meguiar’s 105 Ultra Cut Compound Polish and then Meguiar’s 205 Ultra Finish Polish. The last step was to put on a good heavy coat of wax. We applied Meguiar’s Gold Class liquid car wax to finish the process. This was a long tedious process for my son and I, but the results were fabulous. This was accomplished by hand rubbing rather than a buffer since we did not know how thick the paint was. The following pictures show the results of removing the oxidation from the paint and providing the car with a great shinny wet look. (Costco sells a large 36 pack of Ultra Plush Microfiber Towels that worked well to apply the five step process.)
The first two pictures show the results from the before and after using the four step process. The last six pictures show the finished look.


-
Jon,
I bought seat belts to install in my 52 Buick Super (2Buicks). I have retactable belts for driver and passenger seats and regular belts for the middle front seat and three seat belts for the rear seat. The one main point I am working out is to make sure I use a small flat plate under the floor pan to bolt the seat belt brackets. I don't want to use the after market standard large washer to bolt the belts. I have looked at several installations on the internet to see how I could adapt for my installation. The one I like is http://www.hotrodhotline.com/md/lapbelt/, but I do not want the extra brackets showing behind the front seat. However, Jim Clark's article does show alternate anchor plates with welded nut (approx. 2" x 4") that may work, Juliano's Seat Belt Retractors. This is something that could be made in your garage.
Don
-
The work that has been performed on the 52 Buick since the last post involves working on the inoperative fuel gauge/tank sending unit.
The fuel gauge has read a little over a half tank since I acquired the car over a year ago. After checking out the wiring, I found the fuel gauge was good but the sending unit was bad. Now the challenge was to drop the fuel tank (without draining the tank) to get to the sending unit. That turned out to be an easy task since my son has a car host in his work shop, see thread 53 above. With the car on the host, I used his steel welding table to place under the car at the fuel tank. After undoing the fuel line, fuel tank sending wire, and loosening the bolts holding the tank, I raised the car until the fuel tank filler tube cleared the bottom on the car. I did have to remove the exhaust pipe clamp so the filler tube could be maneuvered to clear the frame during fuel tank removal. With the fuel tank sitting on a spare tire on the welding table, I was able to get access to the sending unit to find out what was wrong. Taking the sending unit apart, I found the filament resistant wire was broken and the float arm was stuck that resulted in the gauge reading only half fuel. I have included pictures of the fuel tank removal and fuel sending unit (unit was bead blasted to remove rust). I did check my fuel tank and it did not have any rust. However, some previous owner had coated the interior and exterior with a rubberized material. Since the sending unit was bad, I replaced the bad sending unit and reinstalled the fuel tank until I could order a replacement. Working alone, having the car on the host made this job relative easy for one person to accomplish. Thank you son for the use of your shop and host!

After determining I had a bad sending unit, I started checking the internet for a replacement unit. My challenge was to locate one that looked like the original. All I found were units that indicated they would work in my 52 Buick, but may need modification to indicate properly. I was trying to find an exact replacement with no success. After checking my normal sources like Fusick Buick Parts, Cars, Inc, and Bob’s Automobila, I went to eBay and located a replacement unit that was for 53-56 Oldsmobile (0-30 ohms). It looked exactly the same as the Buick except for the bent tube and fitting was different that connects to the fuel line (see picture below). I ordered the part and was looking forward to finally knowing how much fuel was in the tank when I drove it. What I received was not exactly the same as my old unit. I resolved the problem by taking the new unit and replacing the float arm from the original Buick unit so the readings would be correct between empty and full. This worked and I have reinstalled the new modified unit. Please let me know if anyone else had similar replacement problems with their fuel sending unit.


-
Dale,
You may have put ice cubes in yours, but this has a water tank that holds about a gallon of water. There is also straw inside that gets wet and as the car moves the air enters and blows through the wet straw to cool down. There is a cord you pull inside the car the rotates the straw bed inside cooler to keep it wet. You can find more info at Car cooler - Wikipedia, the free encyclopedia.
2Buicks


_LI.thumb.jpg.41deda32bcdec3302c83b40f3fcb60ee.jpg.b5536e60f5cb2ba9f0e8b41aee3a1d22.jpg)


.jpg.ccf37ca0d44cbadbb07cc8cc848df3a6.jpg)


1952 Buick Super trunk weather-stripping replacement question
in Buick - General
Posted
My '52 Buick has been repainted, with the painters removing all weather stripping around doors, hood and trunk. After purchasing new weather stripping from Steel Rubber Products, I'm in the process of installing the new rubber. I have no installation issues for the doors and hood; however, I have the trunk partially done but do not know which direction to place the deck lid rubber. The instructions do not show the placement, only where to glue it. I have searched the internet for clear pictures of other Buick trunks to determine which way it should be installed. The attached pictures show where I'm at in completing the re-installation of weather stripping. The instructions only show how to glue the rubber, but not the placement on the deck lid. The photo below shows two installations. From my internet search, I believe the installation circled in black is the correct method. I have included the best internet picture showing how it should be installed. Any help or close-up pictures you can provide are appreciated.