Lisa P
-
Posts
50 -
Joined
-
Last visited
Content Type
Forums
Gallery
Events
Everything posted by Lisa P
-

Flathead 8 Rotor Spins Freely-Now I know Why
Lisa P replied to Lisa P's topic in Pontiac Flathead Owners
Thanks to all of you, the Chieftain is back up and running! -
Flathead 8 Rotor Spins Freely-Now I know Why
Lisa P replied to Lisa P's topic in Pontiac Flathead Owners
He is always right, isn't he? If I only knew where to get replacement parts for the darn thing...thank goodness for guys like Charles and his willingness to help! -
Flathead 8 Rotor Spins Freely-Now I know Why
Lisa P replied to Lisa P's topic in Pontiac Flathead Owners
Oh wow, you are a lifesaver! Thank you so much for the quick reply, I guess you'll know where to find me this weekend. By any chance, are the 3 metal strips something that can be bought, or do they have to be fabricated? And, if they need to be fabricated, are they steel, or spring steel, or some other material? Thanks again. -
I believe that I have discovered why my car has not run reliably or predictably. Today, for a nice 30 seconds, she ran great. No misfiring, no hesitation but then stalled out. Troubleshooting lead to discovering that the rotor will spin freely, even with the distributor bolted down. The shaft on the end of the distributor looks fine, it is slotted and must fit into something, but what is that mysterious something and can I access it by dropping the oil pan? On a side note, I was trying to make sure she would run smoothly as it is a project that needs a new home. *I pulled the oil pump out this morning, and as you can see the drive springs are missing as is part of the retaining clip. Can these drive springs and clip be purchased? If so, where? If not, can they be fabricated? Thanks again for all of your invaluable input.

-
When I took delivery of my 1951 Chieftain, the biggest challenge facing me seemed to be the installation of the hood springs. Mind you, the car was partially disassembled and therefore the springs were located in one of the 13 totes I received with the car. After reviewing my options, a plan was made. The hood was removed and set aside. I then rolled my engine hoist into place so that the hook on the end of its chain was positioned directly over the spring mounting tab that is bolted onto the lower portion of the Pontiac's firewall. The spring was attached here first and then to a lighter (but not too light) length of chain of which the other end was attached to my engine hoist's hook. Carefully, I used to hoist to stretch the spring until it was enough the maneuver it onto the hook of the hood hinge assembly. Slowly, the tension was released, the spring stayed put and a battle was won. This procedure was then repeated for the other side and the hood was carefully bolted back onto the hinge assembly. I have now found another use for the engine hoist I never thought I would need!
-
Here are some before (the top two photos) and after photos of the repairs I've done. I had a donor rear quarter for the right side and used the dogleg, rocker extension and wheel well arch. This replaced the older repair attempt that was made by the previous owner. I purchased a rocker extension and a portion of the wheel well arch for the left side. After welding these in, I did my best to blend it all with body filler. The left side was more extensive due to a crease that ran along a portion of the quarter panel just above where the molding bolts on. I tried to get it out, but I could not get it smooth. This is still a learning experience for me, and at least it is better than it was : ) Now if I could just find the front tabs that bolt on to hold the wheel skirts on...


-
Why I am asking this is because I would like to order a new thick gasket, however the Vauxhall manual and California Pontiac Restoration both list only a thin gasket for the 1951 model year. Hmmm...

-
I have looked in my shop and Vauxhall manual to find a diagram for the carburetor and heat shield mounting, but have not found anything. At first glance, it would seem apparent that there may only be one way to mount these, but I would still feel better if I knew what order you all have had success with. In other terms, does the order go: manifold, thick gasket, heatshield, base gasket, then carburetor? It appears I may have a vacuum leak that I am trying to track down. Any input is greatly appreciated, thanks!
-
Thanks for all the photos and the help. I believe I have sorted out the wiring and will now be working on getting the old gal to idle properly...
-
John, thanks for the photos! I definitely don't have this set up, I'll keep digging behind the dash to look into other options. I have all of the lights working with the exception of the left turn signal. Again, thanks so much for the photos, they are worth a million words.
-
Gary, thanks for the response! I wasn't able to find anything on the handle, but there is a light without a socket, perhaps that is the one, I'll give it a try tomorrow. Also, does anyone happen to know what type of light socket is correct for the hood ornament? I have the ornament, but the socket it long gone. thanks again!
-
Ah yes, one of my favorite jobs, wiring. My car had been completely disassembled before I bought it, so I have a question. My wiring diagram mentions a parking brake indicator lamp but I have not located a switch or anything on the brake itself. Does anyone have an idea regarding this? Again, thank you for your patience and insight. I really appreciate it!
-
1951 Pontiac Chieftain 8 Oil Pressure and First Start
Lisa P replied to Lisa P's topic in Pontiac Flathead Owners
You guys are fantastic! Thanks to the advice and the photographs, I have a flathead that runs well, has good oil pressure and even impressed my mechanic mentor (which is nearly impossible to do). He helped me run it through the proper break in procedure with no problems whatsoever. The no spark condition seemed to have been caused by that little wire in the distributor grounding against the body. After moving that wire away from the body of the distributor, the car fired right up! Thanks again to everyone for your insight and help. -
1951 Pontiac Chieftain 8 Oil Pressure and First Start
Lisa P replied to Lisa P's topic in Pontiac Flathead Owners
John, this is exactly what I needed, thanks!!! This photo also helps me sort out some other mystery parts and their locations. When they say a picture is worth a thousand words, it really is true. It looks like your 53 is coming along beautifully! -
1951 Pontiac Chieftain 8 Oil Pressure and First Start
Lisa P replied to Lisa P's topic in Pontiac Flathead Owners
Thanks! When I see you again, I'll remember ya'. I am glad that you enjoyed the visit to my shop. I hope someday I can get a 4 post lift in order to make life easier for myself and others. The Pontiac is certainly a joy compared to the cars I'm usually saving! -
1951 Pontiac Chieftain 8 Oil Pressure and First Start
Lisa P replied to Lisa P's topic in Pontiac Flathead Owners
Gary, I do have a new heavy gauge positive cable attached to a nice clean connection, as well as a heavy braided negative cable attached to the block. I did clean the paint off the block where it is attached. I also have a "new" 6 volt battery but it had been on a shelf for a while so it is currently on the trickle charger. The good news today is that with the 12V battery, I was able to get the vehicle to start and run. I didn't let it run long (maybe 5 seconds) because I am not sure what the proper break in procedure of a rebuilt engine should be. Between the great advice I have received here, and my mechanic mentor that returns from vacation in a couple more weeks, we might have a smooth running vehicle by summer! Of course it will be on to the body work then.. Todd C, thanks for all of the great information! I am now a member of the POCI, and hope to be an Early Times Chapter member soon so maybe we will meet someday. I am grateful for the information that your friend has shared on the web, it will be very useful! -
1951 Pontiac Chieftain 8 Oil Pressure and First Start
Lisa P replied to Lisa P's topic in Pontiac Flathead Owners
Good news! We have oil pressure around 20 lbs. when cranking, bad news is that I don't have spark. I have checked the timing and it seems the distributor and rotor are installed correctly. There is power to the positive side of the coil when the key is on, but cannot seem to find any power in the distributor with the key on. And I purchased one of the long 6 volt batteries and a new coil and have installed them but the battery doesn't have enough juice to turn the engine over. It reads 6.21 volts with a multimeter. I don't give up without a fight, so maybe more on this tomorrow. Thanks again for the help. -
1951 Pontiac Chieftain 8 Oil Pressure and First Start
Lisa P replied to Lisa P's topic in Pontiac Flathead Owners
Thanks for the reply Bloo. How long should it take when cranking for oil pressure to build? I have read about people putting grease or Vaseline in the oil pump to help prime it while others say it isn't necessary. Any opinions on packing the pump? -
Hello again! I have wired the car for first time starting and would like to hear any insight you all may have regarding priming the engine with oil and connecting (plumbing) the oil pressure gauge. I believe that the oil pressure gauge gets plumbed into one of the oil galleys on the passenger side of the block but am not sure if it should be in front of, or behind the oil pump. Also, the engine was rebuilt several years ago and has never been started, so should I add zinc to the oil? Thanks in advance for your insight.
-
1951 Pontiac Chieftain Basket Case-Almost
Lisa P replied to Lisa P's topic in Pontiac Flathead Owners
Chris, that is one gorgeous '40 Torpedo! I have never seen one out and about, but sadly you just don't see many older cars driven these days. The 1950 that you took the photo of sounds nice as well, these are really very nice cars. I am pretty happy to have finally found one for myself! -
I am in need of a tube and dipstick for my 1951 Pontiac project. It is the 8 cylinder motor. Please let me know if you have one available, thanks.
-
1951 Pontiac Chieftain Basket Case-Almost
Lisa P replied to Lisa P's topic in Pontiac Flathead Owners
Chris, thanks so much for the photos! I think I have found the answer in that small spring between the end of the throttle linkage/rod and the bracket that holds it to the firewall. If I had a spring like this on each end, it could hold the linkage centered between the two brackets that are bolted to the firewall. Or as you suggested, I could take the linkage out to see if it is bent in any way. It appears that I need to look for a throttle return spring in my totes full of parts as well. I am relieved that so far my set up looks correct. Thanks again for your time, I really appreciate it! Oh, and your car looks very clean! -
1951 Pontiac Chieftain Basket Case-Almost
Lisa P replied to Lisa P's topic in Pontiac Flathead Owners
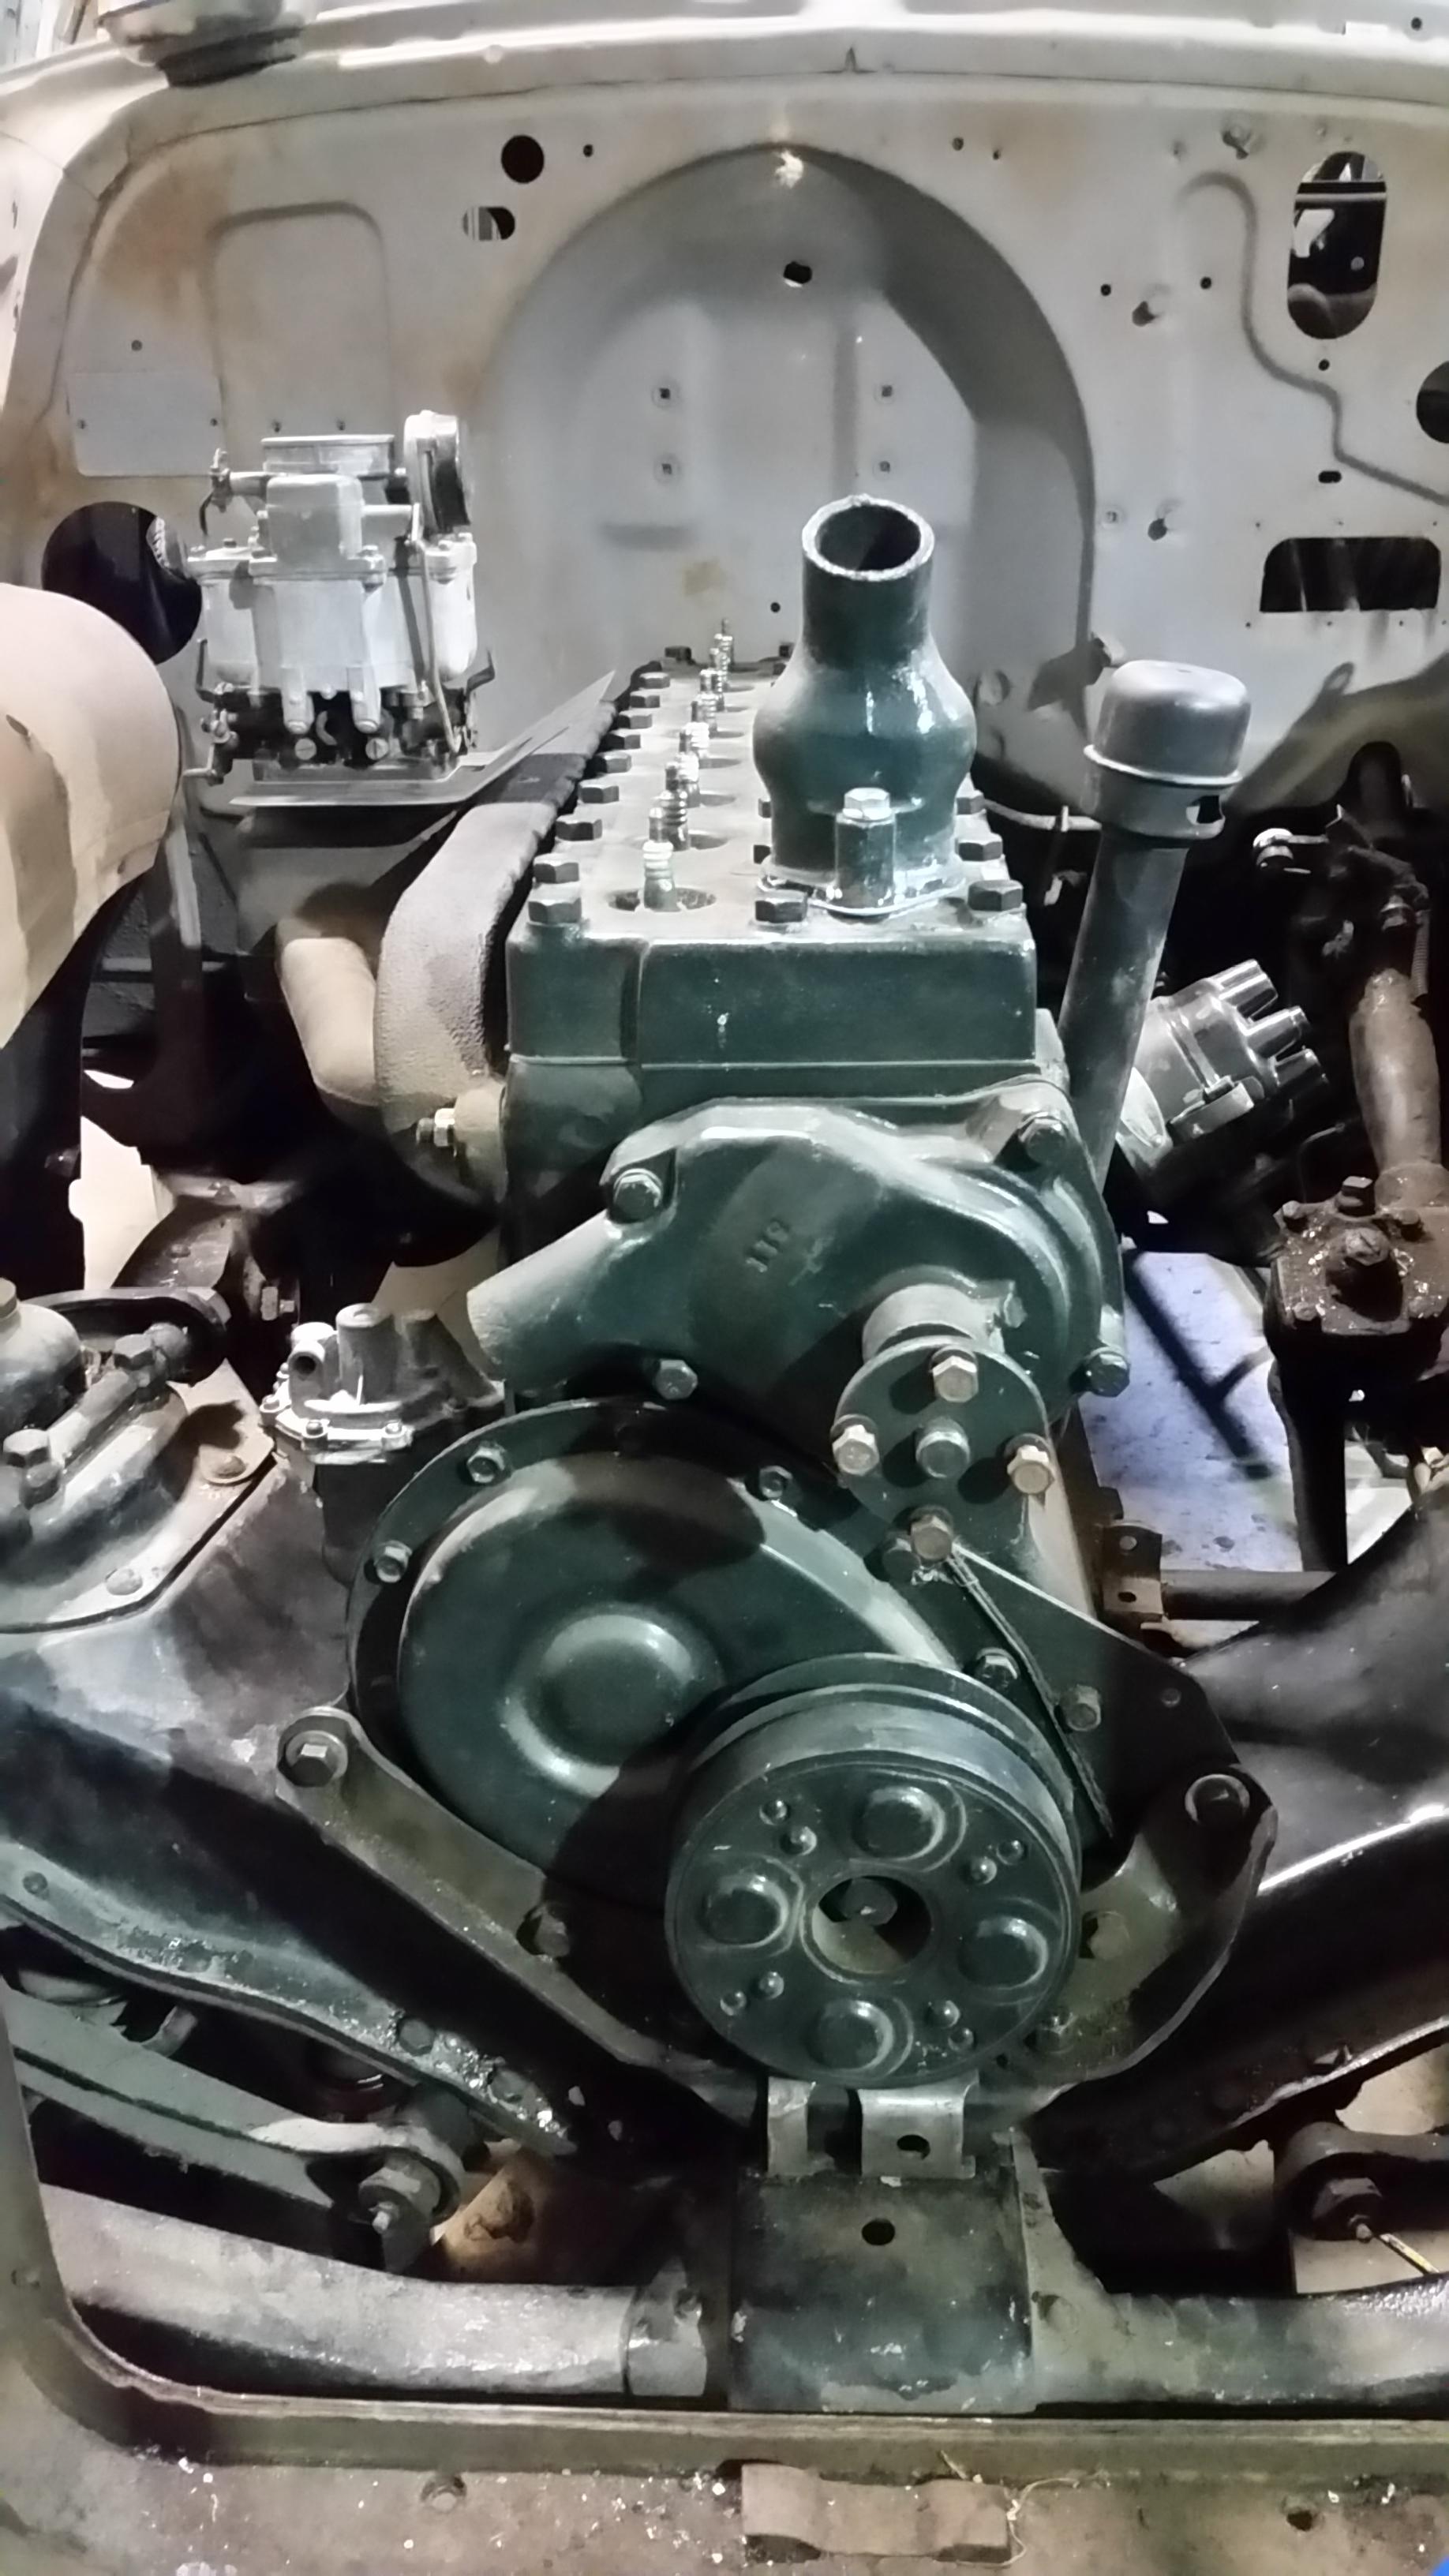
How about, where in the world does the oil pressure gauge plumb into? And, the photo of the motor is just to let you all know what I'm working with I have worked with old cars before, including a 1955 Willys truck, 1950 Desoto, 1959 Desoto, 1948 Kaiser, 1931 Franklin and a 1956 Imperial. This is the only "basket case" car that I have dealt with but I love a good challenge. Thanks again in advance for your time, I do appreciate it!
-
1951 Pontiac Chieftain Basket Case-Almost
Lisa P replied to Lisa P's topic in Pontiac Flathead Owners
Thanks Chris! This is the bracket in question. Perhaps when the linkage is all connected, it doesn't move from side to side as much? I also have other questions regarding the Pontiac if you're willing to help...
-
Thanks to Mr. John Harvey, a friend of mine, I have acquired a '51 Chieftain 4 door sedan that is almost completely disassembled. I have the shop manual, the body and frame manual issued 1961, and a Chiltons but cannot find a good photograph or diagram of the throttle rod/linkage that is mounted with brackets bolted to the firewall. My problem is that when the linkage is installed in the brackets, it appears the brackets are either too far apart or the linkage is too short. With a little push to either side, the linkage falls out of the brackets. What might I be missing? Is it possible that the linkage was bent thus making it shorter? If anyone has a good photo of this setup, I would be thrilled to see it. Thanks in advance for your time!